I'm doing a similar "house battery" install in my Astro right now, too.
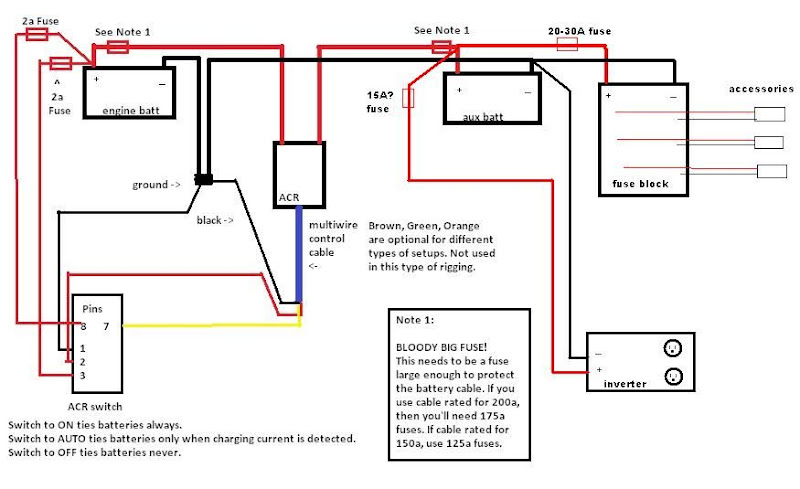
The main thing to think about when figuring out where to put fuses, etc. is this: Assume that ANY wire, at ANY point along the wire, can get chafed or pinched such that it shorts to the chassis or anything else nearby. With that comforting thought in mind, start putting fuses in the places where they can actually DO something about the above scenario. In general, your big main fuse(s) should be close to the batteries, so that every bit of the wire "downstream" from that is protected should there be a short.
In my case, I have a dual-battery solenoid in the engine bay and a house battery in a box near the mid-rear of the van, so I put a big fuse (actually a 150A breaker) between the starting battery and the solenoid, and another at the other end, right next to the house battery. That way, if there's a short ANYWHERE along that run of wire between them, both ends are protected (because otherwise either or both batteries would be shorted!)
The same goes for your load-side fuses, they should be as close to the battery(ies) as is practical, so that the entire run of wiring is protected. I'll be putting a main circuit breaker between the house battery and BlueSea fuse box, (very close to the house battery), then all the loads of course tied to individual fuses. In your case, each "load" would be a jack for your dc fridge, or charger cables, etc.
Other general best practices:
1) Of course, you always size the fuse to the WIRE. If you wouldn't dump 20A into a thin wire, it shouldn't have a 20A fuse on it, right? If you need a big fuse for your load, you had better run big wire to go with it. In my example of my main cable from front to rear battery, I'm planning for the possibility of adding a winch, etc. later so I ran 2-gauge cable, hence the big breaker - use a smaller fuse/breaker if you use a smaller cable. Same goes for the load side.
2) I would say definitely ground both batteries together, and specifically connect the house battery ground directly to the starting battery ground. This sounds like a pain, but dumping big current through the chassis is a "works for now" scenario at best, a likely intermittent or oddball problem most of the time, and a serious hazard at worst. Beyond the safety issues of using the chassis as a "wire", there's a practical effect too: Using the chassis as a ground can create a voltage potential between the two batteries. If you're charging the house battery from the alternator, you're robbing yourself of charge voltage. If you're using any of the automatic charging relays, etc., they can misinterpret this voltage difference and shut off charging too early (or worse, not early enough), risking damage to either or both battery.
You're already running one big cable from front to back, the effort for the second isn't that high. In my case, I just bought a set of 20ft, 2-gauge jumper cables from Autozone and cut off the clamps. I separated the cables in order to cover them with braid and for ease of clamping down, but you could leave them mostly connected too, and then really have no excuse because you're basically just pulling one cable at that point.
Like the convenient (and relatively cheap) Jumper cables, I also purchased the 150A breakers and all of my 2-g lugs, etc. at Autozone, because I was figuring out what I needed and implementing all on a single weekend. Might have saved money going online), but since it sounds like you might be on the road, it'd be good for you to know that you CAN do this with mostly "auto parts" type supplies.
The only specialty tool I needed that you're not likely to have is a BIG effing crimper for the 2-gauge lugs. The one I used actually looks like bolt cutters, except it has crimping dies on the end. It's like a $150 tool and I borrowed it from a friend. If the auto parts store you use can make or service battery cables, starter leads, etc., they might have a similar crimping tool on-hand, and might loan it to you or at least crimp your ends for you, especially if you bought the parts from them. I have soldered 2-gauge cable lugs in the past using a propane torch, but I'm not sure I would swear by that method even though some do. Crimping is your best bet.
This is the method I used when soldering:
[ame="http://www.youtube.com/watch?v=Ph7h6rYZnVI&feature=related"]Solder method[/ame]. You can see some commercial companies sell kits to do this:[ame="http://www.youtube.com/watch?v=SXDkNMDDrBs&NR=1"]solder kit[/ame], but consider it at your own risk.