4RunAmok Build Thread

4RunAmok

Explorer
I wrote up a build thread on another forum, but never did one here.

There are a LOT of awesome 4runners on ExPo, I doubt you will learn anything groundbreaking from me, but here goes...

We bought our 1999 4Runner SR5 4WD in 2000, it had 61K miles on it, but it looked good and ran good. And we got a decent deal.
bonestock.jpg


The stereo was one thing I did shortly after getting the truck. It finally finished out with an Alpine CDA-9856 with iPod, Linear Power XO-3 Active Crossover, Linear Power 2.2HV Amplifier running the two Kicker 10" CompVR subwoofers, Kicker 600.4 amp running Polk Audio components and Kicker mid range rear door speakers.

It remained stock until 2005, when my brother-in-law took my wife and I out on a trail in Mojave in his Jeep Cherokee. The bug was set. We started modding the 4runner. First tires, then some new bilstein coilovers for the front.

I got my HAM ticket pretty early on, and started out with a Yaesu 1802 2M radio. I also had no qualms about drilling my roof, since I'd done that many times before for other reasons on other vehicles. I now have a Yaesu 8800 with the face mounted up front.
2minstall.jpg

nmoinstall.jpg


The running boards didn't last very long... Those got bent up in the El Paso's coming out of Goler wash. So it was time to call Jason Demello and get some sliders. I assured my wife I did NOT bend them on purpose just as an excuse to get sliders.
Slider1.jpg

Slider2.jpg


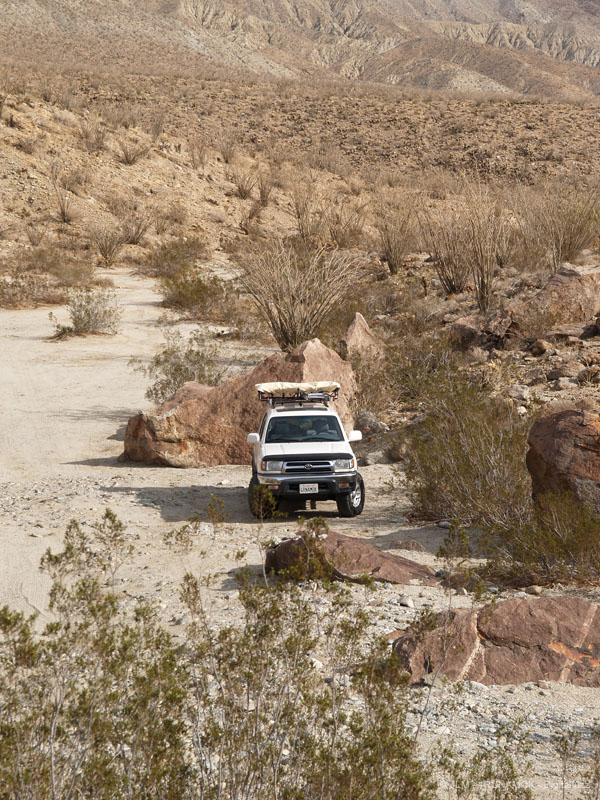
The suspension setup was ok for awhile, but having to be left behind because I couldn't follow up Coyote Canyon in Anza Borrego was too much to bear. (in the defense of my 4runner, we were very loaded down with an Oasis Roof Top Tent, and LOTS of camping gear!)
PC169374.jpg

anzacamp.jpg


So along came King. I can't find their website, but I think they're still around, ProTrux in San Diego did the lift. (Sorry about the whitebalance here)
kingco.jpg

ome891.jpg

These are the Old Man Emu Nitrochargers and their 891 springs. The Spare has since been changed to a BFG AT.

Now that the body is situated where it should be, it was time to work on the electrical system (It's now time again, but that will be a followup post in this thread). With the camping we've been doing, with the thermoelectric fridge (can't afford an Engel yet), I needed a better battery. Enter Odyssey PC1700. Typical fuse block installed as well... Custom bracket welded by a friend.
battery1.jpg


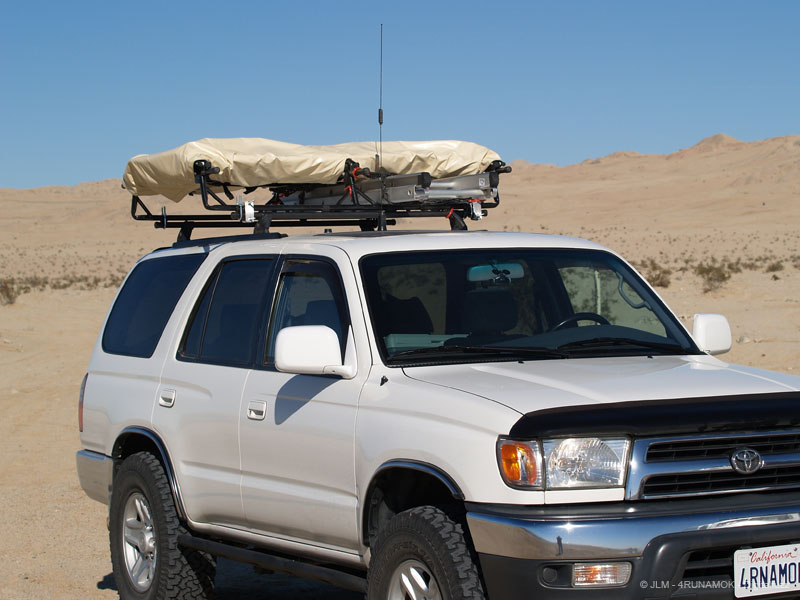
Here's how she stands today...
cleghorn.jpg


Wishlist:
Aluminum front and rear bumpers
New Engine with Supercharger
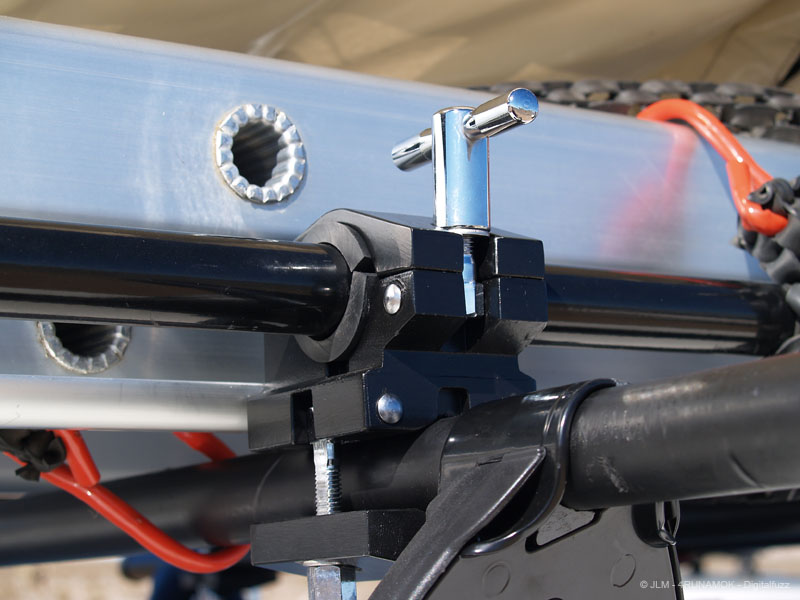
Streamlined tent mounting solution.. (see next post)
Cargo area redone (anyone got a wood shop near Glendale, CA?) :D
Some other stuff...
 
Last edited:

4RunAmok

Explorer
Tent Mounting, drummer style!

When I first got my Oasis RTT, it was a total pain in the butt to mount it.

You had to balance it on the yakima's and try to clamp the U bolts with the plates that come with it.. Total hassle...
PC159317.jpg


And completely ineffective... Wind force even caused it to slip off of the yakima's.

So I went to work thinking of something better (I think I even posted a thread on here about it)... I thought back to my roadie days and remembered Gibraltar had nice clamps for their drum racks. So I picked up a bunch from Guitar Center. This is NOT a cheap way out! These clamps are $30 EACH, and I needed SIX!

There was also the problem that the Gibraltars are a 1 1/2" diameter clamps to attach to their rack. So, I picked up some 1/4" rubber to reduce the size down to the 1" tent legs. This had the added benefit of dampening the connection of the tent and the rack.
P2091258.jpg


A MUCH better solution overall, and now my larger than small body feels pretty secure up there...
 

4RunAmok

Explorer
My $150 Action Packers

Ever seen a $150 small Rubbermaid Action Packer?

I should start out by telling you that I HATE rattles, squeaks and odd noises interiors can make while offroading.

I KNEW that throwing various items inside of an Action Packer would bang around, make noise, and in some cases, rub through the plastic, destroying the container.

So I set out to find a way to not only dampen noise, but beef up those little action packers. The end result was a Rhino Liner Action Packer.

actionpacker.jpg


I did 3 of them for a total of $150 to coerce the guy to spray Rhino Liner into the action packers, he did a good job.

actionpacker2.jpg


actionpacker3.jpg


They're QUIET alright, and sturdy. Mission Accomplished!
 

4RunAmok

Explorer
After getting the King's installed, I had issues trying to get a decent alignment.

The only way I was going to get it back to straight was by changing the upper control arms.

I went with Total Chaos because of their maintenance free Uni-ball design.

chaos.jpg


After the install, I was able to get a good alignment again.
 
Last edited:

Redline

Likes to Drive and Ride
Nice 4Runner.

Great battery.

How many miles on your Total Chaos A-arms? Any complaints?
I put a set of TC A-arms on my 4th Gen last year and I'm hoping they are low maintenance.
 
Last edited:

4RunAmok

Explorer
I think I have about 30K miles on them, and no, ZERO complaints.

One of my friends recommended that I lube the uniball, and a Total Chaos rep I met at a show said "ABSOLUTELY NOT! Don't lube it!", so yeah, maintenance free.
 

Redline

Likes to Drive and Ride
I will be very happy if I can get 30k out of my TC A-arms with zero maintenance (other than greasing the zerks).

Thanks for the NO LUBE warning. Not that I was itching to lube them, but the little surface rust on the top of the Uni Ball could give someone the wrong idea.


I think I have about 30K miles on them, and no, ZERO complaints.

One of my friends recommended that I lube the uniball, and a Total Chaos rep I met at a show said "ABSOLUTELY NOT! Don't lube it!", so yeah, maintenance free.
 

4RunAmok

Explorer
Storage Solution, stage 1

Did you know that plastic water bottles, left loose enough to rub against each other and other things will, over time, develop a hole and leak all over the back of your truck?!?! I didn't...

So it's time to get some of that back end in order, to keep a better grip on things and give me a bit more storage space to boot!

I started with a half sheet of 3/4" premium plywood. Cut to 46"x21" (21" is my depth because my amp rack and speaker box (and yes, it's required!) will sit behind the new deck)

I intend to store my tool bag, some 1 gallon Crystal Geyser water bottles, my PETT toilet, and some miscellaneous items under the deck. The Pett is 19" wide and shorter than the water bottles, the water bottles are 5 1/2 square.

I cut 3/4" dado's 1/4" into the deck, spaced 5 3/4" apart, and the last 19 1/4" apart to fit the PETT, the legs are 5 3/4"x21". I allowed some slack in the spacing to accommodate the carpet that will cover the wood.

Assembly, I used some outdoor patio deck screws and some wood glue along the dado's.

I only got the assembly finished. It started raining while I was out gathering pieces, so it won't go into the truck tonight. I'm taking it to the local stereo shop to have them trim the driver side to go around the wheel well, and carpet it, and install some tie-down's to keep it from jumping around.

And now, the pictures. Enjoy!
 

Attachments

  • deck01.jpg
    deck01.jpg
    347.4 KB · Views: 73
  • deck02.jpg
    deck02.jpg
    335.1 KB · Views: 42
  • deck03.jpg
    deck03.jpg
    351.8 KB · Views: 35
  • deck06.jpg
    deck06.jpg
    336.8 KB · Views: 43
  • deck05.jpg
    deck05.jpg
    379.9 KB · Views: 37
  • deck04.jpg
    deck04.jpg
    396.7 KB · Views: 38
  • deck07.jpg
    deck07.jpg
    354.6 KB · Views: 46
  • deck08.jpg
    deck08.jpg
    384.7 KB · Views: 47
  • deck09.jpg
    deck09.jpg
    424.4 KB · Views: 45
  • deck10.jpg
    deck10.jpg
    452.4 KB · Views: 72

4RunAmok

Explorer
Storage Solution, stage 2

Over to the stereo shop to make some final cuts for fitting into place, and begin carpeting!

I'd say it came out pretty good. :D
 

Attachments

  • P2250004.JPG
    P2250004.JPG
    55.6 KB · Views: 43
  • P2250003.JPG
    P2250003.JPG
    70.9 KB · Views: 48
  • P2250001.JPG
    P2250001.JPG
    84.2 KB · Views: 66
  • P2250005.JPG
    P2250005.JPG
    78.4 KB · Views: 60
  • P2250006.JPG
    P2250006.JPG
    98.3 KB · Views: 58
  • P2250008.JPG
    P2250008.JPG
    169.3 KB · Views: 57
  • P2250010.JPG
    P2250010.JPG
    105 KB · Views: 62
  • P2250011.JPG
    P2250011.JPG
    113.9 KB · Views: 72
  • P2250013.JPG
    P2250013.JPG
    138.9 KB · Views: 73
  • P2250012.JPG
    P2250012.JPG
    113 KB · Views: 144

4RunAmok

Explorer
The fit around the PETT is a BIT TIGHT with the carpet installed, I should have cut that dado to 19 1/2.

Ol well, live and learn. At least that PETT can't escape accidentally! :D
 

4RunAmok

Explorer
Because so many have asked for this info...

Regarding the installation of my twin NMO mounts on my 4runner, with the issue of having a Sunroof and still wanting to use it!

I did do the job myself, with a small amount of help from a friend for the extra arms when I needed them. I did not take pics during the installation. I wasn't on forums back then, and didn't document everything I did like I do now for the sake of the forums, lol :)

Items you need:

Regarding the headliner. Yes it has to come down, but not all the way unless you want it to, but that’s more work.
  1. Remove the rear dome light first.
  2. Remove the top rear panel (The one that had the light in it)
  3. You will need to remove rear-most side panels either entirely (which will require removing the plastic kick panel at the bottom of the rear door) or just pull the tops down and use a bungee cord to hold them down.

Now the headliner edges are exposed from the rear, remove the 4 clips (these will break, so pick up the matching color clips from the dealer, they're cheap), the headliner should now be dangling from the front, you should see the sunroof and the sheet metal behind it. Make sure nothing is in the way, like wiring. Either proceed with complete removal by moving to release the headliner from the front, or just deal with it being in the way a little bit.

Exit to the exterior. Put some thought into the placement... because where you put this hole will determine some things later in life: Such as how big of a cargo rack you can use, Such as how far forward a roof top tent can be mounted, etc... I chose the exact middle between the roof rack rail fronts and the sunroof (which only put it a few inches behind the sunroof. Lay down some masking tape, the tan or blue kind, where you believe center of the truck to be and above that point behind the sunroof you want the mount to be. Measure from one side of the truck to the other (I chose to use the crease in the sheet metal, measured from crease to crease) and find the center, and mark a center line on the tape. Double check your distance from the rack rails and sunroof, and mark that distance along your centerline.

The tape is not only to mark your measurements, but it will protect the paint from chipping while you drill your hole, so press it down onto the paint firmly. Say your prayers, realize there is no turning back, and drill the hole. It also helps to use a very good sharp sheet metal drill bit

I used a Diamond NMO because of its low profile beneath the roof AND because it uses a 3/8” hole instead of the usual 3/4” hole others use.

I used the Silicon Gel Lubricant to coat the underside of the NMO piece that sits atop the roof (keep it away from the threads, just "bead" the outside edge), the part with the o-ring that I also coated with the lube, both as a lubricant, and as a waterproofing method. I used the Loctite on the threads to waterproof them as well as secure the mount from coming loose.
The help of the friend really comes in handy here, because someone is going to have to hold the bottom of the mount on the inside, while someone puts on the Loctite and screws on the top piece and tightens it from the outside. Tighten firmly with a wrench, and the mount is installed.

Now for the duct tape, I chose this because it handles extreme temps that a rooftop might get sitting in the sun. I used this to secure the coax to the roof, and in 5 years, that tape isn't even peeling. This is a MUST so that the sunroof doesn't snag the coax. Clean the sheet metal with some acetone or 409, put a strip from the NMO mount to the pillar you chose to run the coax down the side of the vehicle. Now take a small piece of the tape and secure the coax at the pillar, and run a second piece of tape, sandwiching the coax between the two pieces of tape. This just gives the tape a nice surface to stick to, one that it's used to sticking to, and maybe protects the coax from the heat of the sheet metal...maybe.. I didn't do any tests to confirm, I'm just OCD that way, I'll take whatever extra protection I can get.

Now that that coax is run down the pillar, you can button up the headliner. It was no easy task getting that coax down the pillar, so have the right tools (which I did not at the time) or have some patience. I chose to go down INSIDE the pillar, because that coax is thin and fragile, and I camp and offroad and I didn't want it getting pinched between my gear and the body, eliminating my communication if I needed to use it and no practical way of field fixing it. OCD kicking in again.

From this point, you now have the coax inside the vehicle, free to run it almost anywhere you want, it’s not long enough to run to the other side of the vehicle, but that’s why you should choose the proper pillar to bring the coax down!
 

4x4mike

Adventurer
Thanks for the write up.
From photos I've found online there is a pocket that the sunroof glass goes into. Did this get in the way? Or is it not so much a pocket but more of a tray that is open on the top. This pocket/tray I speak of has the drain tubes for the sunroof. It doesn't sound like to had to remove said pocket/tray but how did you tape the coax without the removal? When you remove the dome light the pocket/tray is the black thing you see.
 

4RunAmok

Explorer
Those are tracks, not a pocket.

The tubes are at the front of the tracks and at the back of the tracks, or at the back of the sunroof opening, I can't recall exactly.
 

Forum statistics

Threads
185,894
Messages
2,879,306
Members
225,450
Latest member
Rinzlerz
Top