Pink Panther Build

bee

Observer
Okay Sikaflex polyurethane type adhesives mentioned above in my 3rd assembly method are out. I did some more research and I don't like the idea of giving my camper a hard set life span as these sealants are only good up to 20 years. I would like to be optimistic and that it will still be around in a few years. And no I have no idea how long the pink foam will last, I hope it will be awhile.

Anyone know of some long lasting adhesives with similar properties to the polyurethane ones? Or do I just use epoxy and fiberglass?
 

bansil

Adventurer
will it still fit in anything in 20 years?

Maybe an "antique" restored dodge pickup?

J/K

What other option are you going with?
 

bee

Observer
How I ended up with a Dodge farm truck
As a winter vehicle diesel heat really makes more sense then propane. With this in mind I set out looking for a diesel truck. I have always been a fan of imports, unfortunately the only diesel option in 4wd is the mitsubishi FG 4x4. I like the cabover concept and this vehicle was my first pick, but there are numerous downsides. They are hard to find in my price range, there simply aren't many out there used, and they don't like to cruise on the highway which is mandatory. These are large deal breakers for me so I was left with buying something from the big 3.
While searching on craigslist I found a dodge farm truck that had been traded in at a dealer that was in quotes "dangerous to drive". My friend who was familiar with dodges figured it was the infamous "death wobble" and we set out to buy it for cheap. To those uninitiated the death wobble plagues all solid axle front coil sprung jeeps and pickups. You will be driving along hit a bump and your steering wheel will start to move back and forth. Sometimes mildly other times so ferocious that your wheels will leave the ground and you will probably wet your self. Here is a video of a mild case
I experienced the death wobble after buying this truck and even after fixing it, I was nervous for quite awhile to drive at any speed it can be freaken SCARY because at least on my truck it was not predictable like in the video i linked. You never knew when it would occur, it was very rare. If you have a severe case, which I did, you lose all ability to steer, the only thing you could do was hang on for dear life and hit the brakes.

So long story short $2000 for the truck, and $2000 in steering components, brakes, and tires. I now have a reasonably reliable truck, (though not pretty) with a very reliable cummins 12valve.


bansil the camper itself is designed to sit on a custom flatbed which could be mounted on any pickup, probably an fg as well. I don't have much brand loyalty it could go on just about anything. In fact it doesn't need to be diesel as the camper will need its own tank to have self sufficient operation when dismounted from the truck. To switch vehicles I would have to build a new flat bed frame. If the new truck has a wider frame then my 95 dodge then I will have to redesign the stairs and lower storage boxes that you can sort of see in this picture. These storage boxes are attached to the camper. My custom flatbed, not shown in the picture, is only 4ft 2inches wide. The stairs and boxes will straddle this flatbed. Worst case the over cab portion would need to be re-done as well.

Untitled_zps401808bd.jpg


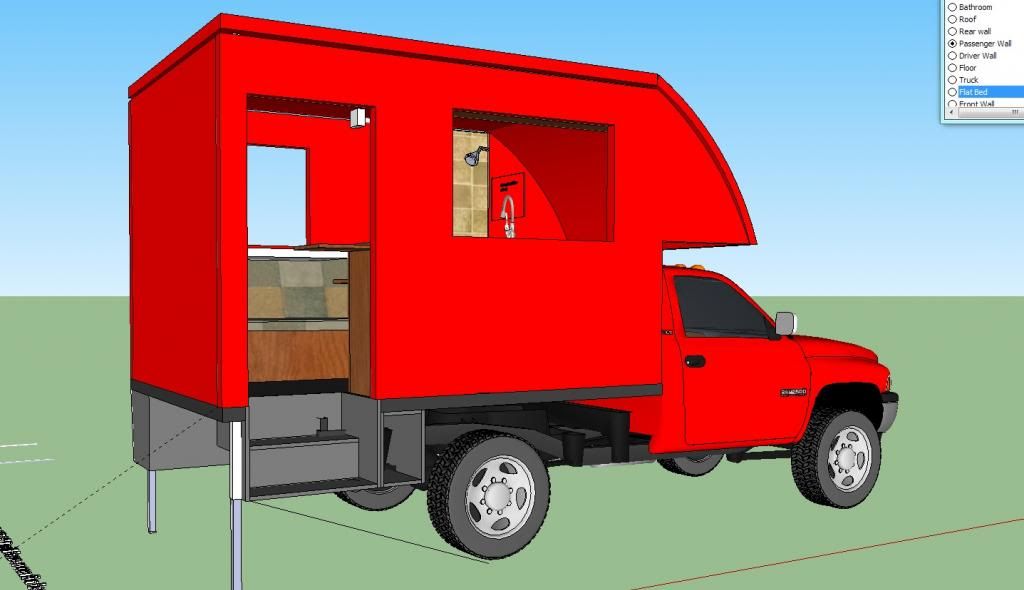
My design is unique in that I plan to make my camper removable from the truck yet have the batteries and water still mounted on the truck frame for better center of gravity. My hope is to be able to remove the box from the truck including water tanks and batteries which will be mounted in front of the rear wheels in about half an hr. I plan on using something like the crawling camper system, no unstable jacks. http://www.truckcampermagazine.com/camper-lifestyle/sport-cam-1158z-the-crawling-truck-camper.
 
Last edited:

hogasm

Observer
Use cabosil mixed with the epoxy to a mayonnaise consistency for gluing the corners together with 6" screws to hold them while the epoxy sets. You can remove the screws after the epoxy sets.
Cut your glass to size
Cover a table with clear plastic or even use glass. I use glass mirror that I got from the 2nd hand store for a couple of bucks. Use the table to wet your glass before rolling out on the body. Just paint a thin layer of resin to the body, let the air bubbles settle after a couple of minutes, roll out the wet cloth and use a roller to smooth out.

Make sure you round your corners, glass does not conform easy to hard corners...inside or out.

Good luck...it is easy and messy
 

bee

Observer
Use cabosil mixed with the epoxy to a mayonnaise consistency for gluing the corners together with 6" screws to hold them while the epoxy sets. You can remove the screws after the epoxy sets.

Yeah i was thinking along the same lines

Cut your glass to size
Cover a table with clear plastic or even use glass. I use glass mirror that I got from the 2nd hand store for a couple of bucks. Use the table to wet your glass before rolling out on the body. Just paint a thin layer of resin to the body, let the air bubbles settle after a couple of minutes, roll out the wet cloth and use a roller to smooth out.

I am having trouble picturing this. So you are saying I should pre-wet up to 10ft long pieces of fiberglass and then re-roll them back up? Then unroll them onto the camper. What is the benefit?, that it will stick to the vertical portions as soon as it touches?
a
 

bphang10

Observer
Cut your glass to size
Cover a table with clear plastic or even use glass. I use glass mirror that I got from the 2nd hand store for a couple of bucks. Use the table to wet your glass before rolling out on the body. Just paint a thin layer of resin to the body, let the air bubbles settle after a couple of minutes, roll out the wet cloth and use a roller to smooth out.

I am having trouble picturing this. So you are saying I should pre-wet up to 10ft long pieces of fiberglass and then re-roll them back up? Then unroll them onto the camper. What is the benefit?, that it will stick to the vertical portions as soon as it touches?

10' of wet fiberglass is like a wet noodle to deal with. by wetting the cloth, then rolling it up, you can then start at one end and unroll the cloth relatively precise and clean. for me, pre-wetting the 1st layer is much easier than trying to wet it out in place. if the 1st layer goes on nice and wet, i often add the subsequent layers dry, also rolled, and use my hands or squeegee to press in place and saturate the cloth. you can brush on more resin in dry spots if needed. i also layout a masking tape line about 1/8" wide of where you want your cloth edge to end and use this as a guide when rolling out the cloth.

in lieu of using glass, i roll out good quality automotive masking paper and tape it to my table or workspace. i use this to wet out the cloth, then simply roll it up and throw it away when done.
 

fluffyprinceton

Adventurer
Great work - go for it!Follow bphang10's advice...it's good stuff. "Good luck...it is easy and messy" nails it...

Getting even, complete wet out on the first layer of glass is the goal & epoxy doesn't wet out glass like polyester resin so you have to work it in & it's much easier to control working on a table. I roll the glass out "scroll" style so you don't need a table the size of your glass piece - just the rolls width...rolling the dry cloth out, wetting it & rolling it back up on the other side till you have the whole piece ready. TEST ROLLING THE PIECE OUT WHEN DRY - sorry for the caps but it will be a real pain to adjust the wet cloth once it's down so plan out your placement.

clear plastic sheet works good on a hollow core door - you can use the doors natural flatness as a "lay up table" for smaller pieces like doors. Light weight sheet lays the flattest & will give you the best "finish" although nothing like gel coat in a mold...

Sounds like you are going to have to use glass tape on your outer corners - use peel-ply! on all glass surfaces you will have to finish later - much smoother, much less filling & sanding. When you use lightweight sandable fillers in your epoxy it's really not that big a deal to get a smooth surface.

Keeping a textured surface on the outside - either glass with the weave obvious or monstaliner is appealing for the labor savings but will catch dirt & mold & over time will not get any prettier...The contrast to the smooth, cleanable body of your vehicle will be really obvious & will scream "homebuilt" no matter how nice a job it is - something to think about when it's time to sell...
A possible compromise is to layup & nicely finish your flat panel sections - which are really easy to fill & sand - and bond the panels with sika/5200 under angles at the outer corners. I've seen aluminum angle used this way and structural fiberglass angles are available as well.

On another matter 5200 & Sika have been used routinely for permanent construction in the boat world since the 70's - any concern about some hardening over 20 years is nuts considering the long term stability of your foam choice & the general life span of campers. I first used 5200 in 1978 and it's still doing it's job - which is the main drawback with the stuff - it's VERY difficult to take apart structures bonded with it without damaging the structure. The great number of caulk tube bonding products are confusing & require study to figure out what's best for a given use.Moe
 

hogasm

Observer
10' of wet fiberglass is like a wet noodle to deal with. by wetting the cloth, then rolling it up, you can then start at one end and unroll the cloth relatively precise and clean. for me, pre-wetting the 1st layer is much easier than trying to wet it out in place. if the 1st layer goes on nice and wet, i often add the subsequent layers dry, also rolled, and use my hands or squeegee to press in place and saturate the cloth. you can brush on more resin in dry spots if needed. i also layout a masking tape line about 1/8" wide of where you want your cloth edge to end and use this as a guide when rolling out the cloth.

in lieu of using glass, i roll out good quality automotive masking paper and tape it to my table or workspace. i use this to wet out the cloth, then simply roll it up and throw it away when done.

Masking paper is nice...you can just roll up after use and toss into the trash. I use the glass because sometimes I leave the wetted fiberglass cloth on the glass and it leaves a smooth finish that requires very little if any finishing. This can be used for hatch covers, door skins, or anything else requiring a smooth finish.....and I have just gotten used to laying things up on the glass.
 

pods8

Explorer
What if I add some dye to the last layer of epoxy? Less work, and way way cheaper......

Epoxy isn't UV stable, it will chalk and degrade over time when exposed to UV. IF you want to try something like this you'd need to use a UV varnish over top that would likely require periodic reapplication over the years.

Epoxy/micro balloons smeared on and back sanded with a 7" sander actually goes pretty fast to get a smooth surface BUT it will be somewhat wavy so stuff like monstaliner that works great with, glossy paint no so much. You'd have to long board sand it out for a glossy smooth paint which is more time consuming.

Whatever you do leaving the rough weave of the fiberglass sounds like a horrible look to me...
 

turbothrush

Member
Untitled_zps401808bd.jpg


Since you are using 3 " foam you have a great opportunity to do a nice radius on the edges (front to sides and sides to top). Besides improving coeffient of drag your camper will have much improved crosswind stability. Just a thought.
Great build by the way !
 

Forum statistics

Threads
185,817
Messages
2,878,507
Members
225,378
Latest member
norcalmaier
Top