All-Purpose Scout 80 build

justcuz

Explorer
Great choice. I've got one in my FJ55 and just fired it up a couple days ago. Working on the exhaust now. Sure sounds good with open headers!

Took a quick look at your build on Mud and read about your family history with Jeep wagons. Did you know that Toledo's semi-pro baseball team is called the Mud Hens? You can get a Mud Hen baseball cap through their gift shop online I believe.
 

justcuz

Explorer
Something cool showed up at work today:
0708151141a.jpg

The small block Chevy of the new millennium!
I am looking for a cam to bring the torque and horsepower down into a lower rpm range. The stock ones deliver it at a higher than normal operating speeds, unless you run 4.56 gear with no overdrive! It was rumored that the factory addressed that with a 6.0 liter cam for the trucks, but I have yet to find it.
 
Last edited:

MotoDave

Explorer
I've run the numbers, and with 35's, 4.56 gears in the axles, I'll be at 2250 rpm at 70 in 5th gear (0.73) and 3000 rpm in 4th (1:1). These trucks (modern 1/2 ton v8s) cruise at under 2k rpm at highway speeds with stock gearing and tires, so I figure the bump in revs will account for the tire difference.

I also have no issue letting the motor rev in 4th on hills, it's what they're designed to do. From what I've seen people get unhappy when they try to drive it like a 20 year old big block, just a totally different set up.
 

Scrapdaddy

Adventurer
Nice looking motor. Did you grab the gas pedal stuff, for the drive by wire assembly? What year is it?

Thanks Juscuz, I didn't know that about the Mud Hens. Cool stuff.
 

MotoDave

Explorer
Yup, one of the selling points for me for this specific motor was how complete it is, down to the drive by wire throttle and controller. It's out of a 2004 Silverado.
 

justcuz

Explorer
Dave,
Both my Suburbans 93 and 2000 have the same gears and tires, 3.73 with 285/75x16's. The 2000 likes to rev, in fact coming home from Wyoming it got better mileage at 80 than at 65-70. My comment about the cam was like you said most of these run at or below 2000 rpm at legal speeds. Mine run at 2200 at 70. I'd like the max torque figure to be closer to that rpm like the older small block since that is where the engine spends a lot of its time.
Really looking forward to the new installation. My early 2 door Cherokee lasted about a year after my son was born.
After that we decided to upgrade to a 4 door and his sister came along soon after. Get it done so Ethan can ride in it before you outgrow it as a family!
Scrapdaddy, your welcome. I was born in Toledo, Jeeps are part of my DNA!
 

Scrapdaddy

Adventurer
Dave,

Same year as mime. It will scare you, when you fire it up. I look forward to knowing your opinion after it's running.
 

MotoDave

Explorer
Finished mocking up the seat position, shifter and got the Suburban Tilt steering column into place, driving position feels pretty good. Still need to make mounts to bolt down the column and make the seat mounts, I want to tie those into the cage so that may come a ways later. I might shorten the shifter just a bit:)

0628151628.jpg


Modified brake mounting plate to tilt the hydroboost/master cylinder up enough to clear the top of the inner fender.

0708152202.jpg


0702151612e.jpg


I'll use a spindle nut with a modified socket to bolt the HB unit to the mounting plate, so that if I ever need to remove it in the field I'll have the tool with me, rather than using the stock large square nut that came with it.

0708152142.jpg


This past weekend I had a good chunk of time to work so I pulled the old TBI 350 with the help of a friend, and took a first stab at fitting the 5.3. As expected the passenger side motor mount bracket on the frame hits the AC compressor, I had planned to re-make this side anyways. Overall it looks like it'll fit pretty well in the same location as the old motor. I'm hoping to have time to fab the new motor mounts this weekend and get the motor bolted in, then I can start figuring out what'll work for exhaust manifolds.

0718151557.jpg


And lastly a bad shot of the truck at ride height. I pulled the springs that were making it sit high in the front, and am just running a single spring and using the adjuster to set height. Doesn't have the stupid bro-truck stance anymore :)

0718151710a.jpg
 

02TahoeMD

Explorer
I really love what you are doing with this build. Make sure you replace the exhaust manifold bolts with something stronger than just factory ones when you do the replacement manifolds. The factory ones like to snap off. Often in the heads. :(
 

KMW-NW

New member
Still lurking and watching this build and gaining inspiration for mine! Looking awesome!

I'll second the exhaust bolt thing. I just did them on the 6.0 in my H2. Had a bolt break so I replaced them all with ARP stainless studs and high temp anti-seize. Much easier to do it before they start breaking, and they will!
 

superbuickguy

Explorer
yep to the 5.3 bolts breaking, I had to replace several on my H3 Alpha. They were easy to replace, though. I welded a nut to the top, let them heat soak for 30 seconds then backed them right out.... easy as pie.
 

justcuz

Explorer
They have done another expansion cut in the new exhaust manifolds to avoid this. I would include these in any manifold you use. The torque spec on stock exhaust manifolds is around 15 ft lb. I think that is why the early bolts only used a 10mm head. The newer factory replacement bolts are 13mm as I recall. I kept the small10mm bolt heads but installed 5/16 lock washers under the bolt heads to make it easy to identify loose bolts. I had loose exhaust manifold bolts and the exhaust leak was tricking the oxygen sensors, making my fuel trim numbers very erratic. I cut 1 new expansion joint in the manifolds, installed new gaskets and the lock washers and all is good.
 
Last edited:

MotoDave

Explorer
Thanks for the input and advice guys - I like the idea of splitting the manifolds, and I already have a set of ARP header bolts in hand :)

I feel like these updates suck lately, but as some of you know babies are a bit of a time sink.

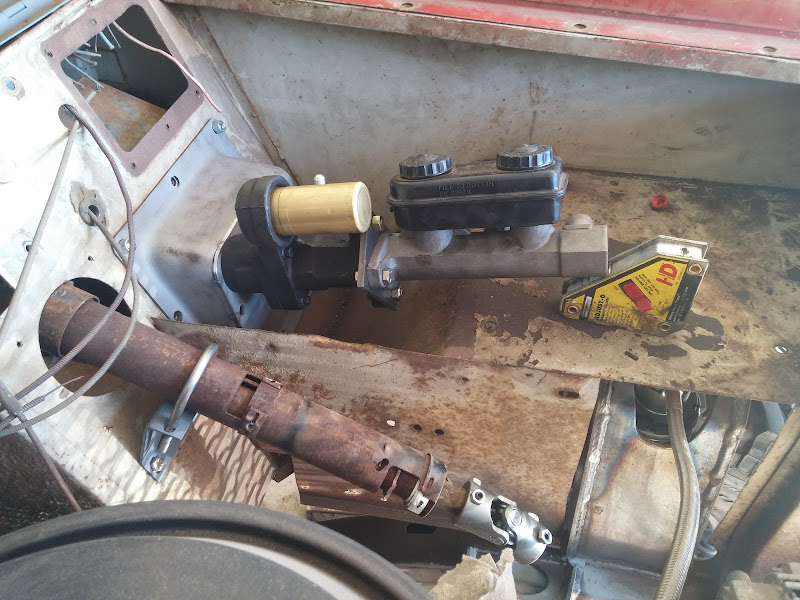
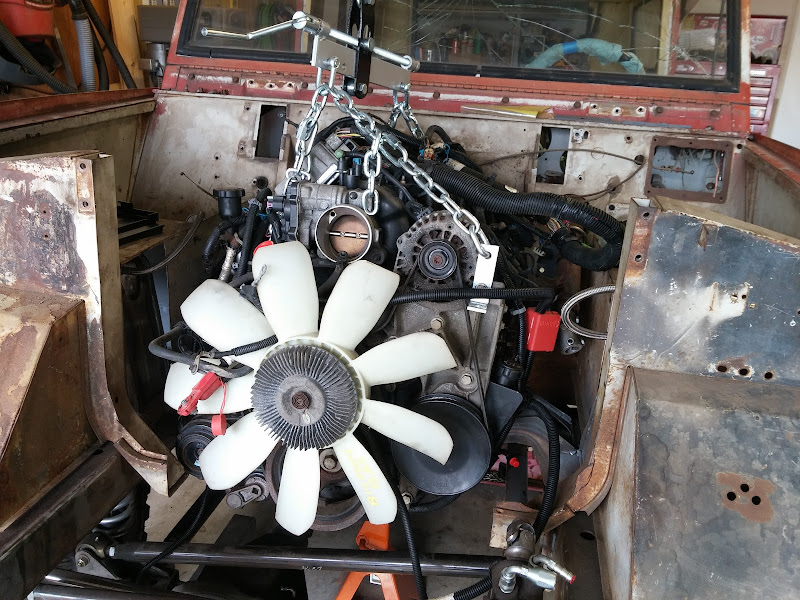
Motor is in and bolted up to the transmission. I built new motor mounts, the drivers side matches the location of the existing frame side motor mount (for the old TBI 350), the passenger side is more like a normal LS motor mount to clear the AC compressor. I didn't like the original mount I'd built off the frame on that side anyways, so it was an opportunity to re-make it better.

0801150959.jpg


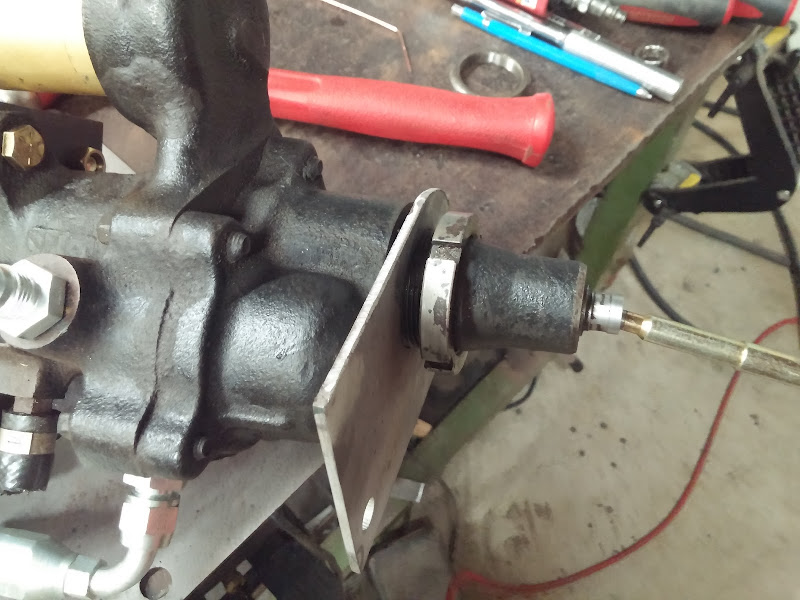
Been using the TIG welder everywhere I can, I'm no pro but I'm happy with how these turned out.
0731152200c.jpg


I got sick of dealing with the inner fenders, so I made them removable. I thought this was going to be trickier than it was, I really should have just done this years ago. I drilled out the spot welds along the 3 seams, and then cut the outside surface of the inner fender (which is 1 piece) at the seam along the line of the firewall. I will weld nuts to the backside of the seams and bolt through the spot weld holes to reattach. I'll probably build the new core support to also support/locate the ends of the fenders and grille.

A tip - if you cant easily find the spot welds, sanding off the paint along the seam will make them stand out pretty well.

0809151158.jpg


Another plug for the Rotabroach cutters, they do such a clean job on sheet metal. I've used my small set enough by now to justify spending the money for the larger set to replace all of the hole saws I used to use.

0809151228.jpg


0809151159a.jpg


Inner fender
0809151229h.jpg


Clearance issues:
I'm not sure the stock truck AC compressor (specifically the tensioner) is going to work out, it hangs down lower than the crank pulley and might get friendly with my panhard bar. I need to make time to cycle the front suspension and make the decision, it should be simple to relocate the AC compressor (Novak makes a nice looking kit that uses the old style AC compressor: Air Conditioning Compressor Relocation - Novak Conversions).

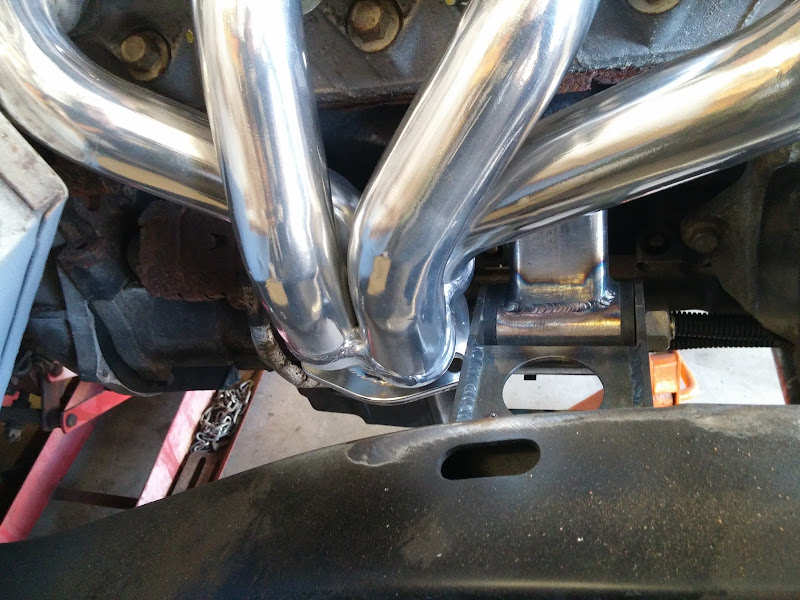
The passenger side motor mount needs to move forward a bit more, the header flange just hits it. Not a big deal, I can move the mount forward and inch easily and have lots of clearance.
0809151159b.jpg


The firewall needs clearance on both sides, as expected. The SBC I had used rams-horn exhaust manifolds that were a bit lower profile. Not really a big deal, and a whole lot easier to do without the stupid fenders in the way.

Drivers side is the worst
0809151226.jpg


Passenger Side
0809151159c.jpg


Current plan is to make enough clearance for the header tube plus a heatshield. Not sure if I want the heatshield mounted to the header (like this stuff Thermo-Tec : Stainless Steel Clamp-On Heat Shield) or to the firewall (https://www.designengineering.com//...ier/floor-tunnel-shield-ii-heat-sound-insulat).
 

ntsqd

Heretic Car Camper
That looks much more convenient!

I'm not sure that I'd use stainless exhaust bolts in aluminum heads. A very large no-no in the marine world as the galvanic corrosion potential is fairly big. Granted, this operating environ ain't that environ but I'd still be cautious. According to this: http://www.preservationscience.com/materials/metals/PGC.html mild steel is roughly half as active against aluminum as stainless is. Galvanized steel would be best, but that ain't going to happen in a bolt grade suitable for retaining an exhaust manifold.
Another note of concern is anti-seize on stainless steel. Avoid copper based anti-seize; use nickel, silver, or possibly lead based.

Are you done yet?
Late response, I know. Best answer that I've ever heard to this question is "If it's done, it's for sale!"
 

Forum statistics

Threads
185,911
Messages
2,879,534
Members
225,497
Latest member
WonaWarrior
Top