You are using an out of date browser. It may not display this or other websites correctly.
You should upgrade or use an alternative browser.
You should upgrade or use an alternative browser.
"TrailTop" modular trailer topper building components
- Thread starter jscherb
- Start date
dcollier32
Adventurer
Help Me?
Is there any way you could build me a kit for my trailer? You can see what I am trying to accomplish here:
http://www.expeditionportal.com/forum/threads/123384-Utility-trailer-(removeable-camper-mod)
")
Is there any way you could build me a kit for my trailer? You can see what I am trying to accomplish here:
http://www.expeditionportal.com/forum/threads/123384-Utility-trailer-(removeable-camper-mod)
jscherb
Expedition Leader
Is there any way you could build me a kit for my trailer? You can see what I am trying to accomplish here:
http://www.expeditionportal.com/forum/threads/123384-Utility-trailer-(removeable-camper-mod)
Looks like your project is off to a good start!
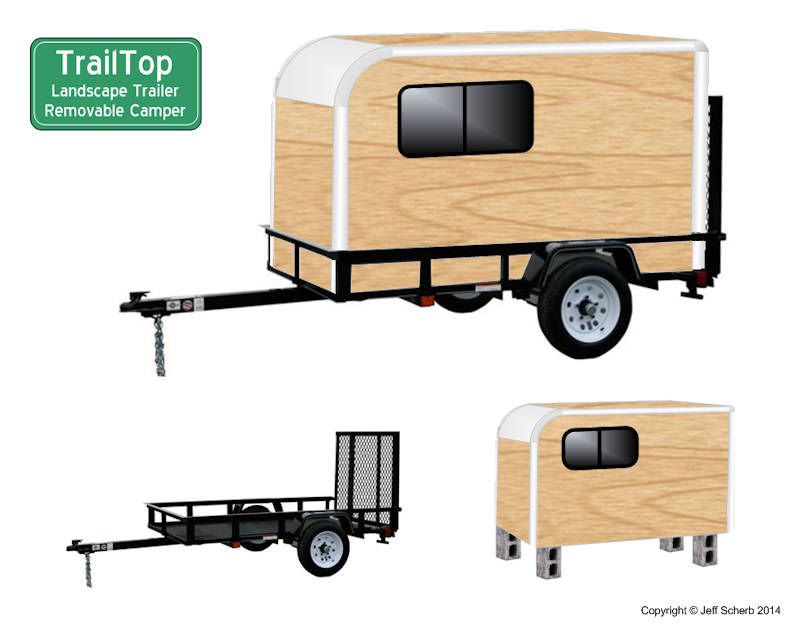
I did post a TrailTop concept for a landscape trailer early in this thread (post 33). The idea was that the camper box would slide out so the trailer could return to landscape/cargo duty when it wasn't camping:
dcollier32
Adventurer
Looks like your project is off to a good start!
I did post a TrailTop concept for a landscape trailer early in this thread (post 33). The idea was that the camper box would slide out so the trailer could return to landscape/cargo duty when it wasn't camping:
Yea, that's the idea I am aiming for... Except, I was really hoping to stay light weight... But with all the bracing and all, all that wood is starting to add up and quick. That's why I turned to you, to see if we could develop some fiberglass wall panels kinda like how you done the dinoot trailer with the camper part on it...?
jscherb
Expedition Leader
Yea, that's the idea I am aiming for... Except, I was really hoping to stay light weight... But with all the bracing and all, all that wood is starting to add up and quick. That's why I turned to you, to see if we could develop some fiberglass wall panels kinda like how you done the dinoot trailer with the camper part on it...?
I've designed the TrailTop system to be light weight but still be strong - the fiberglass framing members are structural and weigh less than 1 pound per linear foot. The framing is designed to accept 1/4" thick side and roof panels, and these can be plywood, aluminum-clad luan, fiberglass-clad foam, there are lots of different 1/4" thick materials available. Another option would be 0.30 aluminum sheets laminated to foam insulation panels, with 1/8" plywood laminated on the inside to give a nice interior finish. I found aluminum sheets in an RV surplus place the other day (http://www.rvsurplus.net/catalog/display.php?product_id=425), they come pre-finished in either black or white.
But consider 1/4" plywood for a moment, it weighs less than 3/4 lbs/sq. foot. I posted a weight estimating formula a week or two ago, it goes like this:
# feet of TrailTop framing * 1 lb./foot
plus
# square feet of plywood * 3/4 lb./foot
plus 10% over that total for misc. things like some 1x2 stringers for the walls, adhesive, hardware, etc., plus whatever weight you add for windows and other outfitting.
That equation is for a TrailTop to sit on top of a Jeep-tub trailer, not the removable landscape trailer concept in the drawing, so you'd need to add some weight for a floor and related framing and a few other misc. bits, but I think you'll find it'll end up lighter than one framed with 2x4's, for example.
dcollier32
Adventurer
Ok, sounds good. Thanks for your time. When will the trailtops be available for consumers like me?
jscherb
Expedition Leader
Ok, sounds good. Thanks for your time. When will the trailtops be available for consumers like me?
This project is still in the prototype stage, and it's a hobby project of mine, not a commercial venture. Within the next week I should have the final parts of the planned set of parts molded and then I'll finish up my work on the proof-of-concept build. Once I've done that, I'll evaluate the results to decide if I think the TrailTop system is worthy of being a commercial product (and everyone's input on whether it should be a commercial product is helpful and welcome too). If I decide it would make sense as a commercial product, there are two companies that have already contacted me that are interested in marketing the TrailTop system. I've talked to both companies, and they're both very credible companies that would do a good job. So stay tuned, and everyone please keep the input, criticism and suggestions coming.
jscherb
Expedition Leader
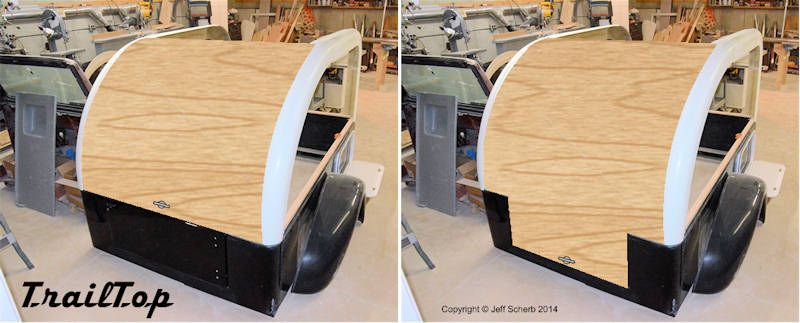
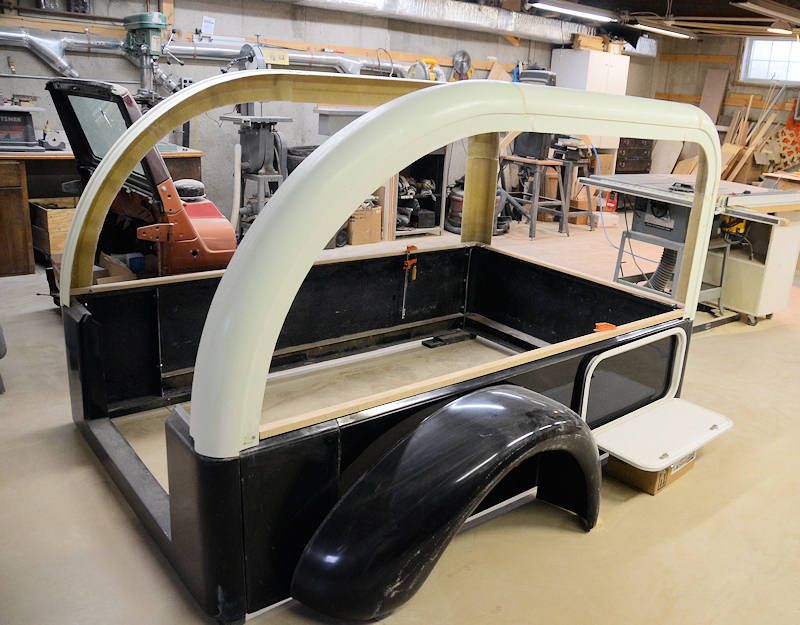
I've been assembling this proof-of-concept teardrop on a Jeep-tub, and that means there are several options for the rear hatch.
On the left, there's a tailgate installed (it's hard to see because it's black), and the hatch only comes down as far as the top of the tailgate. This is a Dinoot Smooth tailgate, which is the same size as a standard Jeep tailgate, but has a smooth exterior so there's no "Jeepness" about it.
On the right, there's no tailgate, and the hatch fills the tailgate opening.
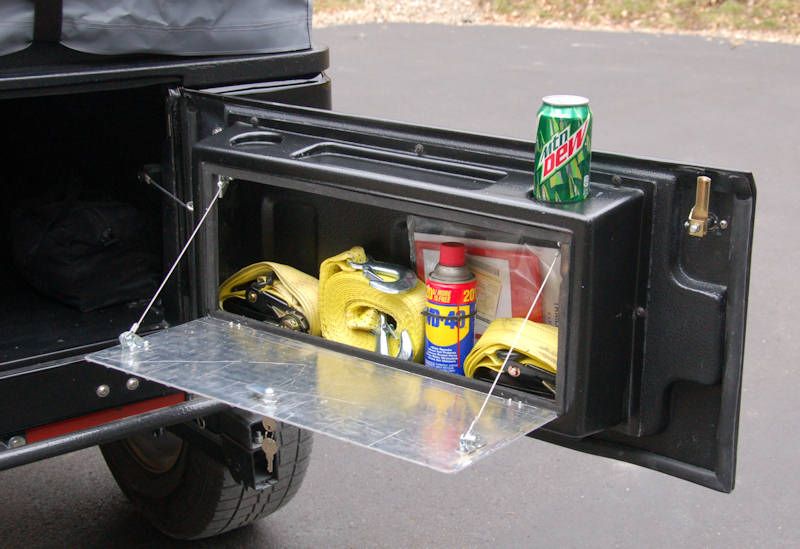
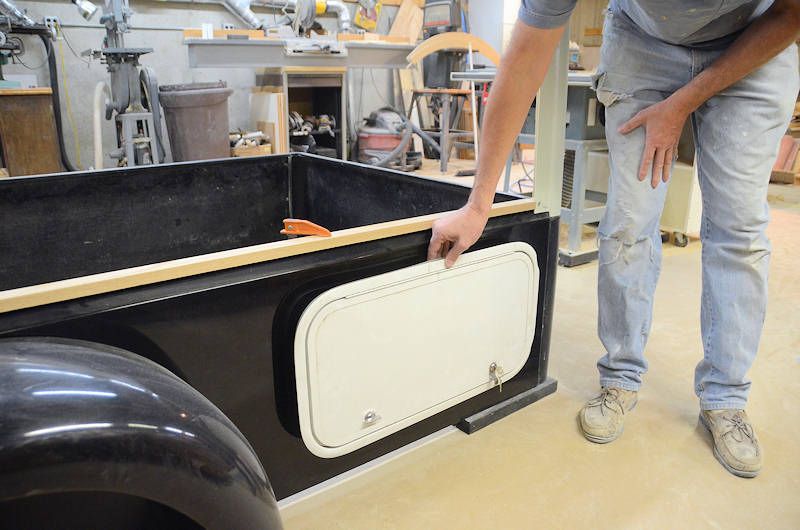
I'm not sure which one I'd really prefer on a Jeep-tub teardrop, but if a side-swinging tailgate were installed, it could add utility to the kitchen. For example, something like this tailgate storage compartment could be installed. This one has a locking compartment, and when it's open, the door serves as a small table. The tailgate would open far enough so that it wouldn't get in the way of access to the galley, but close enough that whatever was mounted on it could be part of the galley area. This one's mounted on the tailgate of a Dinoot Compact Jeep-tub trailer:
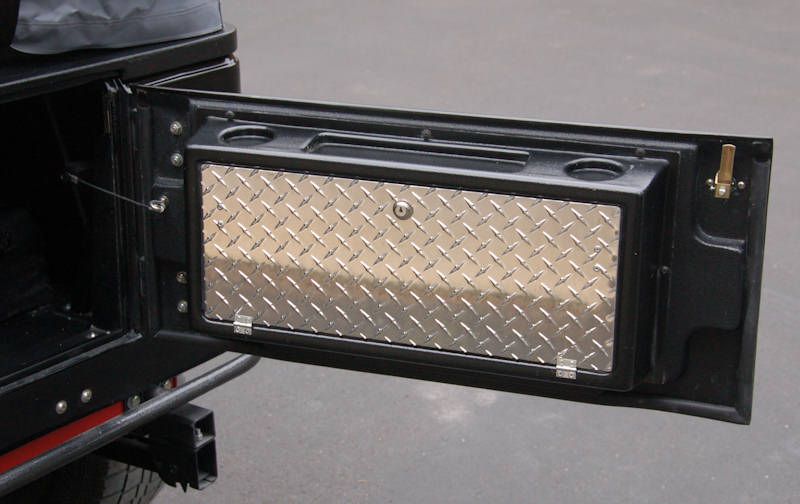
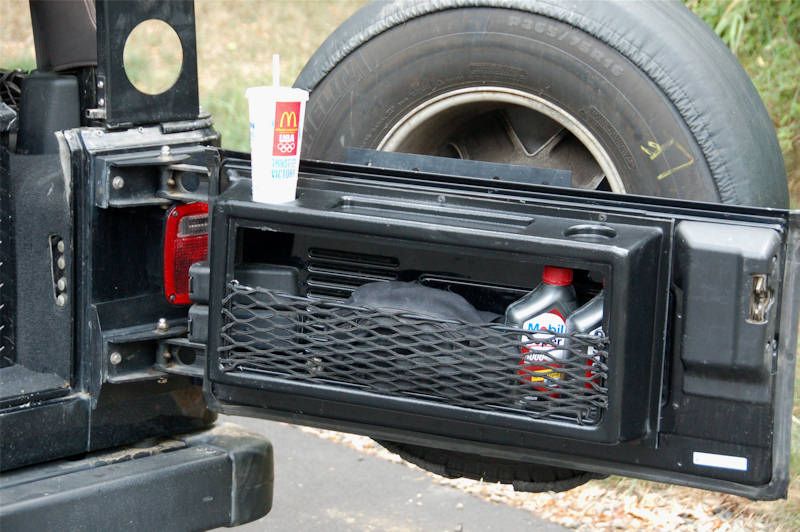
The version I have on my Jeep just has a net to keep the cargo in the compartment:
For the proof-of-concept TrailTop I plan to build the hatch to work with a Jeep-style tailgate.
On the left, there's a tailgate installed (it's hard to see because it's black), and the hatch only comes down as far as the top of the tailgate. This is a Dinoot Smooth tailgate, which is the same size as a standard Jeep tailgate, but has a smooth exterior so there's no "Jeepness" about it.
On the right, there's no tailgate, and the hatch fills the tailgate opening.
I'm not sure which one I'd really prefer on a Jeep-tub teardrop, but if a side-swinging tailgate were installed, it could add utility to the kitchen. For example, something like this tailgate storage compartment could be installed. This one has a locking compartment, and when it's open, the door serves as a small table. The tailgate would open far enough so that it wouldn't get in the way of access to the galley, but close enough that whatever was mounted on it could be part of the galley area. This one's mounted on the tailgate of a Dinoot Compact Jeep-tub trailer:
The version I have on my Jeep just has a net to keep the cargo in the compartment:
For the proof-of-concept TrailTop I plan to build the hatch to work with a Jeep-style tailgate.
Ace Brown
Retired Ol’ Fart
A drop down tailgate can be very handy to work on but in most teardrop designs that have a built in kitchen it would just be in the way, having to lean over it. Your swing out design looks great. The only concern there is you loose some shade without the longer hatch to cover the kitchen area.
You often refer to the Dinoot tub. Is this a commercial product? I met a guy last year who hauled a small trailer on the Kokopelli Trail and he called it a Dinoot.
Sent from my iPhone using Tapatalk
You often refer to the Dinoot tub. Is this a commercial product? I met a guy last year who hauled a small trailer on the Kokopelli Trail and he called it a Dinoot.
Sent from my iPhone using Tapatalk
jscherb
Expedition Leader
A drop down tailgate can be very handy to work on but in most teardrop designs that have a built in kitchen it would just be in the way, having to lean over it. Your swing out design looks great. The only concern there is you loose some shade without the longer hatch to cover the kitchen area.
You often refer to the Dinoot tub. Is this a commercial product? I met a guy last year who hauled a small trailer on the Kokopelli Trail and he called it a Dinoot.
Yes, the Dinoot is a commercially available fiberglass Jeep-tub trailer kit designed for DIY assembly. The kit can be had in several lengths, here's a Dinoot Compact (the smallest size) outfitted with a roof-top tent:
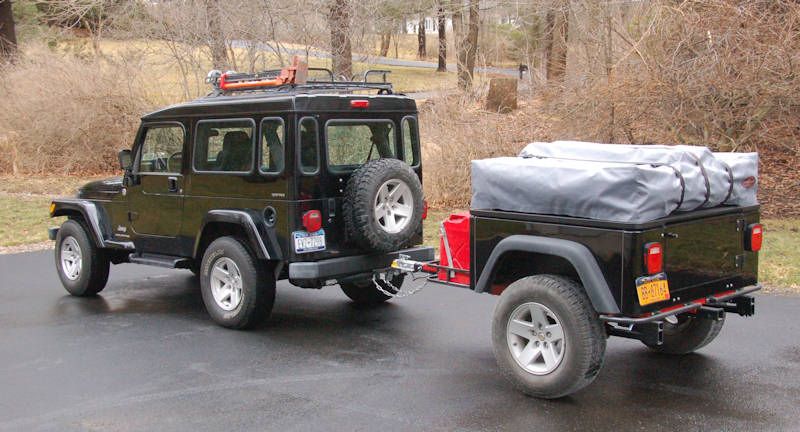
The tub I'm doing the TrailTop proof-of-concept build on is one of the longer Dinoot kits:
jscherb
Expedition Leader
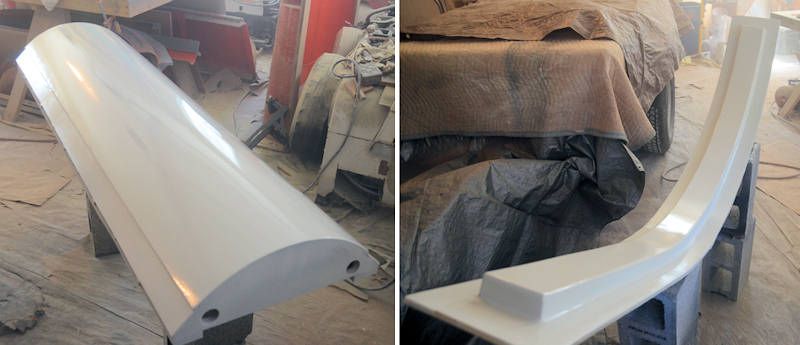
I always like to verify that things are as strong as I thought they would be when I did the design work, so I often do a 225-lb. gorilla test...
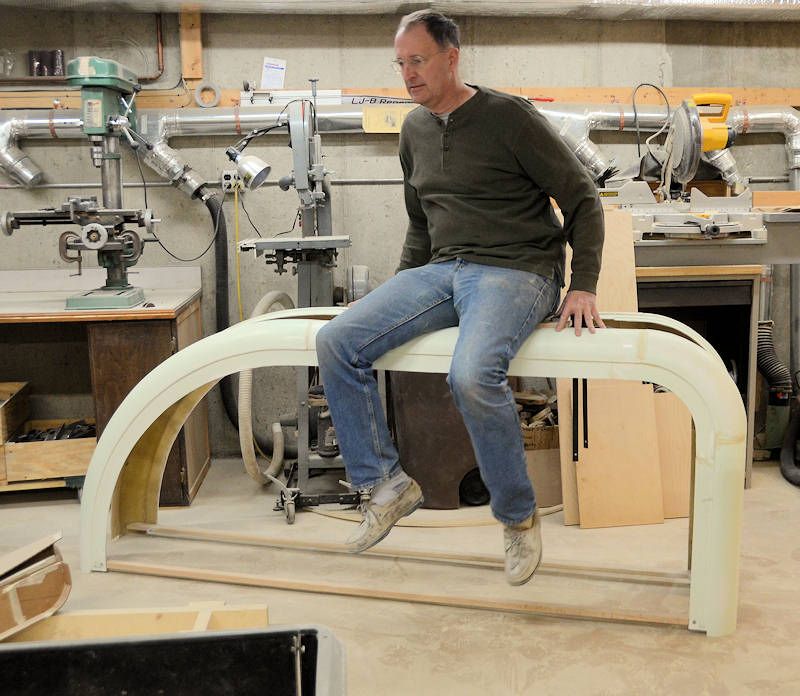
Test passed.
I'm testing two things in the photo - the strength of the fiberglass parts, and the strength of the bonds between the parts, which were done with automotive body filler. I'm especially happy with the body filler "glue" holding the parts together, it's easy and inexpensive. I'll post a "step by step" on joining the TrailTop parts soon.
Since one of my design requirements is for a TrailTop to support a roof-top tent, testing the components for strength is key.
Test passed
.I'm testing two things in the photo - the strength of the fiberglass parts, and the strength of the bonds between the parts, which were done with automotive body filler. I'm especially happy with the body filler "glue" holding the parts together, it's easy and inexpensive. I'll post a "step by step" on joining the TrailTop parts soon.
Since one of my design requirements is for a TrailTop to support a roof-top tent, testing the components for strength is key.
jscherb
Expedition Leader
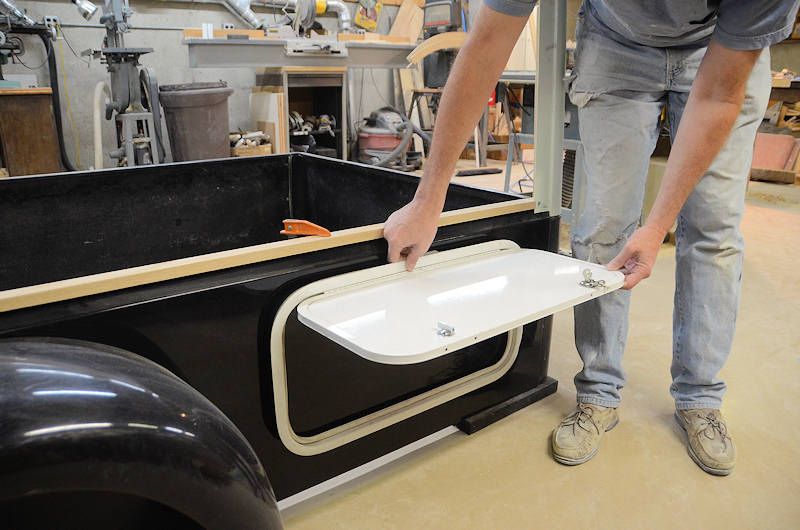
You may have noticed the side hatch that's been in some of the photos of the proof-of-concept project lately. I had to take a road trip about 10 days ago and the route took me past Elkhart, Indiana, so I got off the interstate to visit one of the several RV surplus stores there. I picked up a few interesting things, including that hatch, it's a perfect size for the side of a Dinoot. I don't know what I'm going to do with this hatch (if anything), but for $25, I couldn't pass it up.
I've drawn hatches like this in many of my concepts in this thread and the Jeep-tub trailer thread over the past year, here's just one example...

Or for pull-out kitchens:
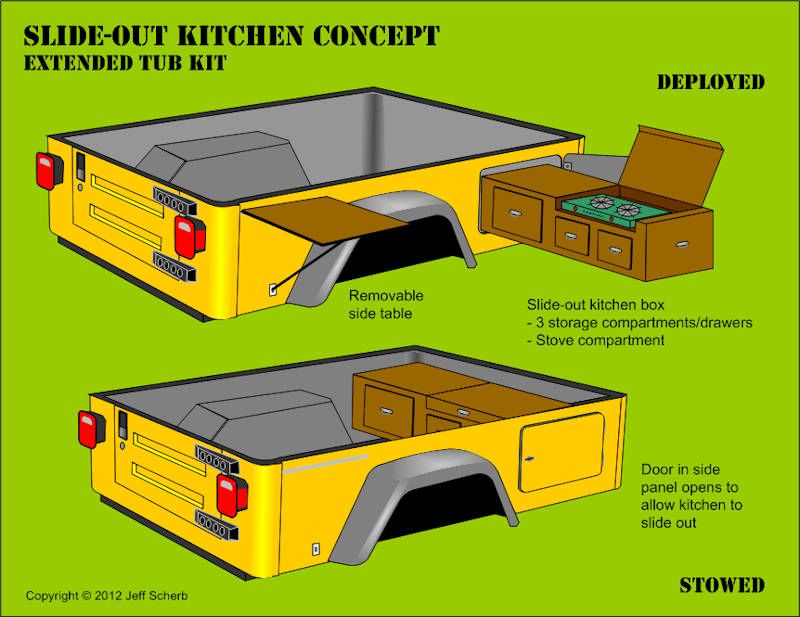
The hatch could be mounted hinge up, and with a prop-rod, it could serve as a small table:
Or mounted hinge down, it would be great for a slide-out kitchen.
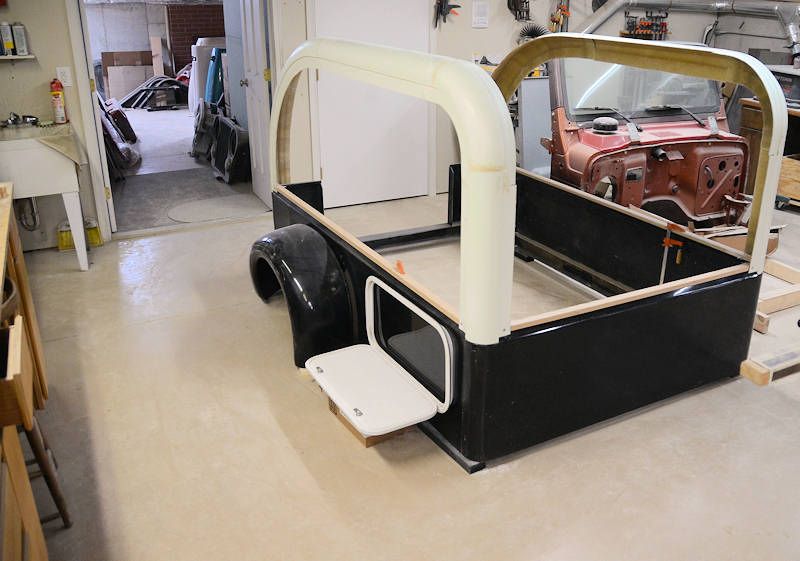
It could look something like this:
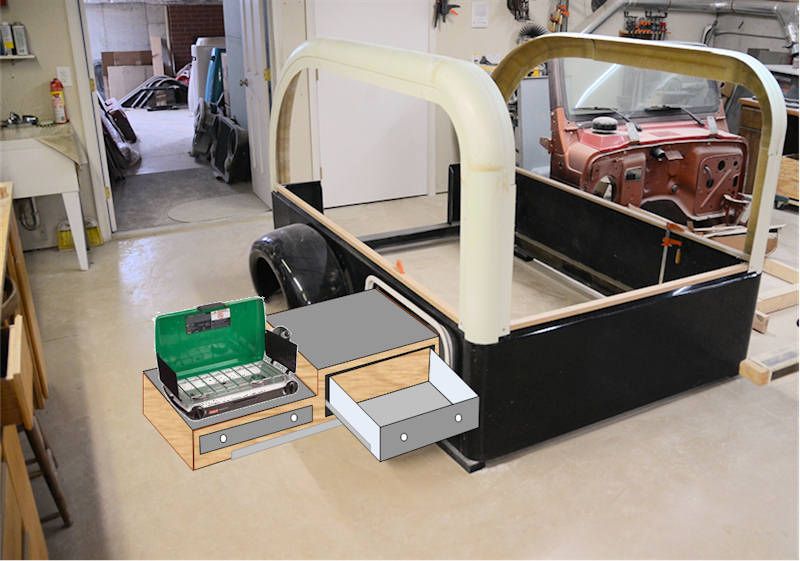
Could do just a storage drawer too:
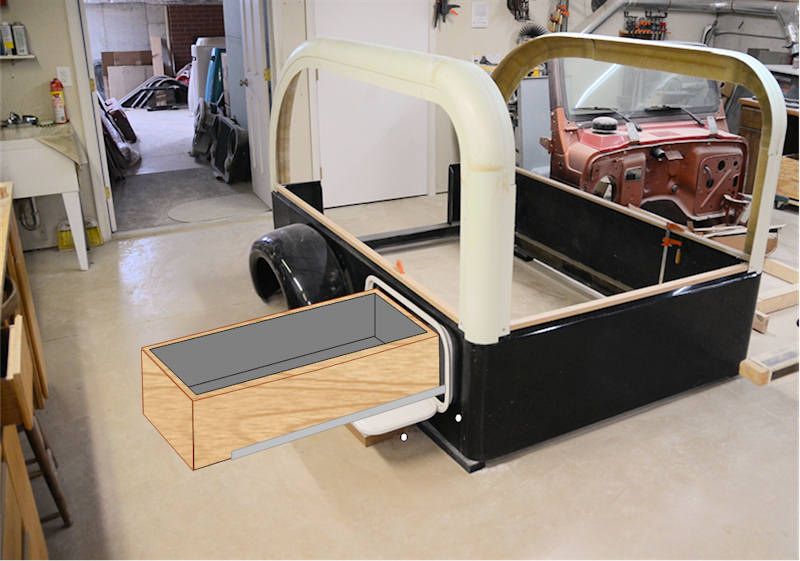
Putting something in a drawer like this probably would be best done with a raised sleeping platform; when slid in the kitchen would store under the bed, so perhaps not a teardrop where the bed would be on the floor but perhaps a rear-door style like the one below where a raised bed would make sense and a rear galley wouldn't be an option.
I've drawn hatches like this in many of my concepts in this thread and the Jeep-tub trailer thread over the past year, here's just one example...
Or for pull-out kitchens:
The hatch could be mounted hinge up, and with a prop-rod, it could serve as a small table:
Or mounted hinge down, it would be great for a slide-out kitchen.
It could look something like this:
Could do just a storage drawer too:
Putting something in a drawer like this probably would be best done with a raised sleeping platform; when slid in the kitchen would store under the bed, so perhaps not a teardrop where the bed would be on the floor but perhaps a rear-door style like the one below where a raised bed would make sense and a rear galley wouldn't be an option.
jscherb
Expedition Leader
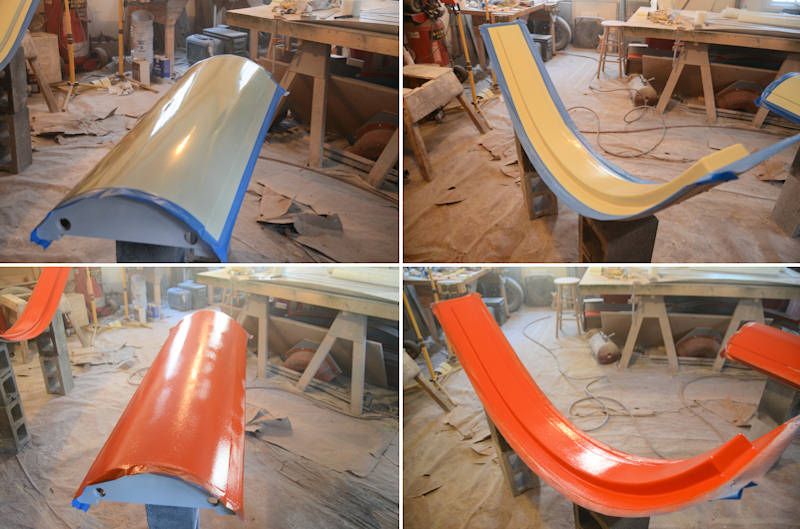
Since the TrailTop straight parts are designed to be cut to length to implement whatever shape/size/style camper you're building, the cut ends need to be trimmed and fitted to the corner/curved parts after cutting to length. I took these photos when I was assembling the side frames a week or two ago but I haven't had a chance to edit them into a post until now. Here are the steps for trimming/fitting/bonding the parts together.
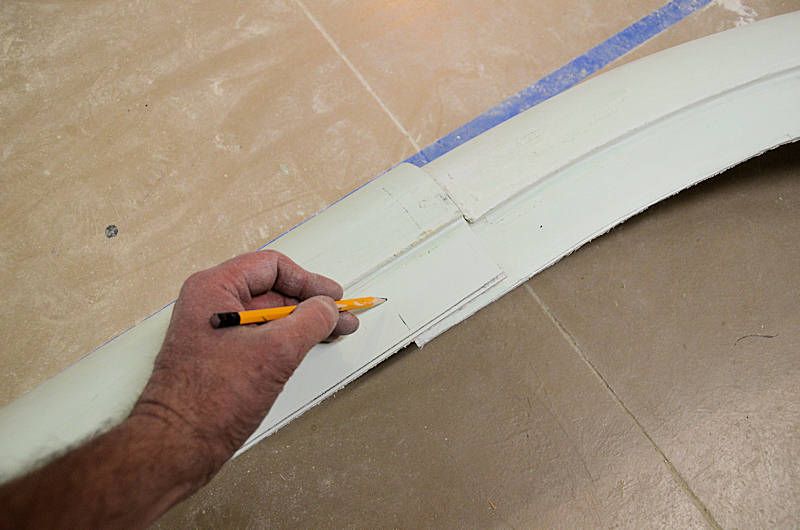
Step 1: Mark the flanges of the straight piece to length:
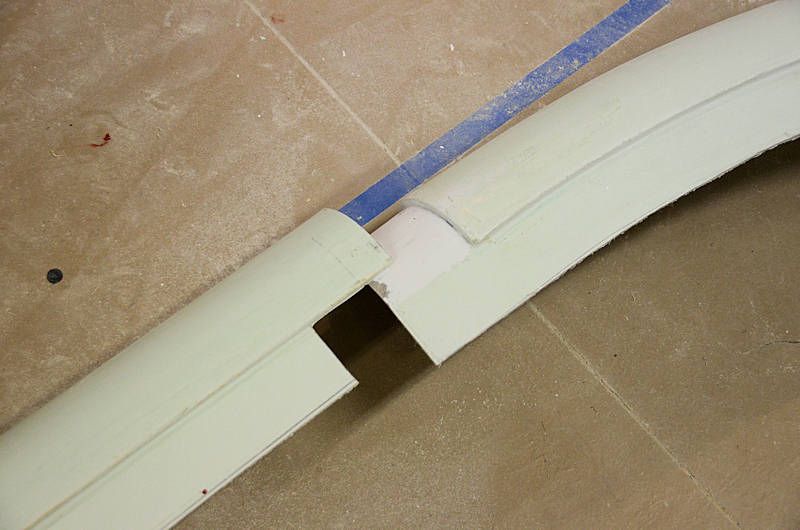
Step 2: Trim to marks and test fit:
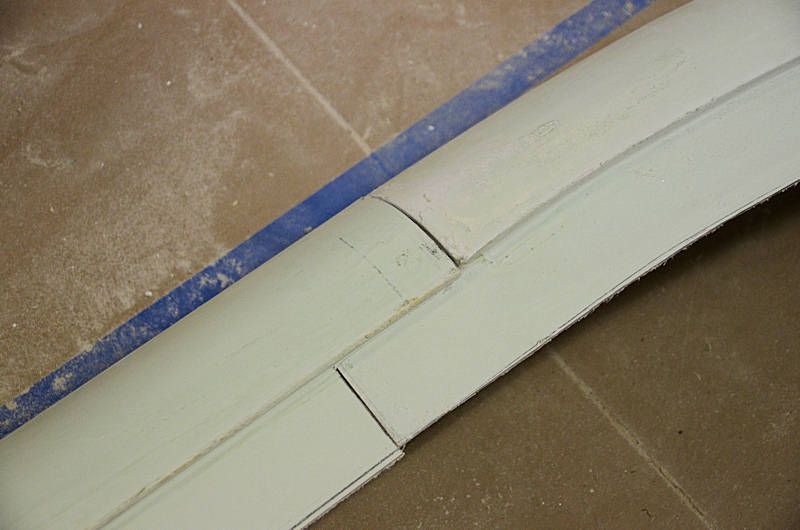
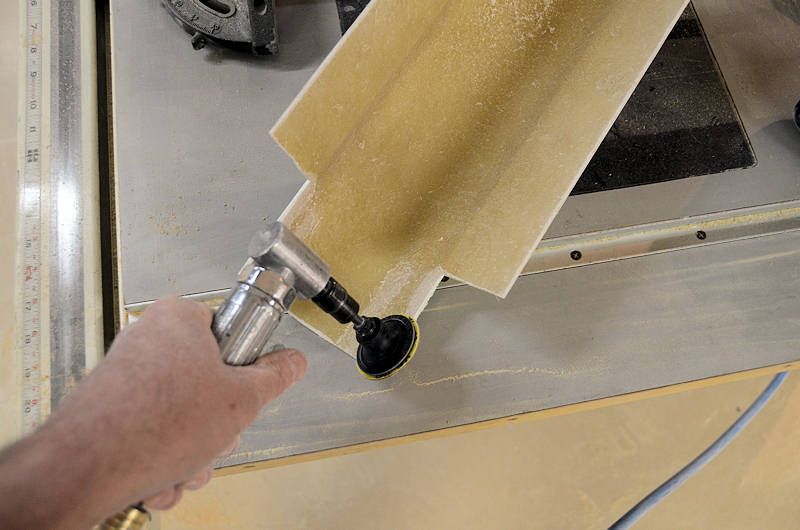
Step 3: Fit as necessary. There will be a little bit of material that has to be removed from the inside, as seen in this photo. This is because of the curve of the fiberglass when the step from the outer curve to the inner flange is molded. I'm using a $10 Harbor Freight angle die grinder with a 50-grit sanding disk in it, this makes really quick work of the fitting process. If you've got a compressor, this is the way to go. If not, a hacksaw and a sanding disk in an electric drill can accomplish the same task. I fitted one joint with those tools as a test, and it worked fine, but the angle die grinder makes the fitting much quicker.
Step 4: Bonding the parts together. I used automotive body filler. I put a fairly thick layer on, this fills any gaps and gives you some "play" to make final adjustments as you're clamping the parts together. I'm using a filler called Feather-Rite, which is an off-white color, and instead of the usual red or blue cream hardener, I'm using white, so the filler retains it's off-white color. I like that because it doesn't stand out as much as filler that when mixed would be light blue or pink. You do have to take a little more care mixing it with the white hardener, because you don't have the color change to indicate when it's fully mixed. It's also one of the less expensive fillers, I paid $12 for a quart.
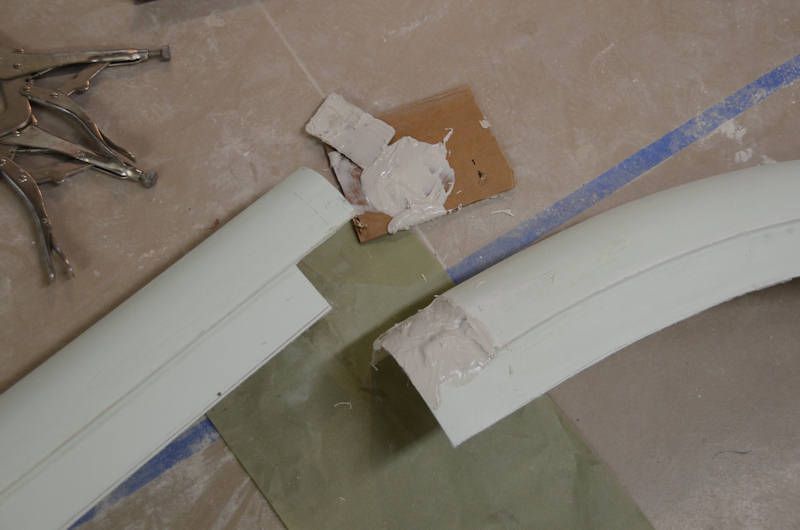
If you weren't comfortable bonding the parts together with body filler, you could use epoxy, or you could use traditional fiberglass (polyester resin with resin-soaked fiberglass mat to fill the gaps), or a 2-part urethane adhesive. If you feel more comfortable working with one of those, they'd work fine too.
Step 5: Clamp the parts and wait until the body filler cures, about 15 minutes (possibly longer if a different adhesive is used). I've clamped a piece of steel angle across the joint in the flanges to ensure the parts go together perfectly straight.

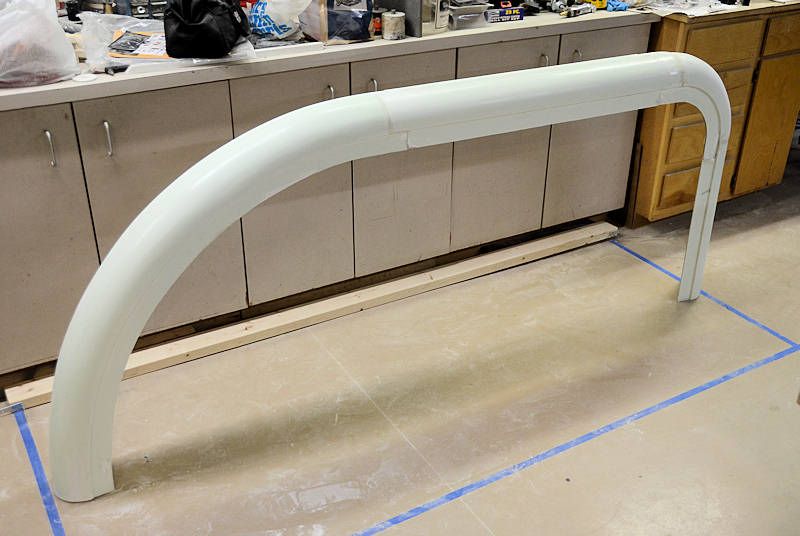
When all the joints are fitted and bonded, you'll have a very solid framework.
Step 1: Mark the flanges of the straight piece to length:
Step 2: Trim to marks and test fit:
Step 3: Fit as necessary. There will be a little bit of material that has to be removed from the inside, as seen in this photo. This is because of the curve of the fiberglass when the step from the outer curve to the inner flange is molded. I'm using a $10 Harbor Freight angle die grinder with a 50-grit sanding disk in it, this makes really quick work of the fitting process. If you've got a compressor, this is the way to go. If not, a hacksaw and a sanding disk in an electric drill can accomplish the same task. I fitted one joint with those tools as a test, and it worked fine, but the angle die grinder makes the fitting much quicker.
Step 4: Bonding the parts together. I used automotive body filler. I put a fairly thick layer on, this fills any gaps and gives you some "play" to make final adjustments as you're clamping the parts together. I'm using a filler called Feather-Rite, which is an off-white color, and instead of the usual red or blue cream hardener, I'm using white, so the filler retains it's off-white color. I like that because it doesn't stand out as much as filler that when mixed would be light blue or pink. You do have to take a little more care mixing it with the white hardener, because you don't have the color change to indicate when it's fully mixed. It's also one of the less expensive fillers, I paid $12 for a quart.
If you weren't comfortable bonding the parts together with body filler, you could use epoxy, or you could use traditional fiberglass (polyester resin with resin-soaked fiberglass mat to fill the gaps), or a 2-part urethane adhesive. If you feel more comfortable working with one of those, they'd work fine too.
Step 5: Clamp the parts and wait until the body filler cures, about 15 minutes (possibly longer if a different adhesive is used). I've clamped a piece of steel angle across the joint in the flanges to ensure the parts go together perfectly straight.
When all the joints are fitted and bonded, you'll have a very solid framework.
jscherb
Expedition Leader
This morning I'm making the last two TrailTop molds and in between steps (waiting for the PVA mold release to dry), I'm doodling a few teardrop concepts. These have TrailTop curved edges all around, hiding the frame on the bottom. The sides are done in stick-on murals. The TrailTop framing parts and the fenders are painted to complement the murals.
So FWIW, some digital doodling this morning...
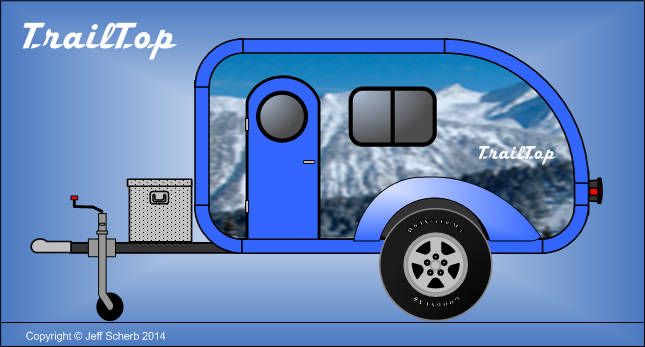
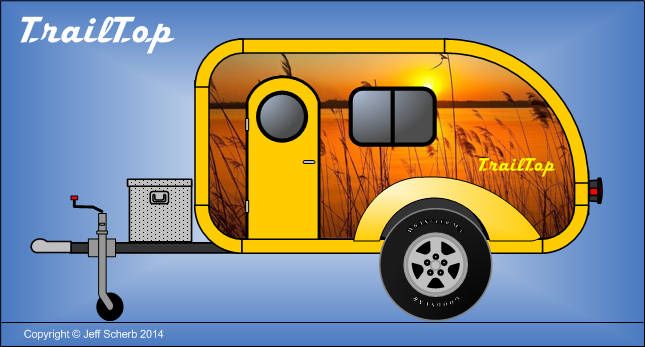
So FWIW, some digital doodling this morning...
Forum statistics
Members online
- K.V.
- rumin8
- DesertIslands
- jasonvt
- Skane40
- kayadog
- kidphc
- SiberianSoon
- Pacific Northwest yetti
- Windaroo
- mtaylo32
- WanderingBison
- gkieser92
- Jpherbalist
- Jonnyo
- 1965 Land Cruiser
- SierraTheJKUR
- Chomar
- Sergio828
- Workhorse
- 94-RUNNER
- phxzuk
- ChrisCosta416
- webfoots
- Meadowlark
- Cummins_expo
- kramer
- High Shelter
- svmaple
- JaSAn
- blackhawkip
- mark5280
- jchasse
- Boatmonkey
- Hawk136439
- Jeeper2001
- Over the hill
- Savagenut
- Flettrich3
- gwittman
- RollingTaco
- Robbus
- scoolbubba
- FMC
- AJM
- Romer
- Steve_382
- bstock1
- Chasing Snow
- Outono
Total: 932 (members: 57, guests: 875)