Oh boy. -NOW a build thread

deminimis

Explorer
After having issues adding led fogs (fixed), a lockpick and cameras (first system didn't work, so going with reportedly a better system...but waiting on parts), a grill guard that blocked headlights, etc., I finally have some success out of the gate. decided to mix Torklift Fastgun Derringers and Torklift Anchor Guards for my tie downs. I got sections of stainless 1/2" all thread for the perfect fit. Installed big D rings on the flatbed. Cut off the rest of the unneeded drop side hinges/mounts (love my plasma cutter). I manged to mount tie downs at 25 degrees. This will work out just right with my scheme.

upload_-1


wwvyi5qazEz2qUet7e1jSv9dLUc-EdlQH93bKsnznrI=w319-h567-no


And the new grill (not as cool, but more functional) guard:
upload_-1
 

deminimis

Explorer
No problems at the auto pumps. Haven't opened up the throats for the trucker pumps. Ram runs fill hoses through the frame, so angle isn't that horrible.
 

IdaSHO

IDACAMPER
Interesting.

Tanks must be set pretty low if the fillers run through the chassis.

My old F350 tanks are nearly flush with the tops of the chassis, so fillers have to go over it.

My low slung flatbed has always been a bit tricky to fuel up. Can only fill at one click, otherwise the slightly sloped filler hose hydrolocks and spits diesel back at you :coffee:.

Slow and steady is the game.


Looks good by the way. My only suggestion would be to bolt some rails to the flatbed itself, left and right of the camper base. Just to help keep the camper aligned and minimize its movements.

Relying completely on the tie downs is a bit sketchy IMO.

If one breaks, or just loosens you might have a world of trouble.
 

deminimis

Explorer
M35 style cargo bed spring mounts:
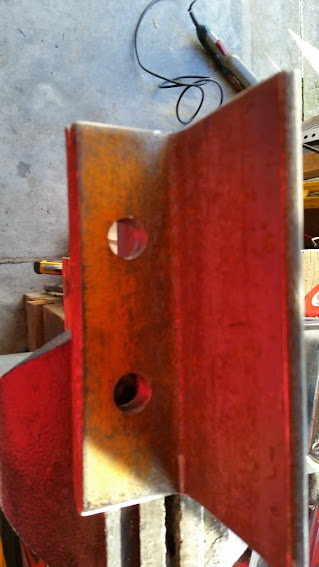
1/4 2x3x6 angle
10" 5/8 Grade 8 (9" if not using spacers between the mounts).
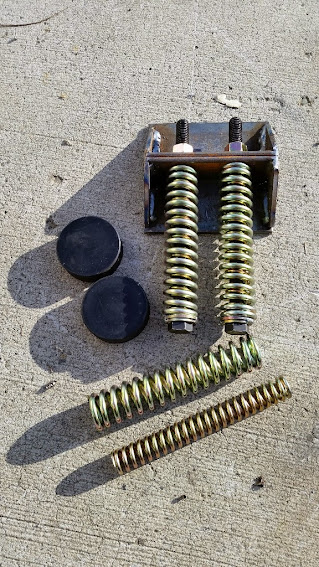
Nuts, wahsers, etc (you may have to weld 7/8 and 3/4 washers together for the spring base)
Gussets
Hockey pucks
Inner and outer springs (5360007372793 & 5360007372792)

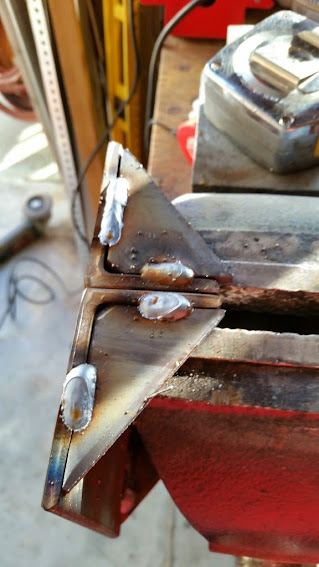
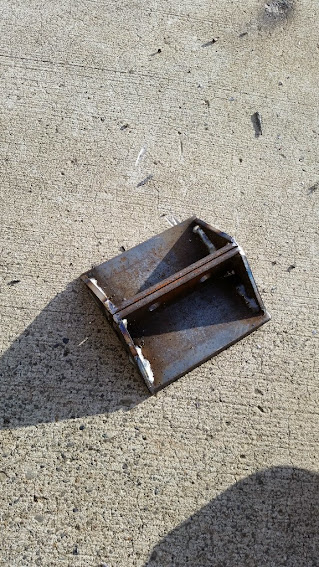
Tack a matched set of brackets together (this pair will always be matched from this point on)

upload_-1


5/8 holes (Remove tack welds and separate the brackets after holes are drilled)

upload_-1


Gussets

upload_-1


upload_-1


Had to tack 3/4 and 5/8 washers together to provide the right amount of surface for the springs. As you can see, here it is without the puck spacers in place, jam nuts, paint, backing plate, etc., but you get the idea. Also shown here are the inner and outer springs.

upload_-1


Spring Specs

*5360007372792*
Inside Diameter 0.646 inches minimum and 0.686 inches maximum

END Style E4 spring end, squared and ground both ends

Spring Free Length 7.500 inches nominal

Coil Quantity 25

Spring Solid Length 4.000 inches nominal

Spring Solid Outside Diameter 0.970 inches minimum and 1.010 inches maximum

Coil Helix Direction Left-hand

Spring Deflection Rate 69.000 pounds per inch minimum and 84.000 pounds per inch maximum

Spring Free Outside Diameter 0.970 inches minimum and 1.010 inches maximum

Material Steel overall

Material Document AND Classification QQ-W-428, type 2 fed spec single material response overall

Surface Treatment Phosphate overall or zinc overall

Style Designator Cylindrical


*5360007372793*
Inside Diameter 1.031 inches minimum and 1.093 inches maximum

END Style E4 spring end, squared and ground both ends

Spring Free Length 7.250 inches nominal

Coil Quantity 16-1/2

Spring Solid Length 4.000 inches nominal

Spring Solid Outside Diameter 1.519 inches minimum and 1.581 inches maximum

Coil Helix Direction Right-hand

Spring Deflection Rate 147.000 pounds per inch minimum and 167.000 pounds per inch maximum

Spring Free Outside Diameter 1.519 inches minimum and 1.581 inches maximum

Material Steel overall

Material Document AND Classification QQ-W-428, type 2 fed spec single material response overall

Surface Treatment Phosphate overall

Style Designator Cylindrical
 
Last edited:

deminimis

Explorer
Thanks. Because that's how the gubment do. No guessing spring rates or trying to source parts as it's been done.
 

deminimis

Explorer
Spare tire well done. Had planned on two wells, but not enough room. So went with a single well in the middle as there was room to "spare." Still need to install a lug bolt and waiting on matching paint, but it's in and I'm pleased with the way it turned out.
upload_-1


upload_-1


upload_-1


An added bonus (beyond not blowing up when using a plasmas cutter directly above the fuel tank -yes, I put a metal shield above the tank to be extra safe), when I re-routed some wiring (so I didn't torch it with the cutter), I discovered I have a disconnect for the headache rack lights. Nice surprise. One less thing I have to do.
 

deminimis

Explorer
Seems like a good day to start tackling raising and properly mounting the flat bed. I need to fab four single spring combo mounts (in addition to the dual packs) and do some serious cutting to remove the solid mounts that are on there now.


Edit: The day got away from me early on, so I did not tackle lifting the bed as I wasn't sure I could finish it in one day (I have a lot of cutting/fitting at the rear so it won't interfere with a SuperHitch). Started fabbing up the single combo spring brackets as well as the solid mount brackets. Did a little more sealing on the camper. Made a slotted lug mount for the spare (allows it to move when placing the spare (so can line up the bolt to the lug hole) and snugs up when tightened). A crap load of issues with my welding helmet, so figured it was time for a new one (I'm burning through a pair of fresh batts everyday). Determined the camper needs new batts too (that was expected, but I was hoping not quite as soon as it turns out).
 
Last edited:

deminimis

Explorer
My Bradford Built should be called Bradford Poorlybuilt. What a piece. The frame (c channel) is bowed about 1/2" outward towards the middle and curls up at the rear approx 1/4". Neither channel runs parallel. Rather pissed at the installer that he didn't tell me this. I would have refused the flatbed. In order to mount my mounts, I'm going to have to cut off those crap frame channel and install some straight ones. No time to do that now, so that will have to wait until Summer. Ridiculous. Further setback is my box builder still hasn't started building the boxes (lined him up in Nov and advised of the time needed -Should have been done months ago). He won't even get to them for another week at the earliest, but I doubt it. So, that's that. I'll likely order my top boxes from Highway products. Takes 12 weeks, but I that's faster than never. However, I need a pair of off the shelf below deck boxes (48x24x18) right now. Does anyone know of a source that actually has them in stock? Everywhere I've checked it's about 10 days before they ship. That's too late. Thanks.

On the upside, built and mounted my bulkhead stop with camper guides. Even managed to slap some paint on it.

NHWcyhyGEnQR7tVhIK6TPY5qZydE3iIGtAh5tmVxmHI=w318-h565-no


upload_-1
 

Capt Eddie

Adventurer
Check with Buyers products. They were a lot cheaper then Highway. I am a dealer for Buyers. Message me with the specs and I will see what I can do for you. They have NEVER been more then 2 weeks on full custom built boxes.
 

deminimis

Explorer
Thanks Capt. For this trip, we could survive w/ two 48Lx18Hx24D underbody boxes. 1708310
 
Last edited:

deminimis

Explorer
Finally started building the new T6 camper base framing. Didn't get very far, but at least it's a start. Removing the old 2x4 base proved a lot more challenging than planned (a lot of hidden, inaccessible, screws that despite all my tools, required cutting by hand with a hacksaw blade and handle -poking into the narrow space I was able to wedge open near each screw). Now I need to clean out the shop so I can weld inside out of the wind. This is the top side (the side that mates with the camper), thus explaining the liberal use of a grinder (old base being used as a jig).

upload_-1


In the above pic, the front of the base is at the rear of the flatbed. I will continue to sister alumn tube along the center to the block. I will weld the three main tubes to the alumn rear bumper framing that is all tied into the camper and rear jack mounts. The cross tube at the brick is roughly where I'll go wide to accommodate the wide part of the camper. The storage area at the wide part of the camper was largely unsupported, but supports it shall have when done.
 
Last edited:

Forum statistics

Threads
185,828
Messages
2,878,632
Members
225,393
Latest member
jgrillz94
Top