Lord Al Sorna's 2014 JKUR Build Thread

Bryan_FRO

Supporting Sponsor
Skiing has been a total bust in Park City where I live, so it has lit the fire of spring 4x4 work a little early. I have added the planned OR-Fab Tire / Gerry Can carrier and am very happy with this modification, which completes the tail section. The rack is super solid, latches and swings smoothly and easily, and holds a lot of essentials.


It moves the spare up 5.5", which nets plenty of ground clearance and clearance for the raised hitch. I mounted an Adventure Trailers jerry can holder to the rack using carriage bolts, which I had from my previous rig. It has already been modified slightly to allow clearance for the spout on the bottom of my Frontrunner water jug. I LOVE this water setup, just flick the valve on the hose bib for water and Voila! On the OR-Fab rack it works great, as you can access the spout with the assembly both closed and open. I have also mounted up my High-Lift on the rack, and a full-sized D-handle shovel for "Plan B" situations. Mounting is super solid, and nothing rattles :D


The only thing I want to do to this is add an ammo can to hold extra recovery gear. I have to locate the right size can for this though, as they are somewhat rare, but there is one similar in size to a gerry can. I will keep this second slot flexible as well, so that I may add a 5 gal fuel can if needed for certain trips.

As a side note, with the extra weight on the back the Teraflex springs are riding worlds better, and the overall ride quality is very good. With the adjustable shocks I can dial in the ride for crawling slowly on rough terrain, or stiffen everything SIGNIFICANTLY for hauling it down dirt roads. The adjustments are very noticable and effective. Set on "1" I might be bottoming out hard on the larger dips / ledges at 15 - 20 mph but the ride is super supple. Set on "4/5" I can be doing the same road at 50 - 60 with total confidence, comfort, and stability. I have yet to need level "6". That could get crazy.

Nice setup! Like what you did with our Jerry Can with Tap!

-Bryan
 

Lord Al Sorna

Harebrained Scheming
Thanks guys! I put a little section of hose to act as a spout. The Frontrunner can is also great for effectively throttling your water use during activities like washing your hands or rinsing cookwear, which makes the supply last longer on the trail. And you don't have to move the can every time you use it... all good things.
 

KlausVanWinkle

Explorer
Thanks guys! I put a little section of hose to act as a spout. The Frontrunner can is also great for effectively throttling your water use during activities like washing your hands or rinsing cookwear, which makes the supply last longer on the trail. And you don't have to move the can every time you use it... all good things.

A spout is definitely the way to go. I didn't use any water out of my can over an 11 day trip because getting it out of the holder was such a pain. I added this spout to my $25 LCI water can and now I use it all the time. Best $13 I've spent on overlanding stuff.

https://www.amazon.com/dp/B00IX87W1Q/ref=cm_sw_r_awd_aF37ub0E3A4TH

ImageUploadedByTapatalk1424980044.662415.jpg
 

p nut

butter
No, my truck was my own doing. Kurt's red taco is now owned by the son of Greg Miller, of Expeditions 7.

Ah, ok. I've seen that truck around, driven by some young kid.

Apologies if I missed it, but how has the transition been going from the Tacoma to the JK? I'm waiting for the new Tacoma to come out, but I have been caught peeking at JKUR's.
 

Lord Al Sorna

Harebrained Scheming
how has the transition been going from the Tacoma to the JK?

In short, more fun. While my Tacoma was an EXCELLENT vehicle both on and off road, it was closer to a "normal" truck like my 1/2 ton daily driver. The Jeep is a lot more nimble and peppy to cruise around in, you can remove the top and doors which I absolutely love, and it rides better on and off highway. I drive the Jeep around town a lot just for the pure fun of driving it, where that wasn't the case as much with my Tacoma. There was a lot more cargo space in my Taco vs the Jeep, and it was a more planted / precise ride at higher speeds on dirt roads. The Jeep is more capable than my Taco in it's current configuration for difficult trails... You must me in UT, so lets grab a coffee sometime and I can talk to you about it until I am blue in the face :coffeedrink:
 

Lord Al Sorna

Harebrained Scheming
Well, I have been busy with the Jeep and I am falling behind on the build page so here we go...

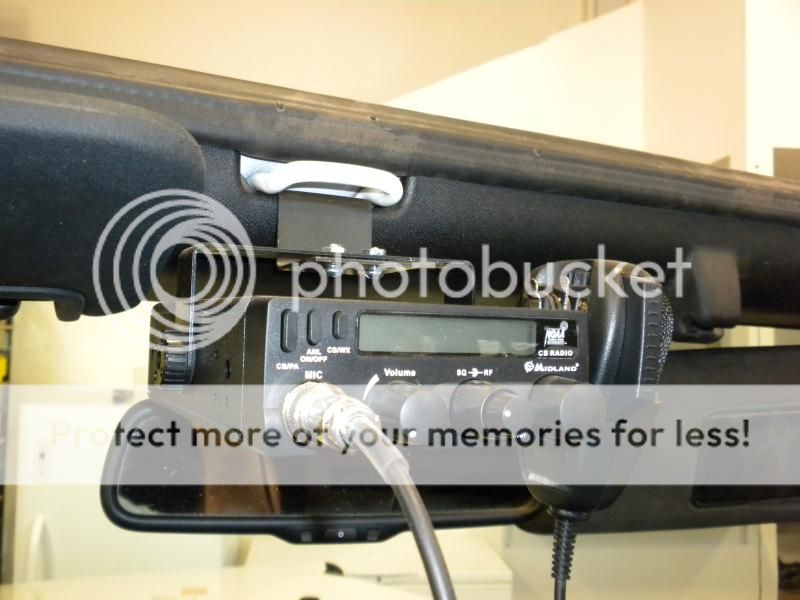
1) Installed Midland 1001 LWX CB radio. You may have noticed the 4' Firestik on the carrier that goes with it. I installed it above the rearview mirror using a very nice little bracket from Strike Force Zebra. It mounts under the footman loop, and puts the radio in a perfect position just above the mirror so as not to interfere.

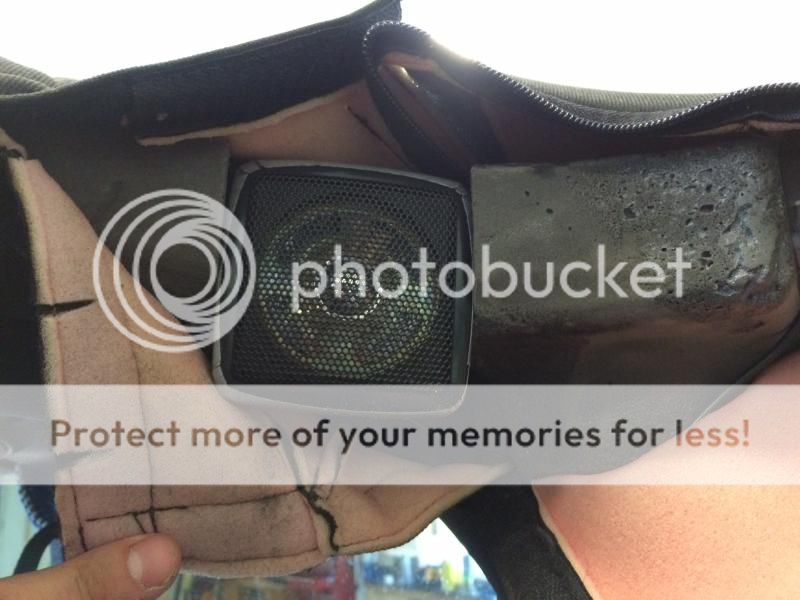
2) With the CB install, I added a 5 watt compact external speaker, and installed it in the roll bar foam / under the padding on the driver's side. I used a fein tool to cut the foam out which was very accurate and it cut like a hot knife through butter. I like this position a lot for the speaker, as it is right in my ear an easy to hear detail.

://s695.photobucket.com/user/coloram/media/IMG_0268_1.jpg.html]
IMG_0268_1.jpg
[/URL]

3) I finished installing accessory switches inside the Jeep. I determined that I needed 3 switches for the things that would be installed, and found that there is an area in the center console that has clearance for 3 carling rockers between the t-case and transmission shifters. This is what I came up with:
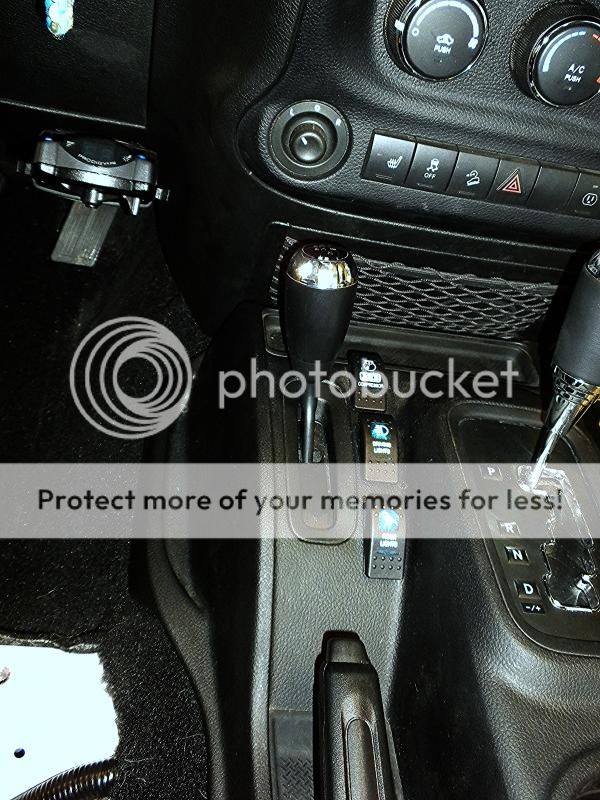

The frontmost switch is for the ARB compressor. I just added the other two, which I got to match the blue light of the ARB switch from ottratw.com. One is "Driving Lights" for my future off-road lights, and one is "Rock Lights" for a set of LED undercarriage and LED rear-Facing floods I have ready to go. More on that to come... There is a channel between the two shifters deep enough to accomodate the switch bodies and wiring, and then it is easy to run wire through the front of the console and through the dash.

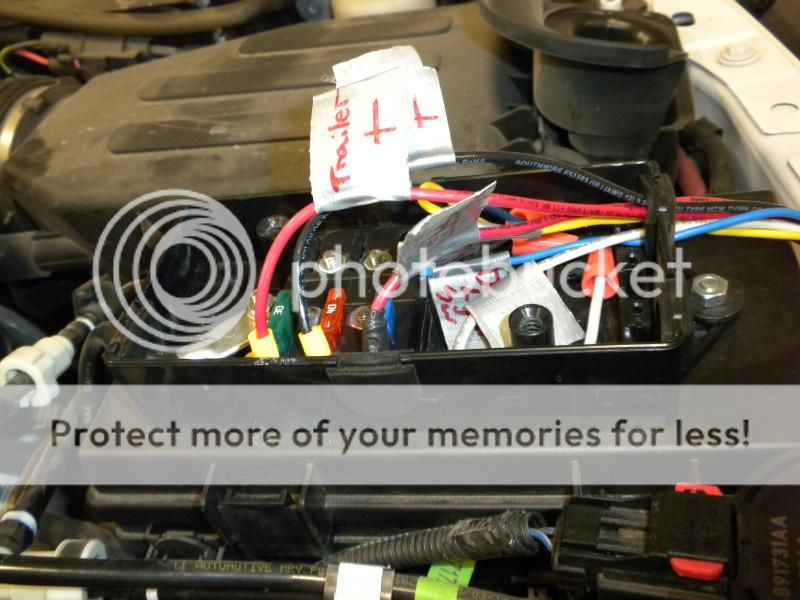
I wired everything to my own DIY "S-POD". I found a nice sealed plastic housing at my local auto parts store, which I piggybacked to the lid of the factory fuse box. I then added a 6-way fuse block from NAPA, and will have room for the lighting relays to all tuck into a nice tight package. I left enough wire for the factory fuse lid to swing open easily.

4) In one of the above photos, you can also see a Tekonisha P2 trailer brake controller, which I also just finished the install on. I fabricated my own off-road trailer last year, and saw numerous advantages to having trailer brakes in that setup. (Added braking in the mountains, added braking on steep descents, ability to drag trailer brakes and straighten vehicle/trailer, etc.) I installed them on the axle assembly for my trailer and now have the right component and wiring to actuate them properly. I will be in the process of doing a build page for my little trailer as well, but haven't made it that far yet. You can see it in a photo on the first page...

5) The last thing I am currently wrapping up is a full sound-insulation treatment to the floor and doors. When I did this exact process in my Tacoma, it made a HUGE difference in NVH levels and overall comfort inside the vehicle... and I do mean HUGE. I initially performed the modification to cut down the tire noise, but discovered a very interesting by-product of doing this: it felt like I had upgraded the suspension on dirt roads! On washboard / rough roads the resonating sound in the body was reduced, and it made things seem "smoother" just because of the decrease in sound. From then on I swore I would do this to every off-road rig I had henceforth, and here we are.

SO the procedure... The two products are Peel and Seal aluminum sealant tape from Lowes, followed by a layer of 1/8" Frost King duct insulation from Home Depot. There is a lot of internet chatter about using this method, but in my own experience it works VERY well, does not smell at all, and adhesion remains very good for years if installed properly. It is loads less expensive than using the brand name sound dampener products like Dynamat.

After stripping everything down to bare floor, I install 1-2 layers of the Peel and Seal. This is a pressure adhesive, so I use the back of a plastic screwdriver handle and rub it down with some elbow grease into EVERY NOOK AND CRANNY to get it to stick down properly. This layer will only do it's job if it is adhered to the metal 100%. We are adding mass to the sheet metal, which in-turn lowers the resonating frequency down. The lower the resonating frequency, the quieter your vehicle will be. Also, the foil facing of the Peel and Seal acts like a second layer of sheet metal. Sound "echoes" off the foil and the floor metal, and gets stuck in the butyl rubber layer where it is reduced.
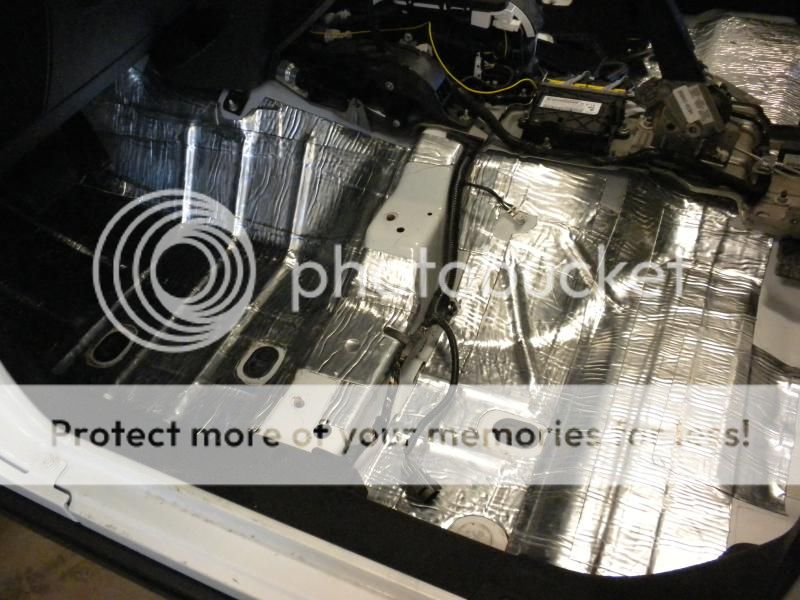

Then, I add a layer of the duct insulation product using 3M high strength spray adhesive. This layer is just for more sound absorbtion and isolation, so the adhesion is not quite as critical. I do roll every piece out with a small wallpaper seam roller to make sure it is adhered well.
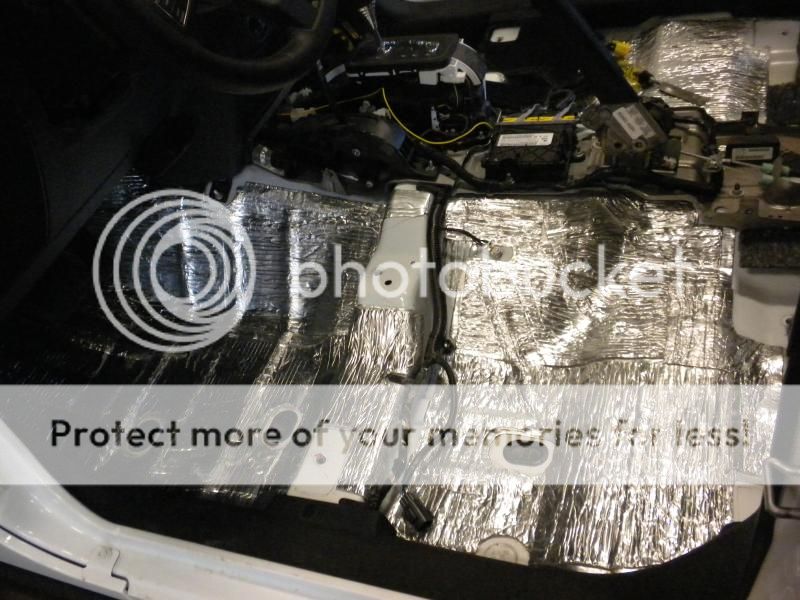

I cut around all the drain holes and any other penetrations / hardware so as not to impact any service work in the future. I will do everything that is covered by carpet this way. For the doors, my options were very limited for installing the Peel and Seal, but I put a few pieces on the interior plastic panel that did not interfere with any of the components on the door. What worked great, however, was bonding a layer of the duct insulation to the inside of the plastic panel with spray adhesive. This ended up working perfect, with zero interference to the way the piece fit back on the door.
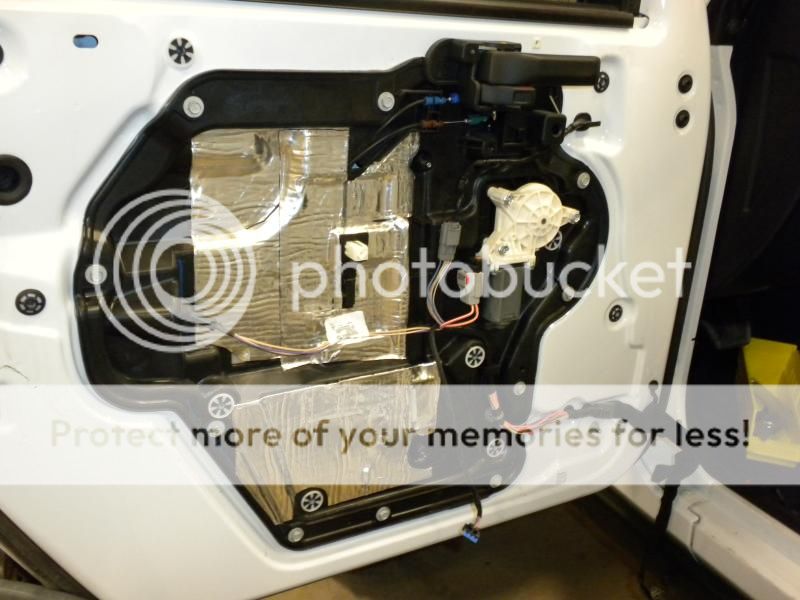
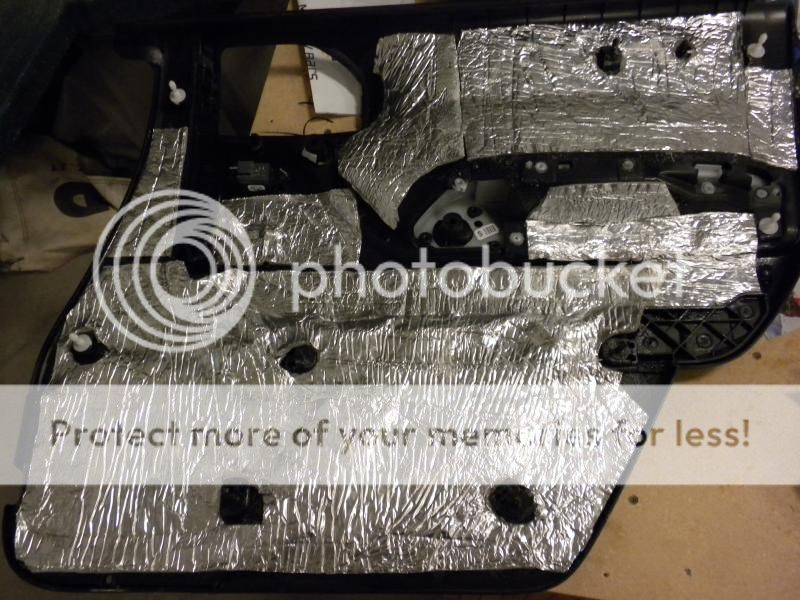

Still working on the sound damening procedure, but i will post an update when I take it on a test-drive after. I am not expecting it to be quite as stark a difference with the soft top, but I still feel strongly that this will help in many ways with interior comfort.
 

usafstud

New member
Well, I have been busy with the Jeep and I am falling behind on the build page so here we go...

1) Installed Midland 1001 LWX CB radio. You may have noticed the 4' Firestik on the carrier that goes with it. I installed it above the rearview mirror using a very nice little bracket from Strike Force Zebra. It mounts under the footman loop, and puts the radio in a perfect position just above the mirror so as not to interfere.


2) With the CB install, I added a 5 watt compact external speaker, and installed it in the roll bar foam / under the padding on the driver's side. I used a fein tool to cut the foam out which was very accurate and it cut like a hot knife through butter. I like this position a lot for the speaker, as it is right in my ear an easy to hear detail.

://s695.photobucket.com/user/coloram/media/IMG_0268_1.jpg.html]
IMG_0268_1.jpg
[/URL]

3) I finished installing accessory switches inside the Jeep. I determined that I needed 3 switches for the things that would be installed, and found that there is an area in the center console that has clearance for 3 carling rockers between the t-case and transmission shifters. This is what I came up with:


The frontmost switch is for the ARB compressor. I just added the other two, which I got to match the blue light of the ARB switch from ottratw.com. One is "Driving Lights" for my future off-road lights, and one is "Rock Lights" for a set of LED undercarriage and LED rear-Facing floods I have ready to go. More on that to come... There is a channel between the two shifters deep enough to accomodate the switch bodies and wiring, and then it is easy to run wire through the front of the console and through the dash.

I wired everything to my own DIY "S-POD". I found a nice sealed plastic housing at my local auto parts store, which I piggybacked to the lid of the factory fuse box. I then added a 6-way fuse block from NAPA, and will have room for the lighting relays to all tuck into a nice tight package. I left enough wire for the factory fuse lid to swing open easily.


4) In one of the above photos, you can also see a Tekonisha P2 trailer brake controller, which I also just finished the install on. I fabricated my own off-road trailer last year, and saw numerous advantages to having trailer brakes in that setup. (Added braking in the mountains, added braking on steep descents, ability to drag trailer brakes and straighten vehicle/trailer, etc.) I installed them on the axle assembly for my trailer and now have the right component and wiring to actuate them properly. I will be in the process of doing a build page for my little trailer as well, but haven't made it that far yet. You can see it in a photo on the first page...

5) The last thing I am currently wrapping up is a full sound-insulation treatment to the floor and doors. When I did this exact process in my Tacoma, it made a HUGE difference in NVH levels and overall comfort inside the vehicle... and I do mean HUGE. I initially performed the modification to cut down the tire noise, but discovered a very interesting by-product of doing this: it felt like I had upgraded the suspension on dirt roads! On washboard / rough roads the resonating sound in the body was reduced, and it made things seem "smoother" just because of the decrease in sound. From then on I swore I would do this to every off-road rig I had henceforth, and here we are.

SO the procedure... The two products are Peel and Seal aluminum sealant tape from Lowes, followed by a layer of 1/8" Frost King duct insulation from Home Depot. There is a lot of internet chatter about using this method, but in my own experience it works VERY well, does not smell at all, and adhesion remains very good for years if installed properly. It is loads less expensive than using the brand name sound dampener products like Dynamat.

After stripping everything down to bare floor, I install 1-2 layers of the Peel and Seal. This is a pressure adhesive, so I use the back of a plastic screwdriver handle and rub it down with some elbow grease into EVERY NOOK AND CRANNY to get it to stick down properly. This layer will only do it's job if it is adhered to the metal 100%. We are adding mass to the sheet metal, which in-turn lowers the resonating frequency down. The lower the resonating frequency, the quieter your vehicle will be. Also, the foil facing of the Peel and Seal acts like a second layer of sheet metal. Sound "echoes" off the foil and the floor metal, and gets stuck in the butyl rubber layer where it is reduced.


Then, I add a layer of the duct insulation product using 3M high strength spray adhesive. This layer is just for more sound absorbtion and isolation, so the adhesion is not quite as critical. I do roll every piece out with a small wallpaper seam roller to make sure it is adhered well.


I cut around all the drain holes and any other penetrations / hardware so as not to impact any service work in the future. I will do everything that is covered by carpet this way. For the doors, my options were very limited for installing the Peel and Seal, but I put a few pieces on the interior plastic panel that did not interfere with any of the components on the door. What worked great, however, was bonding a layer of the duct insulation to the inside of the plastic panel with spray adhesive. This ended up working perfect, with zero interference to the way the piece fit back on the door.


Still working on the sound damening procedure, but i will post an update when I take it on a test-drive after. I am not expecting it to be quite as stark a difference with the soft top, but I still feel strongly that this will help in many ways with interior comfort.

How much in material did you spend for the insulation?
 

Lord Al Sorna

Harebrained Scheming
How much in material did you spend for the insulation?
By the time I am done, it will be 6 rolls Peel & Seal:
http://www.lowes.com/pd_154017-8132...arch=peel+&+seal&productId=1018733&rpp=32

3 Rolls Frost King:
http://www.homedepot.com/p/Frost-Ki...ick-Foam-Foil-Duct-Insulation-FV516/100028603

2 Cans 3M Spray Adhesive:
http://www.homedepot.com/p/3M-17-6-oz-Hi-Strength-90-Spray-Adhesive-90-24/100151277

$162 total

Nice progress! Why the CB instead of a HAM?
Thanks mate. A CB is a pretty universal requirement for group 4x4 runs, and that is really the only reason I have it. I do really like the NOAA weather bands, which the Midland has. None of my friends are HAM's, so I really wouldn't have anybody to talk to if I installed one. For emergency comms I carry a DeLorme InReach messenger/PLB which I really like a lot. With that I can take it in the Jeep, in the backcountry on ski tours, hiking, and traveling in foreign countries as it isn't much bigger than a cell phone and covers all of those bases.
 

KlausVanWinkle

Explorer
Gotcha. Sounds like you need a more serious crew to roll with ;)

I'm eyeing an inreach or Spot myself. And I mights steal your peel and seal technique for the sound bar. Keep the mods coming.
 

Lord Al Sorna

Harebrained Scheming
UPDATES!
Finished the sound deadener, and like I suspected it did quiet down tire howl and the sound effects of a passing semi, but the overall difference was not as stark as if I had a solid roof. Definitely glad I did it though, as it is a noticeable boost in interior comfort and the radio is easier to listen to. The one side effect is it actually makes the sound of the soft top more noticeable because everything else is more quiet... :ylsmoke:

I have added a rock light circuit that included two nice LED lights from Amazon that are rear-facing, as well as 6 single leds mounted in the bumper / on the back side of the front crash bar.
http://www.amazon.com/gp/product/B00G8R69RC/ref=oh_aui_detailpage_o06_s01?ie=UTF8&psc=1
http://www.amazon.com/gp/product/B00LC06RWM/ref=oh_aui_detailpage_o06_s01?ie=UTF8&psc=1

The pair of Nilights are super sturdy, and BRIGHT! I have them fitted to the top bar on my rear cargo rack, just outside the spare. This gives me a huge amount of light behind the rig for things like night runs, backing at night, camp activities, and keeping an eye on my trailer to make sure it is behaving itself.


The Eagle-Eyes are tucked under the ARB in some very well protected spots. There are 6 total, third mounting position is barely shown in photo in the back of the u-shaped crash bar (bottom right) and splashes light under the truck. The one on the sides of the bumper give me a perfect angle to illuminate what is directly in front of the front tires, and chances are very slim anything can reach up to grab one of these (and if something does I have extras).


The results are good usable light around the perimeter and underside of the rig. The photos don't show it, but there is plenty of light that cascades toward the rear axle and underside from this combo, so I do not feel the need to add anything back there. Love the results, and the lights were very inexpensive!


Lord Al Sorna

Harebrained Scheming
In other news,
I found and decided to go with a Rampage Trail Can/Storage box that is super stealth, and an easy solution to get me that extra storage space on the rear for recovery gear. I want to fab up a mount that supports the can over the full width of the base for this, as the off-center mount puts a lot of stress on the lid and hinge. Currently stashed battery cables, two tow straps, a tree saver, and extra shackles in there with room to spare, and I love that at first glance it looks like a water jug (I painted it).


Last small addition is a set of safari mirrors from Rugged Ridge for doorless cruising. I am taking the Jeep down to AZ in about a week, and have every intention of stripping her down in the nice weather! These seem like a nice solution. You leave the brackets on 24/7 and the mirror arms screw on easily with a thumb screw. The bracket has a nice foam backer to protect the paint underneath.


Forum statistics

Threads
185,839
Messages
2,878,740
Members
225,393
Latest member
jgrillz94
Top