You are using an out of date browser. It may not display this or other websites correctly.
You should upgrade or use an alternative browser.
You should upgrade or use an alternative browser.
AND YET AGAIN: Paul and Mike Try to Build a Hard-Sided Do-It-All ADV Trailer
- Thread starter mhiscox
- Start date

Of Requirements and Men
Pardon a few questions from an ole' requirements engineer:
(a) So what do you want to pull it with? Your Sprinter? A Pickup? A Pinto? If it is your Sprinter, which already does a lot, just have the trailer cover what the Sprinter doesn't. Paul could whip up a rather awesome matching trailer (plus have him refresh your second sleeping position with matching upholstery") ...).
...).
(b) Why not just get a cheesy little fold-up HFT trailer for picking up stuff at the big box stores (maybe even the motorcycles) and eliminate that requirements (KISS) - reduce that 10 pounds of stuff in a 5 pound bag problem.
(c) What is the ranking/priority of your wish list? Would you sacrifice cooking for the ability to stand up inside? You could build a real bloat-mobile if you're not careful....
(d) How about one of those fancy RTTs that sleeps 4 with the enclosed stand-up rooms (and a screened porch) vs your hard-side requirement? You could install a off-the-shelf cargo rack and mount it above the RTT for the Kayaks/"Fun Stuff" and have it swing away (when unloaded) for the RTT deployment. Or if it is just a Thule-ish rack just have it mounted to the top of a hardside, clamshell RTT and let the empty rack flip down.
(e) How soon do you want to be enjoying your trailer?
(f) How much $$$ do you want to blow in your budget?
(g) A few people on this site did a linear actuator driven lift for the RTT platform to raise it's height. With some pop-up canvas sides under the RTT platform lift you could get some extra dry-space depending on the deployed platform height (governed by the RTT deployment height requirements).
(h) Have comfortable inside places to sit during bad weather - If it's a rainy day sit in the towing vehicle. The Sprinter looks pretty comfy to me (KISS)
.... just some thoughts and questions, take em' or leave em' or ignore 'em ...
Pardon a few questions from an ole' requirements engineer:
(a) So what do you want to pull it with? Your Sprinter? A Pickup? A Pinto? If it is your Sprinter, which already does a lot, just have the trailer cover what the Sprinter doesn't. Paul could whip up a rather awesome matching trailer (plus have him refresh your second sleeping position with matching upholstery
...).(b) Why not just get a cheesy little fold-up HFT trailer for picking up stuff at the big box stores (maybe even the motorcycles) and eliminate that requirements (KISS) - reduce that 10 pounds of stuff in a 5 pound bag problem.
(c) What is the ranking/priority of your wish list? Would you sacrifice cooking for the ability to stand up inside? You could build a real bloat-mobile if you're not careful....
(d) How about one of those fancy RTTs that sleeps 4 with the enclosed stand-up rooms (and a screened porch) vs your hard-side requirement? You could install a off-the-shelf cargo rack and mount it above the RTT for the Kayaks/"Fun Stuff" and have it swing away (when unloaded) for the RTT deployment. Or if it is just a Thule-ish rack just have it mounted to the top of a hardside, clamshell RTT and let the empty rack flip down.
(e) How soon do you want to be enjoying your trailer?
(f) How much $$$ do you want to blow in your budget?
(g) A few people on this site did a linear actuator driven lift for the RTT platform to raise it's height. With some pop-up canvas sides under the RTT platform lift you could get some extra dry-space depending on the deployed platform height (governed by the RTT deployment height requirements).
(h) Have comfortable inside places to sit during bad weather - If it's a rainy day sit in the towing vehicle. The Sprinter looks pretty comfy to me (KISS)
.... just some thoughts and questions, take em' or leave em' or ignore 'em ...
I like it. There is a great build with a fiberglass mini truck Utility body on Expo.
Only problem is that he specified hard-side living area vs. RTT. I think what you pictured is what is do-able - an extra room for the Sprinter.
PaulJensen
Custom Builder
Getting ready...
I just want to step in here to say, I'm stoked to be working with Mike again, the trailer is awesome, and I need to finish a couple other projects before I start this build...
My first thing to do is make a 1/3 scale model of the trailer from knife cutable plywood and a hot glue gun... It's how I do it... I'm old school that way... When the trailer model is built, the next thing to do is design the rack to support the roof top tent and the moveable walls, and doors, per plan... I need to see how everything will fold together with my eyes and not on a computer screen...
I'm new to this kind of build and so far the questions you are all asking are supplementing the design considerations Mike has already put on the table...
I think what Mike expects is reasonable considering his given parameters of budget and time... There is no rush, and he has tons of stuff to fill the build out already... His budget is fairly tight, but that hasn't stopped us in the past from achieving his goals... It's definitely not something either of us stress about...
Mike and I have a great time working together on projects like the Jeep, and the Lexus, and the Sprinter, and now this... During the build process, we talk on the phone every day... Usually me telling him what I've already done, and to let him know it's not too late to change things... Most of the time we just push forward until it just seems "done"... Then we add more "essentials"... So far, the results speak for themselves, and ultimately what I'm doing is building Mike's dreams on time and on budget...
BTW: The comment about ten pounds of stuff in a five pound bag is hilarious...!!!... I never thought of it that way and I either need to learn to say "no" more often or just keep on meeting expectations...
Keep the questions and suggestions coming, I'm really looking forward to seeing where this thing goes...!!!...
More later...
762X39
Explorer
It's funny that you are starting this project now. I was thinking about the utility body you had stashed and wondered if you were going build something out of it or not. I'm looking forward to Paul's magic touch with it. I don't remember there being a trailer under the body, what are you using for the trailer frame, axle and wheels?
Duh, I just reread the first post and answered my own question about the trailer...
Still looking forward to the build
Duh, I just reread the first post and answered my own question about the trailer...
Still looking forward to the build
Last edited:
PaulJensen
Custom Builder
01
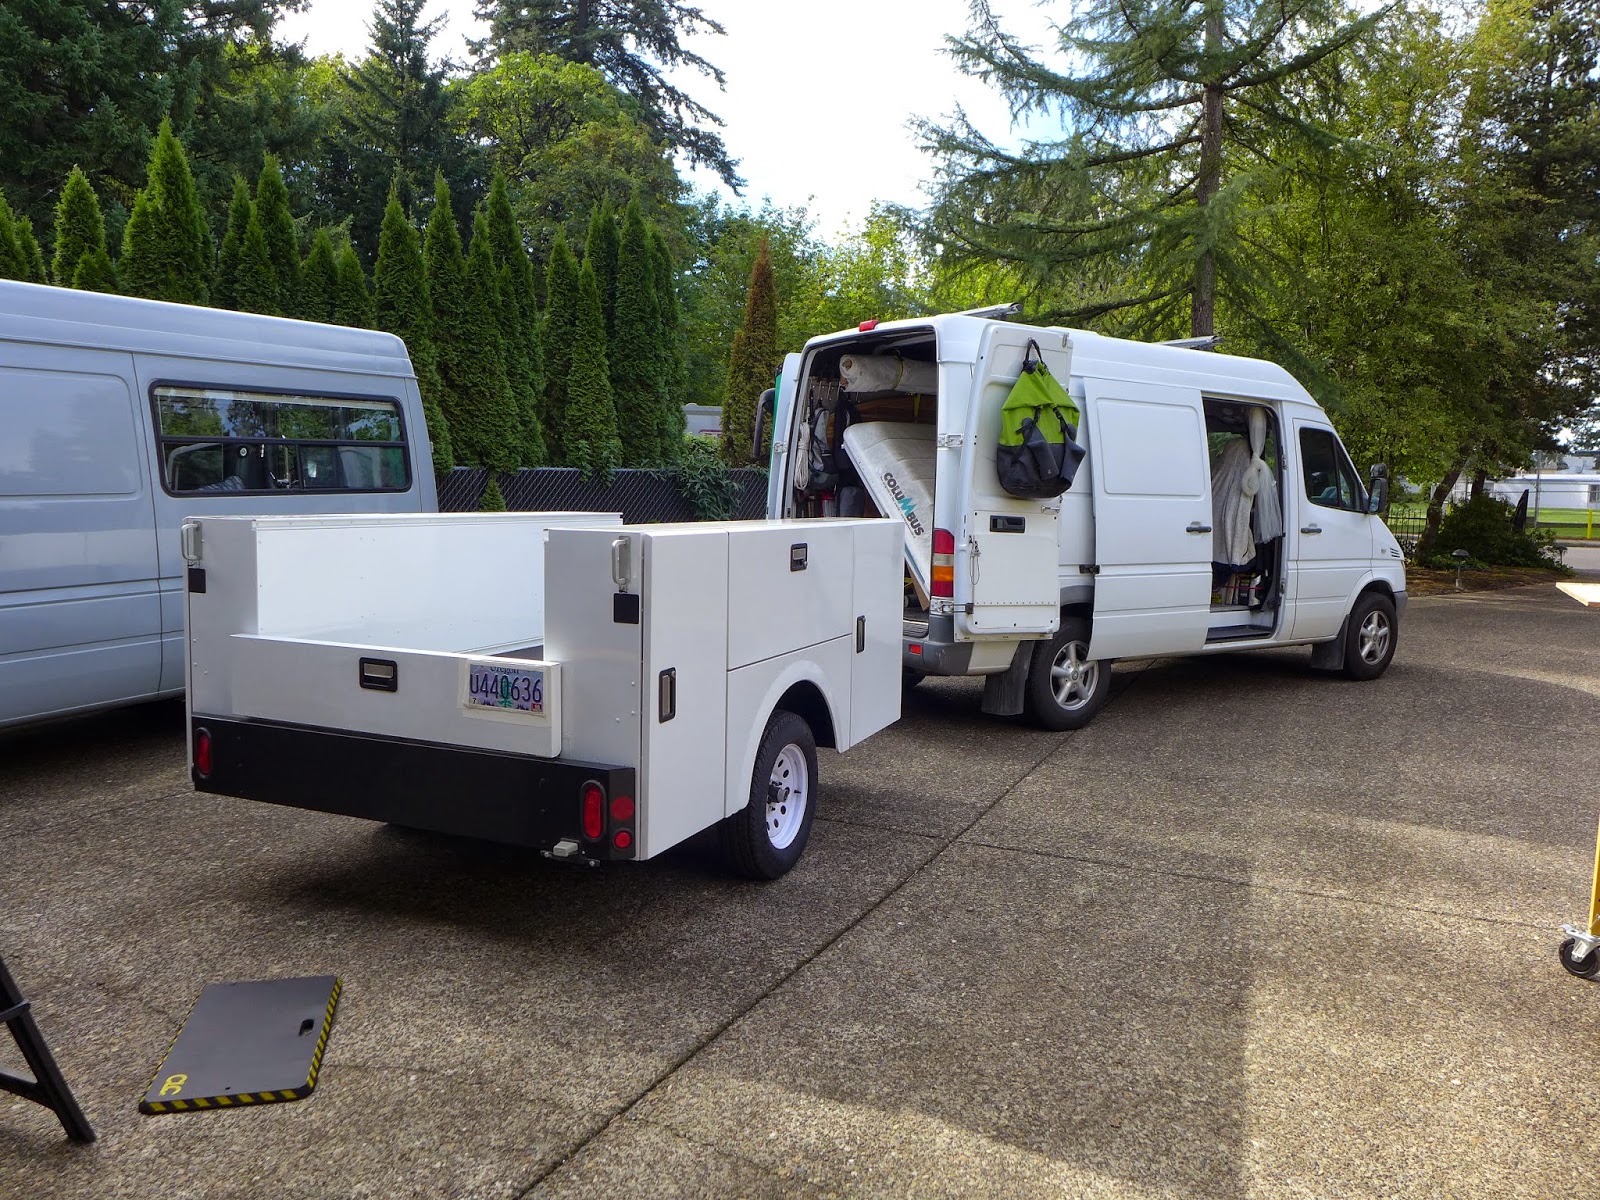
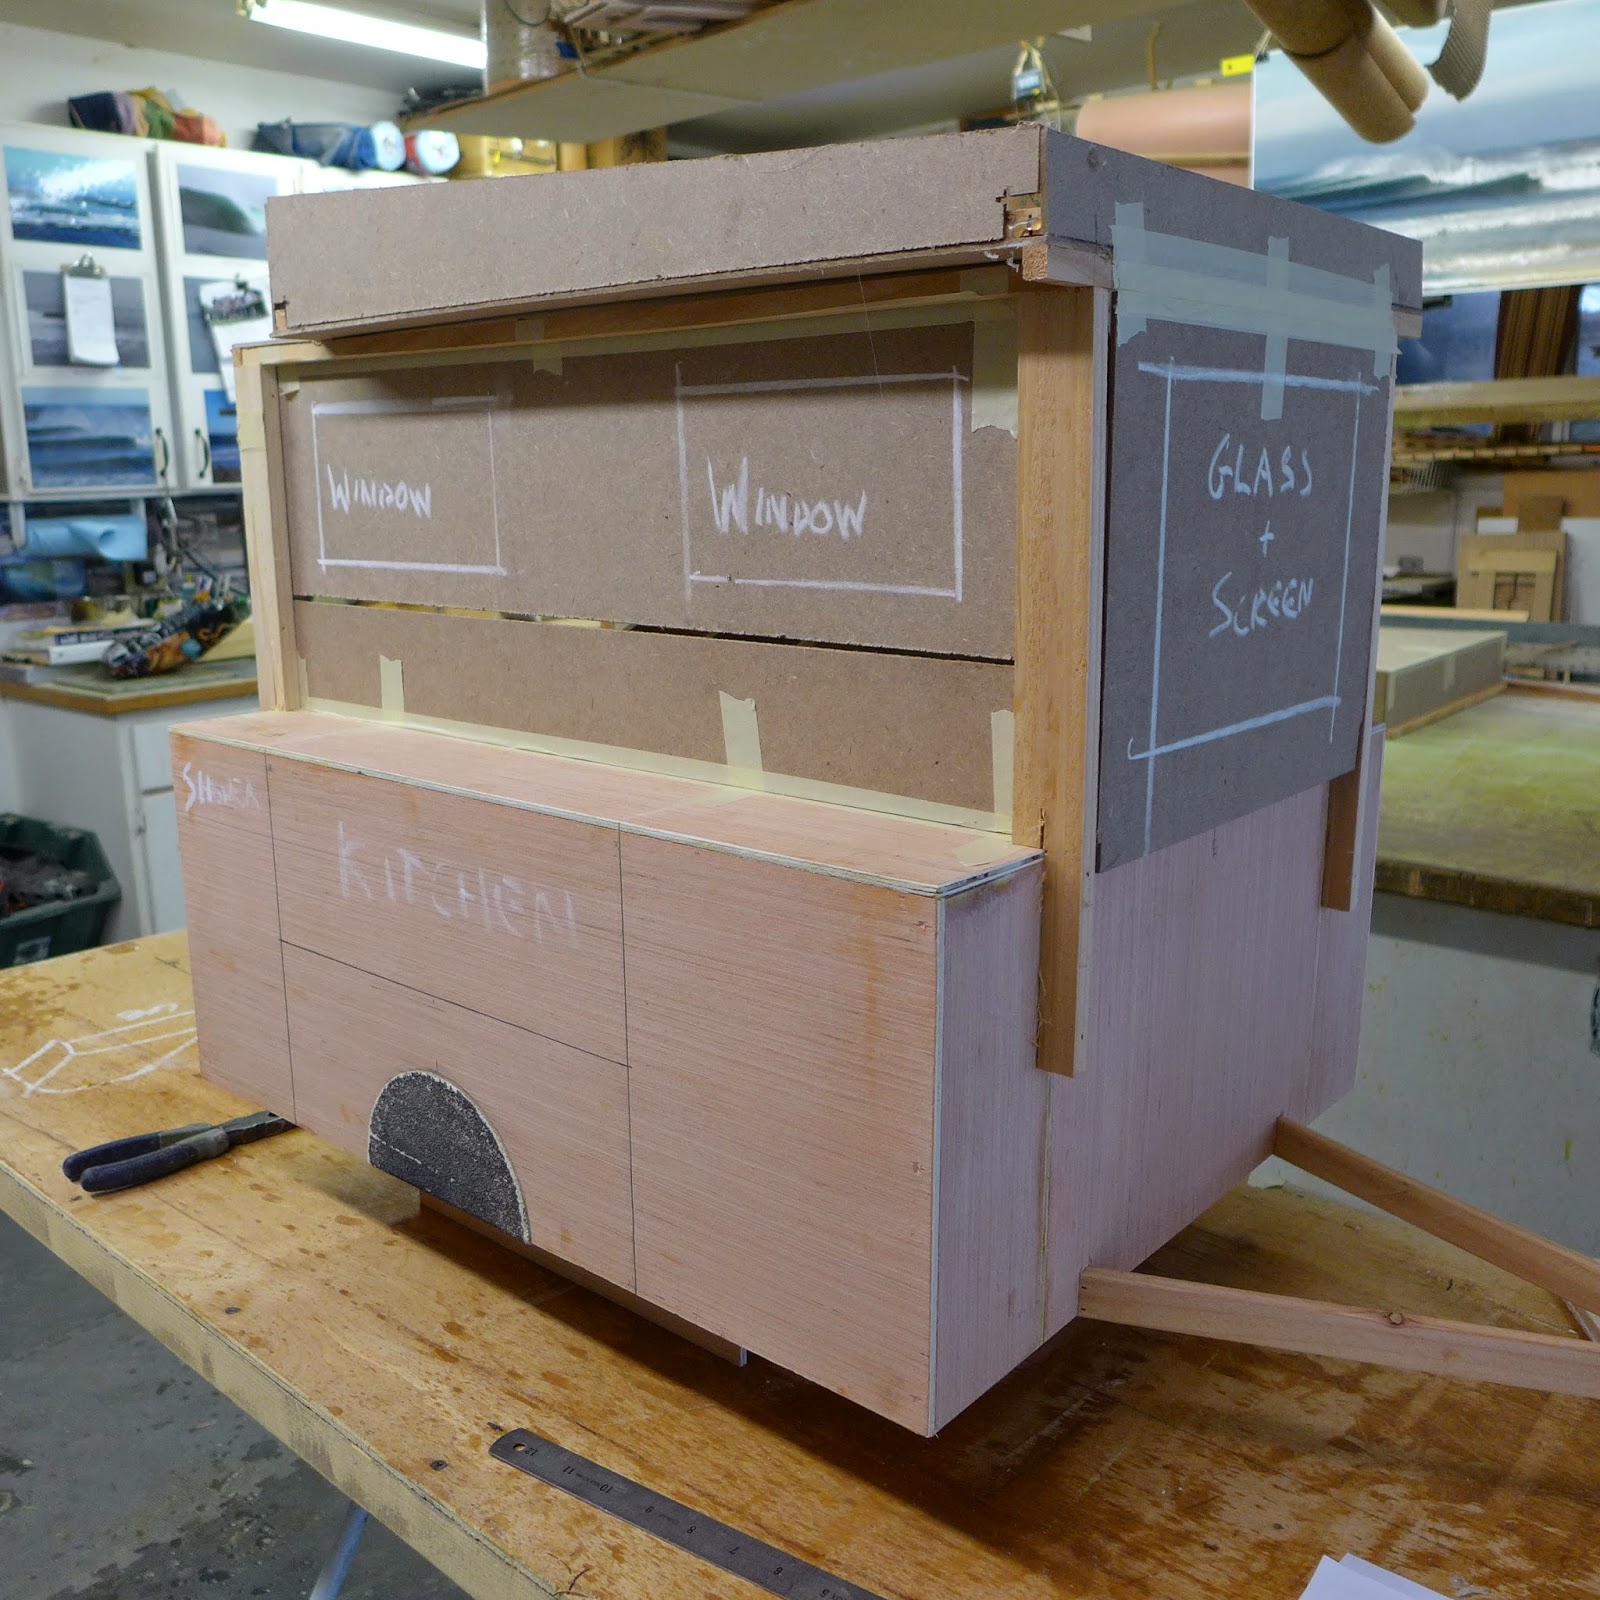
(above) At Mike's a few weeks ago, the trailer was hooked up and the sleeping pod was wrestled into my van...
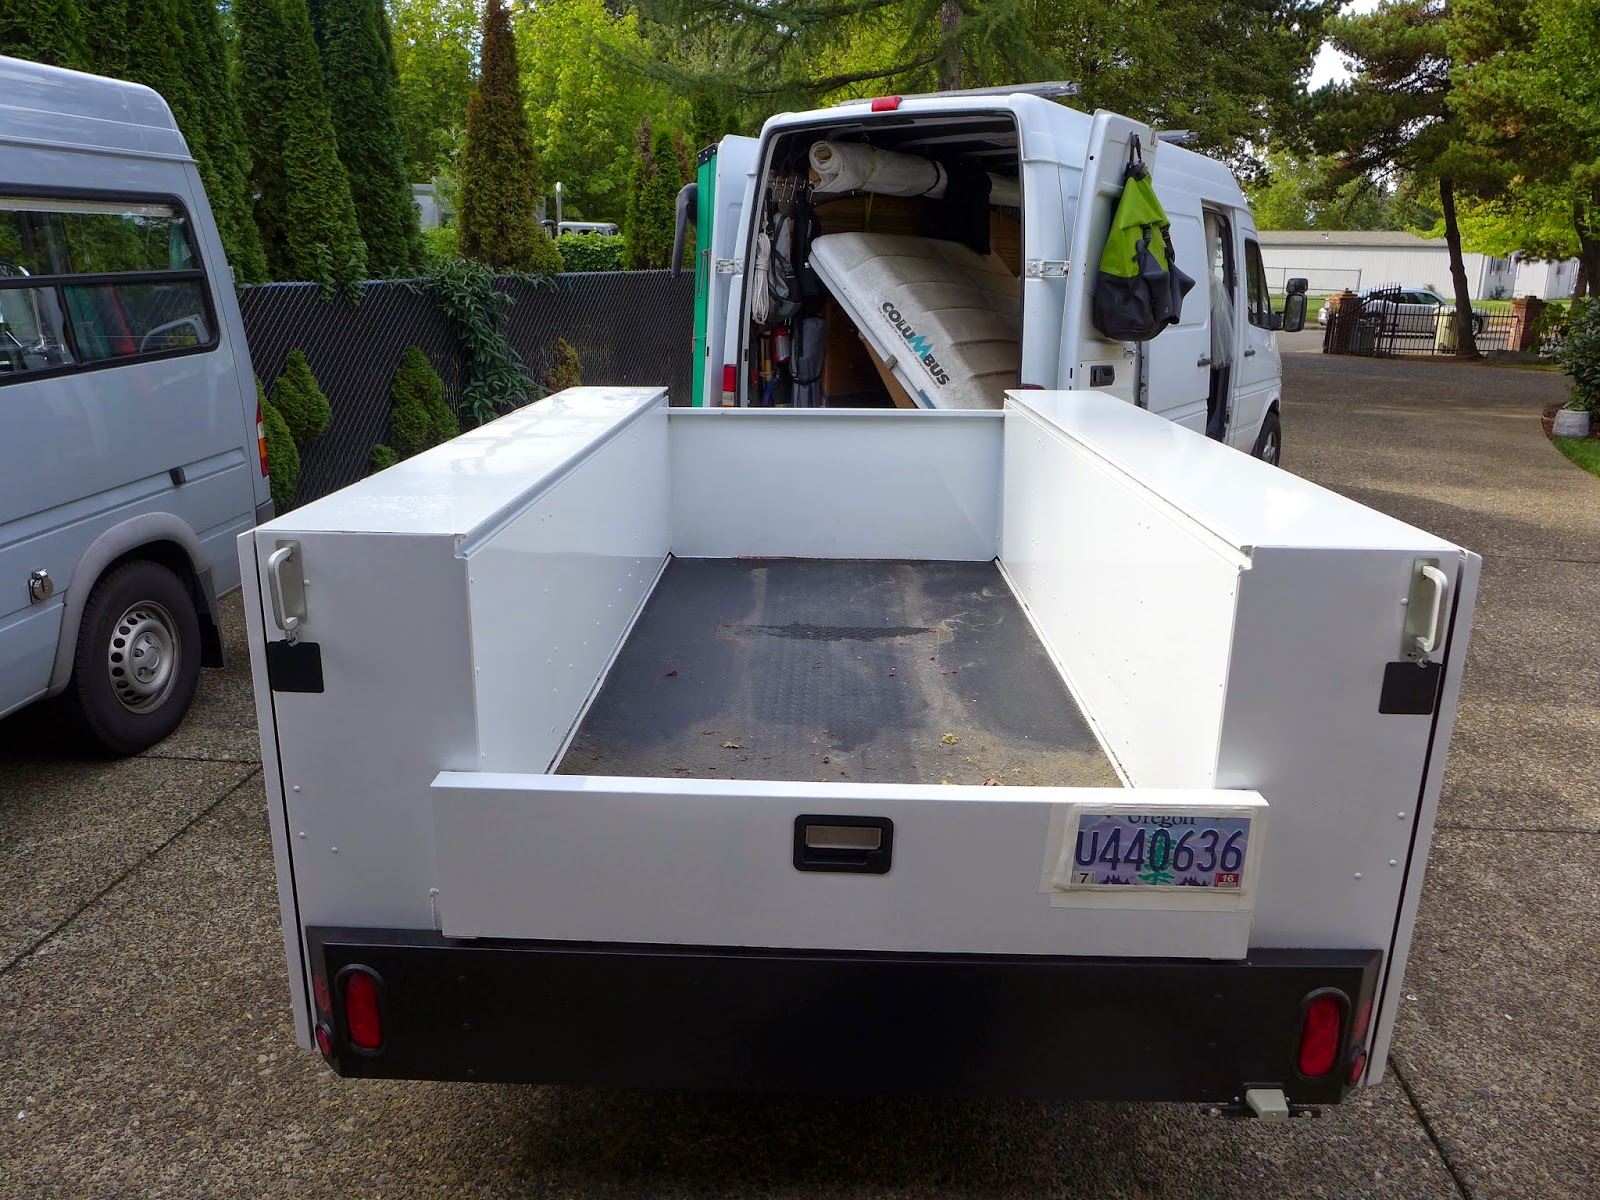
(above) The Challenger TR Service Body Trailer...http://arrowheadtruckequipment.com/Brochures/IWvOY-CEPCO-EGtfL-Service_Body_Trailer_02.10_-_Sm.pdf ...Payload up to 1,900 lbs... 48.5" bed width... 98" overall body length...
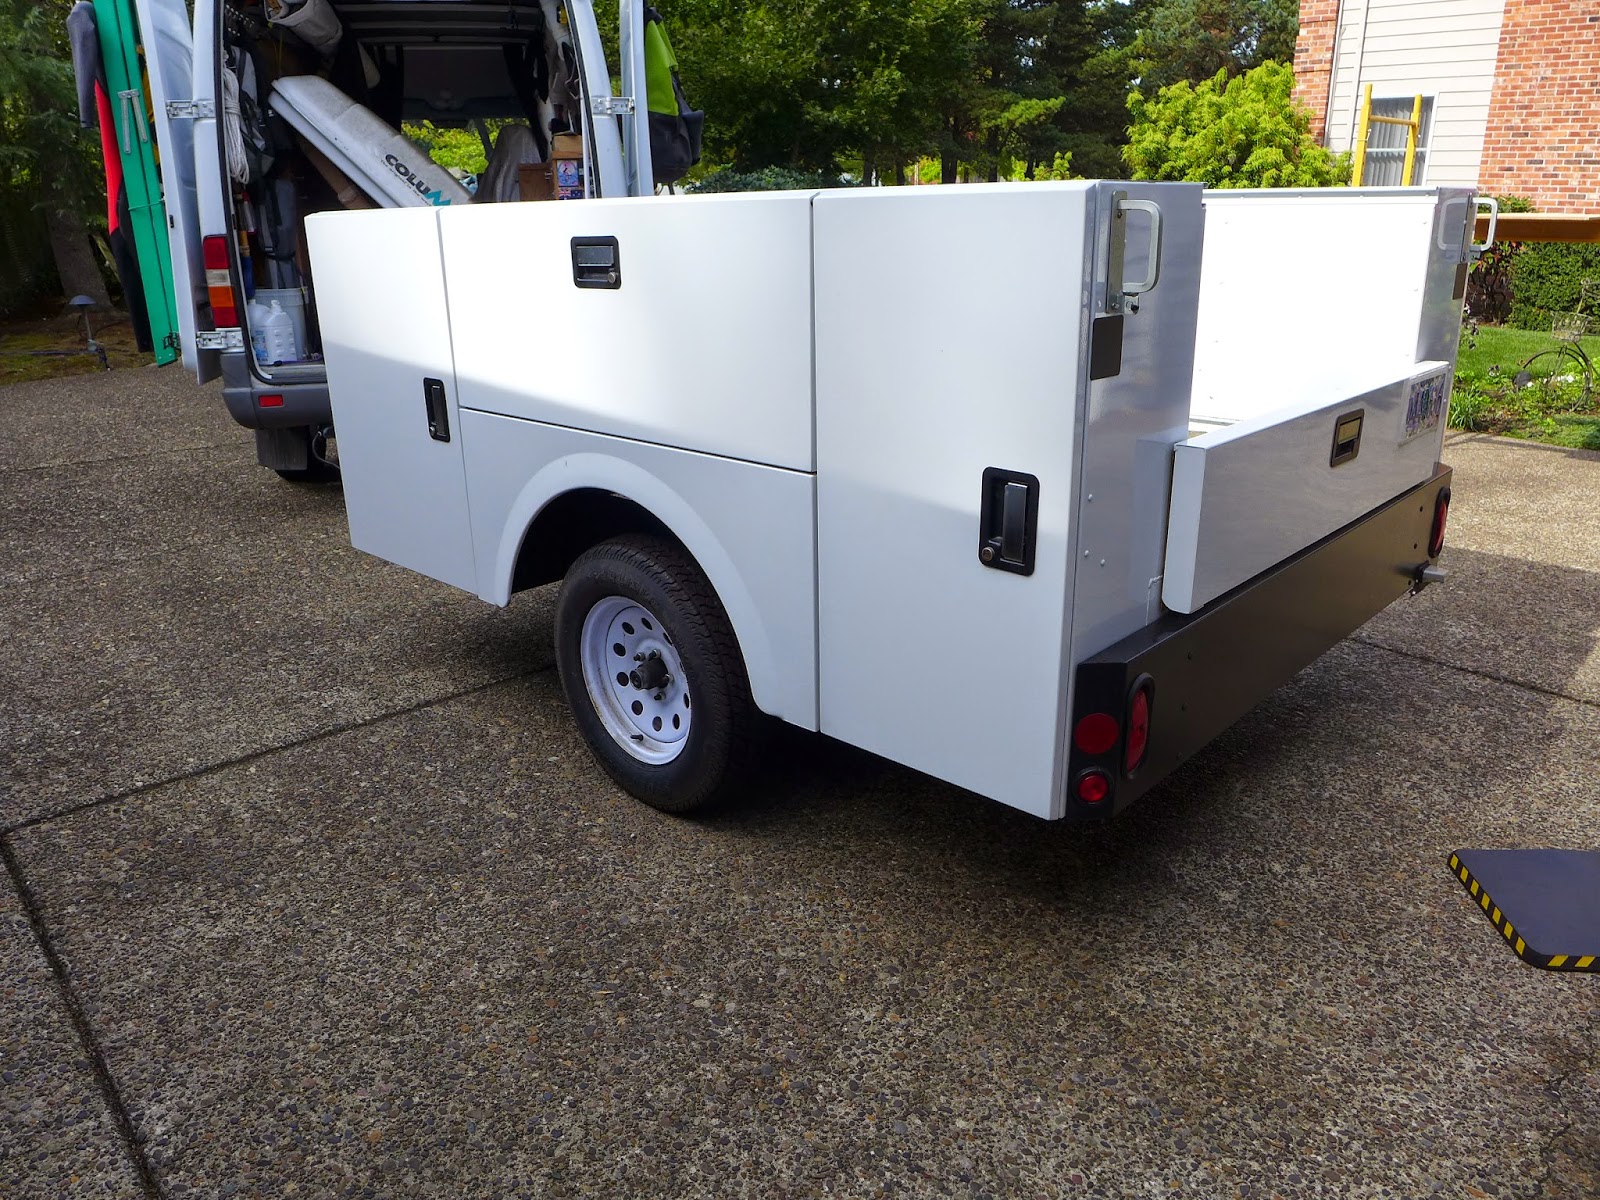
(above) Keyed alike locks... Concealed door hinges... The six compartments provide 44 cu. ft. of storage space...
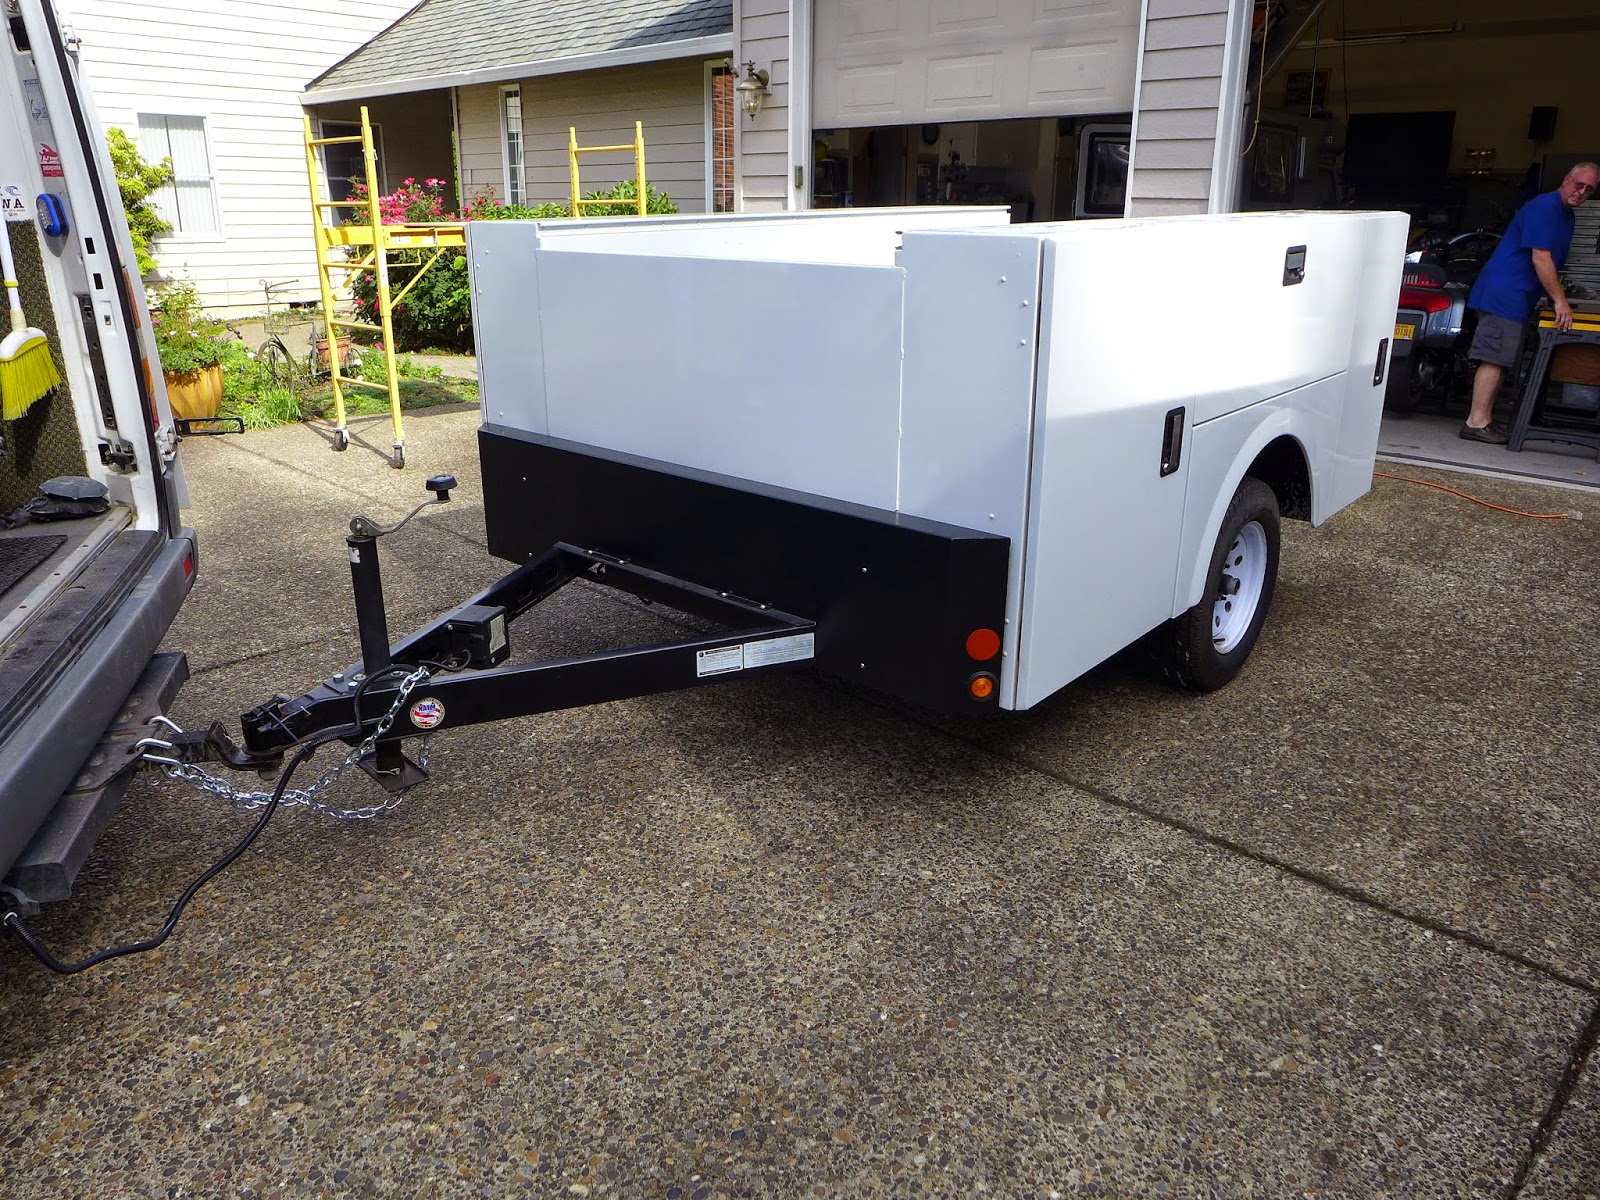
(above) Powder coater Galvanneal Steel construction...
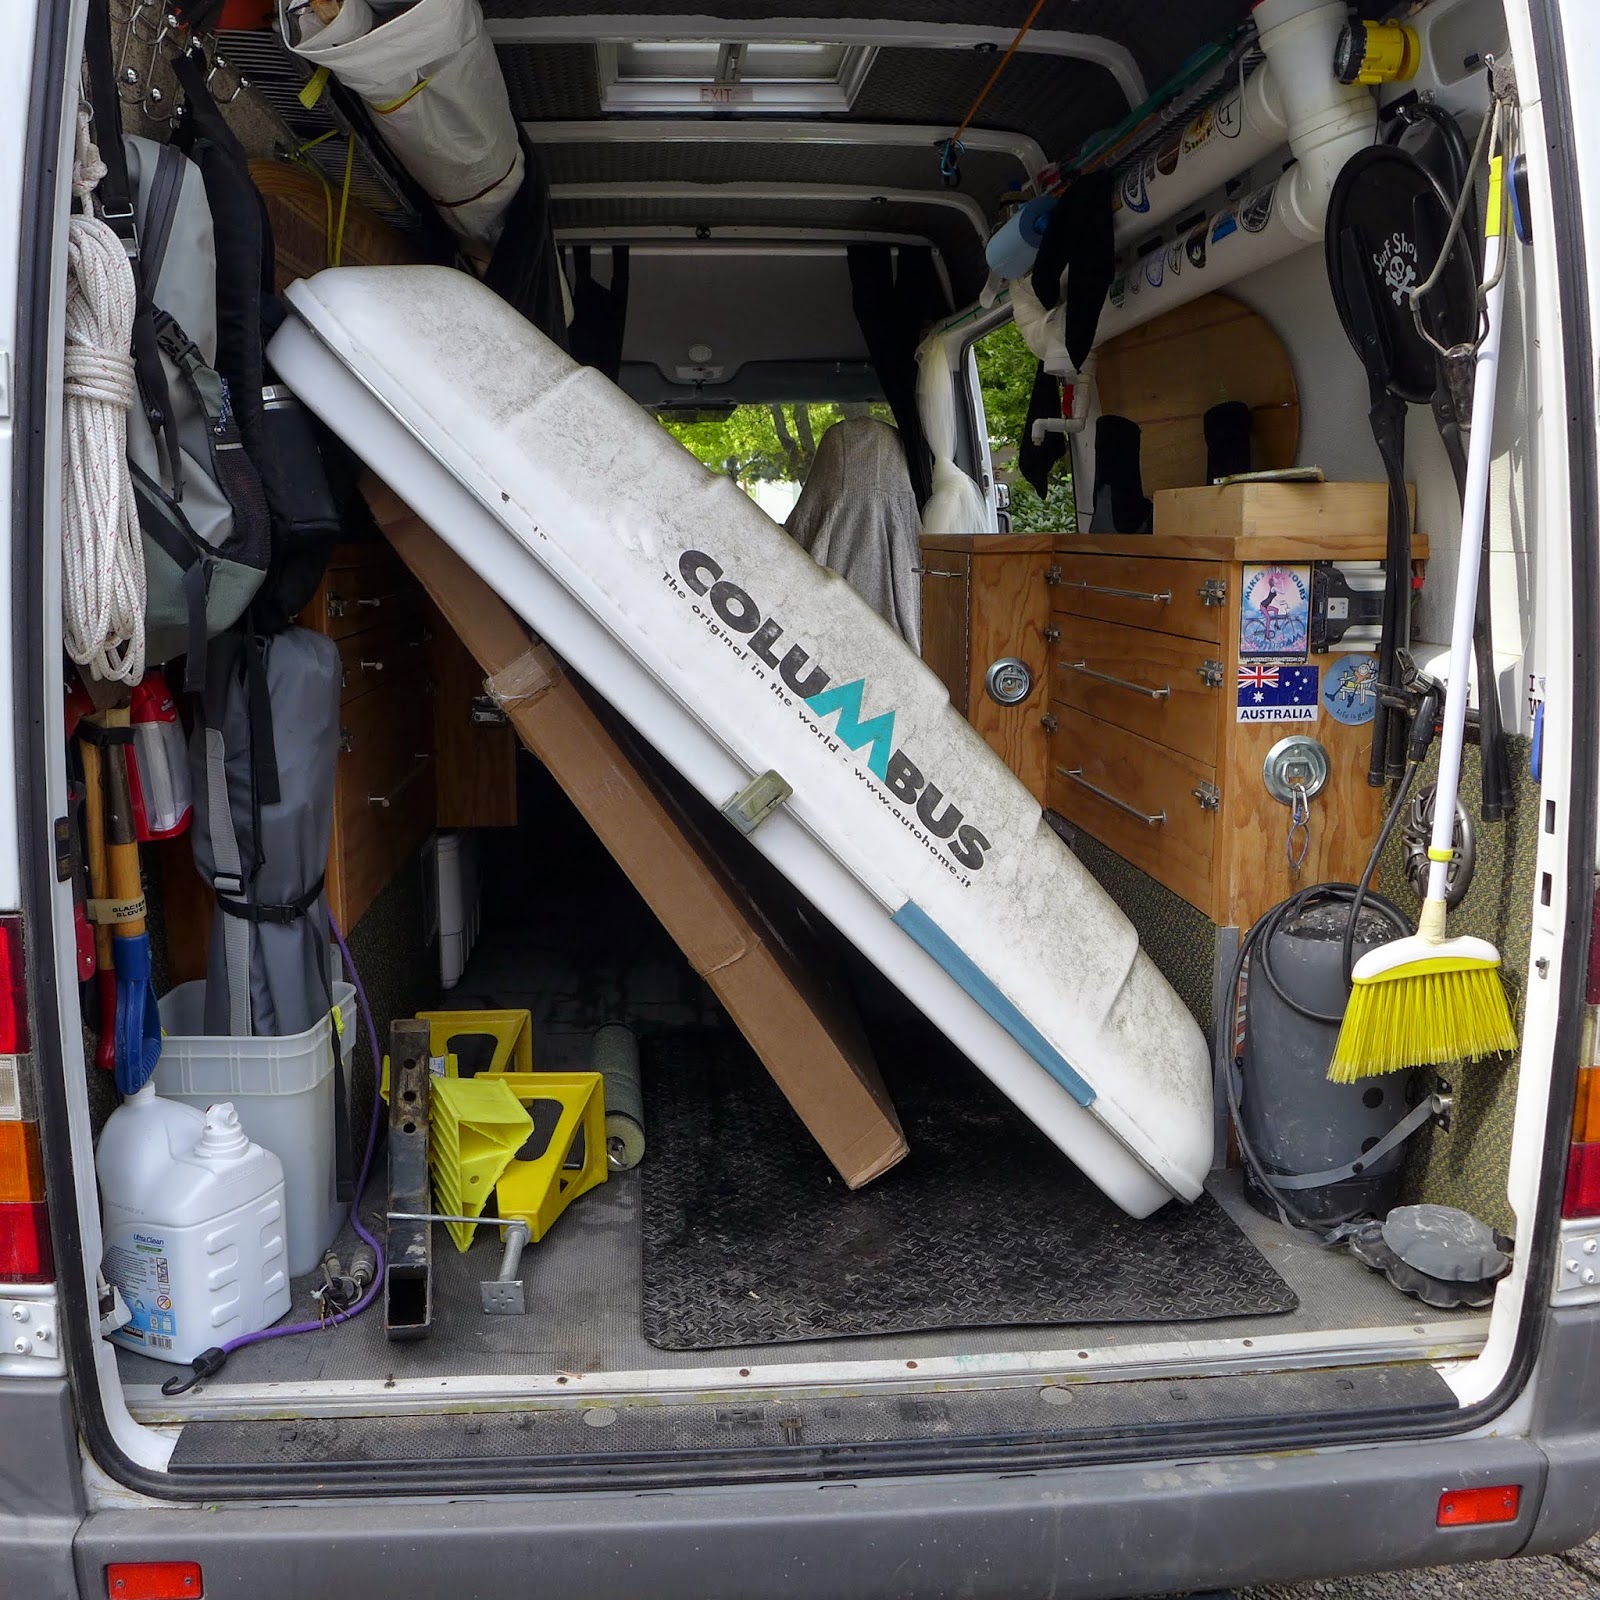
(above) Columbus Roof Top Tent... http://www.autohomeus.com/rooftop/columbus.php ... Heavier than it looks...
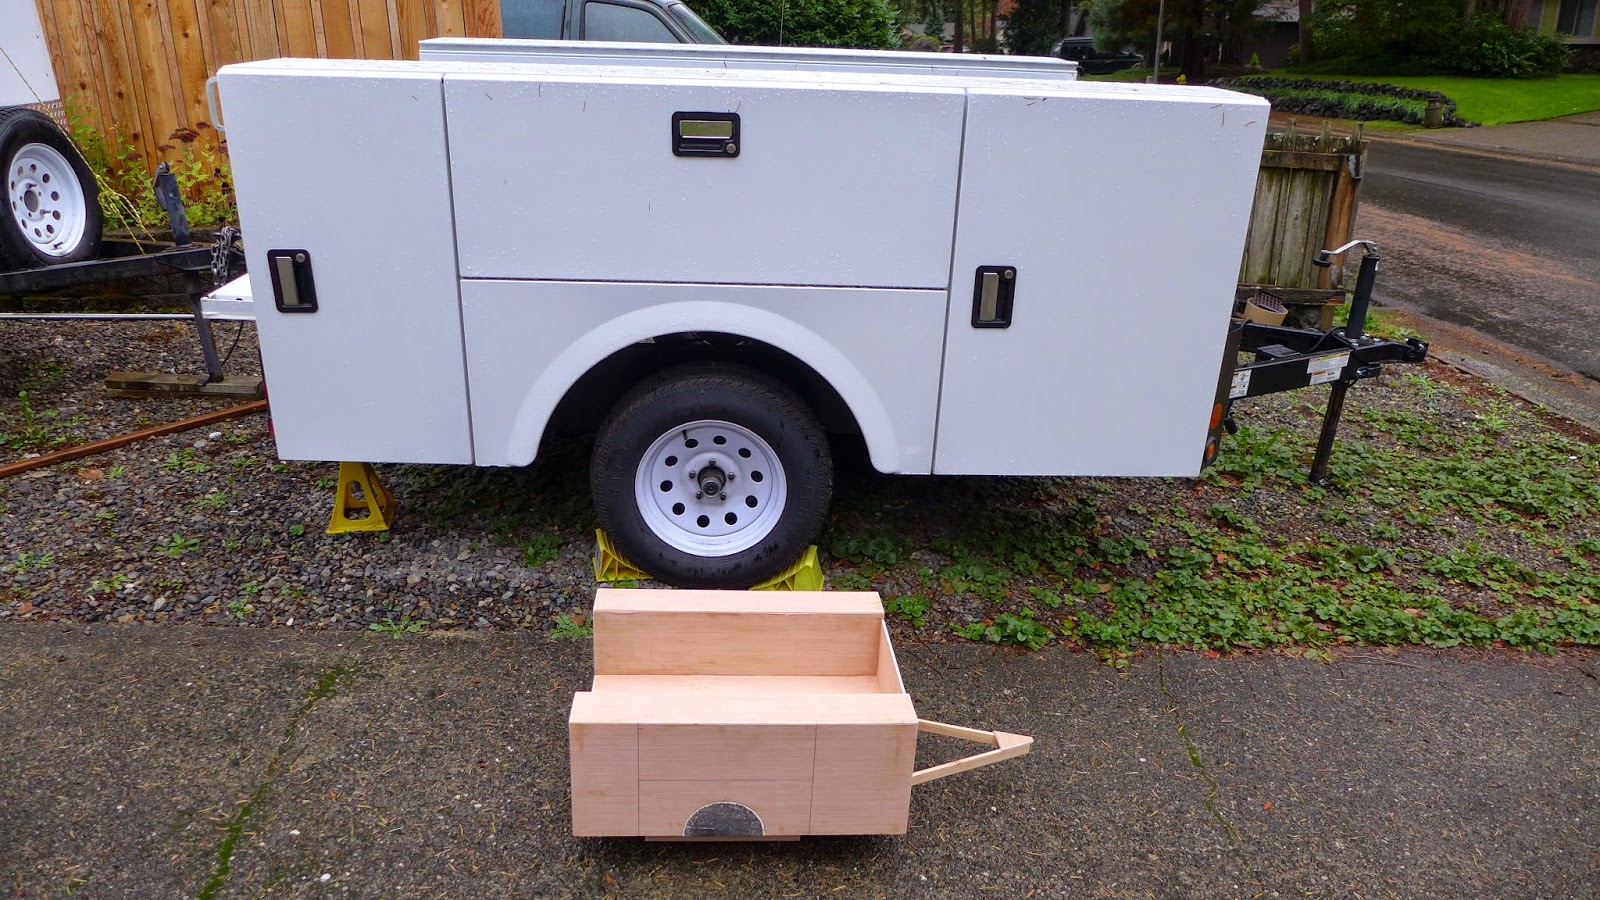
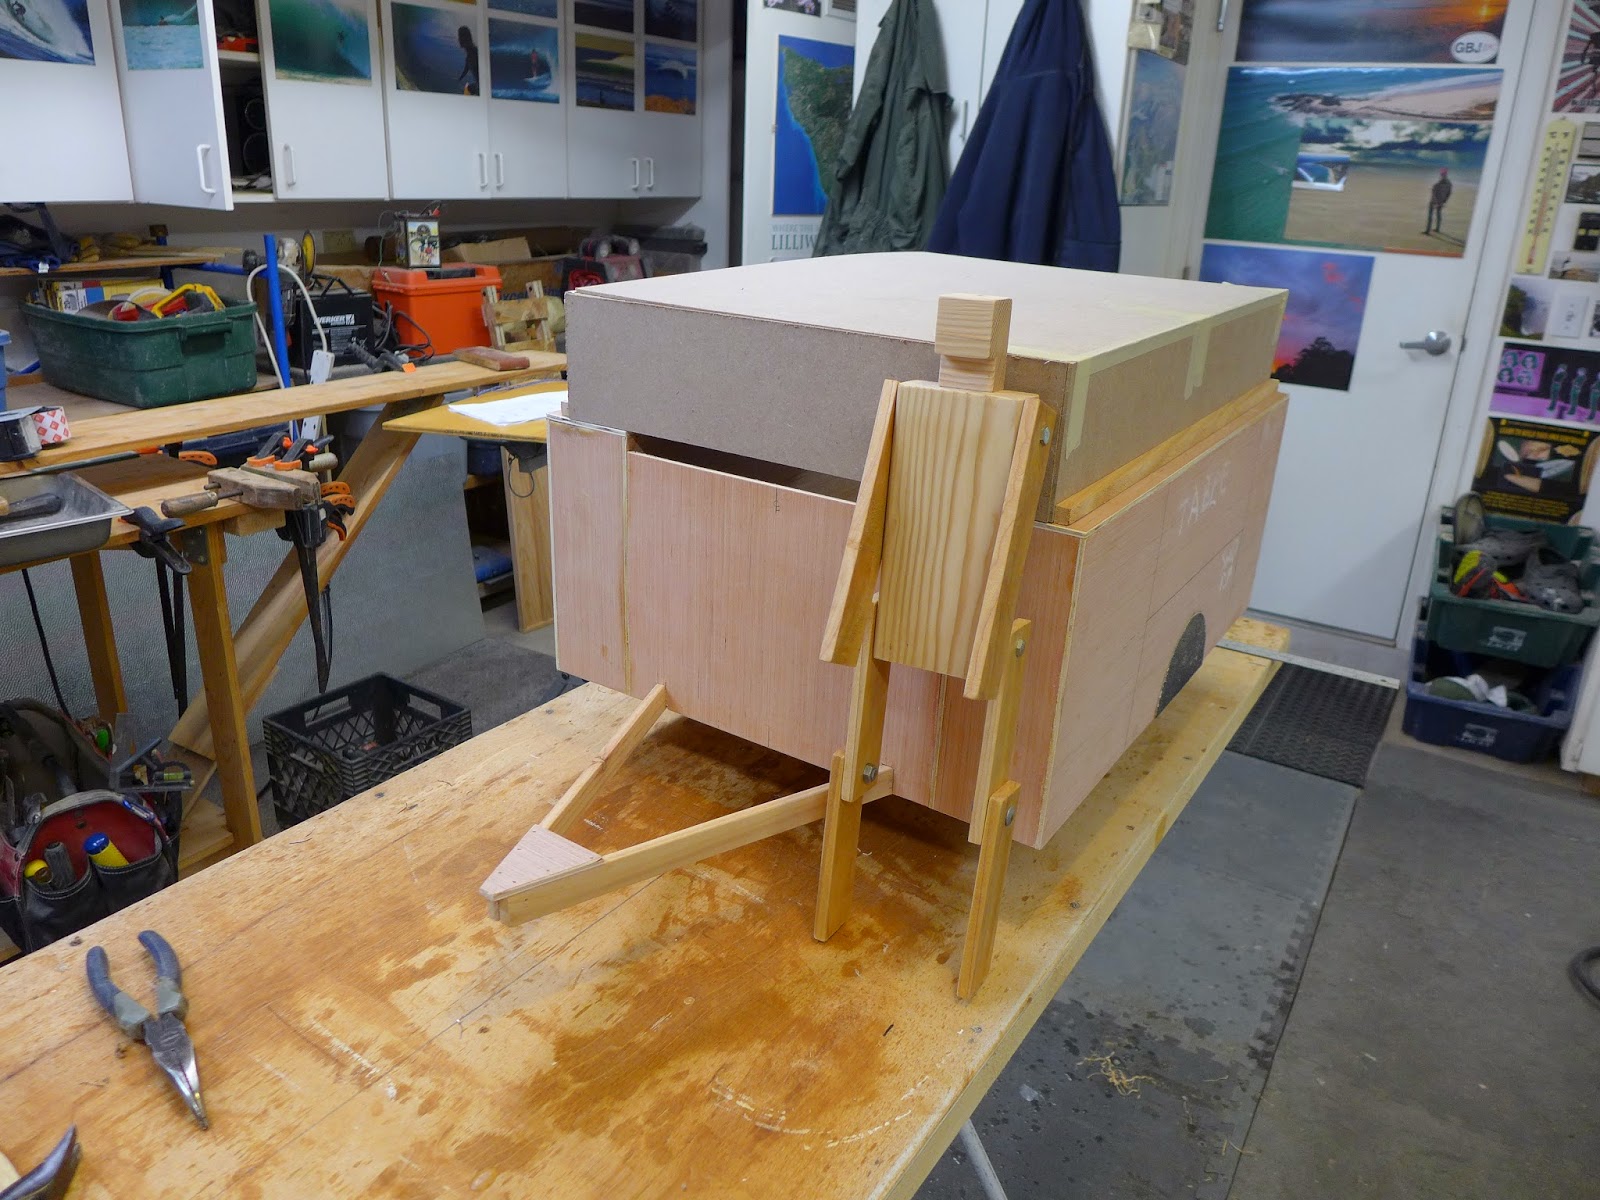
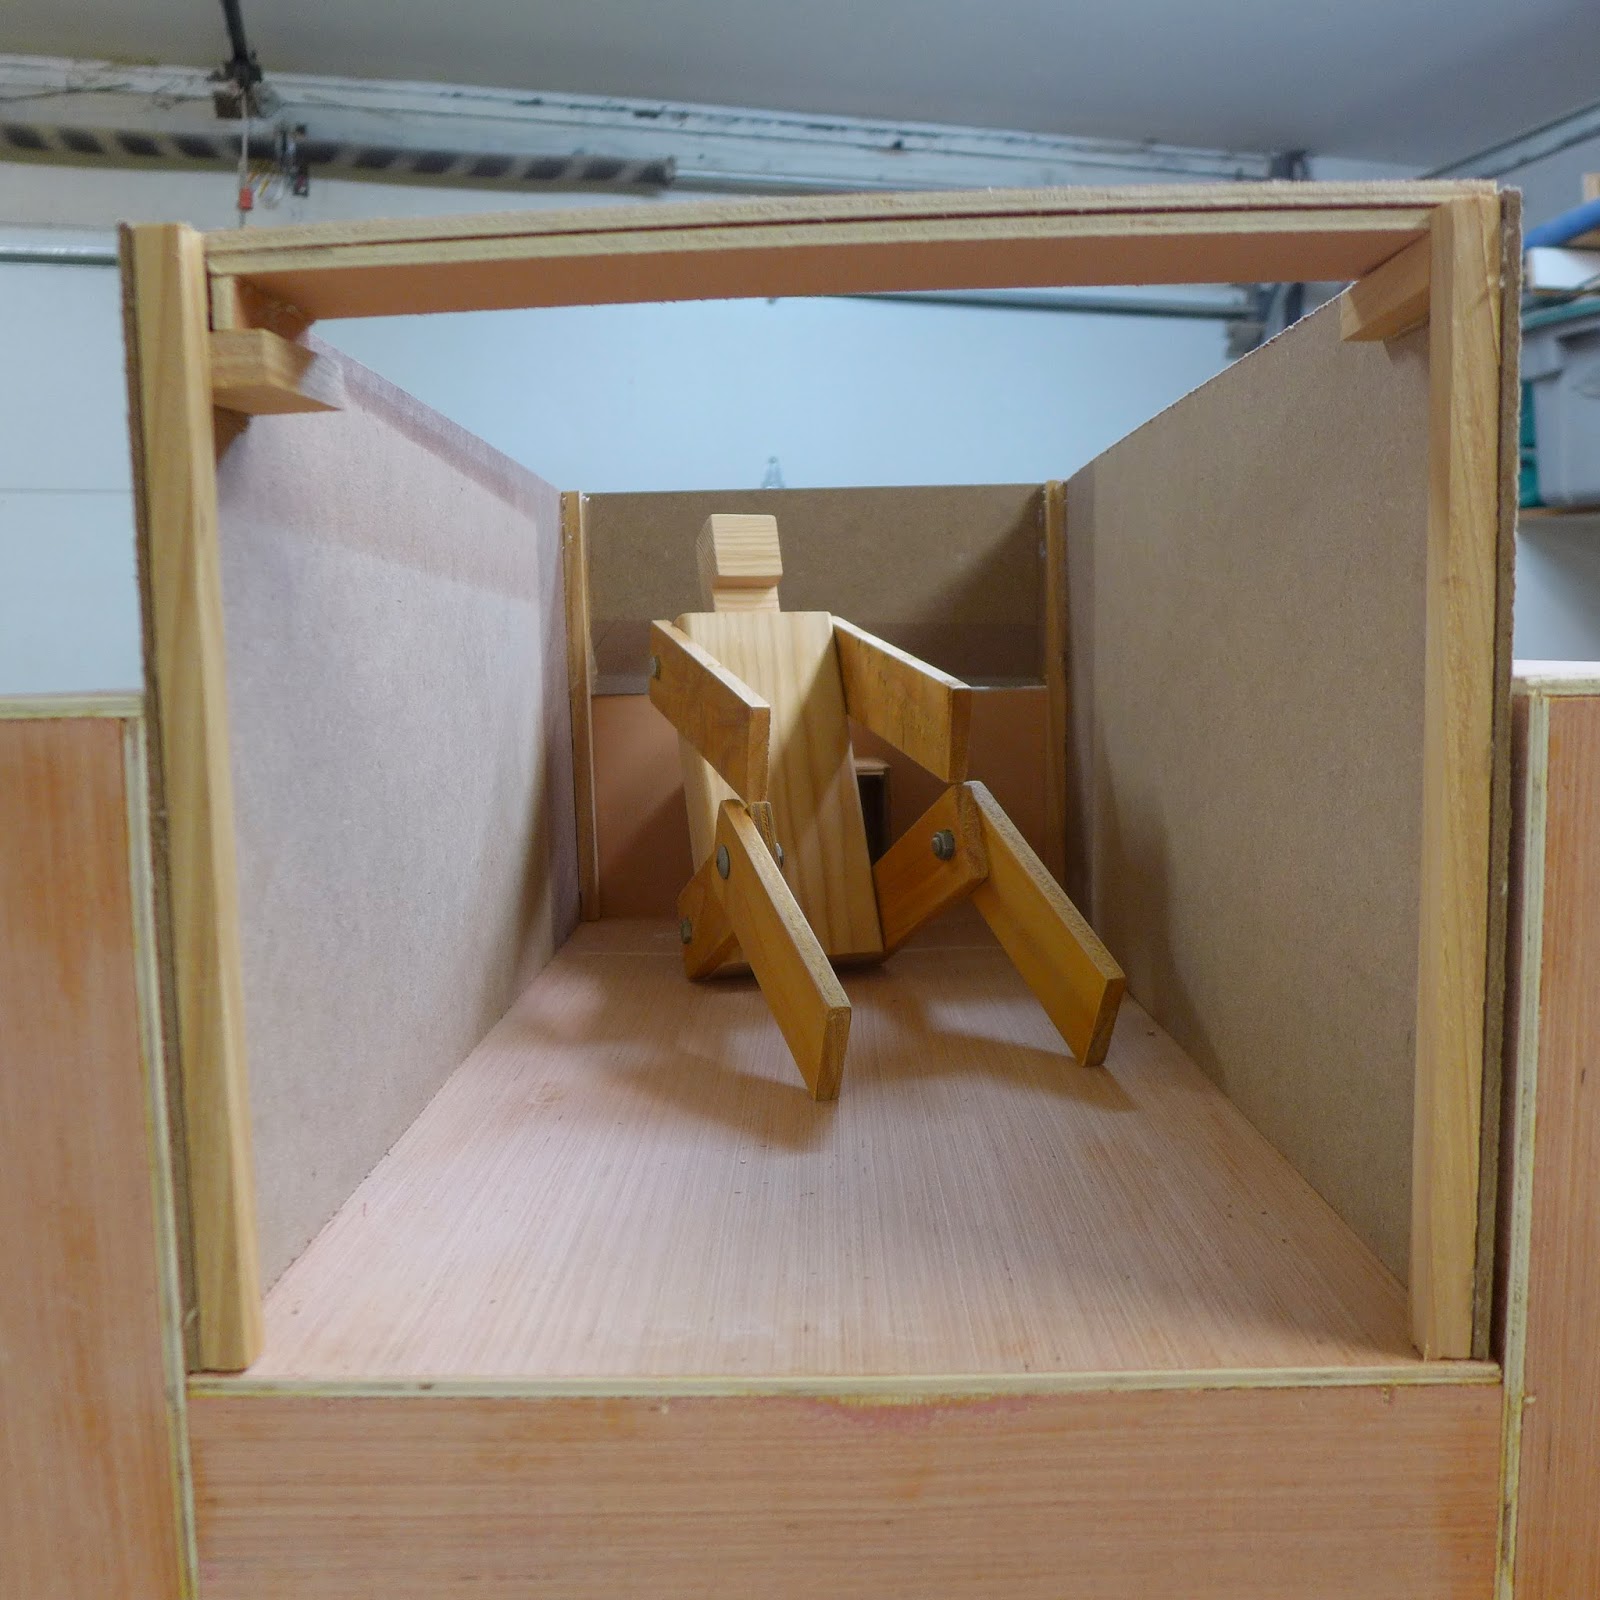
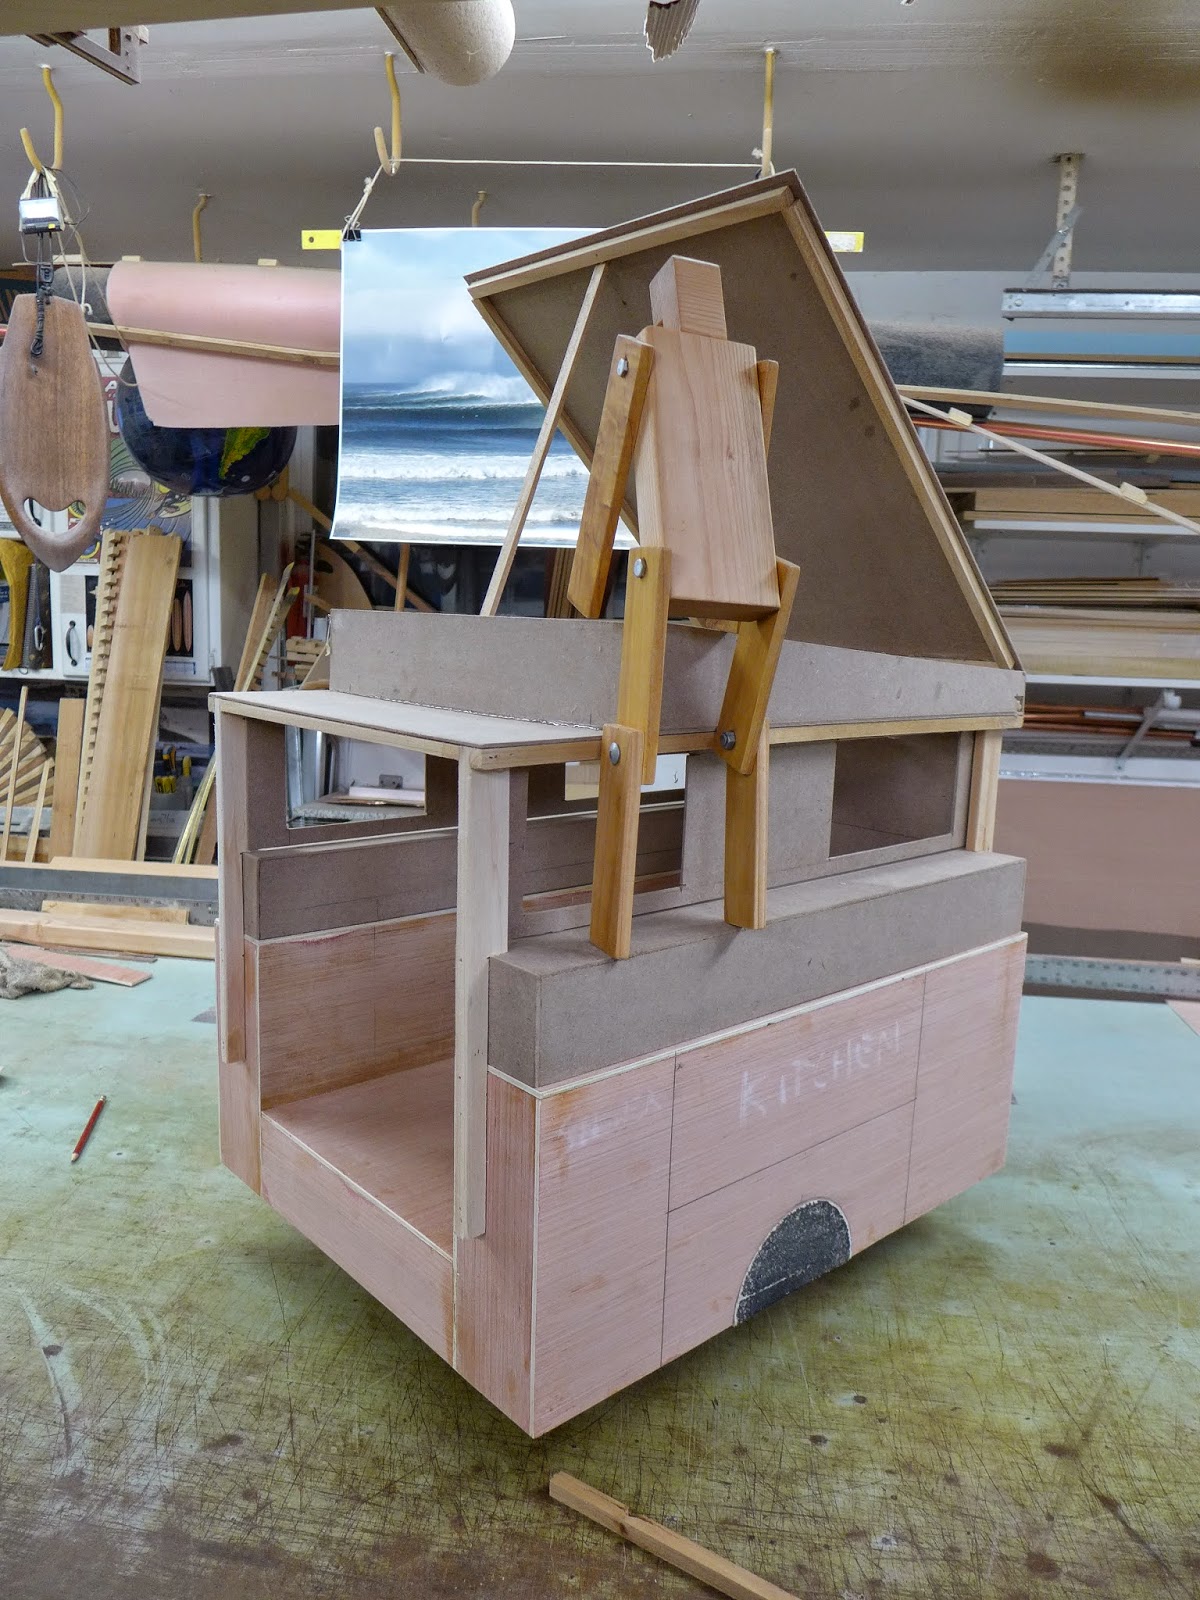
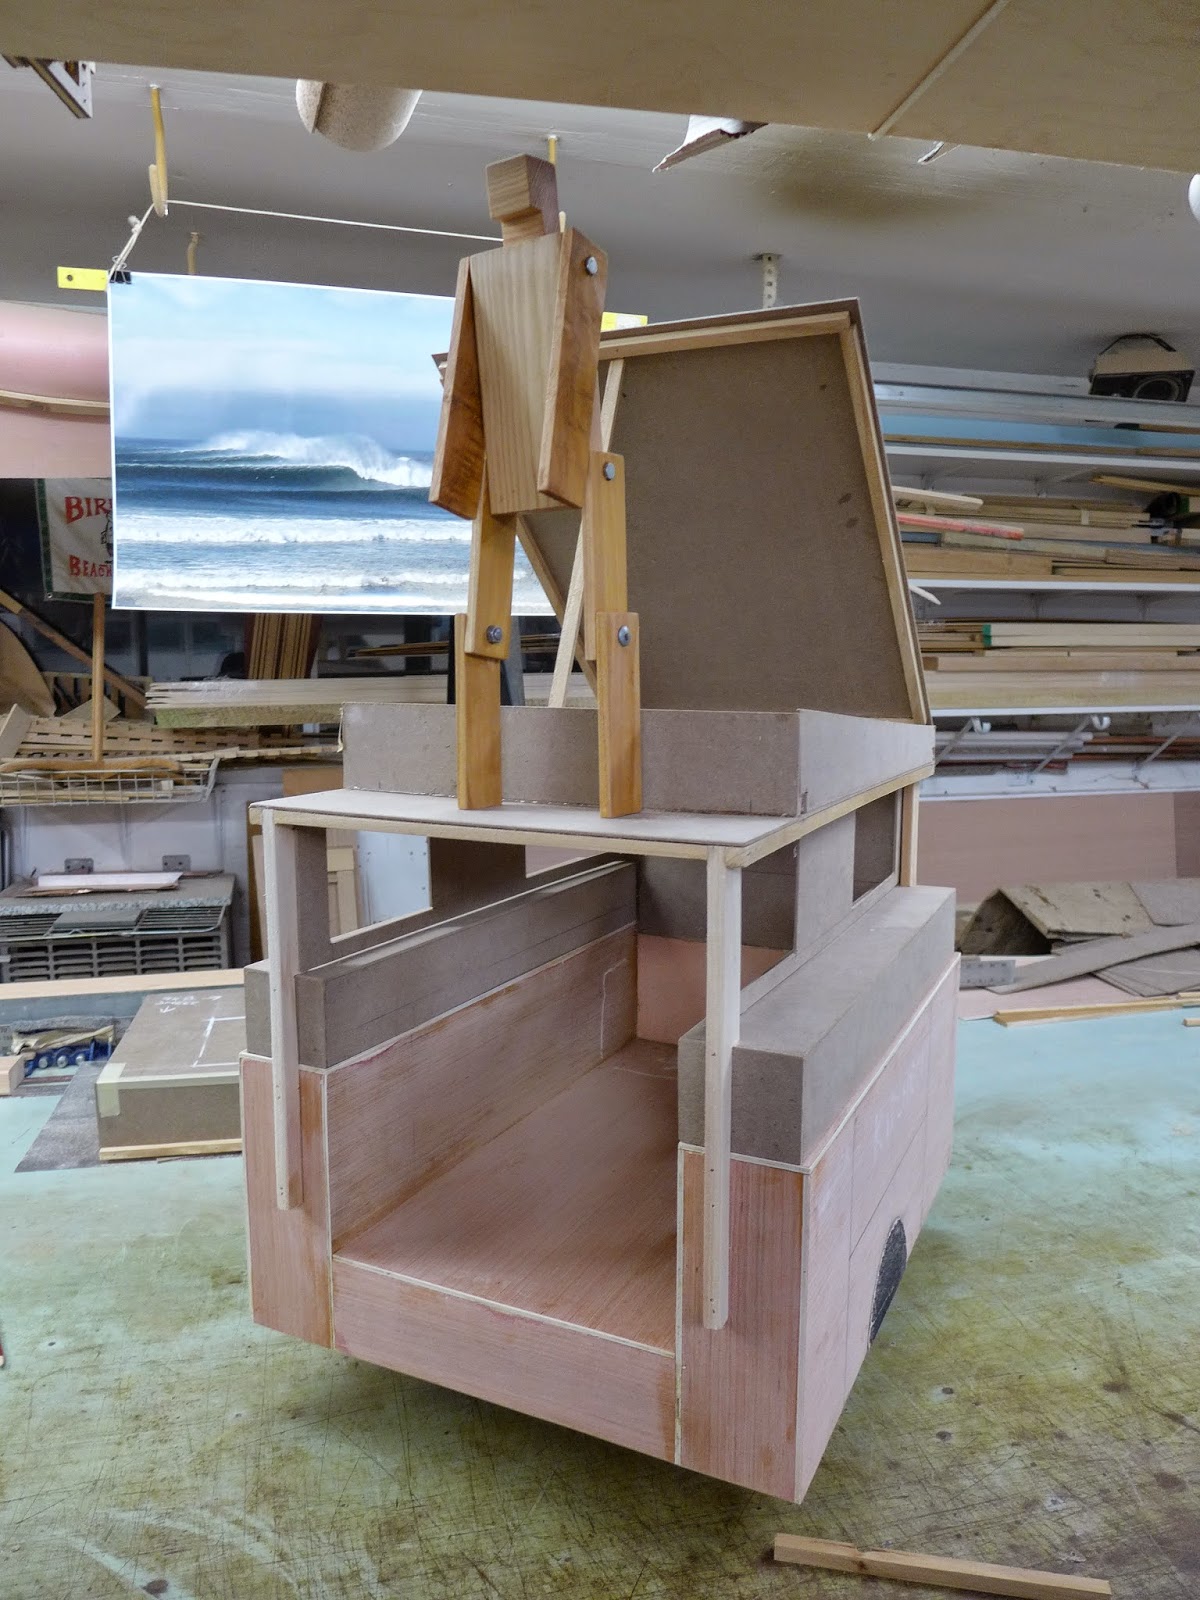
(above) Back in my shop I made a 1/4 scale model of the trailer from thin plywood...
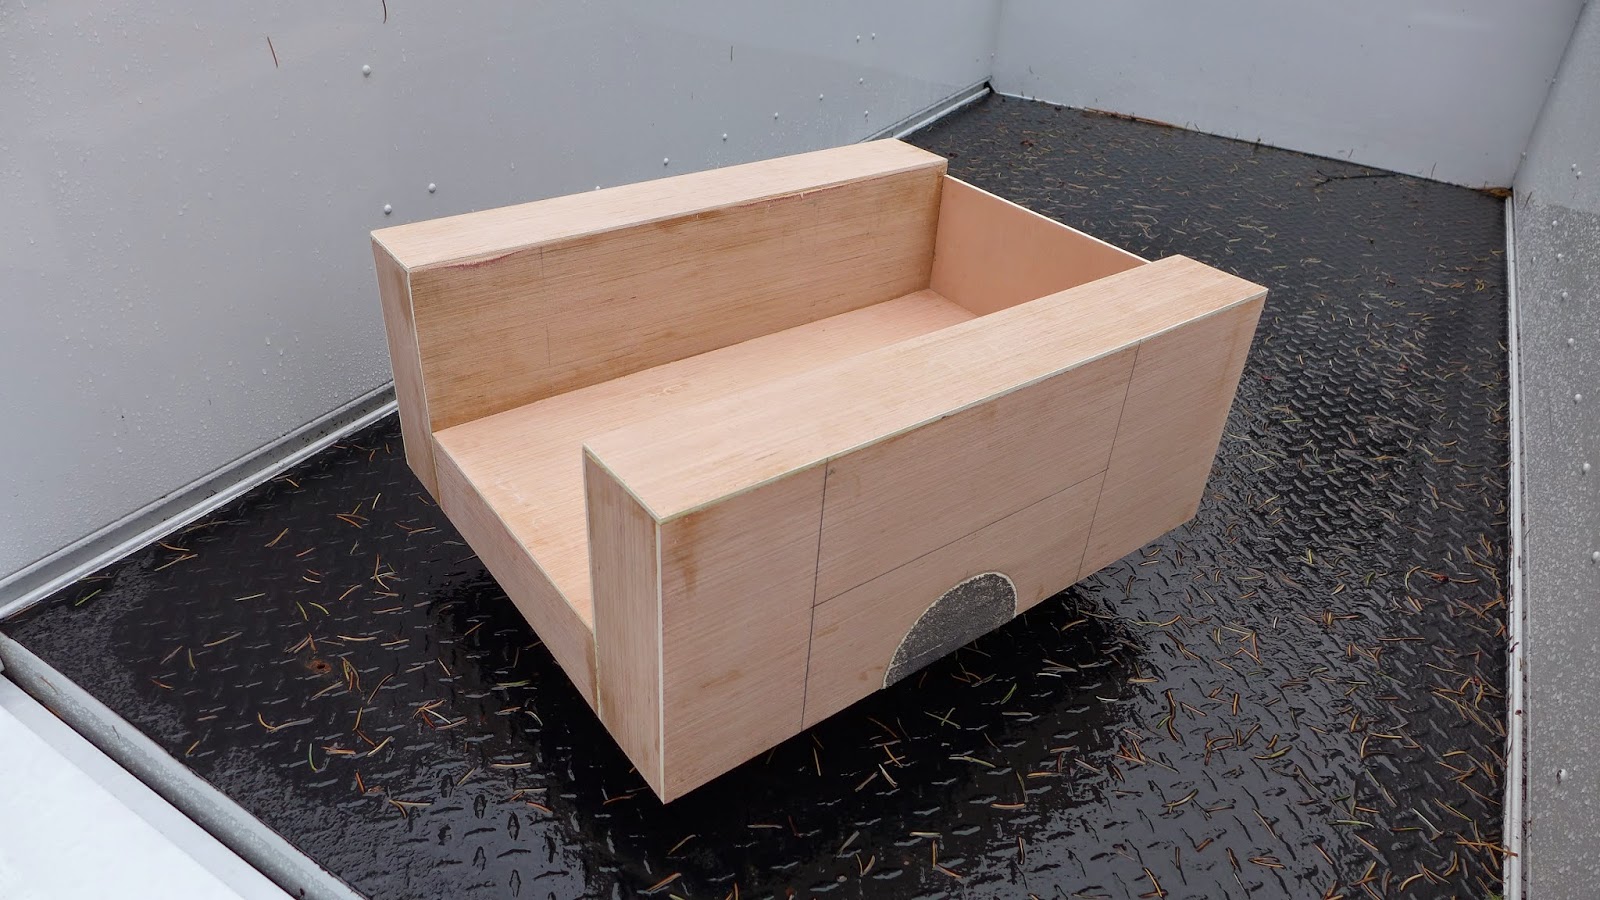
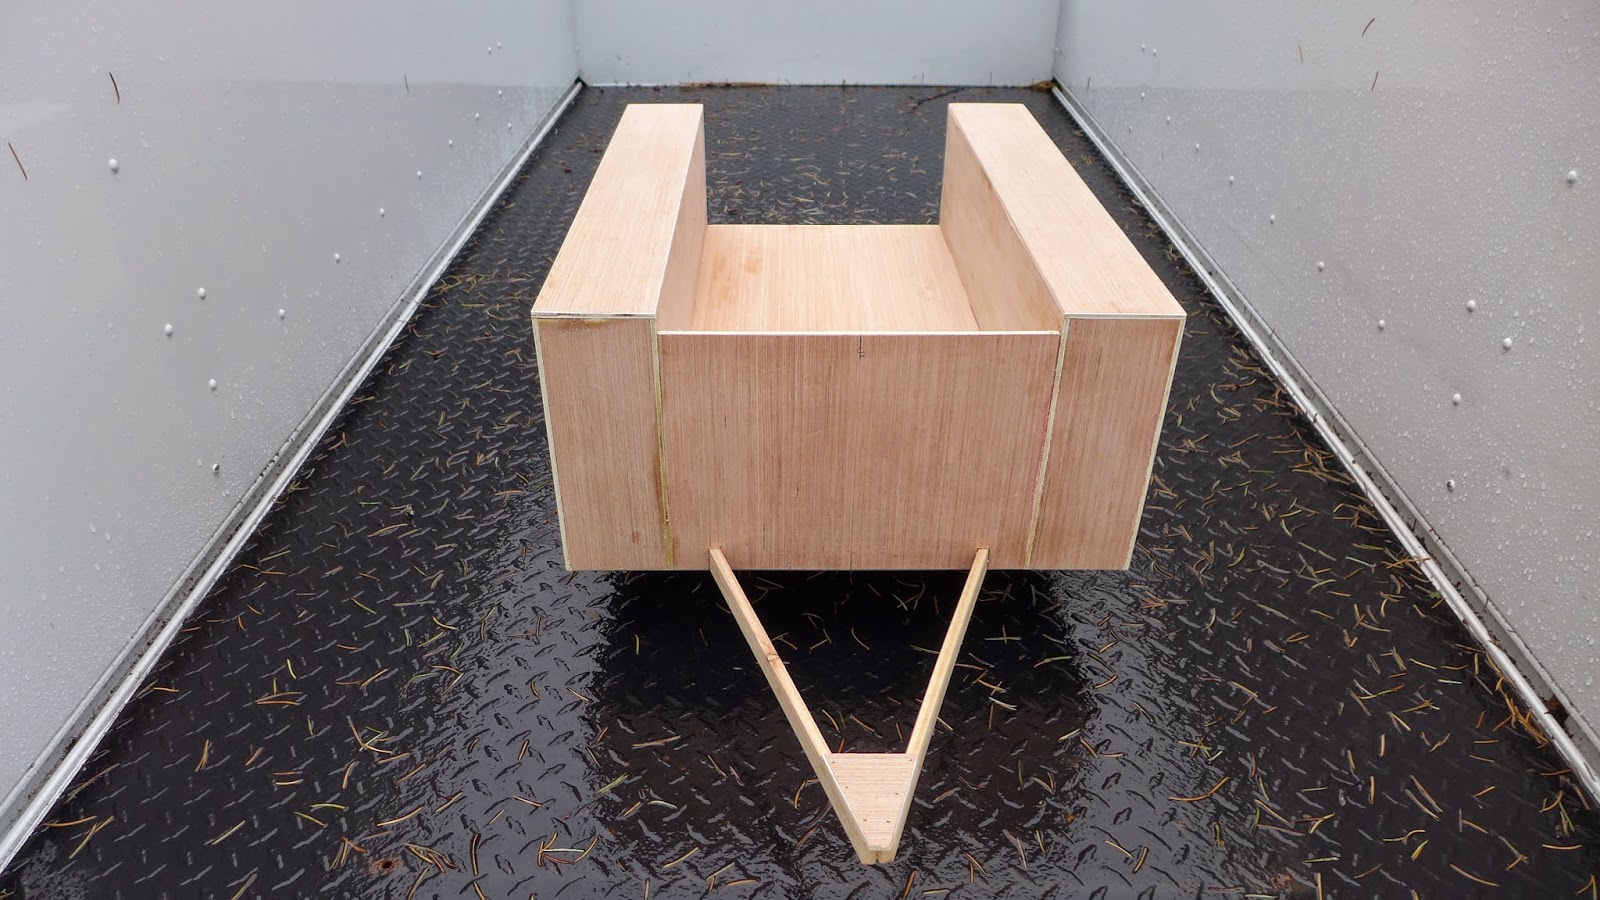
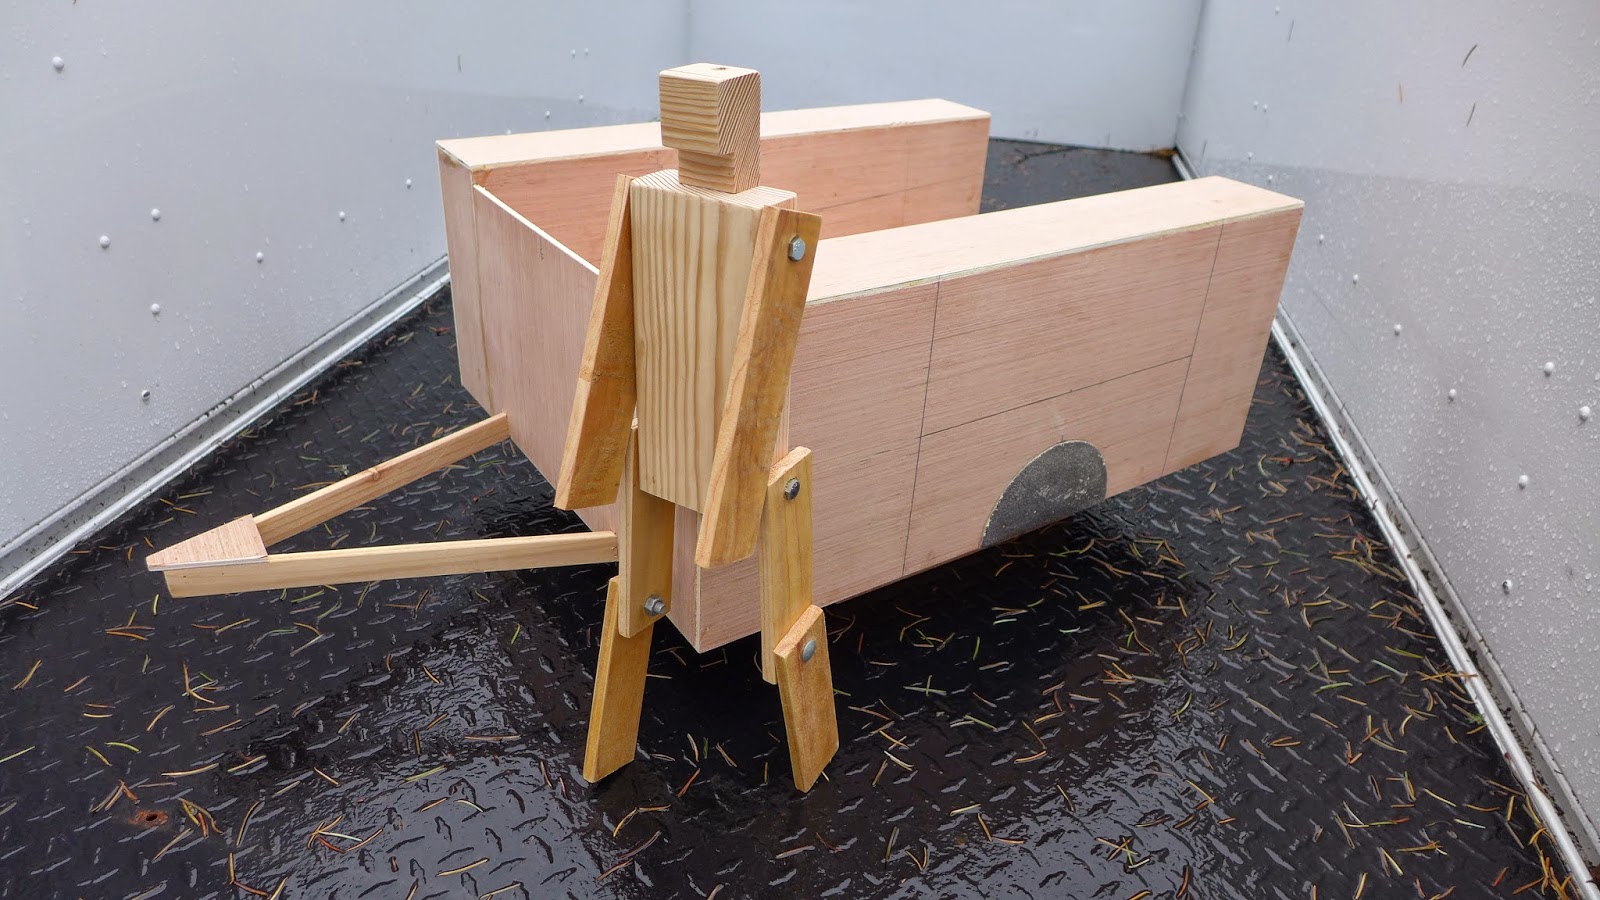
(above) To help visualize the space, I made a 1/4 scale human figure with pivots where they make sense...
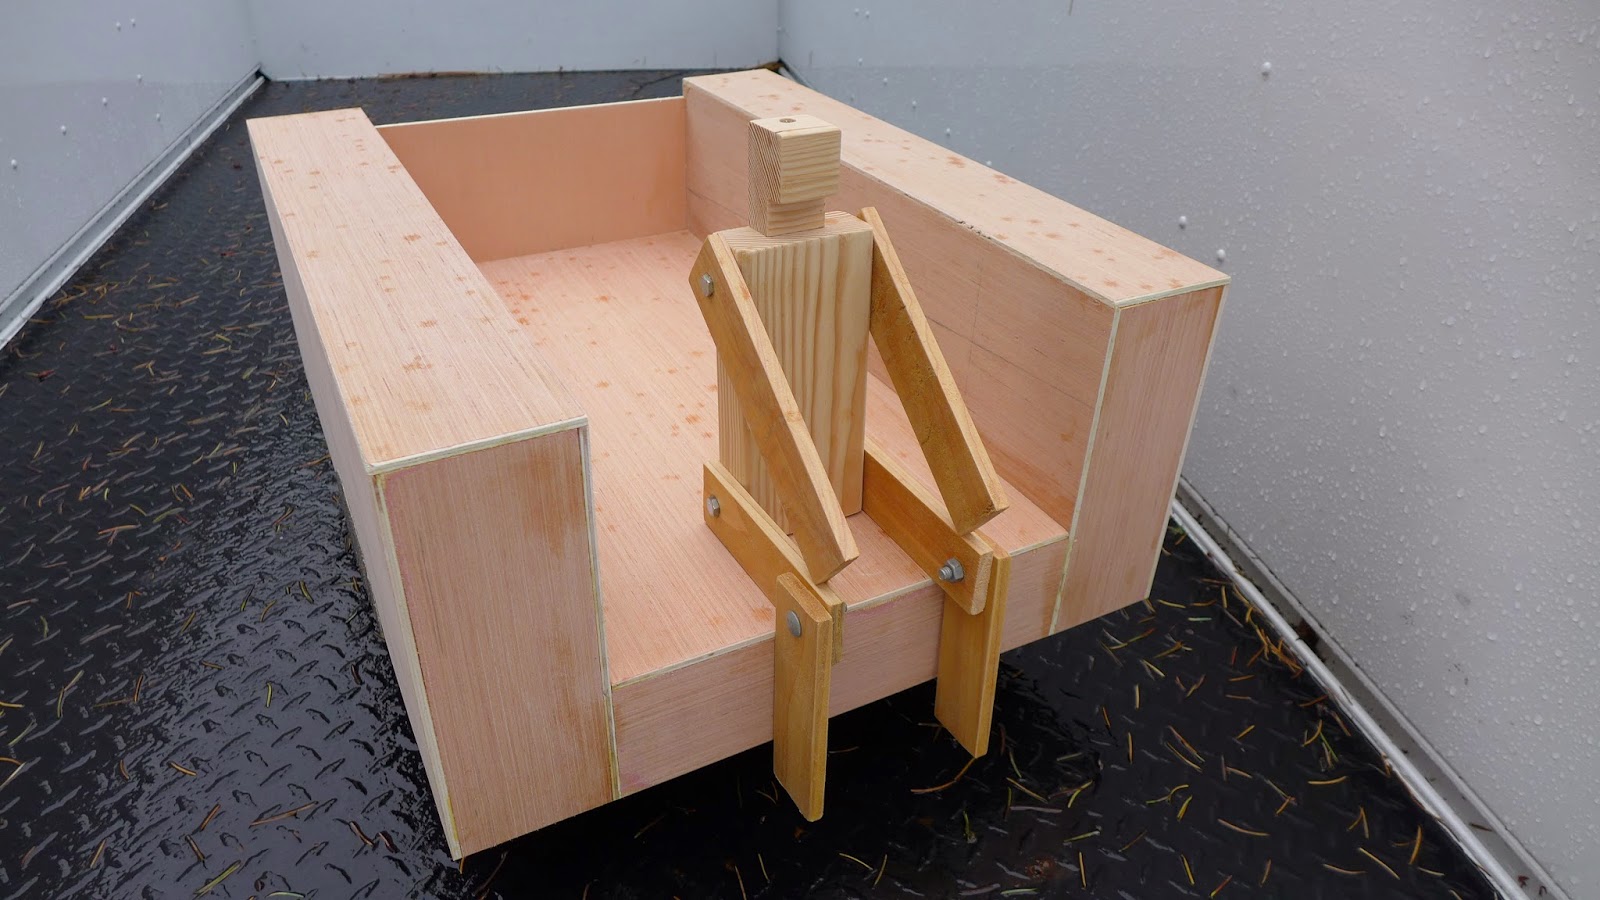
(above) An empty trailer model is pretty abstract without something to give it scale...
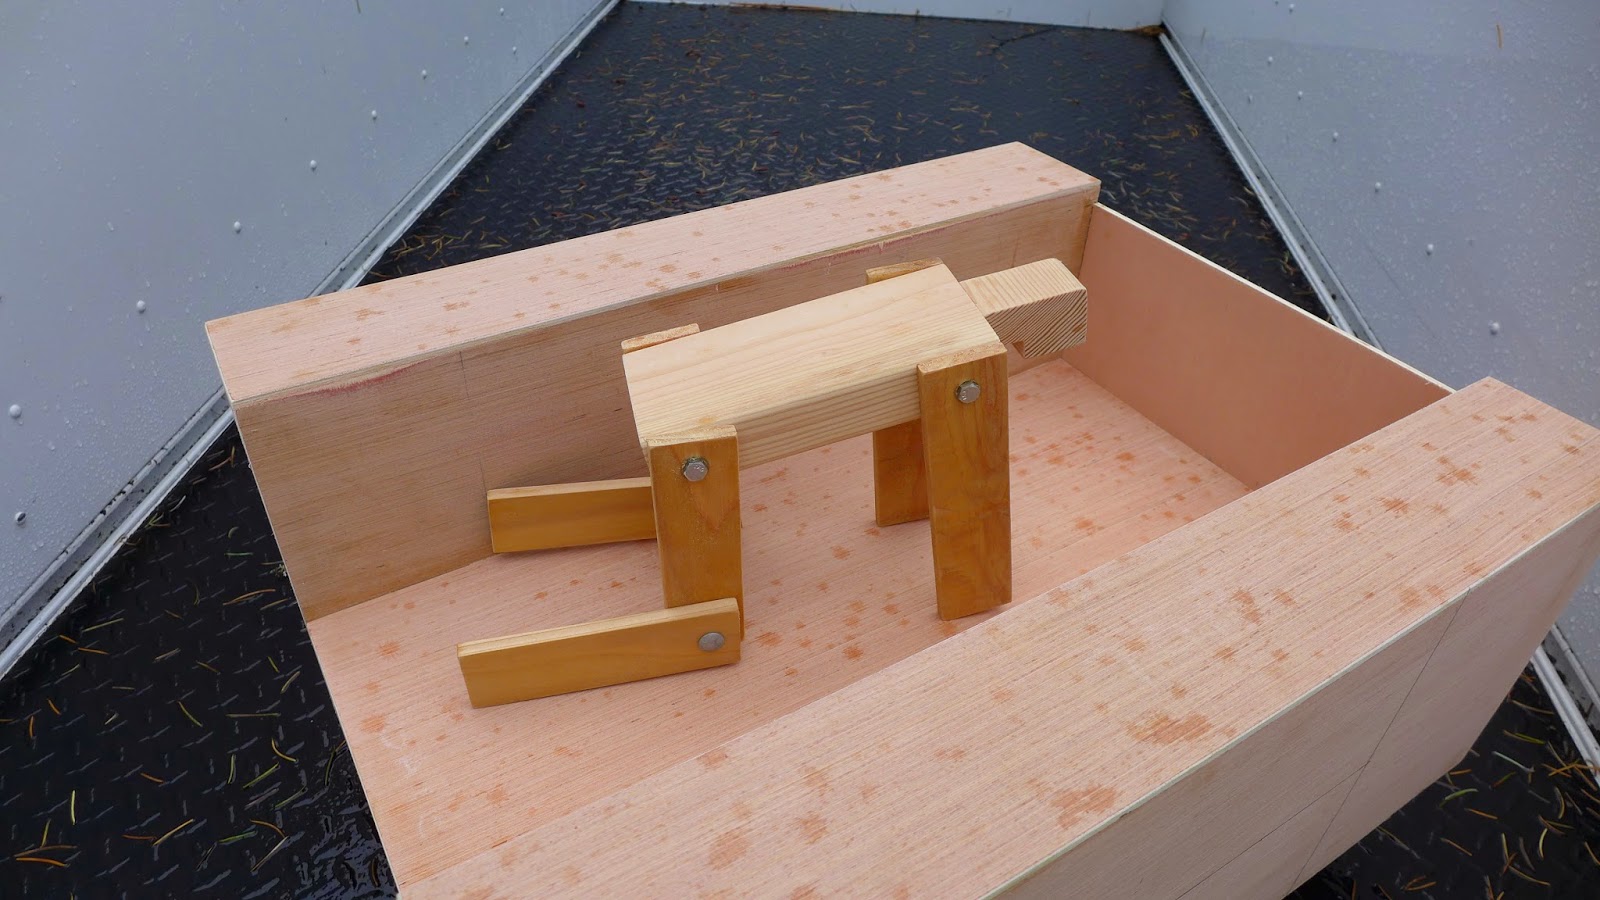
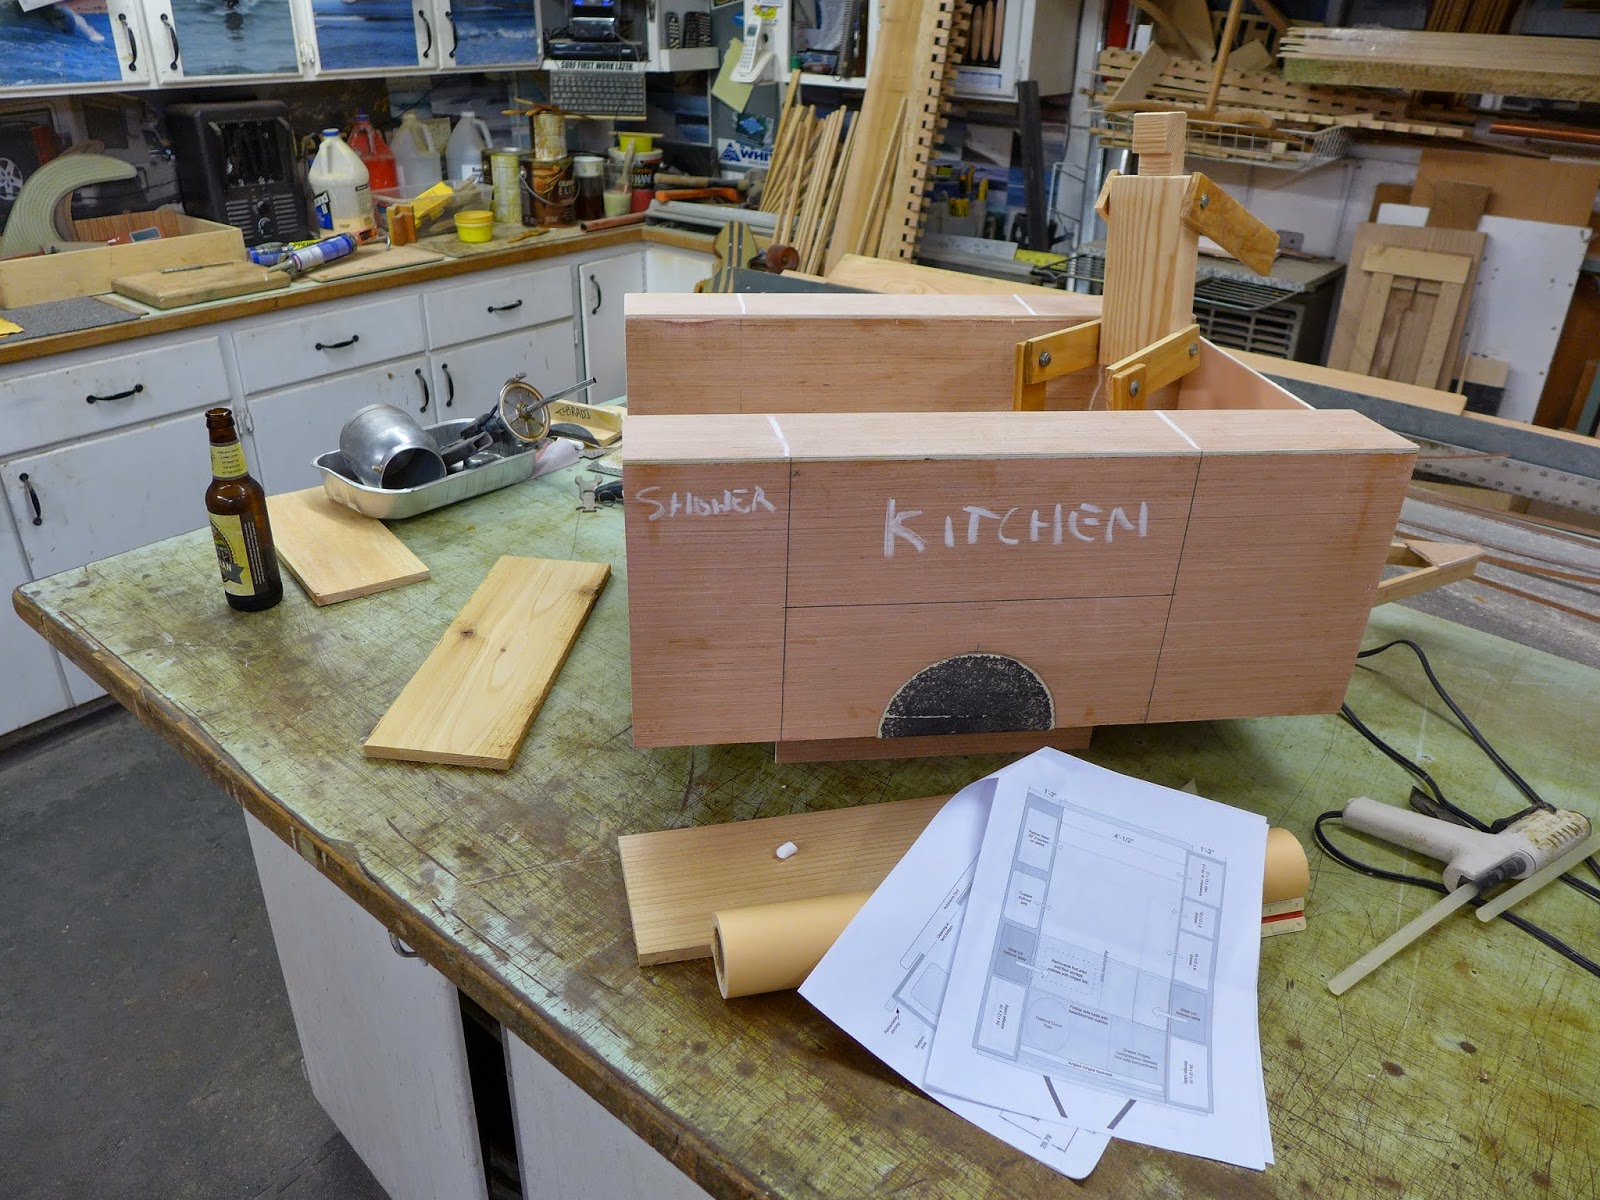
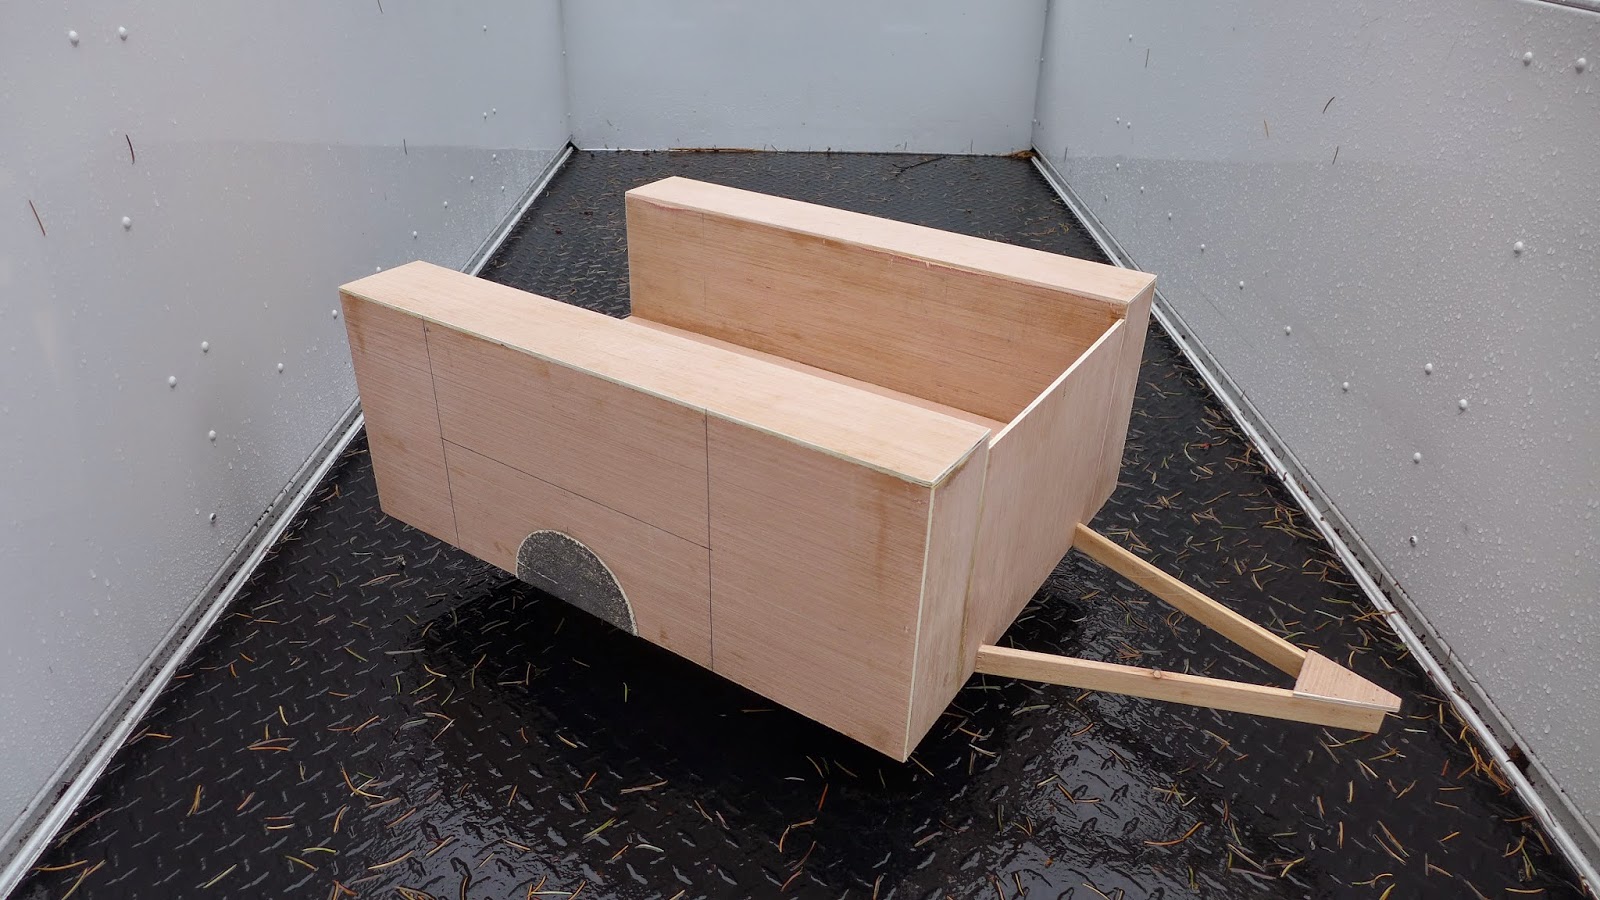
(above) End of the day, the foundation for designing what comes next, is finished...
(above) At Mike's a few weeks ago, the trailer was hooked up and the sleeping pod was wrestled into my van...
(above) The Challenger TR Service Body Trailer...http://arrowheadtruckequipment.com/Brochures/IWvOY-CEPCO-EGtfL-Service_Body_Trailer_02.10_-_Sm.pdf ...Payload up to 1,900 lbs... 48.5" bed width... 98" overall body length...
(above) Keyed alike locks... Concealed door hinges... The six compartments provide 44 cu. ft. of storage space...
(above) Powder coater Galvanneal Steel construction...
(above) Columbus Roof Top Tent... http://www.autohomeus.com/rooftop/columbus.php ... Heavier than it looks...
(above) Back in my shop I made a 1/4 scale model of the trailer from thin plywood...
(above) To help visualize the space, I made a 1/4 scale human figure with pivots where they make sense...
(above) An empty trailer model is pretty abstract without something to give it scale...
(above) End of the day, the foundation for designing what comes next, is finished...
PaulJensen
Custom Builder
02
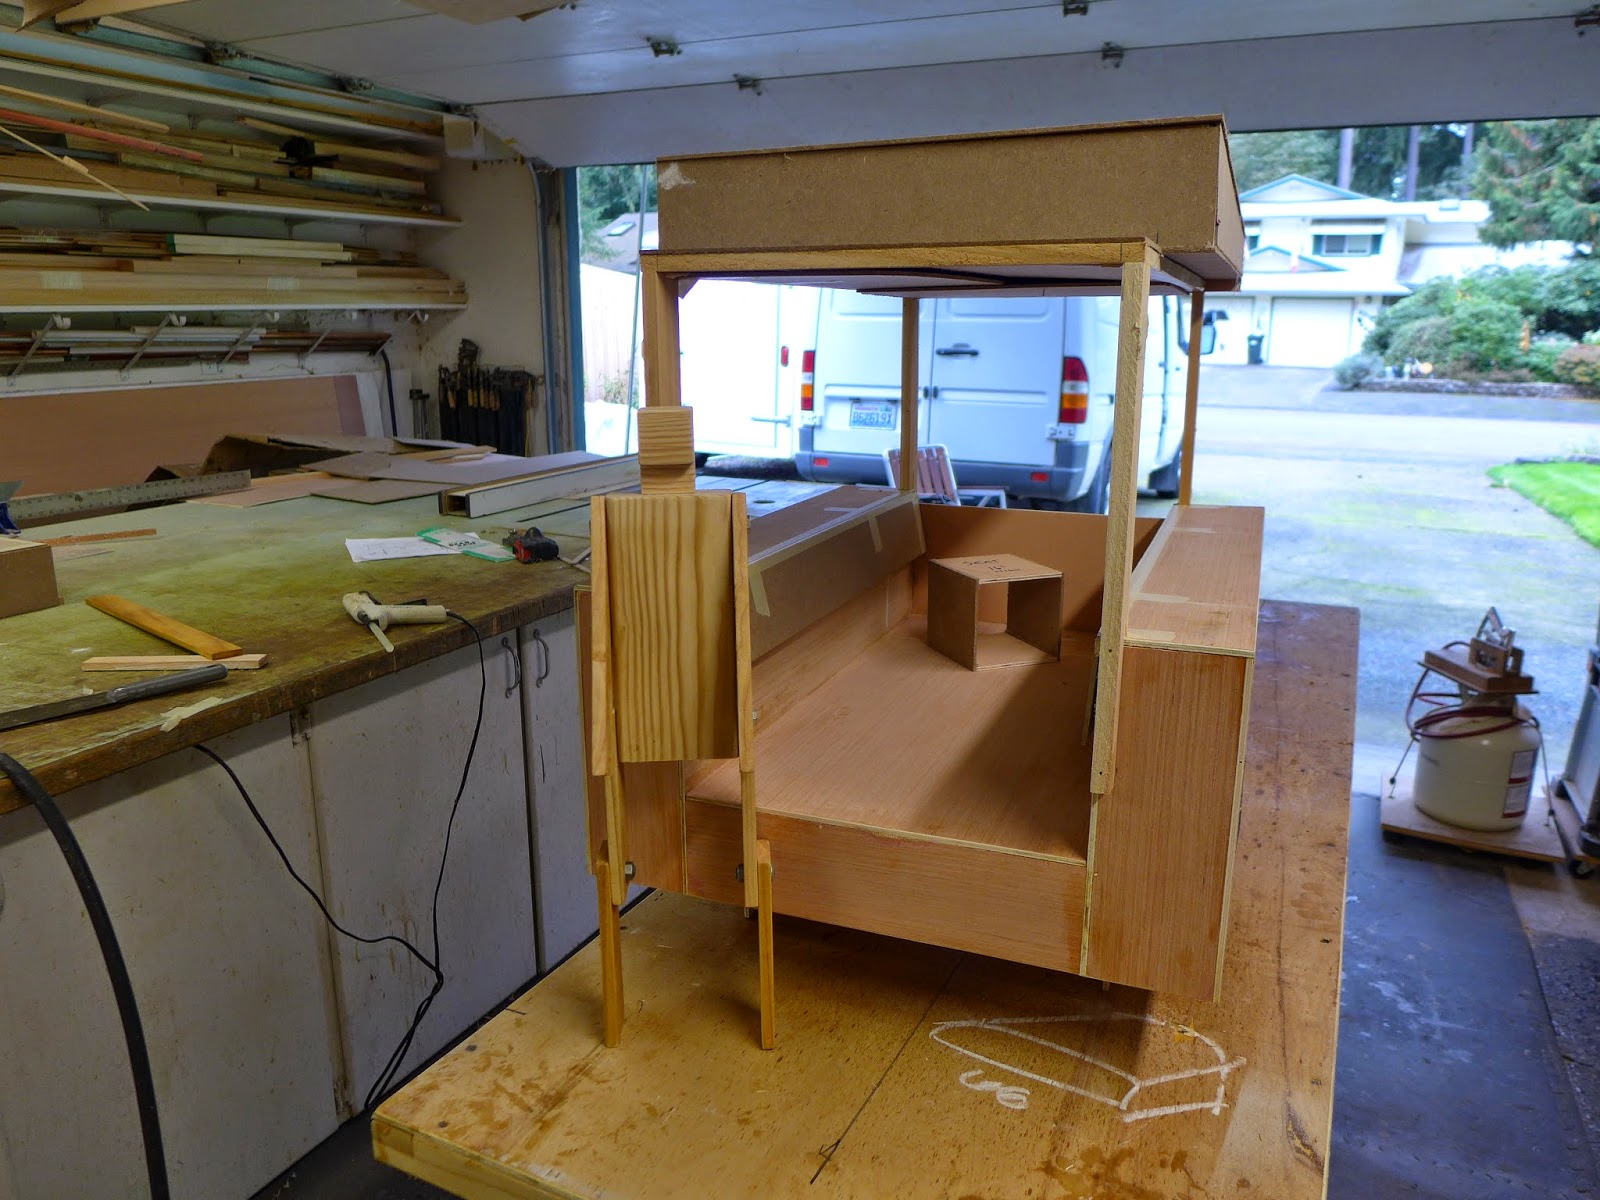
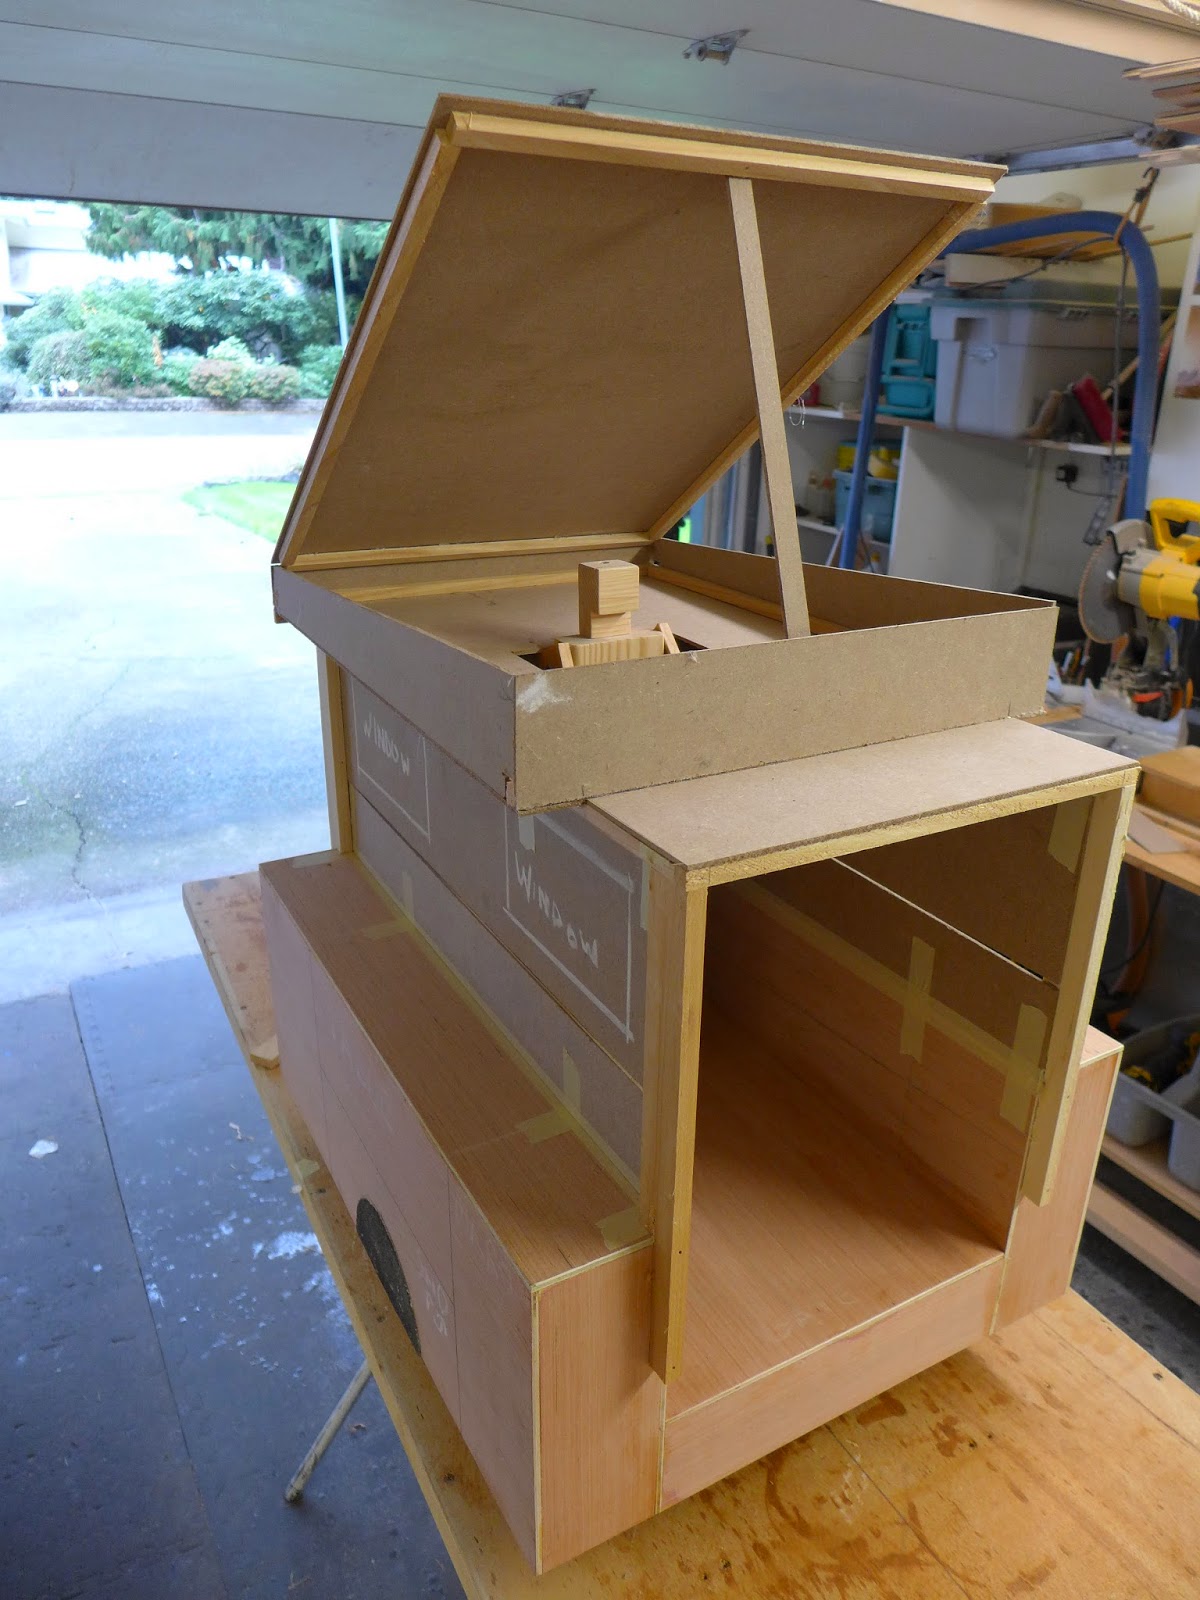
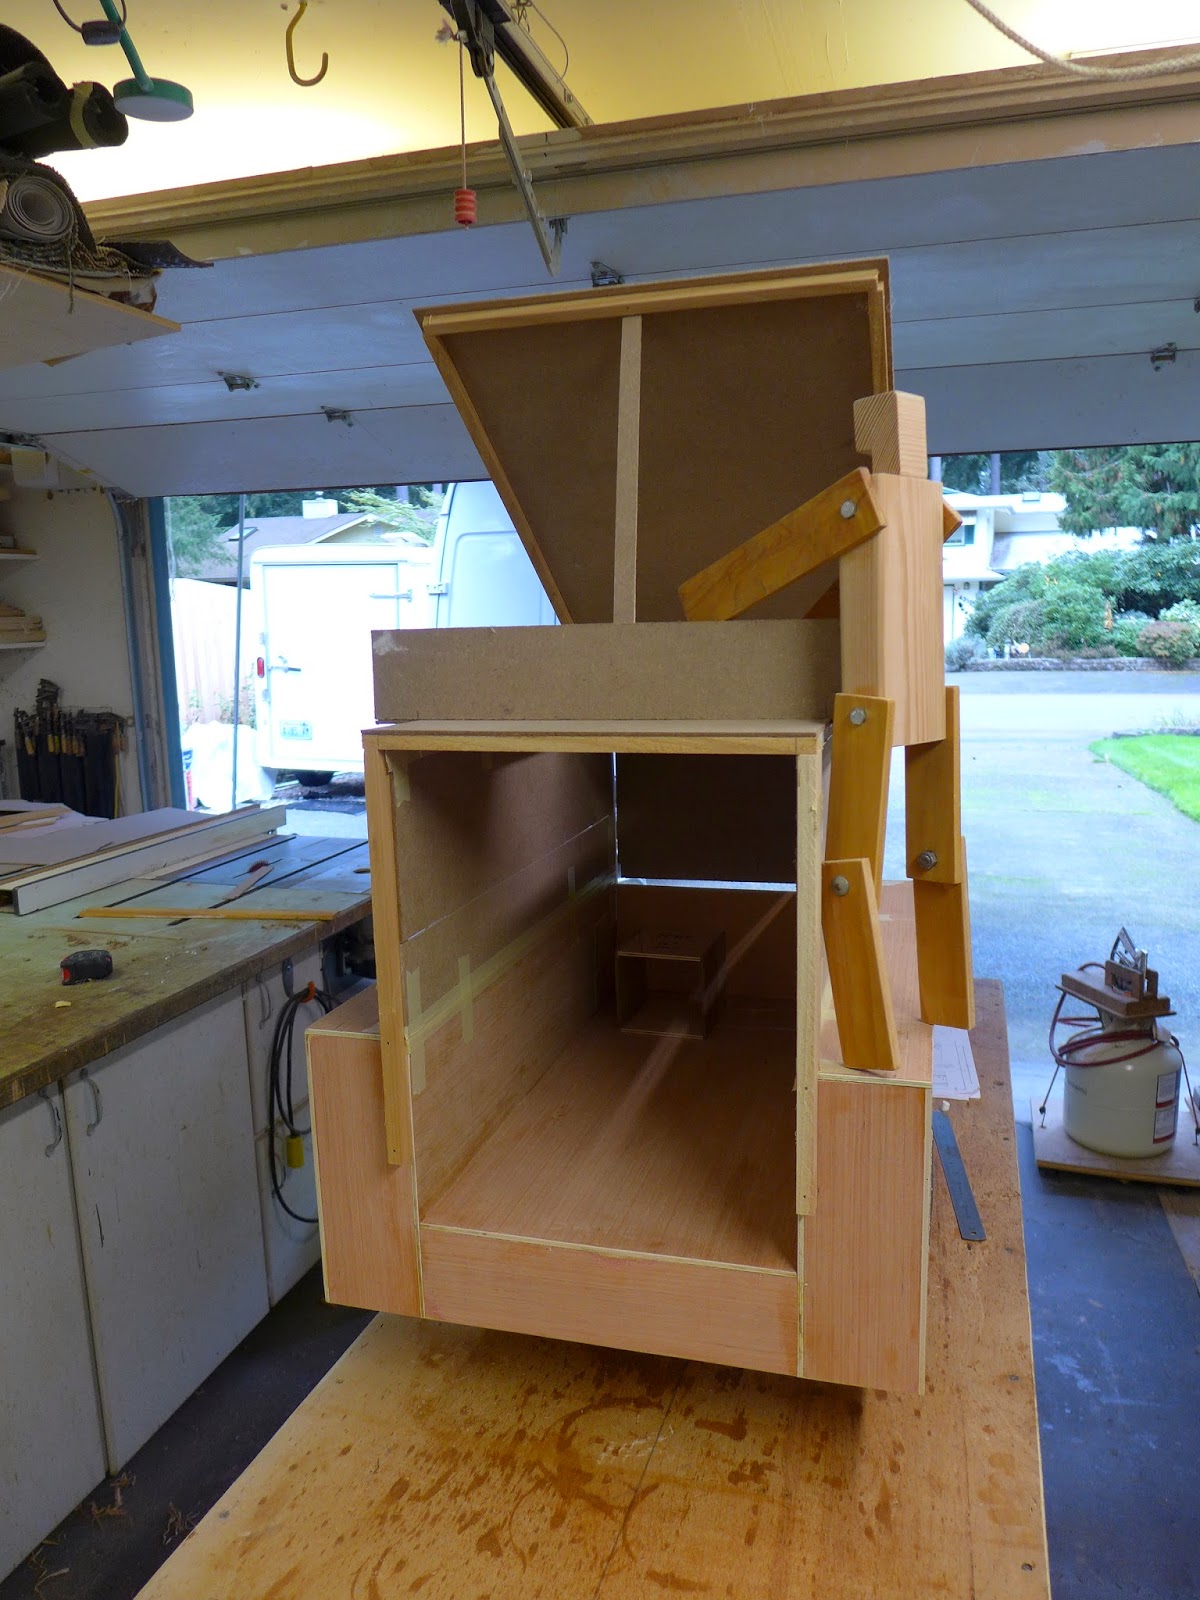
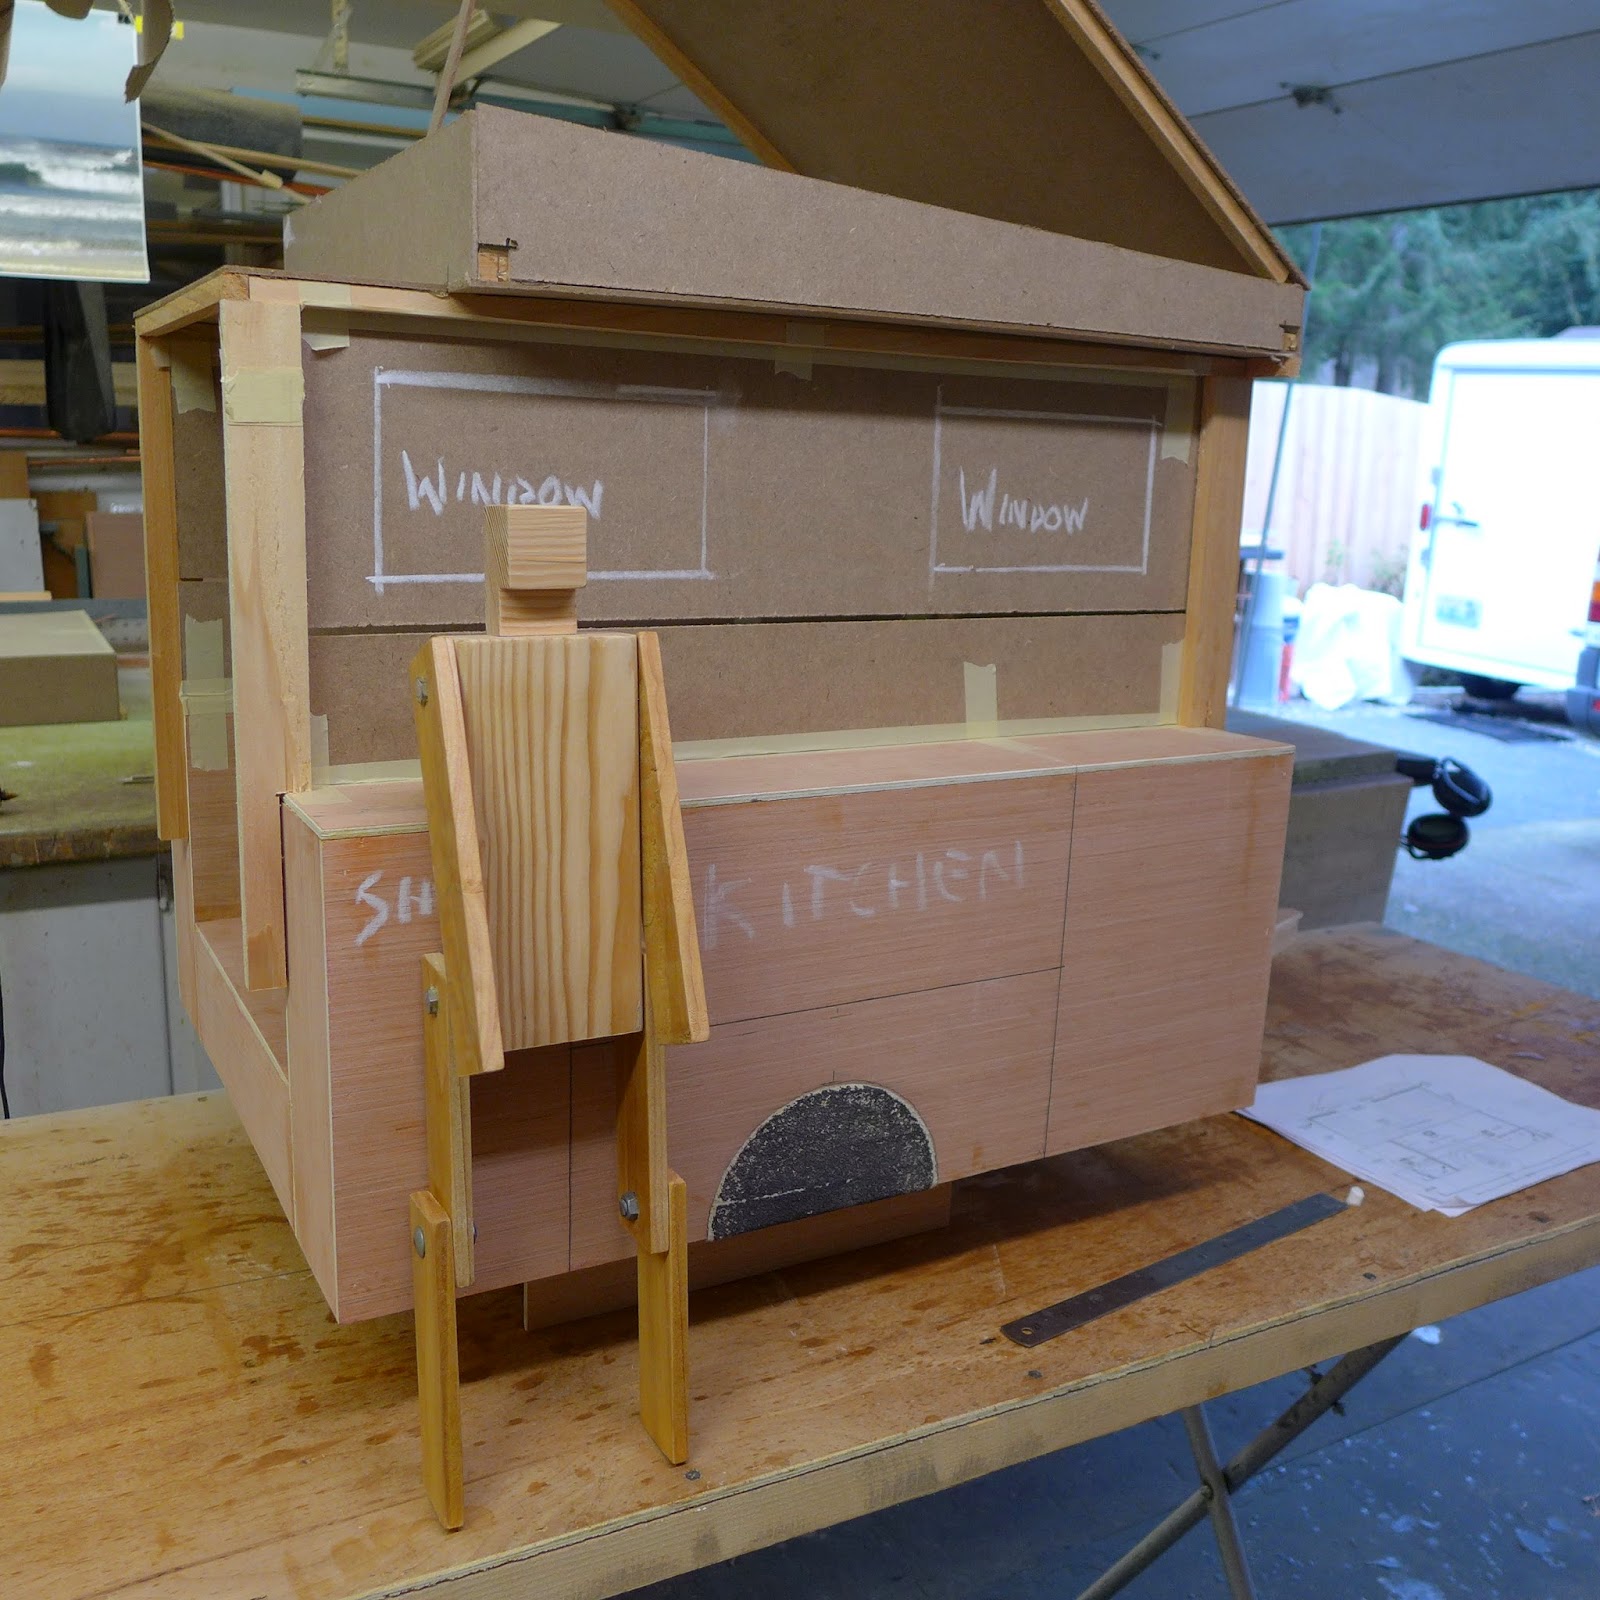
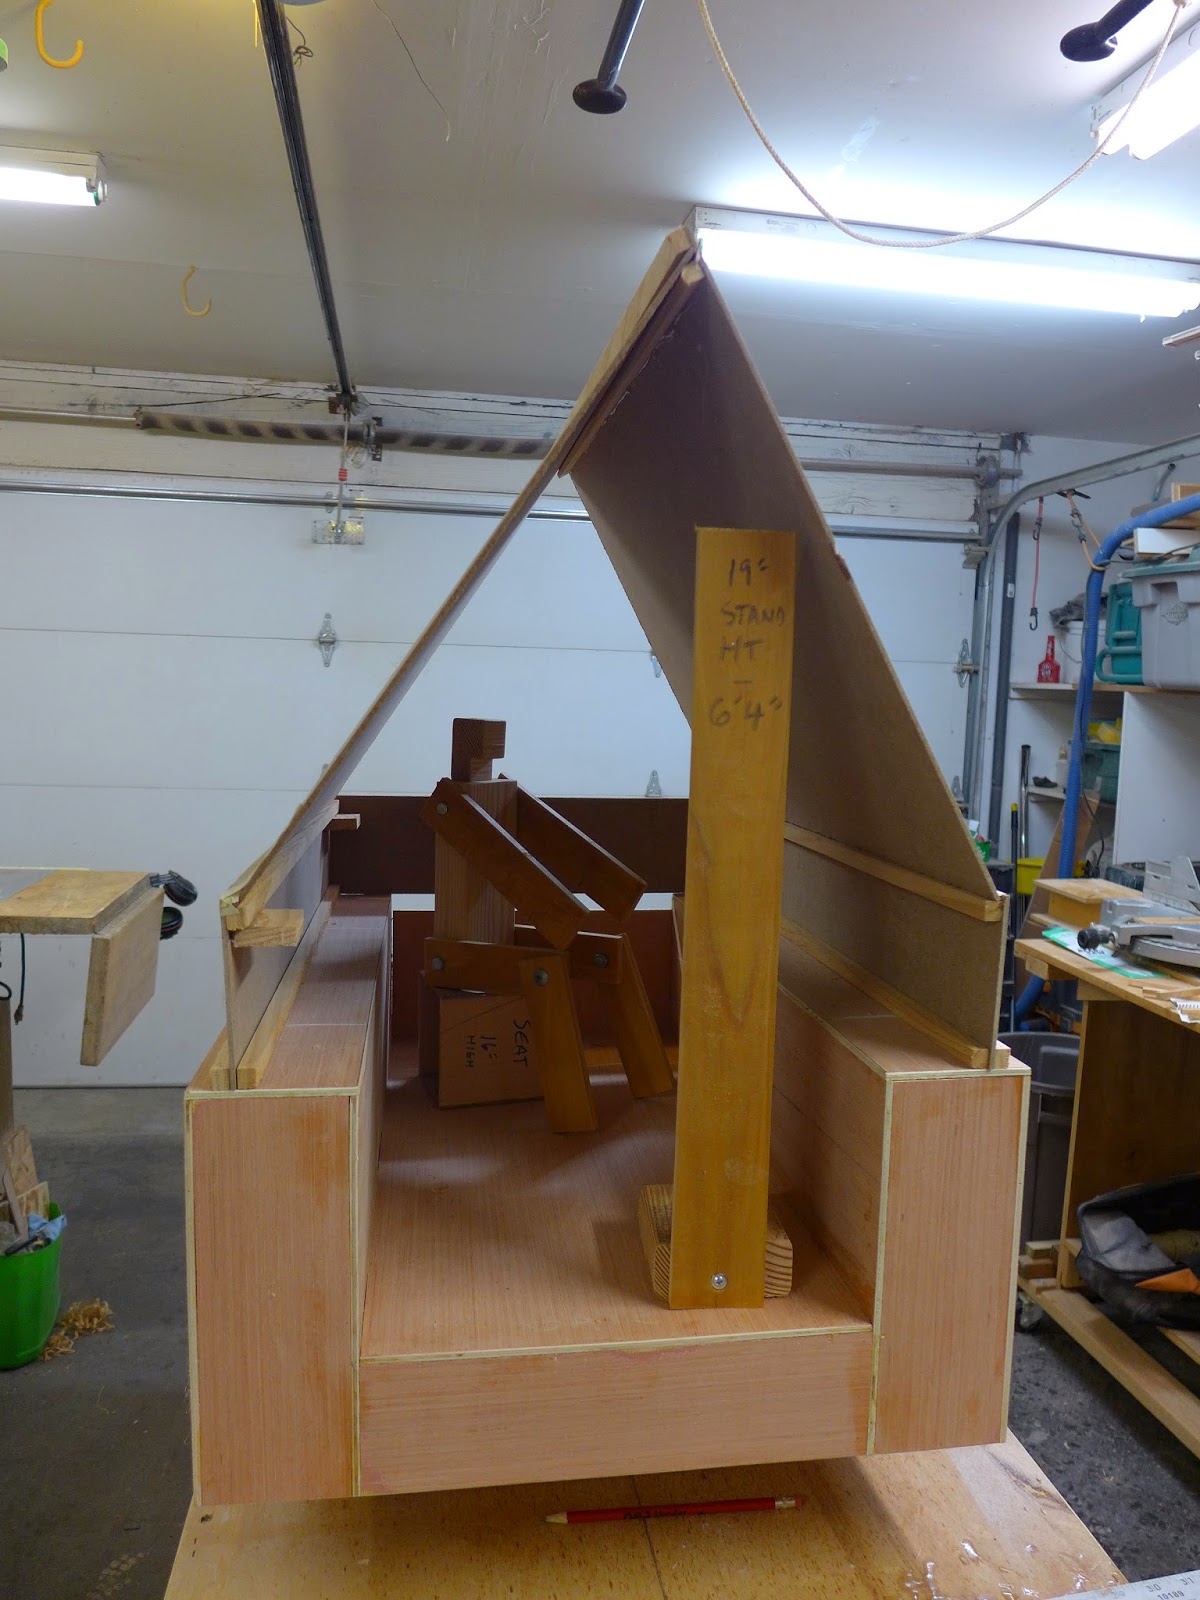
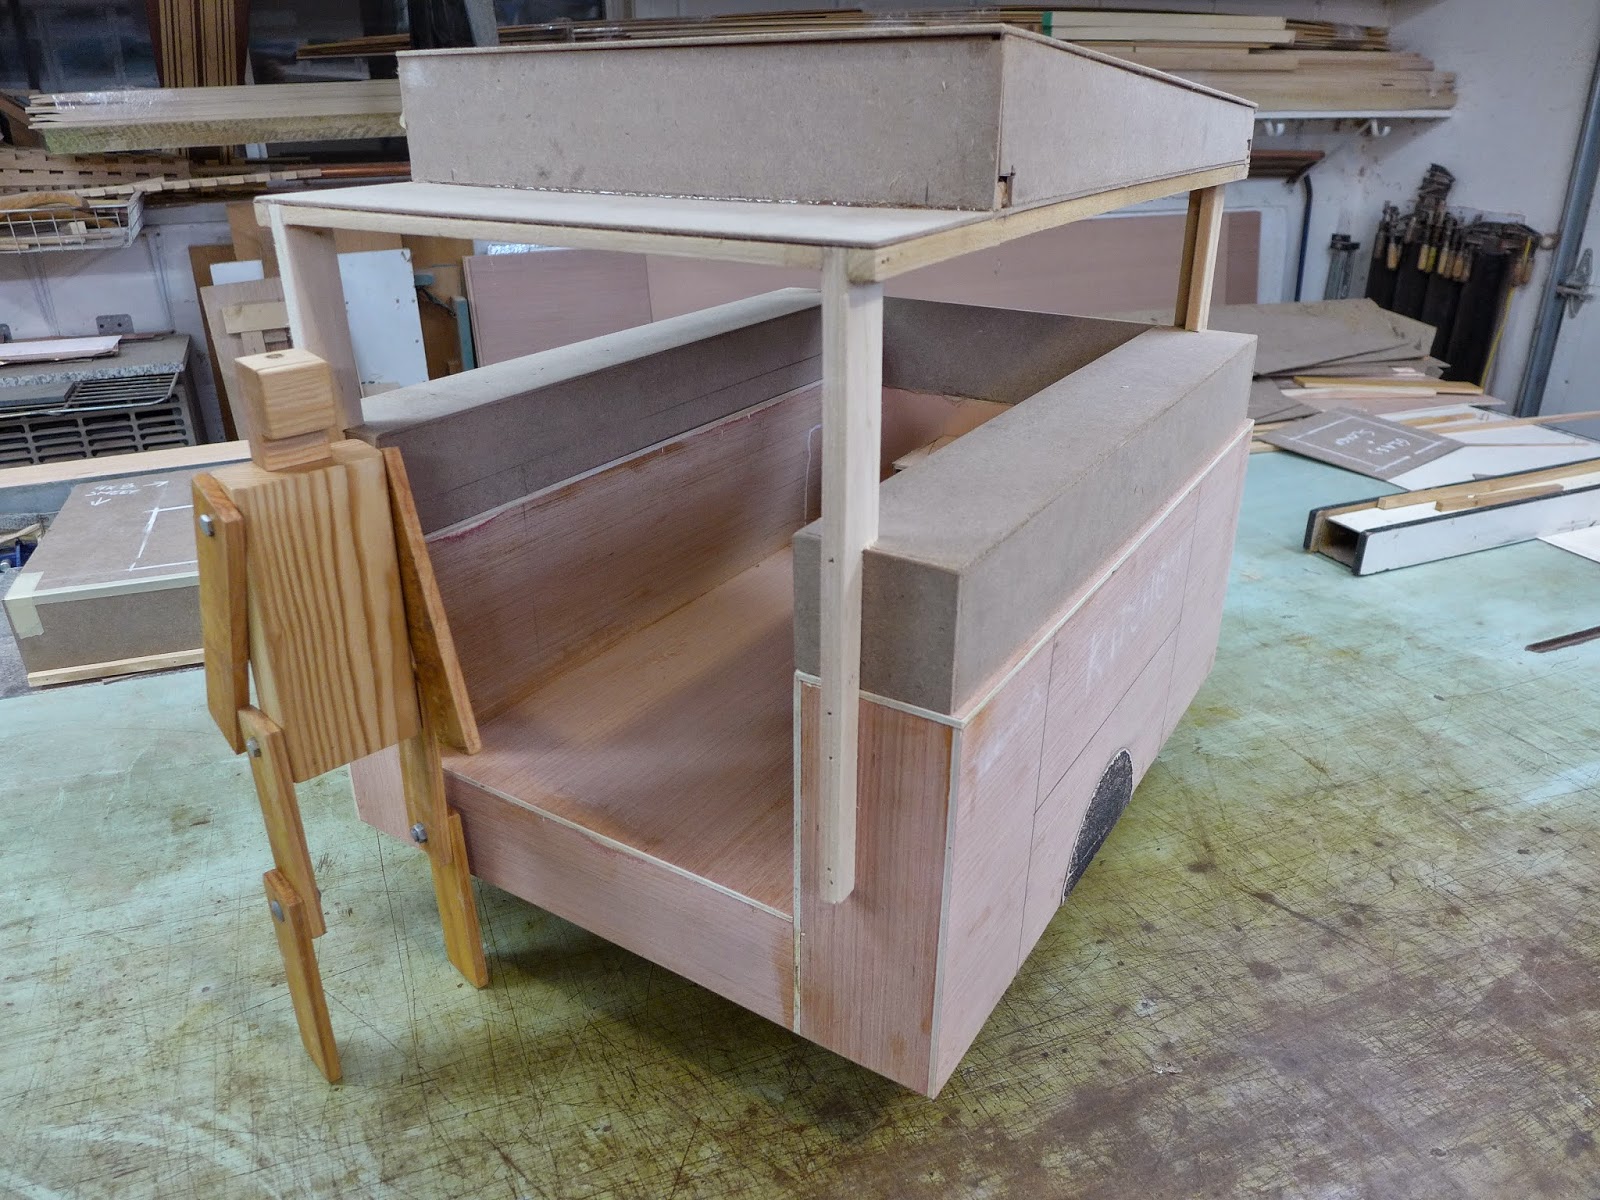
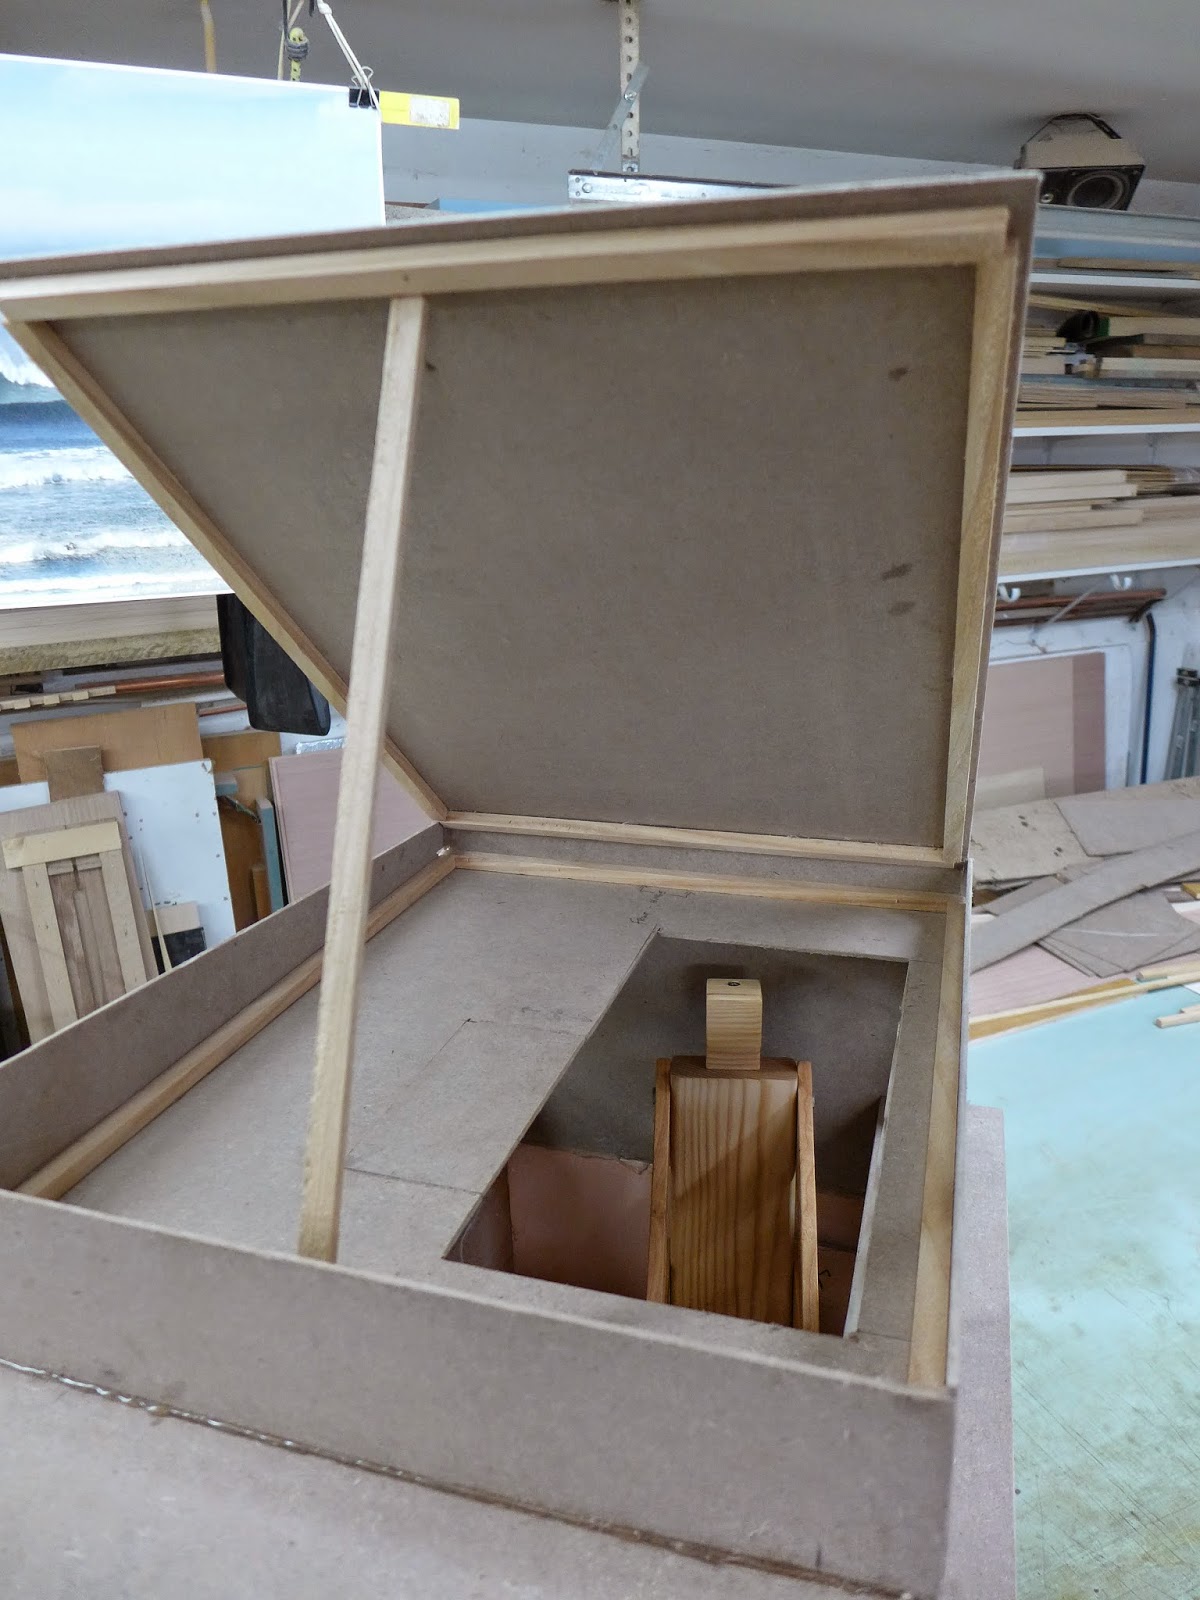
(above) Mike came up with a set of measured drawings and from those, the trailer model was transformed into a 3D representation of the space...
(above) If that was me, my fingertips would be at 8'2" from the ground...
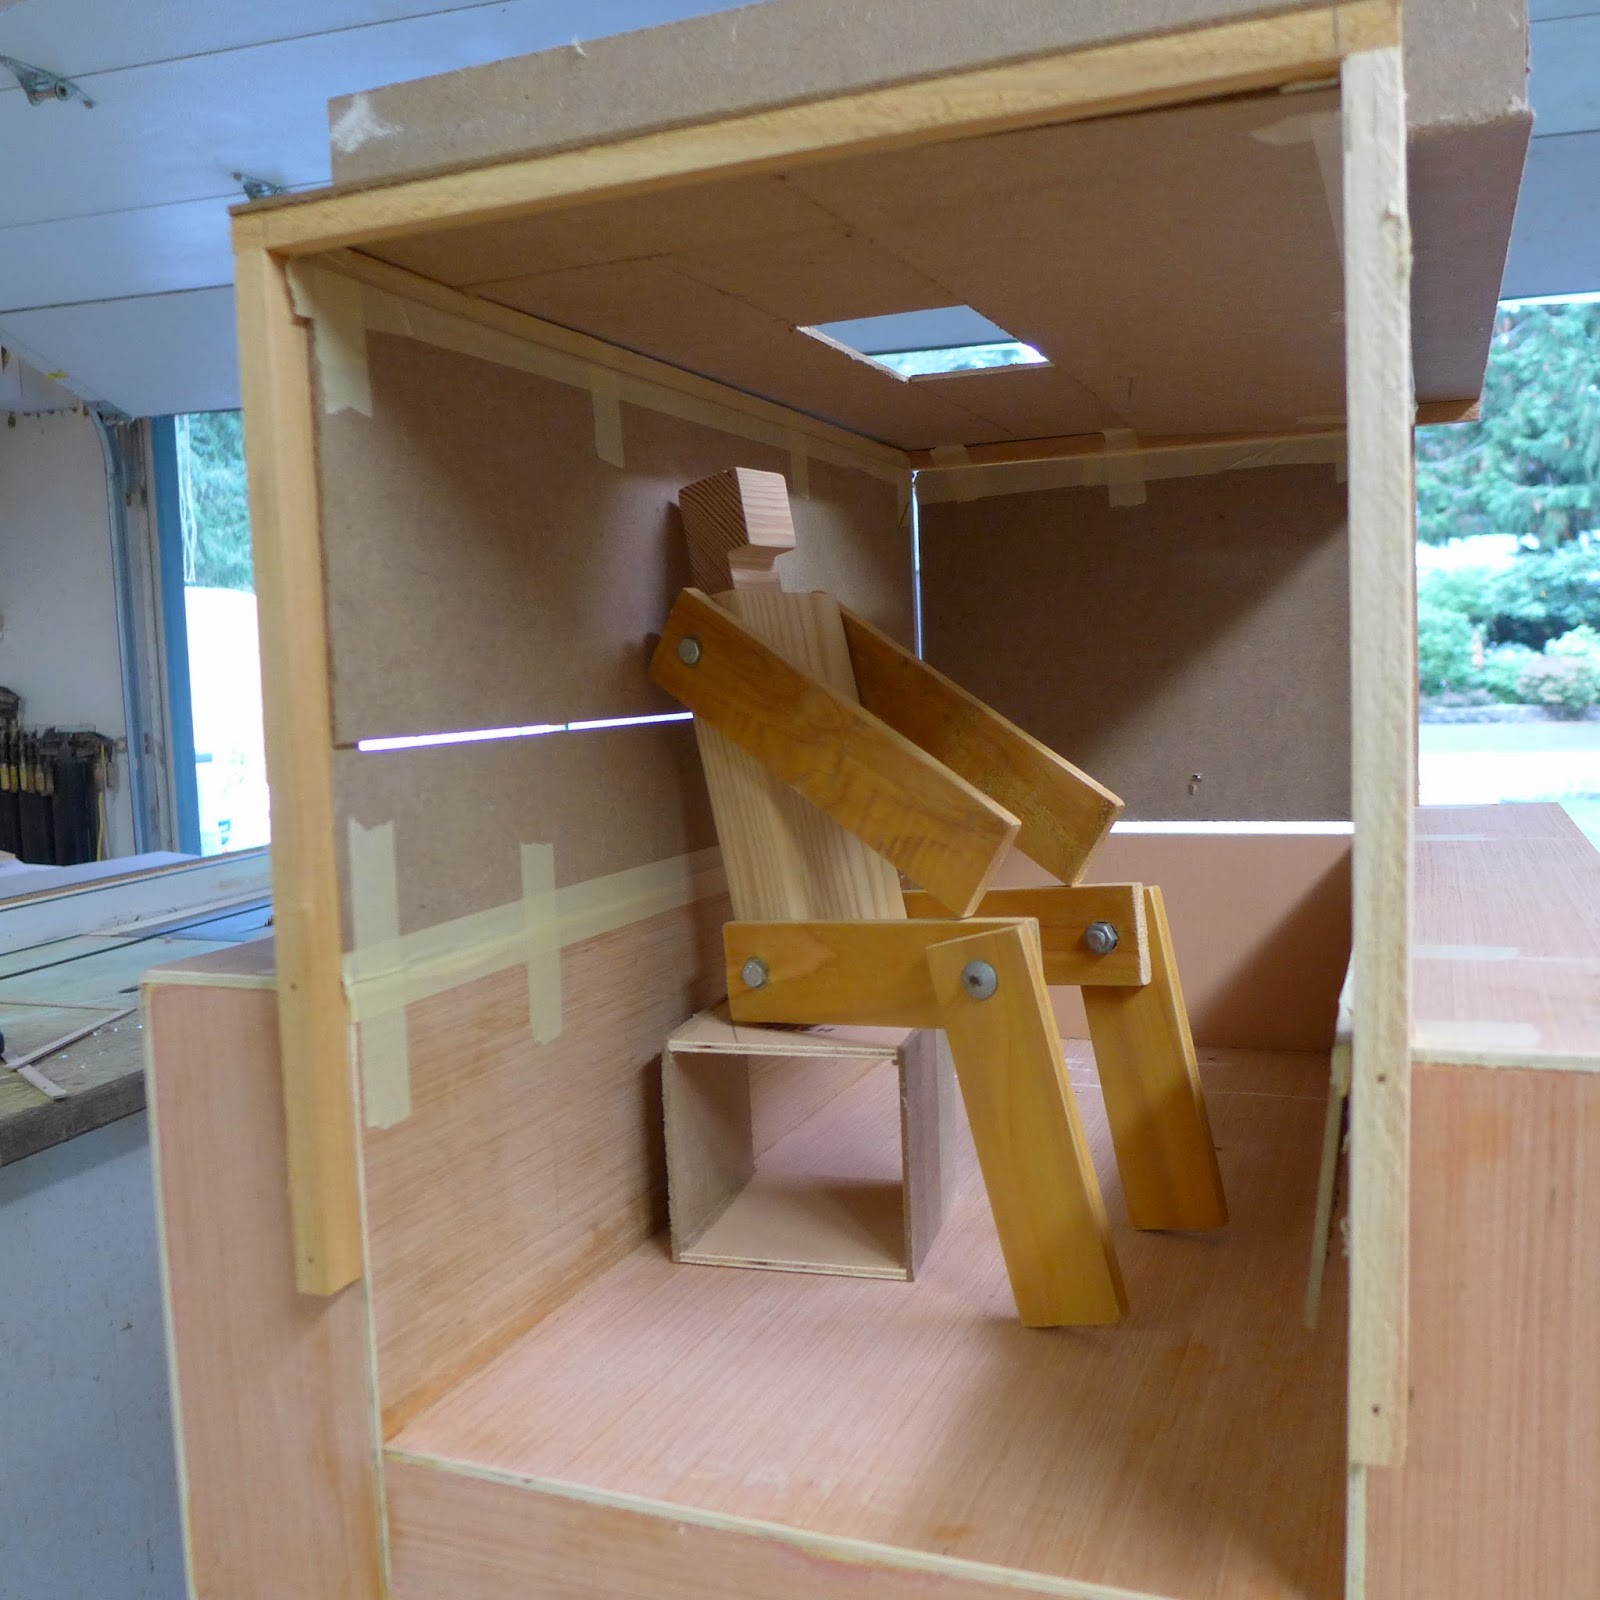
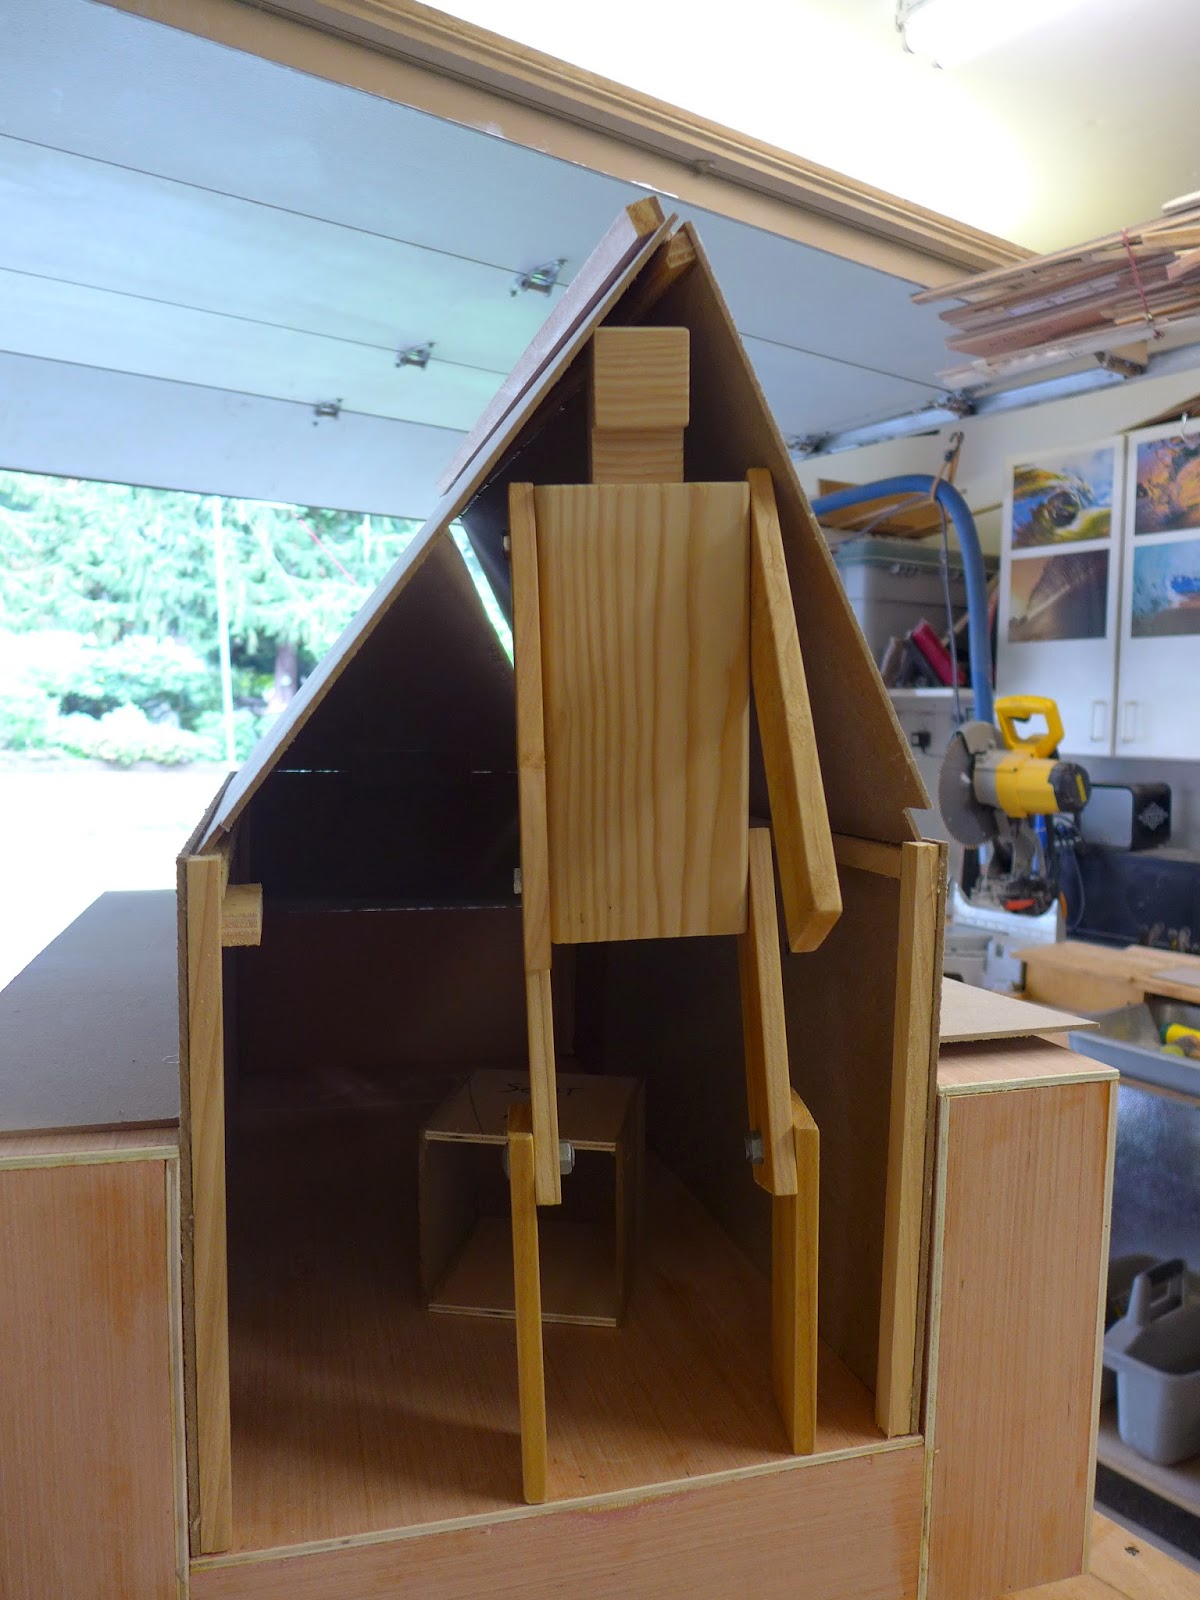
(above) Made a seat and got an idea of what it might be like inside...
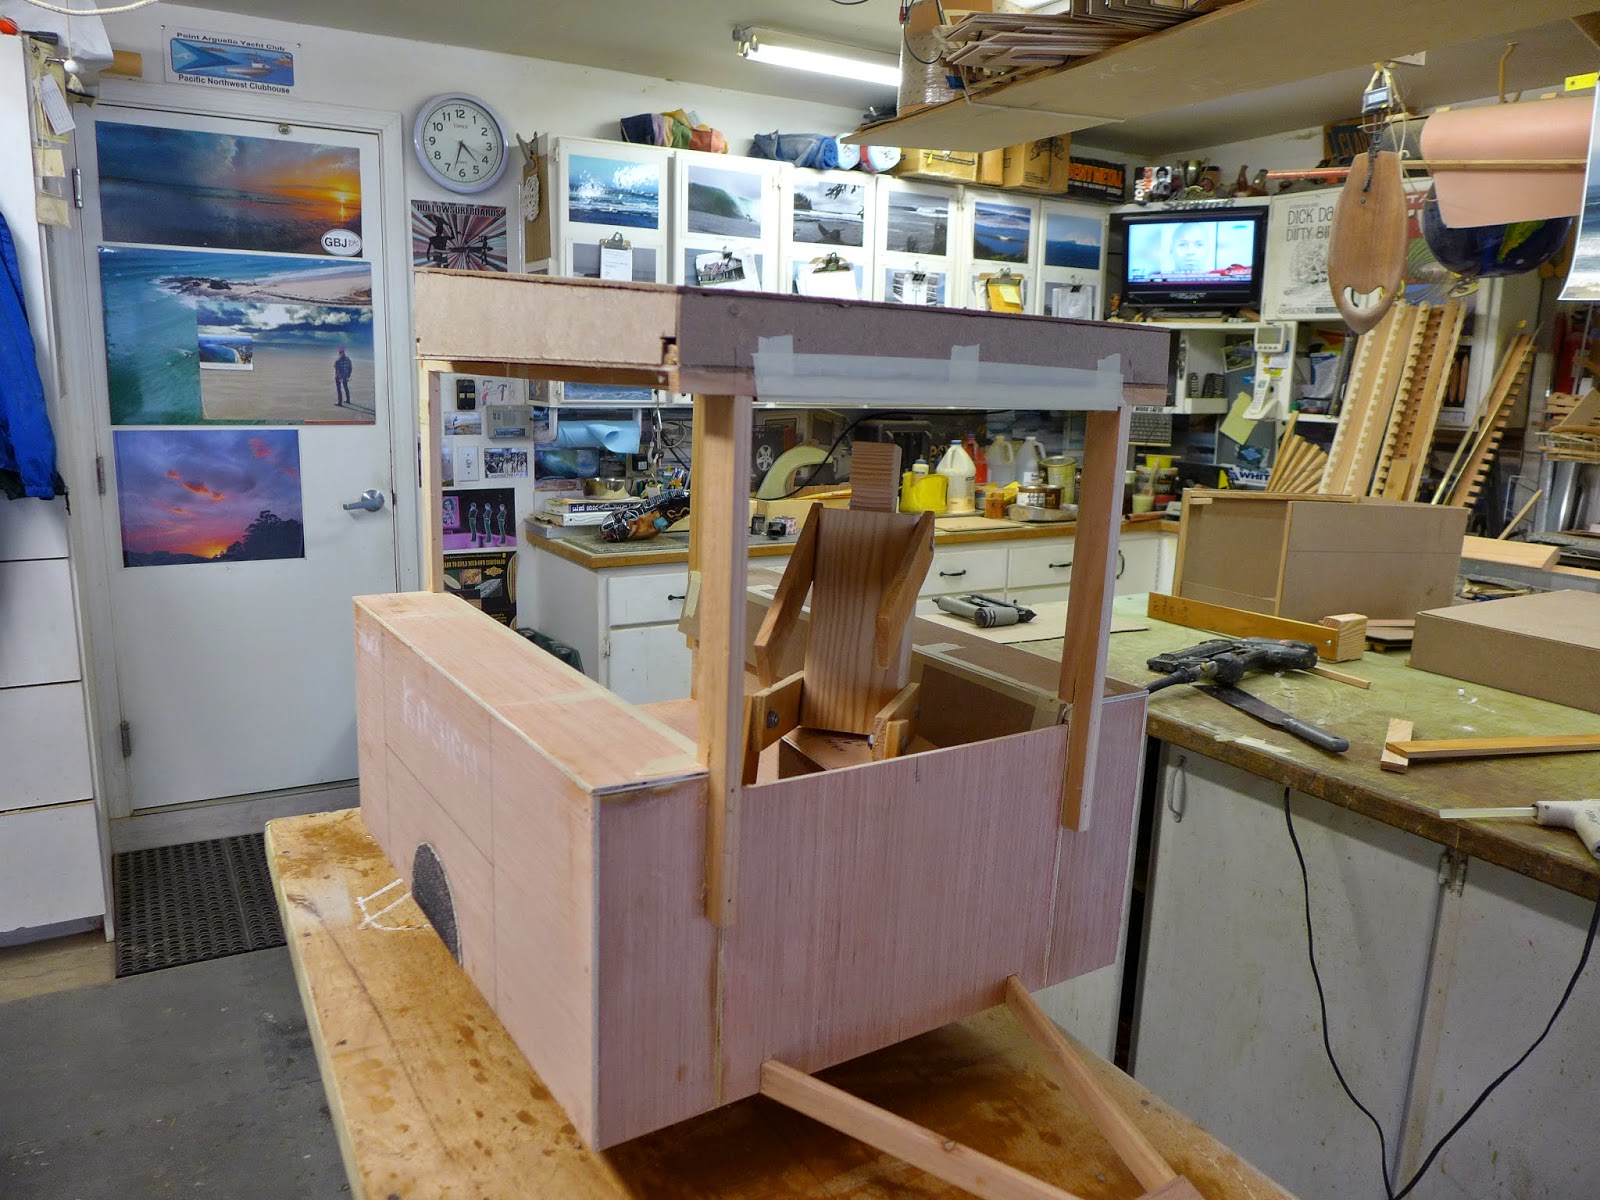
(above) The build today was made with 1/8" hardboard and a hot glue gun... The rack is scrap cedar... Hinges are masking tape... As it sits now, it's ready to transform into a camper...
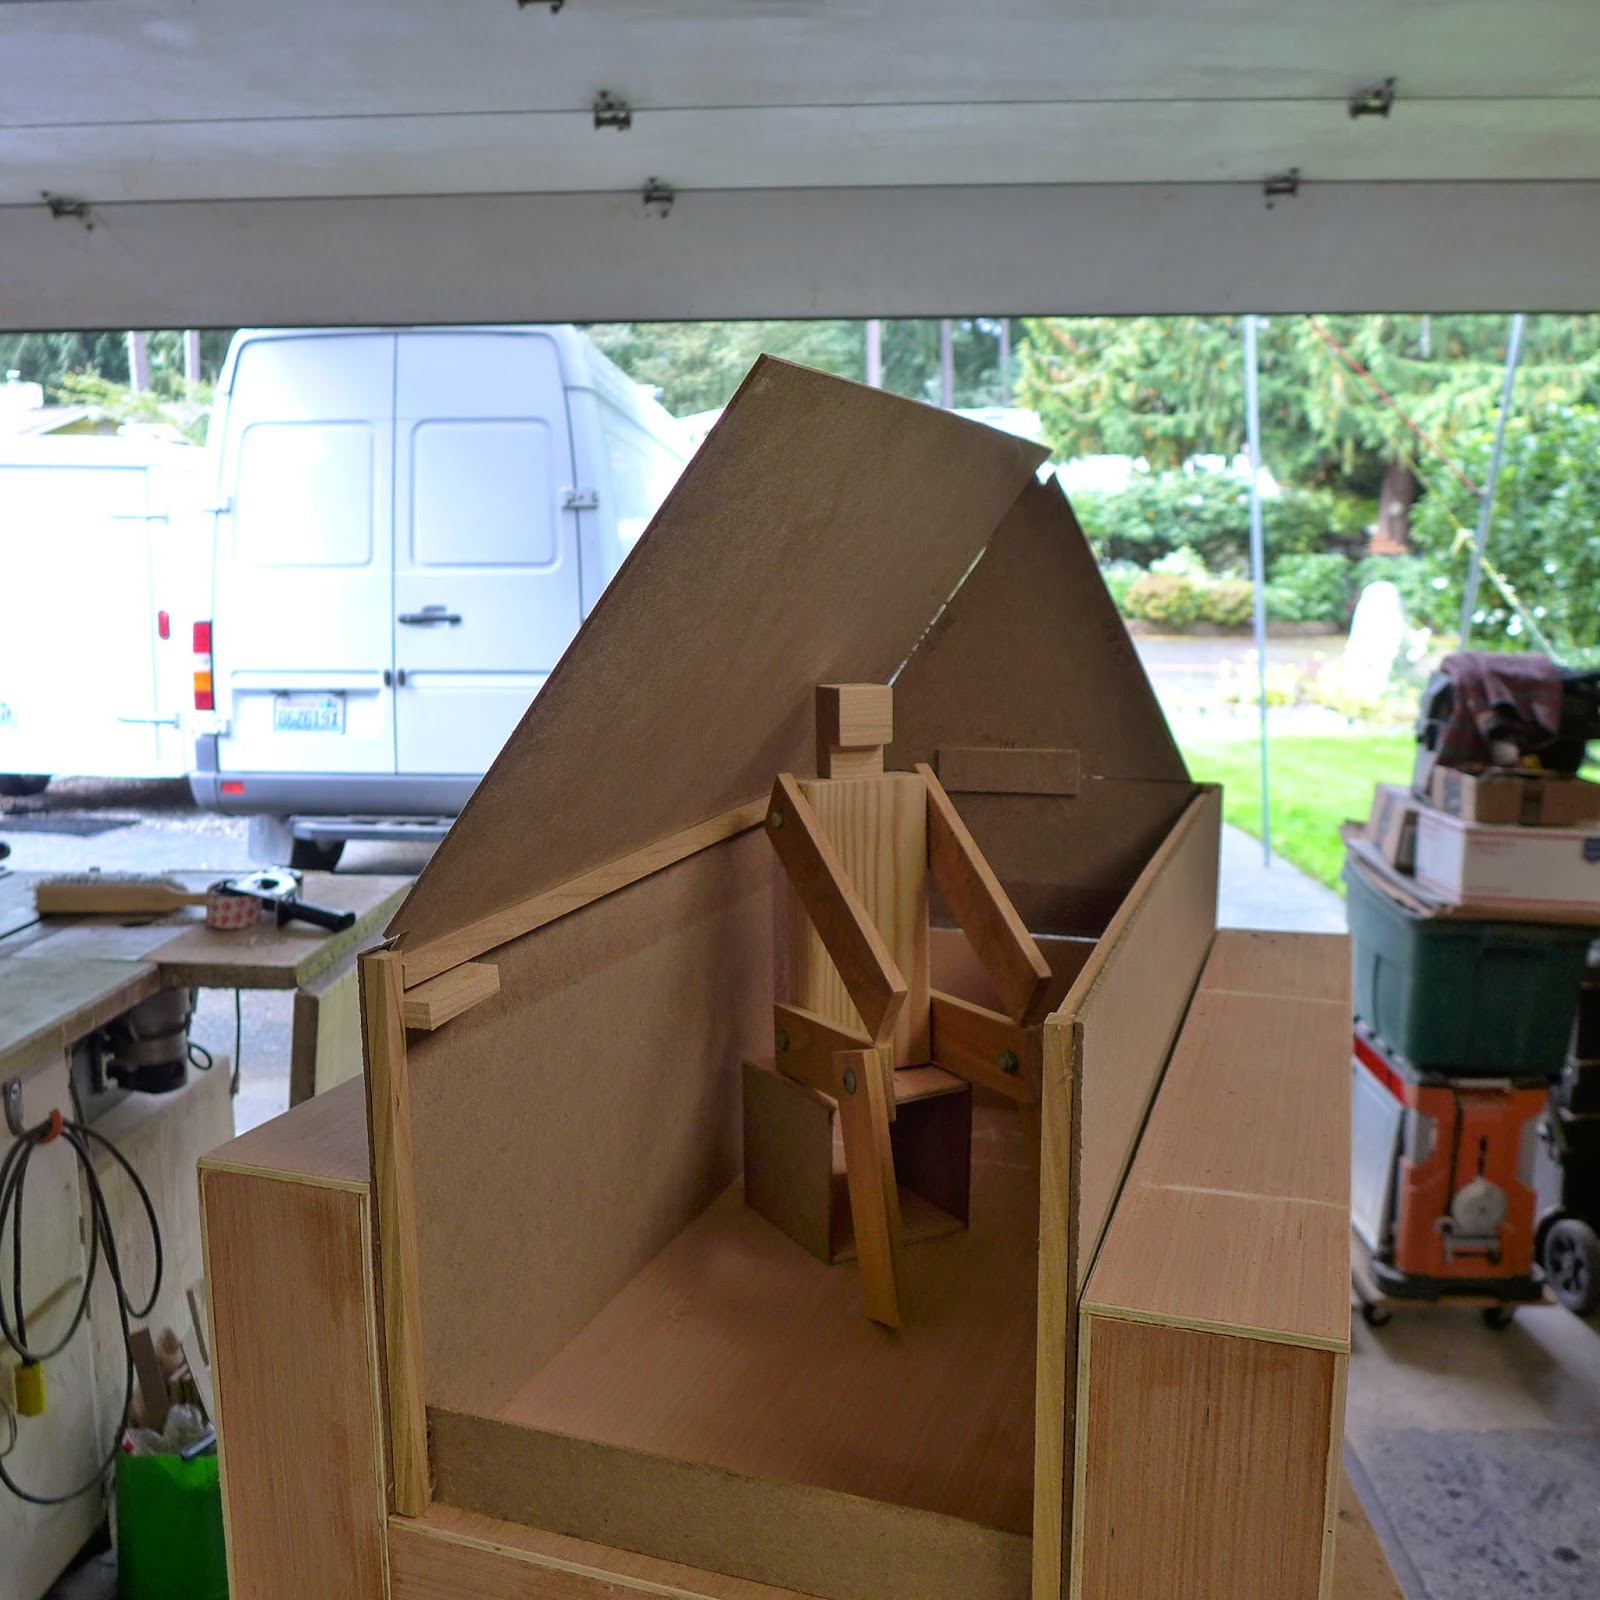
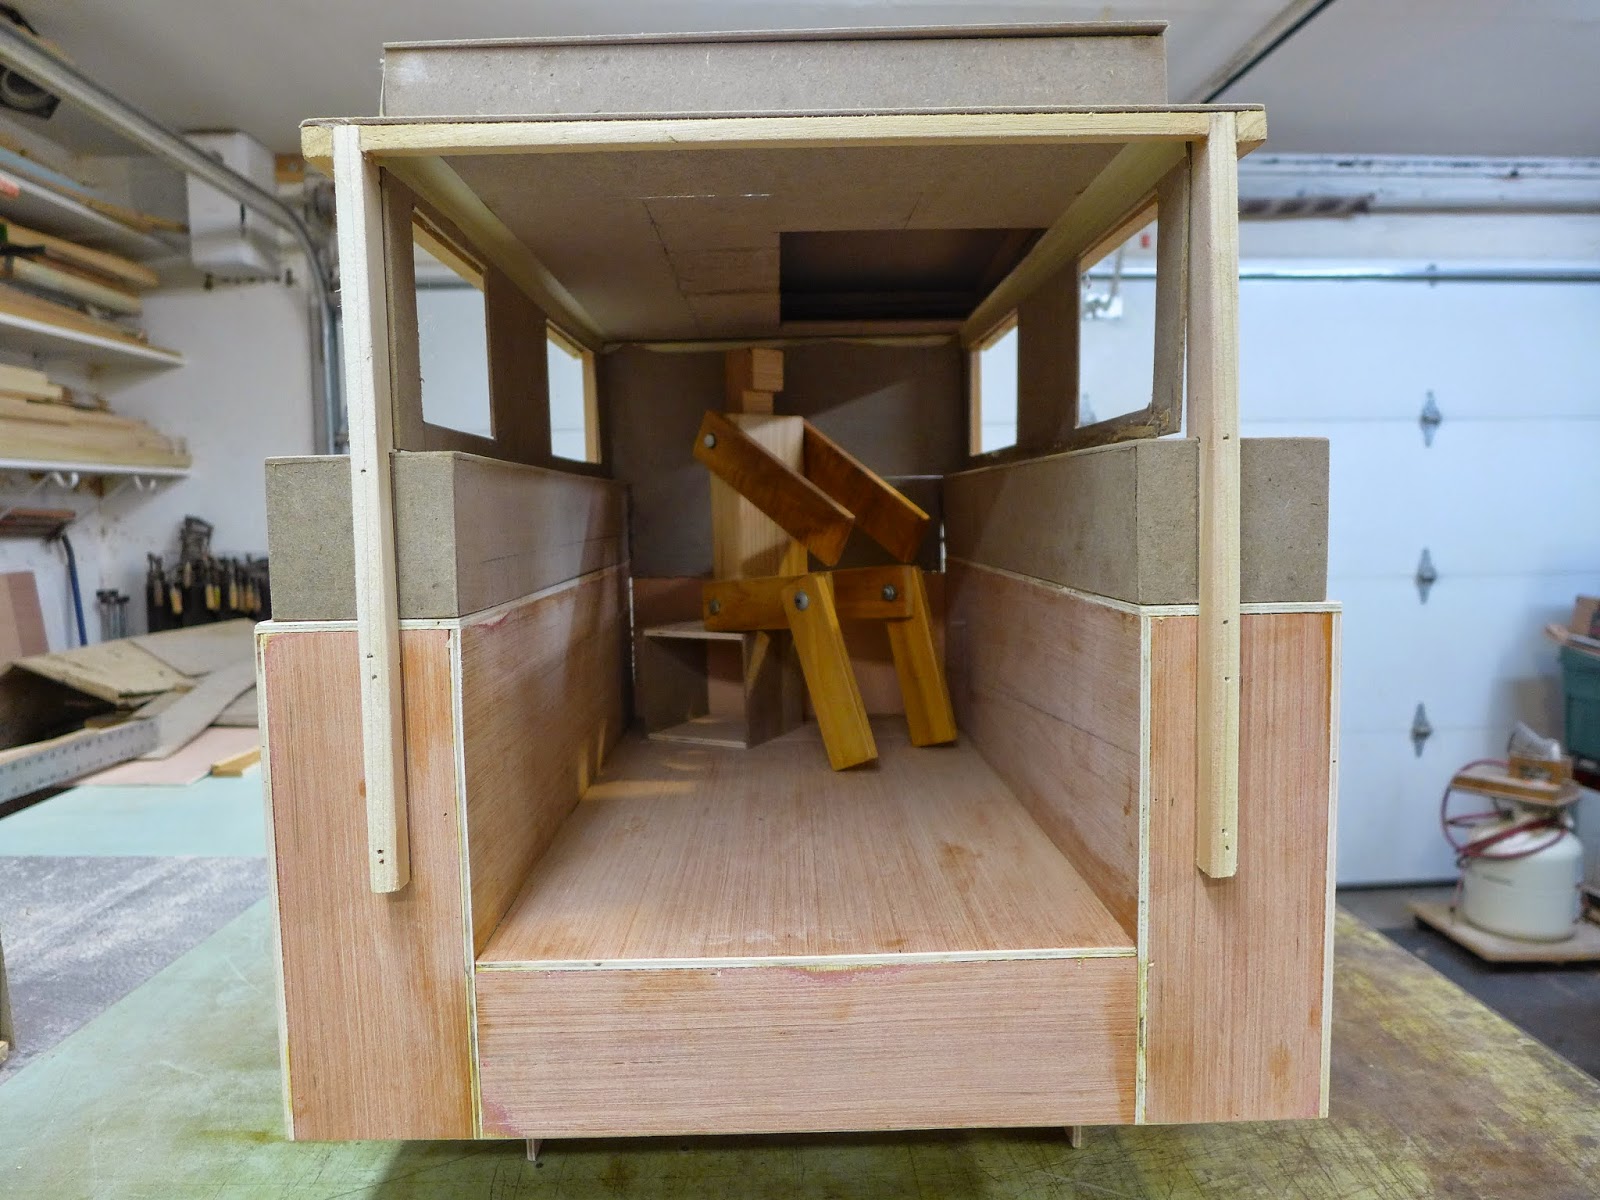
(above) Hinged to the roof pod is the hitch-end wall panel...It drops down...
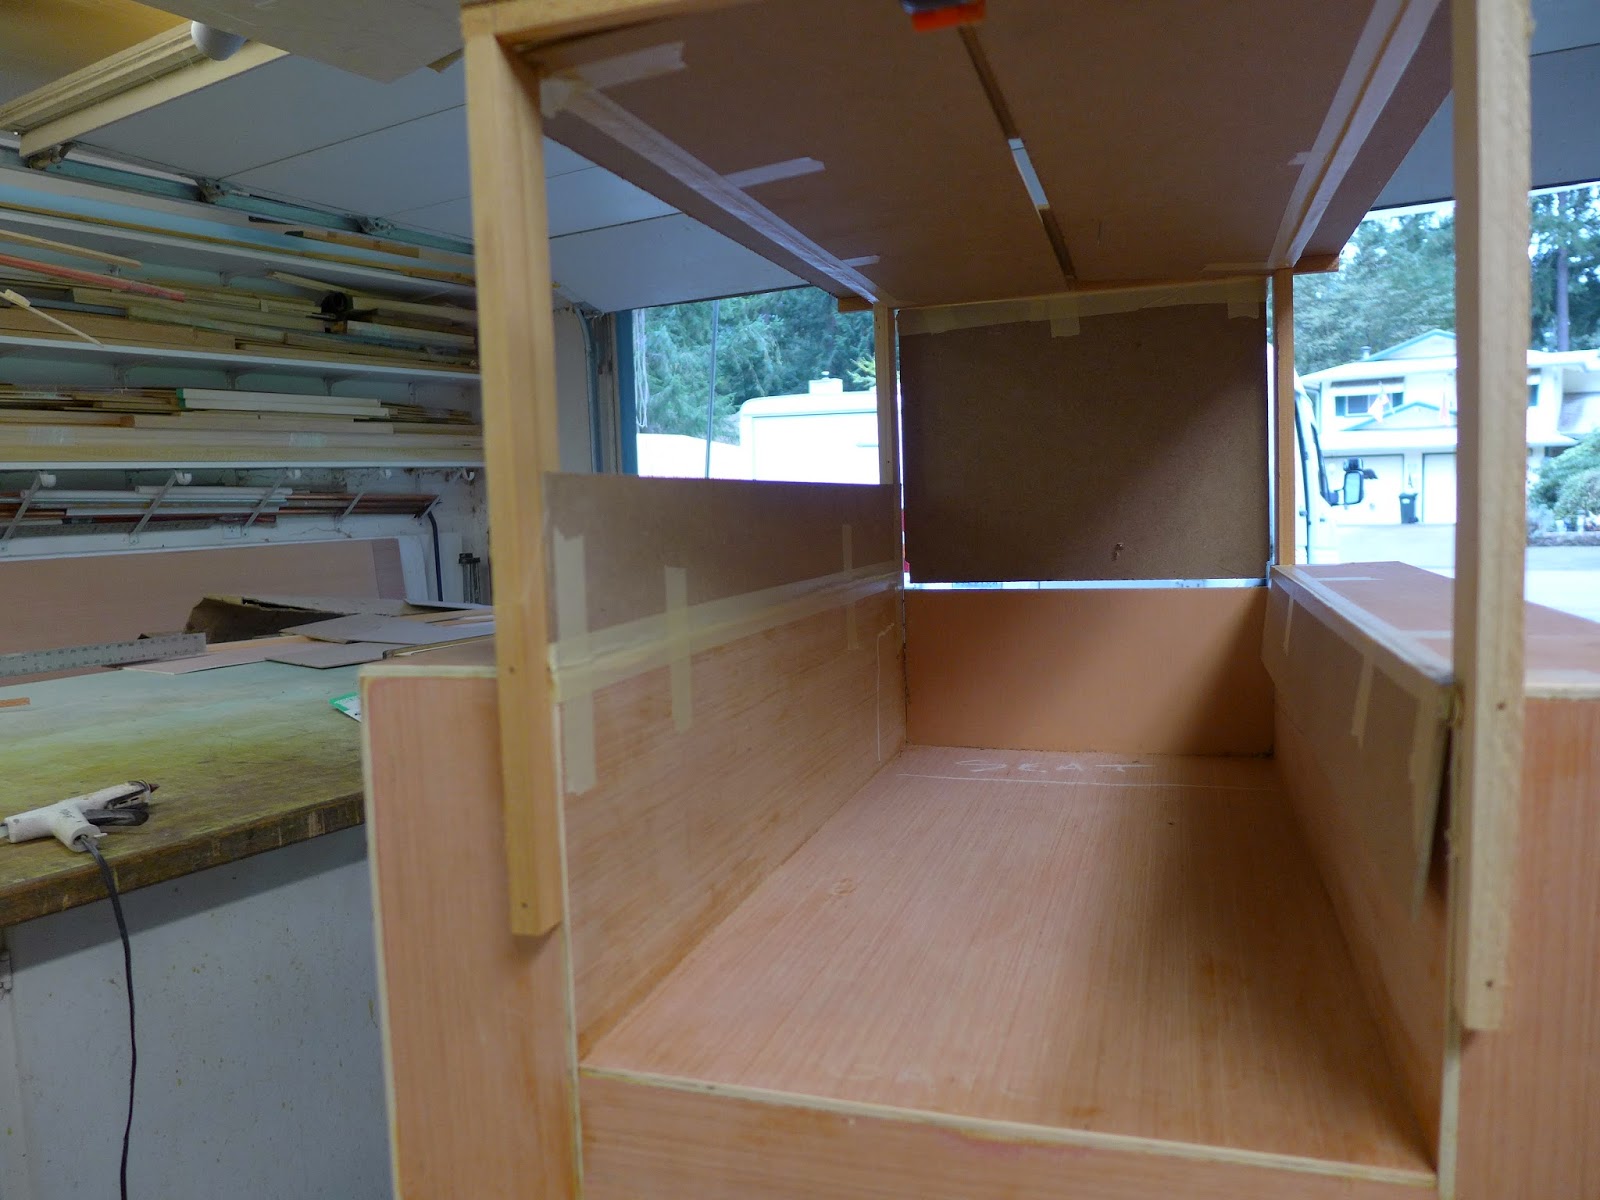
(above) Lifting up are hinged lower wall panels...
(above) Next, the upper wall panels hinge down to meet the lower wall panels... That hole in the ceiling is a proposed access hatch to the roof top tent...
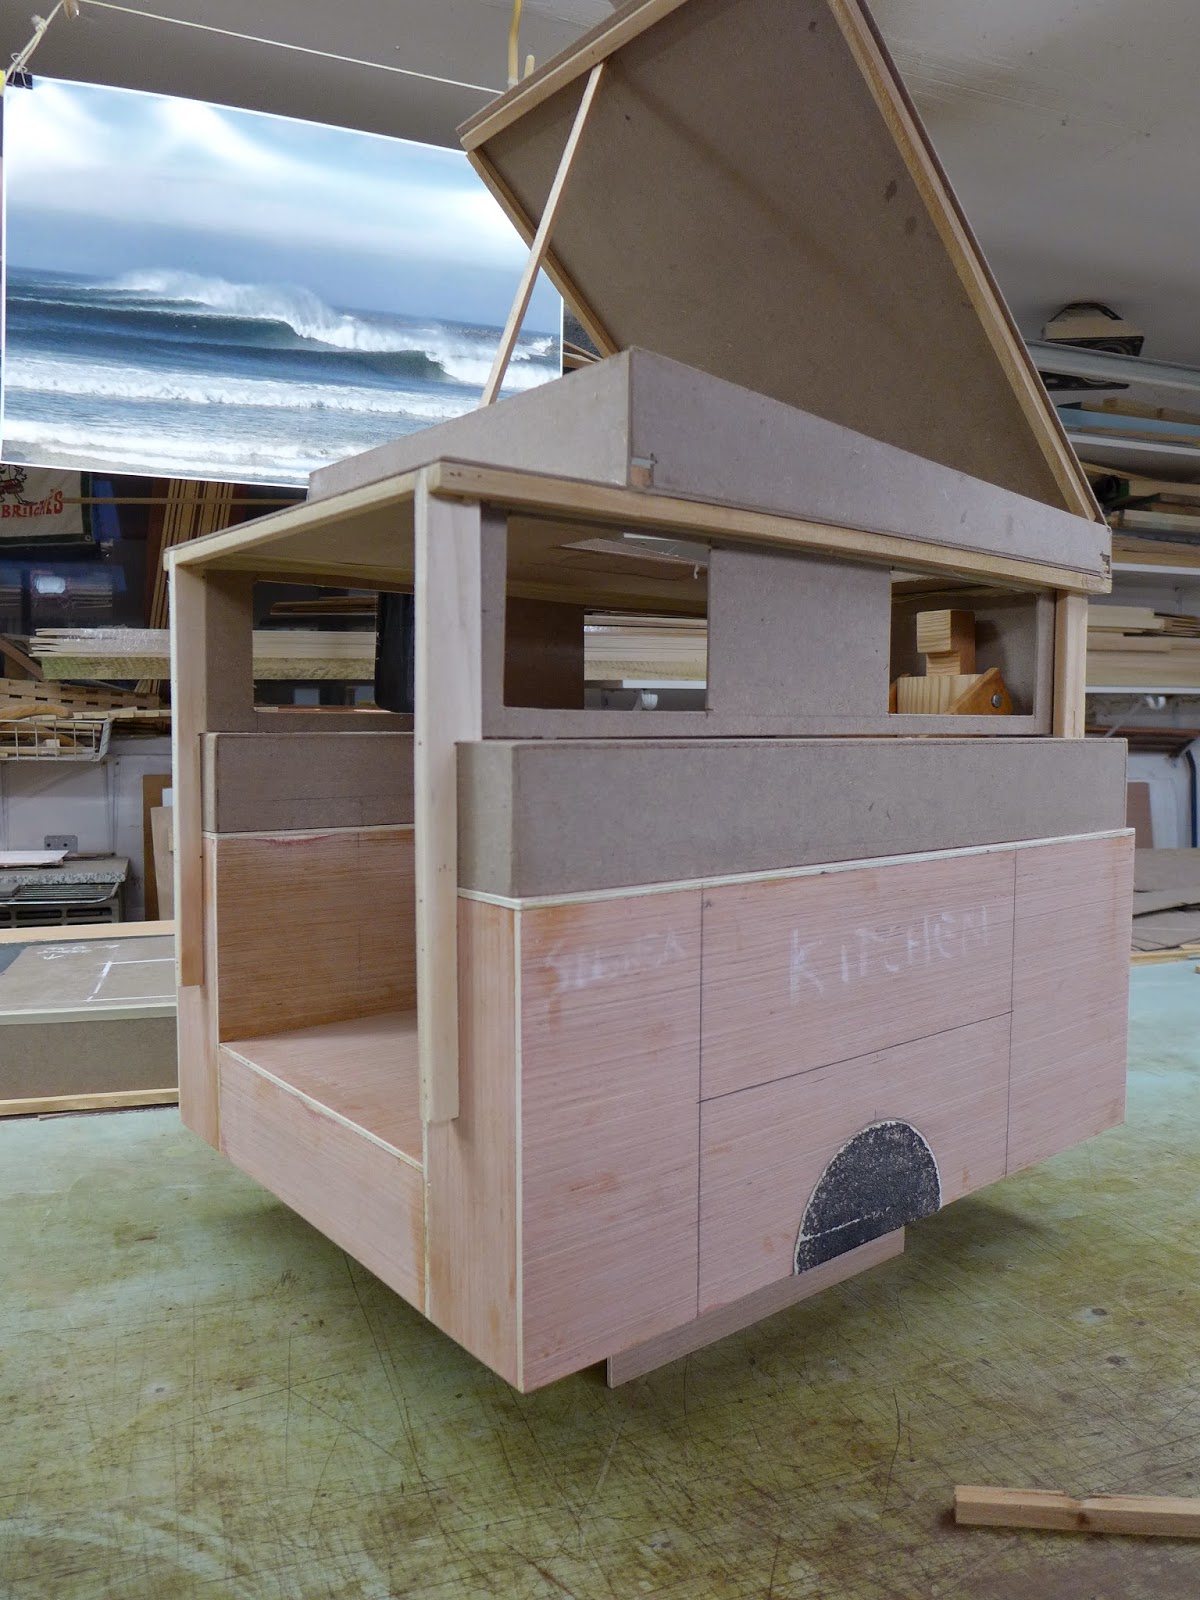
(above) Outside it might be something like this...
(above) With the tent open it really stands tall...

(above) The bed in the tent is queen size...
(above) Not a bad start... Now the refinement begins...
I also made a couple other cabin options, based on an A-frame design...
(above) Ready to set-up...
(above) The roof is hinged at the walls... The roof ridge locks the panels together... This model has the walls resting on the service body and that results in the ceiling ridge about eight feet from the floor...Lower than the roof top tent fully extended...
(above) Another model that has the walls as wide as the body bed...
(above) Tighter inside if you want to stand tall...
(above) With both A-frame options, there would be about this much room with the roof folded flat...
Building the proposed trailer configuration to scale this way really helps me (and hopefully you) to understand the design in ways that paper plans or computer screens can't... Changes are simple and comparing options is fast...
Onward...
(above) Mike came up with a set of measured drawings and from those, the trailer model was transformed into a 3D representation of the space...
(above) If that was me, my fingertips would be at 8'2" from the ground...
(above) Made a seat and got an idea of what it might be like inside...
(above) The build today was made with 1/8" hardboard and a hot glue gun... The rack is scrap cedar... Hinges are masking tape... As it sits now, it's ready to transform into a camper...
(above) Hinged to the roof pod is the hitch-end wall panel...It drops down...
(above) Lifting up are hinged lower wall panels...
(above) Next, the upper wall panels hinge down to meet the lower wall panels... That hole in the ceiling is a proposed access hatch to the roof top tent...
(above) Outside it might be something like this...
(above) With the tent open it really stands tall...
(above) The bed in the tent is queen size...
(above) Not a bad start... Now the refinement begins...
I also made a couple other cabin options, based on an A-frame design...
(above) Ready to set-up...
(above) The roof is hinged at the walls... The roof ridge locks the panels together... This model has the walls resting on the service body and that results in the ceiling ridge about eight feet from the floor...Lower than the roof top tent fully extended...
(above) Another model that has the walls as wide as the body bed...
(above) Tighter inside if you want to stand tall...
(above) With both A-frame options, there would be about this much room with the roof folded flat...
Building the proposed trailer configuration to scale this way really helps me (and hopefully you) to understand the design in ways that paper plans or computer screens can't... Changes are simple and comparing options is fast...
Onward...
PaulJensen
Custom Builder
03
(above) After talking with Mike, we sort of agreed that this is close to what he wants...This is an evolutionary process...
Over the existing service body will be plywood "pods"...Storage compartments and a slide-out kitchen, accessible from the inside...Since the pods will be exposed to the weather, rainproofness is designed into the build... The roof-top tent is lowered a bit and extended forward to allow about a 2' porch area at the rear of the upper rack...
(above) Inside, the ceiling is a few inches lower... You can also get a sense of the accessibility to the new pod storage and kitchen areas... The roof-top tent floor is further cut away to give more of a walking galley... The lower cabin area is not fully defined yet, but promises to be interesting...
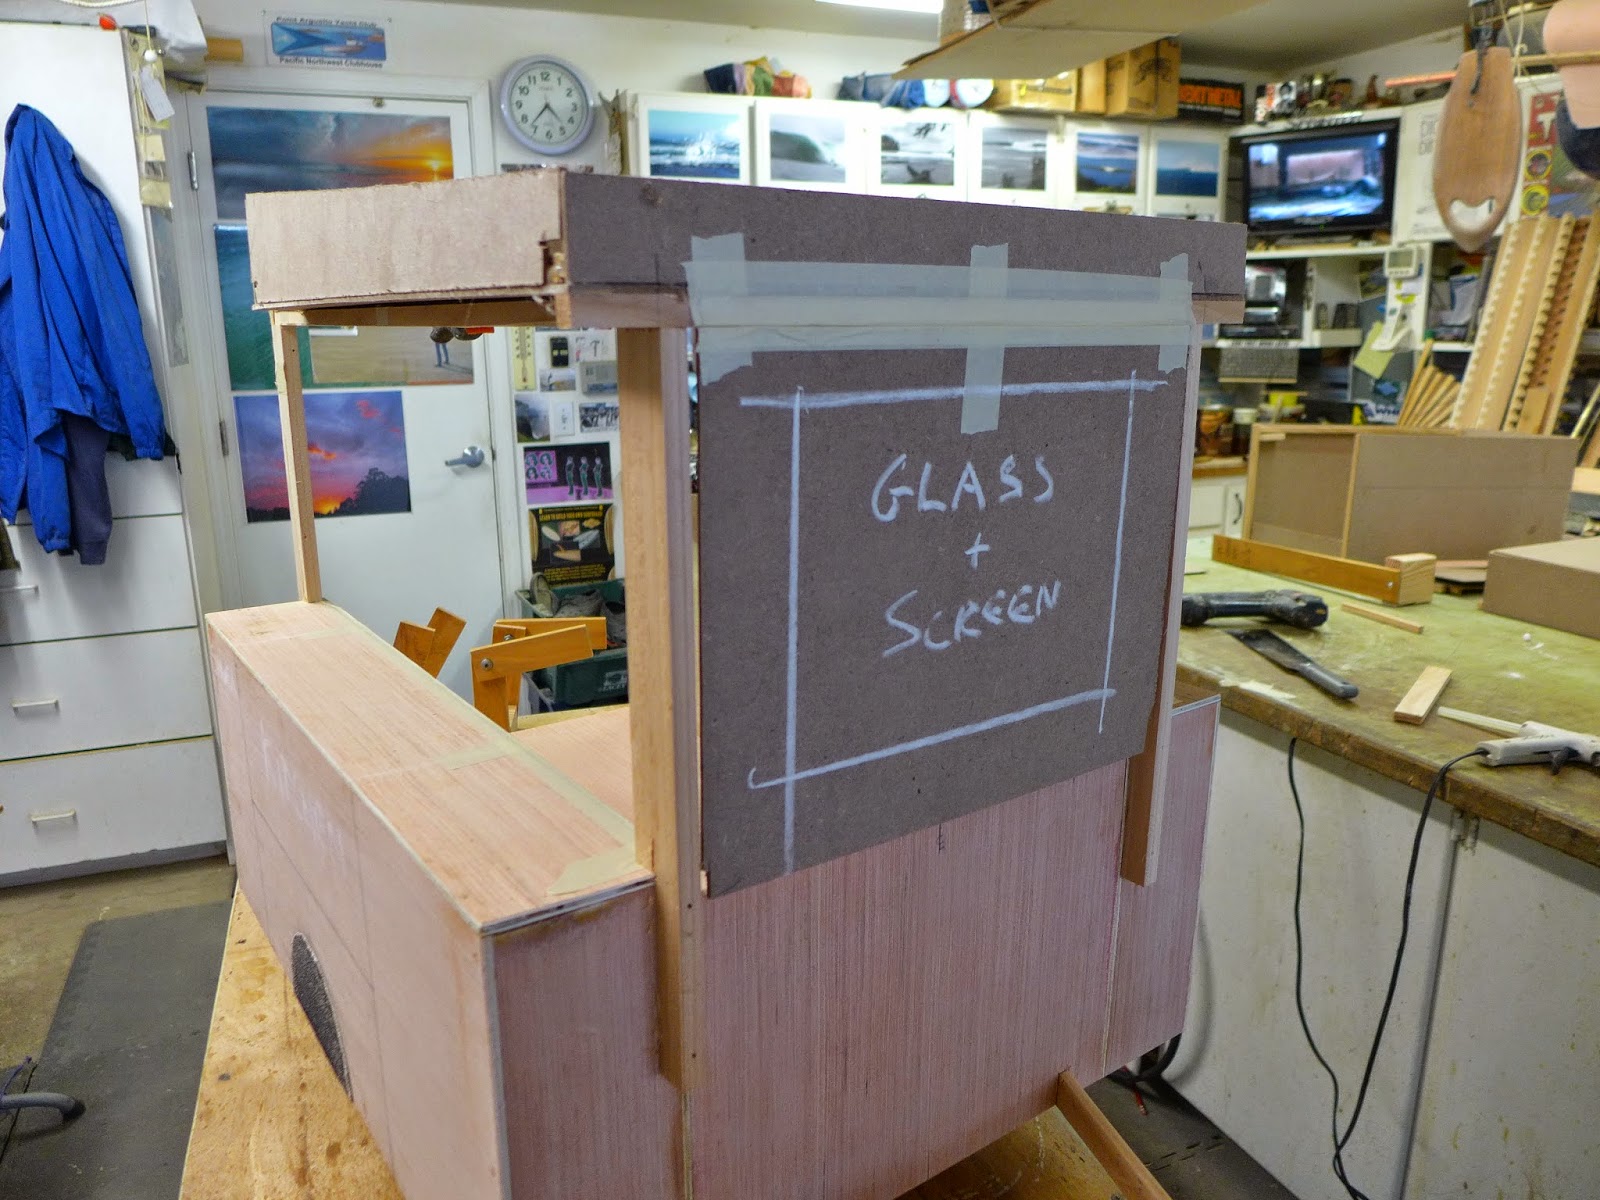
(above) The fold up walls are shorter now... The window sizes are likely to be 16"x24" and 16"x32"...
(above) This configuration makes roof access to the tent significantly easier...
(above) When you are not hanging out and enjoying the view from up high, the "upper patio" is also big enough to store stuff... For those times when you just need to bring more, stuff...
(above) Up in the roof-top tent, the sleeping area will primarily be for one, but expands to two by extending a sliding platform (not shown) over the floor opening...When configured for one, you can access the tent from the inside.... With two, you need to go up on the roof...
More later...
(above) After talking with Mike, we sort of agreed that this is close to what he wants...This is an evolutionary process...
Over the existing service body will be plywood "pods"...Storage compartments and a slide-out kitchen, accessible from the inside...Since the pods will be exposed to the weather, rainproofness is designed into the build... The roof-top tent is lowered a bit and extended forward to allow about a 2' porch area at the rear of the upper rack...
(above) Inside, the ceiling is a few inches lower... You can also get a sense of the accessibility to the new pod storage and kitchen areas... The roof-top tent floor is further cut away to give more of a walking galley... The lower cabin area is not fully defined yet, but promises to be interesting...
(above) The fold up walls are shorter now... The window sizes are likely to be 16"x24" and 16"x32"...
(above) This configuration makes roof access to the tent significantly easier...
(above) When you are not hanging out and enjoying the view from up high, the "upper patio" is also big enough to store stuff... For those times when you just need to bring more, stuff...
(above) Up in the roof-top tent, the sleeping area will primarily be for one, but expands to two by extending a sliding platform (not shown) over the floor opening...When configured for one, you can access the tent from the inside.... With two, you need to go up on the roof...
More later...
Herbie
Rendezvous Conspirator
Hey Paul (and Mike), regarding ingress/egress for two people using the tent - have you looked into how the Ursa Minor eCamper and Jeep-camper pop-tops do the drop-in panels?
They have their access hole up through the sleeping floor in the same way, but use a pair of divided panels that makes it possible for both people to sleep upstairs without having to enter via the tent-side. There's enough room in the tent for one person to stay in "sleeping" position while other removes one panel, moves in/out, then replaces the panel.
They have their access hole up through the sleeping floor in the same way, but use a pair of divided panels that makes it possible for both people to sleep upstairs without having to enter via the tent-side. There's enough room in the tent for one person to stay in "sleeping" position while other removes one panel, moves in/out, then replaces the panel.
mhiscox
Expedition Leader
Thanks for bringing this up . . . I was working on just that idea yesterday and we could do it. I'm pretty familiar with the Ursa Minor setups and thought about doing ours the same way.Hey Paul (and Mike), regarding ingress/egress for two people using the tent - have you looked into how the Ursa Minor eCamper and Jeep-camper pop-tops do the drop-in panels?
They have their access hole up through the sleeping floor in the same way, but use a pair of divided panels that makes it possible for both people to sleep upstairs without having to enter via the tent-side. There's enough room in the tent for one person to stay in "sleeping" position while other removes one panel, moves in/out, then replaces the panel.
And it may be that we go that direction. At the moment, however, I'm leaning toward the way Paul has it set up for two reasons . . . the first being that using the whole upper bed--what Paul and I are calling the "two amorous people configuration"--is one of the least likely arrangements I'll run into, and thus it may not be worth giving up full flexibility for the cutout size and position. The other is that we're growing fond of the rear porch storage idea, which will require us to have a way to climb up the back anyway, so the path up to the tent will be built regardless.
The current plan is to get an upholsterer to make the mattress fold in the middle, so in one-person use, it'd be twice as thick (which can only be good) and to have a board that's stored under the mattress to pull out to cover the cutout. That'll make it really quick to push the board over the hole and unfold the mattress. But it wouldn't be difficult to subdivide the board and put another fold in the mattress to allow the interior access you suggest. I'll talk with Paul and see if it seems worth the effort.
Thanks for the help. Always appreciated.
This is going to be cool...
Reluctant to post this up as Paul and Mikes design and execution track record exceeds anything I have attempted let alone created but here goes.
Iooking at the mock up I cant help but think mounting the Autohome hard to one side would have some advantages.
Assuming it us mounted hard to the passenger side (which should be the "living" or kitchen side if I don't miss my guess) gives an extra foot or so of coverage for the retractable awning which is bound to show up...
The now exposed top of the drivers side tool body becomes a very nice standing platform for entering the tent from the side door (in couples mode).
Onto the cutout...
I would center the floor cutout in the bottom of the Autohome and size it for a bunk on either side. Maybe have some sort of flip up bed side that would help keep young kids in place when up and serve as the floor when folded down in couples mode.
(I am thinking about a purely hypothetical situation where a mom and dad with two kids want to haul a few dirtbikes down to the beach for a weekend with something like a Landcruiser, which has is own sleeping platform already. Mom and dad sleep in the cruiser and the small herd sleeps in the trailer... After the Trail bikes have been unloaded of course...)
Cheers
Chris
Forum statistics
Members online
- DisRunna
- WideOpenThrottle
- econjohnaz
- hscoots
- Roaming Robertsons
- 94-RUNNER
- Switch
- dizzydom
- hobie17li
- randomsubfun
- adamalli
- twofourexplore
- Jason Blunt
- hedley
- JoeRidesBikes
- soaringpotato
- webfoots
- GetOutThere
- SilicaRich
- jp510
- Philbro
- peteyboy
- Wazak
- Jack Mac
- CoryQuackenbush
- Chiefhahn
- beef tits
- jmmaxus
- Timpanzee
- dependencies
- yamaha225
- cyclesomatic
- montypower
- busmup808
- bobbyjeans
- 25.4
- hobiekaw
- trabs00
- PathNotTaken
- SnoopisTDI
- berns00
- Martin480
- jawha1020
- Jpfan
- Fly fisherman
- Cweege
- EvolGorilla
- Photomike
- kwhitham
- Inspired Adventurist
Total: 649 (members: 56, guests: 593)