1984 Dodge W350 Crew Cab

Kmehr

Adventurer
I figured out that the short tube is actually the return!

Well I spent most of the day running around crawling under trucks looking for a driveshaft to cut down since in person my quote for a new shaft doubled in price to $900. If I can find one to cut down, it'd be a lot cheaper. Just can't believe those things are that expensive! That's not even with a CV joint, just 1410s. Hell I only paid $1400 for my whole engine!

I did get most of the exhaust done today though. Definitely had to do some heating up and beating to get it to clear all of the cross members and transfer case. Used some old valve springs as supports, thought it was a pretty clever Idea! right now it's just a straight pipe, with a dump right about the end of the cab. I bought a muffler and have the pipe to do a side exit right in front of the rear tire, but I need to have the cab on to make sure the muffler will clear. It's hard to tell from the picture, but there is probably a good 6-8 inches of clearance between the pipe and the tire. Obviously I'll trim it down some, but let me know what y'all thing about where I've got it exiting:


And some more of the whole thing, all welded together and the spring hangers. I really hope i don't regret welding it all together, but there sure wasn't a lot of room for clamps and I probably saved $40 on hanger materials!
 

Renntag

Adventurer
Awesome build. keep it up.

I would question the exhaust mounts as there is a lot of movement. I have always found it best to use a bracket welded to the exhaust with a heavy duty rubber strap to locate the pipe. Being able to disassemble the exhaust in the future will also be important.

Project looks good. Keep up the hard work.
 

Kmehr

Adventurer
Hahaha yeah, I guess time will tell. I tried to at least put the two in the rear opposing each other. Ill probably need one more when I get the muffler mounted, so maybe Ill do rubber there. I crawled under my other truck that has a brand ew exhaust, and it seemed even tighter than the stuff with the springs. Well see, I could be on to something, or it could be a rattling nightmare.

I think I have located a 2 piece driveshaft from a Ford F350 with a 178in wheelbase that could work to be cut down, ill go check it out tomorrow. My local junkyard might also want a fortune for it and it wouldn't end up saving me much money.

Spent the better part of the day removing the dash, and everything associated with it. Had to remove the windshield to get the whole dash out and ended up cracking it pretty bad in the corner, damn! I stripped the firewall and sanded it to paint and insulate, then got after my rain gutters with a wire wheel and removed a ton of caulk and all the rust that was underneath. Hopefully I can find some tan rattle can paint till I can afford the paint job I really want 5 years from now! I only found one small hole that is all the way through, but I figured go ahead and strip it, better to look a little off paint wise for a few years than have my cab rust out.

Finished the seat mounts up, I love how tight the back seat folds up against the rear cab wall. It will be perfect for my dogs! There is so much damn room in this truck, its going to be the ultimate road trip vehicle! I'm 6'3" and sit pretty far back. I positioned the front seat about two inches further back than I would be comfortable sitting, just to give some leeway. At that position, my uncle, who is 6'0" could sit in the rear seat and still have about 3 inches from his knee to the back of the driver seat- just massive.

Finally, I painted the rear section of the cab that makes up one half of the gap between the cab and the bed, it was a little rusty, and I'm on a warpath against rust!

How the seats fold up in the back:


Firewall stripped and ready for paint:


Dash totally stripped:


The insulation I'm using, and starting to lay it out. Cost me $63 for $100 sq/ft on amazon, but they may actually sell it at lowes.


Kmehr

Adventurer
More progress today. I'm at the point that I've been dreading though- wiring and putting in the A/C. Yesterday I found a driveshaft out of a 99 F350 that was 80in long that had 1410 joints and was two piece. Just FYI all 1999-2004 Superduty fords used 1410 joints. Saved me a boat load of money- $350 to cut it down and replace all the joints and the carrier bearing. Whew, and to think I was close to paying $950 for a new one. Realized I sold all my what turns out to be really expensive turbo oil fittings and drain with the old turbo...dang. Also, I picked up a oil pressure sensor-with of the holes in the oil filter housing is the turbo supply, and can I put the sesor in the other one? Got the fire wall painted, rain gutters sanded to be painted, some fuel lin ran but not yet hooked up, and all the insulation is in. Finally, I got the cab mounted. It's getting close!


Got my goose neck un frozen, now i just need a trailer to pull....
 

Kmehr

Adventurer
More progress today, though it was slow going. Spent a loooong time at the parts store getting all the fuel lines and fittings, and got all that hooked up and ready to go. Altered and covered up some of my extra transmission tunnel holes, put the carpet in, painted the rear seat bracket, and went to town hacking up my core support to get my 99 Dodge intercooler and radiator to fit. I think I'm there but I need to weld in a lot more supports because I cut out about half of the core support. Would have been a ton easier to just use a setup from a first gen, but I'm committed to the larger 2nd gen stuff now! I should have enough room to run some electric fans behind the motor, but the middle insert of the grill is certainly not going to fit if I set it up that way. Maybe I'll try to grab a first gen grill (Do I remember correctly that they will fit better?), or just try to make something that looks decent. I'm a little concerned that my radiator cap won't fit under the hood when it's all said and done, but I won't really know till I get a bit further.

Finally, I got a hydroboost brake unit out of a 98 dodge cummins, so stay tuned on seeing if I can fit that in there, it's going to be really tight with the injection pump, and my dual fuel filter setup is going to half to be spun about 90* to make it work.

Firewall clearance:


transmission tunnel patched up- still need to come up with a shifter idea because there is no way I'm paying the price of the bottle top crap.


core support as it used to sit:


it's much closer to the front of the cummins- about 5 inches closer than the 360


various stages of getting the radiator and intercooler mounted up:


What my uncle thinks my grill should say:


I think I can squeeze an electric fan in there:


The length of my hudroboost unit:


And the space I've got to work with till I hit the injection pump. You can also see how the fuel filter setup interferes with it:
 

Kmehr

Adventurer
Sam- thanks for the heads up on the new hydrobooster setup idea. I got set to shorten my push rod and discovered that the little socket it sits in was cracked open. Not having a lot of luck finding replacement parts for it, so it looks like I might be back to square one on the booster and using mine as a core unless someone knows better. (see picture below).

I'm at the end of my project week, so it's back to reality tomorrow, though I am picking up a new pup that I'm really excited about (german short haired pointer) and the missus is over the moon about him. I've made a ton of progress this week, and it's really starting to look like a truck. I think another 3 solid work days with my uncle and i working as a team and I'll be jamming gears. Won't be able to get back up till early may though, so ill have plenty of time to sort out some of the issues i have remaining.

Today we got the rear seat mounted for good, the carpet in, the dash is back in, and I got all the a/c parts installed. The UPS man did a hell of a job smashing up my A/C box, so I had to do quite a bit of plastic mending. The compressor on my motor ran two huge A/C units on the bus it came from, so I'm hoping it'll freeze out the cab, which Ill need in the georgia summer! Got all of the fender wells, core support, and inner sides of the fender sanded down and primed. I added some bracing to the core support to make up for what i chopped off, and welded up several cracks in the various fender pieces. Finally I sanded down and primed the rear of my frame behind the cab.

I need to complete the wiring, put the dog house back on, the bed back on, mount the front seats, seat belts, get the rear suspension setup, do some more painting, and mount shocks to my dana 80
The issues I have left:
1- hydroboost
2- find out if I can spin the dual filter setup out of the way for the hydroboost to fit
3- find oil supply and feed lines
4-lines/adapters for the hydroboost and power steering pump
5- new wiper motor bolts (snapped them removing it)
6- figure out the throttle linkage
7- find some super long bolts that will work with my intake horn and the grid heater
8- find an appropriate length belt
9- find a new pushrod on the clutch disc side of my hydraulic clutch setup- mine either fell out and I lost it, or my setup never had one to begin with
and probably a few more things I can't think of right now. (this list is partially to help me remember what i need to do!)

some pictures:

Fender wells sanded and primed


I just love these seats. So happy I decided to redo the interior.


The busted push rod socket on my hydrobooster


For those of you doing A/C conversions, here are some hopefully helpful pics
 

amgvr4

Adventurer
Looking really good. Tons of great work and it is coming together! This will be so awesome when it is done.
 

Kmehr

Adventurer
Just had to upload a few pics of our new co pilot, Roger- I'm sure they will continue as the project progresses:

 
D

Deleted member 12023

Guest
Build is looking great man! You've got some skills!

Looking forward to seeing it finished. I always loved the older body style. And congrats on the new co-pilot!!
 

Kmehr

Adventurer
Build is looking great man! You've got some skills!

Looking forward to seeing it finished. I always loved the older body style. And congrats on the new co-pilot!!

Thanks! He's going to be keeping up with his big brother in no time. Ill be sure to post up pictures of him on our adventures. I'm really excited about how much room the rear seats folded up give the boys. (my other is a 100lb doberman, so he needs lots of room!)
 

lstzephyr

wanderer
Looking good! Have fun with the new puppy.

What are your seats out of?

Do this(http://www.dieseltruckresource.com/forums/1st-gen-ram-all-topics-93/cleaning-hvac-box-twist-298318/) so you can clean out your "suitcase". These trucks tend to accumulate stuff in the a/c box.

The 1st gen core supports are closer to the front of the truck allowing more space in front of the engine. If you can find one that may make your conversion easier. The plastic 91-93 grill is supposed to have more space for intercooler and a/c condenser. I have not tried it but what I have read is that it is only possible to fit either a condenser or an intercooler without cutting. If you cut I think you can fit both.

This truck uses 90s sheetmetal with a 77-78 grill and I believe he has a/c and an intercooler.

E02A7A39-B1E3-42A7-9962-6C2A9910B995-1022-000001675F5AC3B2_zps1a682137.jpg


If you search for supercrew w250 there are build threads on 1stgen.org, cumminsforum and ramchargercentral if you want to read about his approach.

http://www.1stgen.org/viewtopic.php?f=32&t=13264&start=210
 

Kmehr

Adventurer
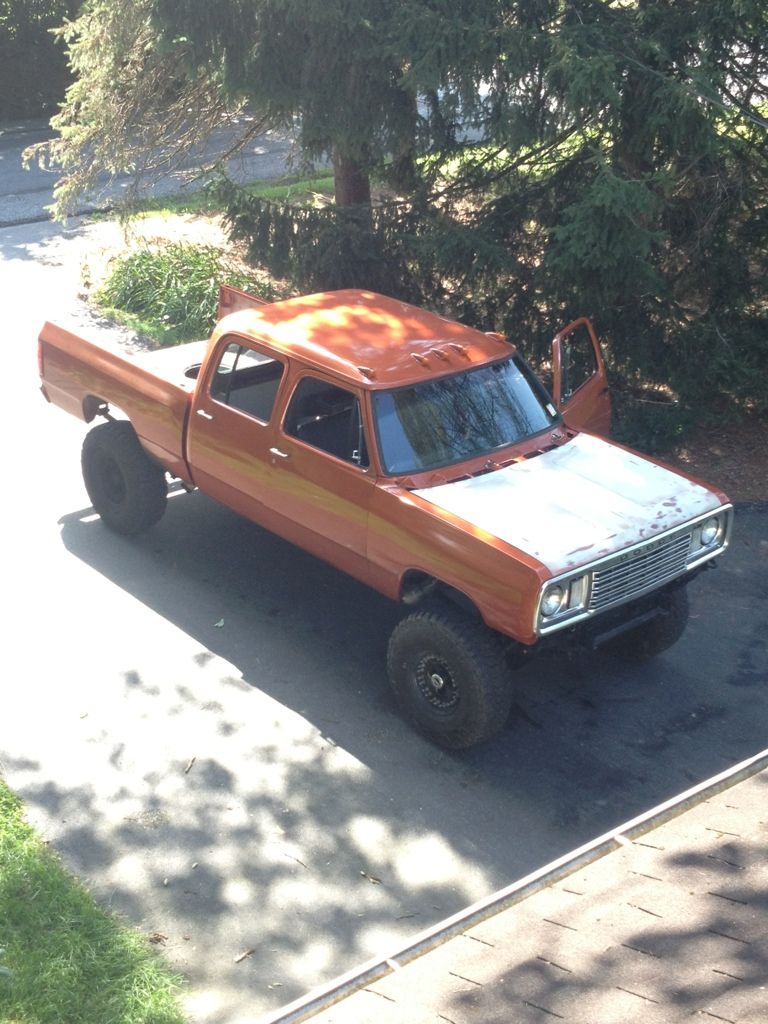
So much fun to watch. Is that a GSP puppy? looks beautiful. I love those dogs.

Thanks! yes he is a GSP. Already a lot of energy at 7 weeks, don't think he's going to have any trouble keeping up with my doberman on the trail.
 

Kmehr

Adventurer
Looking good! Have fun with the new puppy.

What are your seats out of?

Do this(http://www.dieseltruckresource.com/forums/1st-gen-ram-all-topics-93/cleaning-hvac-box-twist-298318/) so you can clean out your "suitcase". These trucks tend to accumulate stuff in the a/c box.

The 1st gen core supports are closer to the front of the truck allowing more space in front of the engine. If you can find one that may make your conversion easier. The plastic 91-93 grill is supposed to have more space for intercooler and a/c condenser. I have not tried it but what I have read is that it is only possible to fit either a condenser or an intercooler without cutting. If you cut I think you can fit both.

This truck uses 90s sheetmetal with a 77-78 grill and I believe he has a/c and an intercooler.

E02A7A39-B1E3-42A7-9962-6C2A9910B995-1022-000001675F5AC3B2_zps1a682137.jpg


If you search for supercrew w250 there are build threads on 1stgen.org, cumminsforum and ramchargercentral if you want to read about his approach.

http://www.1stgen.org/viewtopic.php?f=32&t=13264&start=210

That's an awesome idea on the a/c box. mine was busted up wwhen i got it, so i was able to clean it up before I fixed it, but i'll have to put now of those in there to keep it clean.

I think I can get my old grill to fit if i just remove the center section. I really like the look of it originally, but it's just not going to fit. I've read that "super crew" thread a couple times on ram charger, the kid that built that truck has some insane skills. His truck is the truck mine dreams about being when it grows up.

I'm going to keep an eye out for the first gen stuff- thanks for the heads up on that!
 

Forum statistics

Threads
185,823
Messages
2,878,599
Members
225,378
Latest member
norcalmaier
Top