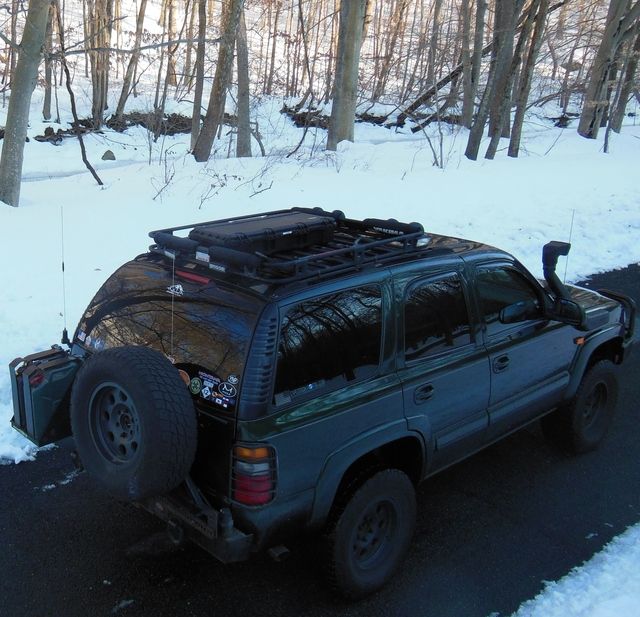
Awesome rig, man! do you have any close up pics of how you mounted the defender rack to your factory roof rails? What do you think of the defender rack in general? thanks,
Jason
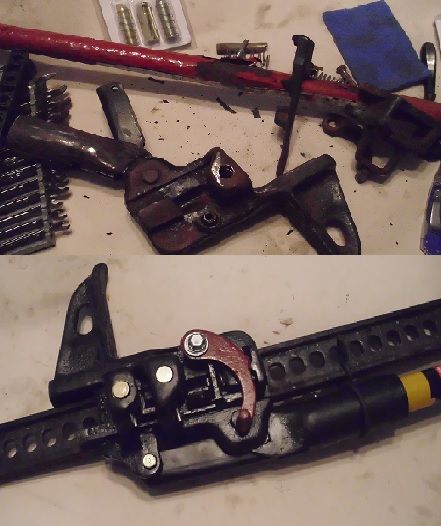
Thanks for the compliment and apologies for the delay in a reply. I used some metal angle brackets that I fabbed up to bolt to both the roof rack frame and the underside of the rack itself. I also used hose clamps that I painted and then covered with heat shrink tubing. So far I am happy with the Defender rack, it will probably require a repaint in a year or two. If you have welding skills and a pipe bender anyone should be able to build one of their own. But, I have neither so...the Defender suits me fine. Here is a pic of the mounts.
Now, onto the latest other work I have done to the rig! :elkgrin:
Over the past few months I took a lot of vacation time to do some maintenance and modifications. The biggest project I did was to replace the rusted brake lines (one of which failed last year) with the pre-bent stainless steel kit from Classic Tube. The project was very time consuming and took about 4 days to finish. But, doing it myself saved major coin and made the literal headaches of banging my head under the chassis worthwhile.And there is considerable peace of mind knowing the truck will not blow right past any more stop signs!
I also
got rid of the defunct OnStar antenna (GM went all digital around 2006 and my system was the old analog. Thus, useless) and replaced it with a GM factory XM antenna. I used an SMBcable to attach it to my Onyx receiver.
The ARB turn signal housings would burn bulbs out on a fairly regular basis, some research here on Expo revealed this to be a common problem. This time around the outlet itself was broken so my solution was to replace the entire housing with a standard 3 x 9 oval LED turn signal. They fit almost perfectly in the metal brackets from ARB.
Another project I tackled was to add a cooling fan with speed control to the dog window grates. This way I could provide a more comfortable environment should I need to leave the dogs in the truck on a warm day. This just plugs into a cigarette lighter. I test ran it for an hour and had no heat build upon the line nor any appreciable drop in the battery so I figure I should be good to go for a stop to get lunch or dinner while traveling.

Some more electrical modifications involved the tail end of the vehicle. Grote Industries introduced a standard oval light that is a combination of tail light, brake light,and reverse light. I decided to give it a try since I really like having extra brake signal warning, and I used them to replace the reverse lights that have been in the bumper since I put it on the rig. I have not hooked up the taillight function yet but have the brake and reverse lights wired. I also added super bright LED reverse light bulbs from SuperBrightLED's. They were kind of pricey but I am happy with the light output. From the same company I also got some LED floodlights to replace the rear basket lights. The new floodlights also have a much broader area of illumination versus the lights that I had been using for the past few years.

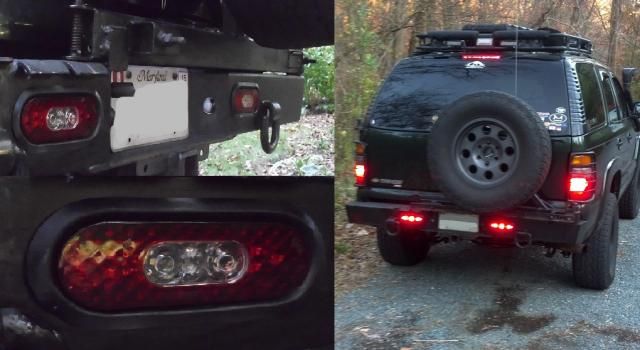
Another mod for the tail end was to add some white hide-away LED's from StrobesNMore to the reverse lights.These compliment the strobes that I already had in the brake light housings. I have also had some amber TIR3 lights sitting on the shelf for awhile. These were added to both the top rear deck with some metal brackets, and then I added a pair of them to the middle of the ARB bumper. Here is
a short YouTube Video of the light mods.
Many times over my travels I have wished I could have had a dashcam running to capture a memorable view of scenery, wildlife running in front of the truck, epic weather, or some act of moronic driving skill. I bought a Novatek A118 dashcam and wired it up to a switched circuit. I like it a lot and I think it takes pretty decent video. It records in 5 minute segments that are overlapped by a few seconds each. If I record something worth saving,it is very easy just to pop the micro-SD card into a computer and copy the file over. Here is another
short YouTube video showing some samples of the footage I got.
Last year when I repaired my intake manifold gaskets I was really surprised at how dirty the inside of the manifold was. I did some research on the issue and realized that an oil catchcan could be a big help to keeping the intake cleaner.After browsing some GM related websites I decided to make my own oil “catchcan”. I modified a Craftsman air compressor filter by mounting it to the firewall and plumbing it in line with the PCVvalve. The filter is stainless steel wool. I did this install in September and checked the filter last week. The steel wool is now grimy with some globs of oil in it, with a small amount of oil down at the bottom of the housing. So, I would say that the thing is actually working.
So, that is it for now, this could be considered my August to October modifications update. Stay tuned for an update detailing the work I have done November to December.


")
