Mwilliamshs
Explorer
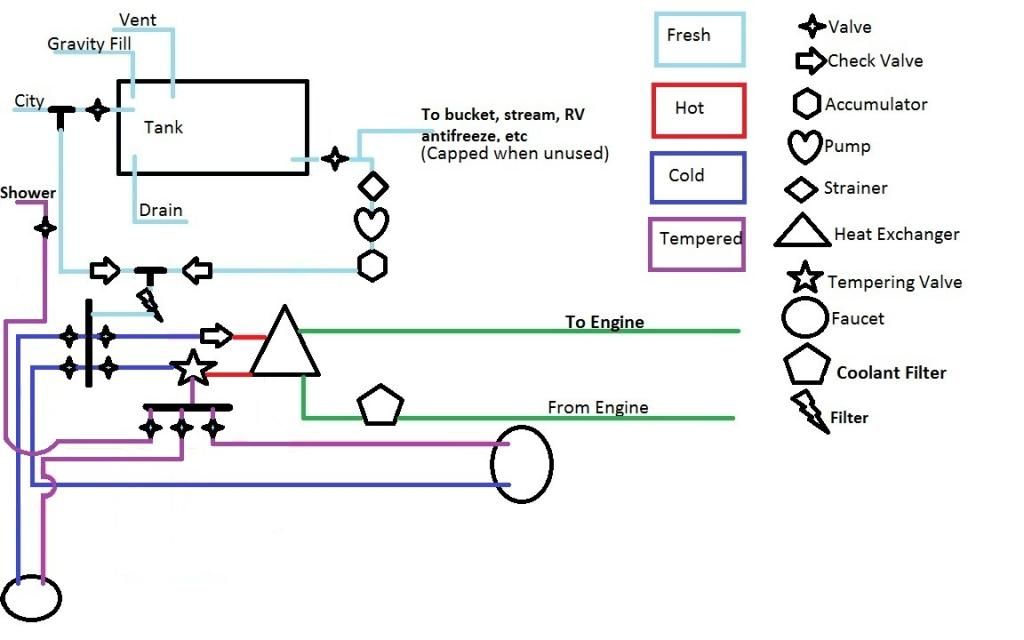
Looking for suggestions on the routing of the diagram moreso than the individual components.
Thinking my way through a water system for the van. This will all be installed on the passenger side, rear, with the tank just ahead of the wheel well for better weight distribution and the shower, fill points, tempering valve, etc just inside the right rear door built into a cabinet. This is so they're secure (locked up) and no extra holes have to be cut into the van body. The heater core is also already on the passenger side so no water should need to cross the body or frame and since the passenger door opens first in the back a fill-up or rinse off could be done without opening the whole rear end.
.
What I want:
Hot shower
Easy access to water while cooking outside (side doors, under my awning)
Hot and cold sink in kitchen
Good filtration (under questionable conditions drinking will be bottled or 20L purified jugs)
Reliable, leak-free system (he's got hiiiiiiigh hopes)
Water and electrical efficiency (the main reason I'm not going Reverse Osmosis on filter, in which case I would use the tank for drinking water too)
Ability to fill tank from city water connection or by gravity fill or pumping from a bucket, etc.
Ability to use pump-pressurized water in shower, sink, etc either from tank or a bucket, stream, etc or from a city water connection (hose bib). This allows unlimited hot showers from a stream or lake, using a 20L jug (think office water cooler) of filtered water (super commonly sold in central american markets) instead of onboard tank, and filling tank by gravity (pour it in or stick a hose in without pressure [water bandit]) or filling tank from a bucket, etc by sucking from the bucket, through strainer, pump, filter, then filling the tank with the Spray-Away through the gravity filler. Also makes heating the entire tank of water possible should a large volume of hot water be needed or if the engine overheated this gives a 3 gpm liquid-to-liquid cooling system with a 20 gallon heat sink.
.
I've decided to go with a liquid-to-liquid heat exchanger to obtain hot water from the engine. This is compact, effective, and energy efficient because I'll either be driving and get heat as a byproduct of a warm engine or l can heat water at idle and not use propane, etc. I've decided to use PEX lines. It's cost-effective, widely available and common in RV/Marine applications, and more durable than most alternatives especially considering unknown water qualities and temperature swings on travels.
.
Going with the home-run style of plumbing and it uses manifolds (one hot, one cold) and solid legs from manifold to fixture (faucet, etc) without connections or fittings in the middle unless absolutely necessary for clearance (like an ell to make a tight-turn). Manifolds are like one big tee fitting with multiple outlet connections (see below).
.
.
With an assembled camper interior the fewer connections and fittings hidden behind panels the better in my opinion, especially considering the temperature swings, bouncing around, etc that the camper will see. Home-run plumbing's advantage is that from the manifold to the faucet (for example) there's nothing but solid pipe so no likely leak-points. If PEX (or any pipe really) is gonna leak it'll likely do it at a fitting so best to eliminate as many of them as possible and consolidate as many connections as you can at the manifolds or at the fixtures. This puts any likely problem areas where they'll be easily accessed for troubleshooting or repair. The manifolds will have built in ball valves for each run so if there were a leak it could be isolated easily.
.
Now about what's actually in the diagram:
The Tank will likely be used from a local RV scrapper. Goal is 25 gallons or so total capacity. For reference, Barker 11916. My van is 80 miles away on the farm so using Sportsmobile's DIY Studio it looks like the rear fenderwells are 9-10" deep and I'd like to stay flush with their inner edges for at least 8' from the inside of the rear doors so let's say I can have a tank that's 10" wide (fender will have insulation affecting its dimension and cabinet will not). DIY Studio also shows about 28" of length from the fenderwell forward to the center of the rear-most barn door, let's say I have a tank there 24" long. If that tank is 10" wide and 24" long and 20" tall its volume will be 4,800 cubic inches, which is 20.78 gallons. At 8.3 lbs/gal that's 172.47 lbs of water. The 20 gallon tank kit linked has a shipping weight of 14 lbs with threaded adapters, hoses, etc so call it 200 lbs total. The only way I can think of moving the tank any further forward is to put it on the driver's side and closer to the driver's seat which concentrates about 400 lbs (200 tank plus 200 driver) in a small area and I'd rather not do that. Mounting the pair of 6v golf cart batteries (~60 lbs each) and a Manchester #66-4941 propane tank (83 lbs full) directly across from the water tank should allow the two to just about perfectly cancel one another out side-to-side. (200lbs water on right and 200 lbs batteries and propane on left) Add the pump, filter, accumulator, etc and they'll hopefully balance the solar charger, inverter, etc on the other side. Method to my madness.
.
The shutoff valves will be something like Watts WPBVD-08, #0653003, from their LFWPBVD line. They're full-port, lead-free, brass units with PEX ends, probably with waste drains (winterization).
.
The Check Valves will likely be Sharkbite U2008-0000. They're very simple and frankly if there's a likely leak point it's probably the place where flow stops and pressure increases when anything goes wrong aka check valves and I trust sharkbites more than other PEX stuff.
.
The Strainer will be a stainless mesh, probably Shurflo #255-313, as it's included with the pump (see below). Just a simple stainless screen to protect the pump from anything in the tank. They're servicable by disassembly and backflushing or replacing the screen.
.
The Pump will likely be a Shurflo #4048. Flows 4.0 GPM max (~1.475 @ 45 psi) and draws 10.4 amps stalled @ 65 PSI (but draws~8.75@ 45psi & ~1.475 GPM)
.
A 5 minute navy shower @ 45 PSI with the Oxygenics shower head below would use 1.475 GPM @ 45 PSI (pump limited) or 1.5 (head limited) 5 x 1.5 = 7.5 and since I like to be conservative let's say that's 8.25 (10% cushion) gallons. 8.75 amps x 1 hour = 8.75AH and 8.75/60 minutes= 0.14583 amps/minute and .14583 x 5 minutes is .73AH and that plus a 10% cushion is .8AH per shower. A 2 gallon accumulator @ 50PSI (for instance, probably needs to be 55ish, requires testing so accumulator is above pump "off" pressure) would allow the pump to run less than 3 minutes per 5 minute shower so electrical consumption would go down but is already pretty darn negligible.
.
The Accumulator might be Shurflo #181-201 as it's very popular with RVs but I think an all-metal heavier duty and larger unit has some definite benefits. The larger the accumulator tank the less often the pump runs which is good for pump durability and power efficiency not to mention noise and vibration. I also think buying a bigger accumulator would be a good way to better utilize space by allowing a smaller holding tank thanks to the Accumulator's capacity. 20 gal main tank + 2 gallon acc. = 22 gallons, etc.
.
The Coolant Filter is to keep the heat exchanger working as well as possible, as long as possible. Gonna use something like a Wix #24019 housing with a #24070 on it. This a simple engine coolant filter, rated at 27 microns, with no additives or chemicals involved. Just trying to prevent sediment from clogging up the exchanger.
.
The water filter is a 10" whole-house water filter. There are a few different filter cartridges for the housings: carbon, pleated polypropylene, and spun cotton. These are inexpensive and typically sold in 2 packs and last 3 months or 15,000 gallons. I think packing 3 (1 in use) should definitely last a year, especially if I use an in-line RV filter to filter any imperfect water prior to putting it in the tank.
.
The shower head will likely be an Oxygenics BodySpa #26781. Flows 1.5 GPM @ 45 psi and has great reviews among the water-conscious RV crowd and the tiny-house folks.
.
The shower head will likely be connected to a D&W Spray-Away which is a coiled, self-retracting hose in it's own housing. The hose is fitted with a self-sealing quick-disconnect fitting.
.
The shower "faucet" won't be a faucet per-se but rather an adjustable tempering valve like a Watts LFL1170-QC-M2. It connects to both hot and cold lines for inputs and has a large center-mounted knob that adjusts temperature by mixing the two automatically. This should prevent scalding (possible, especially with the engine heated heat-exchanger) and conserve water by not forcing you to run it and adjust it till it's just right then step into the stream but rather repeat a preset temperature again and again with no fear of burning. QC means it's push-fit onto PEX (sharkbite style). The LFL is the low temp range, which has a max output of 120* vs the LF model which will go up to 160*. Above those temperatures the tempering valves flow no water at all so burns should be nearly impossible and if it's too hot (very unlikely) ya just shut the motor off (wireless remote start/kill). The burning thing is a small concern for me (I'm an adult with no kids and never managed to burn myself yet) but the heat-exchanger can get very hot when you pause the shower (water sitting in heat exchanger as opposed to flowing) and the tempering valve should prevent that from being an excuse to step out of the stream and waste water.
.
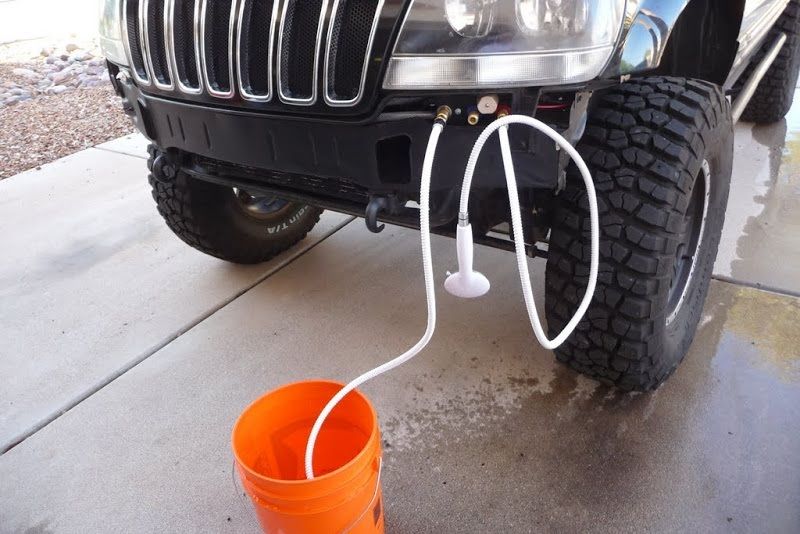
Here's a pic of a similar setup, the big tan knob is the tempering valve and its tempered output is the connector with the red ring around and there's also a direct inlet for a bucket. The blue ring surrounds a cold (non-tempered) output that the system's designer lated admitted is unnecessary because when unheated water is desired either the engine is allowed to cool first or the tempering valve is turned as cold as possible (~60*).
.
The kitchen faucet/sink will be a nice long-neck Delta Bar Faucet I already have which is pretty basic but is a design that's been around for decades and uses readily available cartridges (I'll pack spares). The second faucet will be in the barn-doors on the side and will likely be the D&W Hot/Cold Spray-Port. It's a hot/cold faucet with the D&W quick-disconnect fitting like the Spray-Away so it can use the Spray-Away's coiled hose or a flexible spout they also offer to make it more like a regular faucet. No sink here, just the faucet. Can always use a bowl, bucket, etc if you want a "sink".
So what say you? Where did I screw up?
Thinking my way through a water system for the van. This will all be installed on the passenger side, rear, with the tank just ahead of the wheel well for better weight distribution and the shower, fill points, tempering valve, etc just inside the right rear door built into a cabinet. This is so they're secure (locked up) and no extra holes have to be cut into the van body. The heater core is also already on the passenger side so no water should need to cross the body or frame and since the passenger door opens first in the back a fill-up or rinse off could be done without opening the whole rear end.
.
What I want:
Hot shower
Easy access to water while cooking outside (side doors, under my awning)
Hot and cold sink in kitchen
Good filtration (under questionable conditions drinking will be bottled or 20L purified jugs)
Reliable, leak-free system (he's got hiiiiiiigh hopes)
Water and electrical efficiency (the main reason I'm not going Reverse Osmosis on filter, in which case I would use the tank for drinking water too)
Ability to fill tank from city water connection or by gravity fill or pumping from a bucket, etc.
Ability to use pump-pressurized water in shower, sink, etc either from tank or a bucket, stream, etc or from a city water connection (hose bib). This allows unlimited hot showers from a stream or lake, using a 20L jug (think office water cooler) of filtered water (super commonly sold in central american markets) instead of onboard tank, and filling tank by gravity (pour it in or stick a hose in without pressure [water bandit]) or filling tank from a bucket, etc by sucking from the bucket, through strainer, pump, filter, then filling the tank with the Spray-Away through the gravity filler. Also makes heating the entire tank of water possible should a large volume of hot water be needed or if the engine overheated this gives a 3 gpm liquid-to-liquid cooling system with a 20 gallon heat sink.
.
I've decided to go with a liquid-to-liquid heat exchanger to obtain hot water from the engine. This is compact, effective, and energy efficient because I'll either be driving and get heat as a byproduct of a warm engine or l can heat water at idle and not use propane, etc. I've decided to use PEX lines. It's cost-effective, widely available and common in RV/Marine applications, and more durable than most alternatives especially considering unknown water qualities and temperature swings on travels.
.
Going with the home-run style of plumbing and it uses manifolds (one hot, one cold) and solid legs from manifold to fixture (faucet, etc) without connections or fittings in the middle unless absolutely necessary for clearance (like an ell to make a tight-turn). Manifolds are like one big tee fitting with multiple outlet connections (see below).
.

.
With an assembled camper interior the fewer connections and fittings hidden behind panels the better in my opinion, especially considering the temperature swings, bouncing around, etc that the camper will see. Home-run plumbing's advantage is that from the manifold to the faucet (for example) there's nothing but solid pipe so no likely leak-points. If PEX (or any pipe really) is gonna leak it'll likely do it at a fitting so best to eliminate as many of them as possible and consolidate as many connections as you can at the manifolds or at the fixtures. This puts any likely problem areas where they'll be easily accessed for troubleshooting or repair. The manifolds will have built in ball valves for each run so if there were a leak it could be isolated easily.
.
Now about what's actually in the diagram:
The Tank will likely be used from a local RV scrapper. Goal is 25 gallons or so total capacity. For reference, Barker 11916. My van is 80 miles away on the farm so using Sportsmobile's DIY Studio it looks like the rear fenderwells are 9-10" deep and I'd like to stay flush with their inner edges for at least 8' from the inside of the rear doors so let's say I can have a tank that's 10" wide (fender will have insulation affecting its dimension and cabinet will not). DIY Studio also shows about 28" of length from the fenderwell forward to the center of the rear-most barn door, let's say I have a tank there 24" long. If that tank is 10" wide and 24" long and 20" tall its volume will be 4,800 cubic inches, which is 20.78 gallons. At 8.3 lbs/gal that's 172.47 lbs of water. The 20 gallon tank kit linked has a shipping weight of 14 lbs with threaded adapters, hoses, etc so call it 200 lbs total. The only way I can think of moving the tank any further forward is to put it on the driver's side and closer to the driver's seat which concentrates about 400 lbs (200 tank plus 200 driver) in a small area and I'd rather not do that. Mounting the pair of 6v golf cart batteries (~60 lbs each) and a Manchester #66-4941 propane tank (83 lbs full) directly across from the water tank should allow the two to just about perfectly cancel one another out side-to-side. (200lbs water on right and 200 lbs batteries and propane on left) Add the pump, filter, accumulator, etc and they'll hopefully balance the solar charger, inverter, etc on the other side. Method to my madness.
.
The shutoff valves will be something like Watts WPBVD-08, #0653003, from their LFWPBVD line. They're full-port, lead-free, brass units with PEX ends, probably with waste drains (winterization).
.
The Check Valves will likely be Sharkbite U2008-0000. They're very simple and frankly if there's a likely leak point it's probably the place where flow stops and pressure increases when anything goes wrong aka check valves and I trust sharkbites more than other PEX stuff.
.
The Strainer will be a stainless mesh, probably Shurflo #255-313, as it's included with the pump (see below). Just a simple stainless screen to protect the pump from anything in the tank. They're servicable by disassembly and backflushing or replacing the screen.
.
The Pump will likely be a Shurflo #4048. Flows 4.0 GPM max (~1.475 @ 45 psi) and draws 10.4 amps stalled @ 65 PSI (but draws~8.75@ 45psi & ~1.475 GPM)
.
A 5 minute navy shower @ 45 PSI with the Oxygenics shower head below would use 1.475 GPM @ 45 PSI (pump limited) or 1.5 (head limited) 5 x 1.5 = 7.5 and since I like to be conservative let's say that's 8.25 (10% cushion) gallons. 8.75 amps x 1 hour = 8.75AH and 8.75/60 minutes= 0.14583 amps/minute and .14583 x 5 minutes is .73AH and that plus a 10% cushion is .8AH per shower. A 2 gallon accumulator @ 50PSI (for instance, probably needs to be 55ish, requires testing so accumulator is above pump "off" pressure) would allow the pump to run less than 3 minutes per 5 minute shower so electrical consumption would go down but is already pretty darn negligible.
.
The Accumulator might be Shurflo #181-201 as it's very popular with RVs but I think an all-metal heavier duty and larger unit has some definite benefits. The larger the accumulator tank the less often the pump runs which is good for pump durability and power efficiency not to mention noise and vibration. I also think buying a bigger accumulator would be a good way to better utilize space by allowing a smaller holding tank thanks to the Accumulator's capacity. 20 gal main tank + 2 gallon acc. = 22 gallons, etc.
.
The Coolant Filter is to keep the heat exchanger working as well as possible, as long as possible. Gonna use something like a Wix #24019 housing with a #24070 on it. This a simple engine coolant filter, rated at 27 microns, with no additives or chemicals involved. Just trying to prevent sediment from clogging up the exchanger.
.
The water filter is a 10" whole-house water filter. There are a few different filter cartridges for the housings: carbon, pleated polypropylene, and spun cotton. These are inexpensive and typically sold in 2 packs and last 3 months or 15,000 gallons. I think packing 3 (1 in use) should definitely last a year, especially if I use an in-line RV filter to filter any imperfect water prior to putting it in the tank.
.
The shower head will likely be an Oxygenics BodySpa #26781. Flows 1.5 GPM @ 45 psi and has great reviews among the water-conscious RV crowd and the tiny-house folks.
.
The shower head will likely be connected to a D&W Spray-Away which is a coiled, self-retracting hose in it's own housing. The hose is fitted with a self-sealing quick-disconnect fitting.
.
The shower "faucet" won't be a faucet per-se but rather an adjustable tempering valve like a Watts LFL1170-QC-M2. It connects to both hot and cold lines for inputs and has a large center-mounted knob that adjusts temperature by mixing the two automatically. This should prevent scalding (possible, especially with the engine heated heat-exchanger) and conserve water by not forcing you to run it and adjust it till it's just right then step into the stream but rather repeat a preset temperature again and again with no fear of burning. QC means it's push-fit onto PEX (sharkbite style). The LFL is the low temp range, which has a max output of 120* vs the LF model which will go up to 160*. Above those temperatures the tempering valves flow no water at all so burns should be nearly impossible and if it's too hot (very unlikely) ya just shut the motor off (wireless remote start/kill). The burning thing is a small concern for me (I'm an adult with no kids and never managed to burn myself yet) but the heat-exchanger can get very hot when you pause the shower (water sitting in heat exchanger as opposed to flowing) and the tempering valve should prevent that from being an excuse to step out of the stream and waste water.
.
Here's a pic of a similar setup, the big tan knob is the tempering valve and its tempered output is the connector with the red ring around and there's also a direct inlet for a bucket. The blue ring surrounds a cold (non-tempered) output that the system's designer lated admitted is unnecessary because when unheated water is desired either the engine is allowed to cool first or the tempering valve is turned as cold as possible (~60*).

.
The kitchen faucet/sink will be a nice long-neck Delta Bar Faucet I already have which is pretty basic but is a design that's been around for decades and uses readily available cartridges (I'll pack spares). The second faucet will be in the barn-doors on the side and will likely be the D&W Hot/Cold Spray-Port. It's a hot/cold faucet with the D&W quick-disconnect fitting like the Spray-Away so it can use the Spray-Away's coiled hose or a flexible spout they also offer to make it more like a regular faucet. No sink here, just the faucet. Can always use a bowl, bucket, etc if you want a "sink".
So what say you? Where did I screw up?
Last edited:

") No disrespect perceived.
No disrespect perceived.