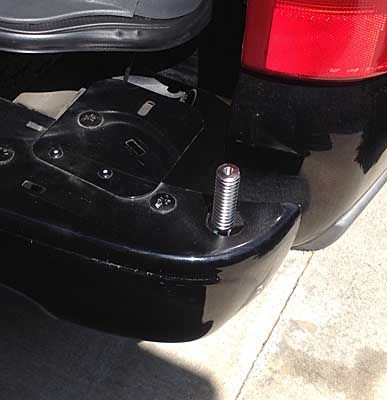
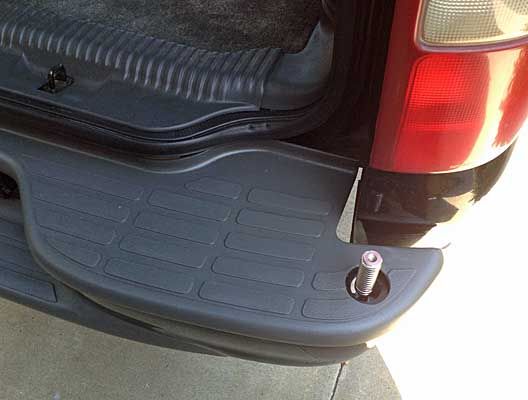
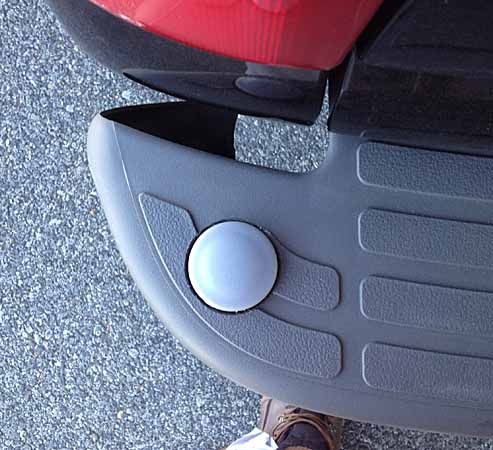
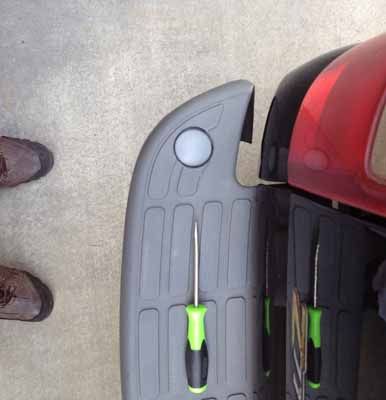
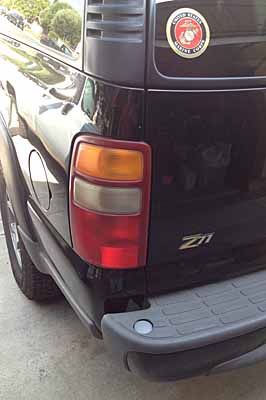
Question about running Rg-58 antenna cabling and heavy gage power lines under vehicle

AlbanyTom

Adventurer
Now I get it. :) The reason those military mounts work OK is because the base of the antenna is equal to the body of the truck, and the antennas are really long. The equivalent for you would be to mount it on the rear TOP of the roof, and honestly that wouldn't be too bad. With the suburban at bumper level, and a 2m antenna, the first 1/4 wavelength of the antenna wouldn't even reach the top of your taillight, and it would be just inches away, and moving back and forth. Much different than the military truck.

Drat is right, "ideal" is right in the middle, decent separation, etc. But the difference between where you put the antenna on the metal roof won't be anything near the difference between roof and bumper corner. Roof rack would be good, too. Not quite as good as right on the roof, but way better than the bumper. I don't know big guns, but to put in perspective, I'd say between center of roof and side, .30-06 and .308, maybe the roof rack is a .243, and the bumper is a 22 short, maybe.

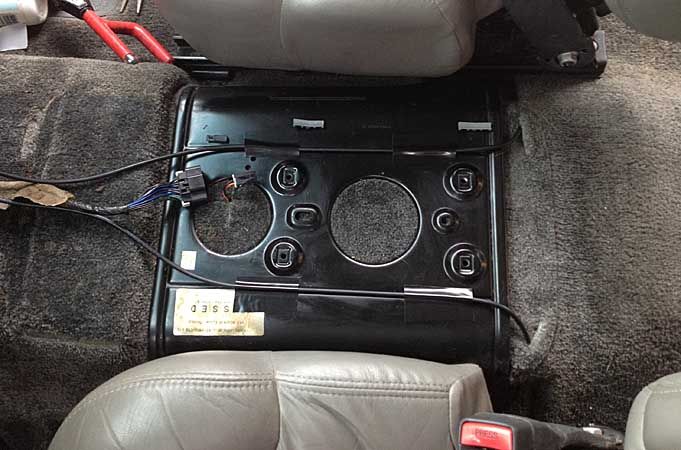
As far as the ground plane thing goes, that's a word/phrase that gets thrown around a lot. Really, it's the second half of the antenna. A dipole is a basic antenna, one wire in each direction, signal is balanced, radiates great. A vertical antenna is where half that dipole is straight up, the other half can be a flat plate, or wires down at an angle, or if there's nothing, it ends up being the shield of the coax, which usually isn't great. The length matters. Suffice to say, the simplest vertical part is 1/4 wavelength, around 18" for 2m ham, like 102" or so for CB. Shorter isn't as good, usually has a coil to compensate for the missing length. The ground is the same thing...1/4 wave is good, shorter is a compromise. Any car roof has enough ground area to be fine for 2m. Some maybe not so much for CB, but your suburban is about as good as you can get. For lower frequencies, that ham or the military use, the whole vehicle is the second half of the antenna, and it just might couple to the ground...that I don't know.

Sorry to hear about the dog and the car, but cool that you took in a rescue. Wish I were home enough to have dog...still miss the one I had as a kid.

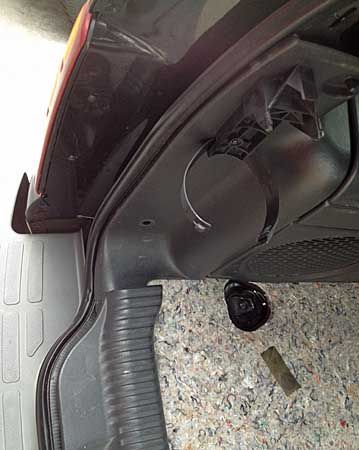
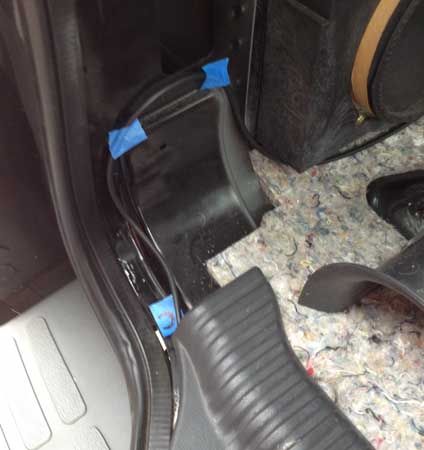
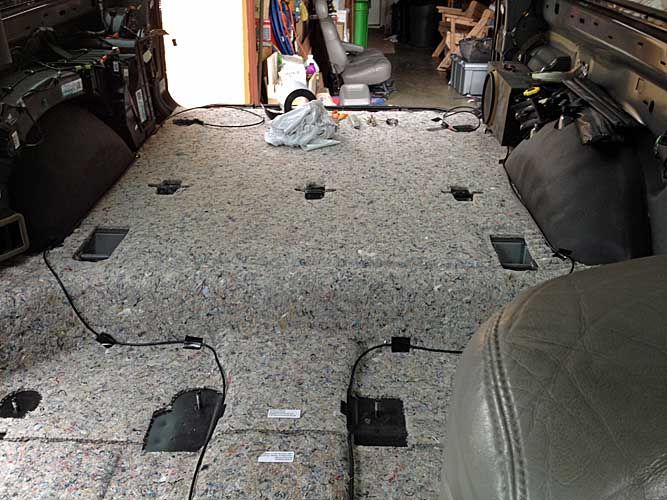
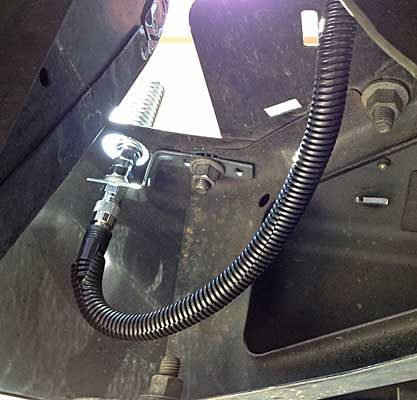
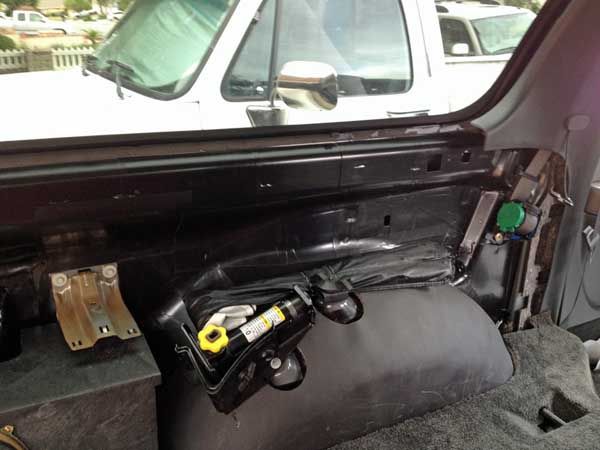
Oh, and for coax. Most coax sold is not military grade, and by that I mean the dielectric insulation between the center conductor and the braid/shield is usually foam. That means lower loss and better performance, which honestly doesn't matter any in the short lengths you have for mobile, but it also means the cable can get crushed much easier. Foam RG-58 and all RG-8x types shouldn't be put someplace where there will be weight on them, like under a carpet that will be loaded with stuff. You can get solid dielectric, RG-58C I believe, that will hold up better. We ran into this with field communications for public service stuff, RG-8x and foam RG-58 is pretty easy to damage.
 
Last edited:

Dratwagon

Adventurer
Talked to my expert tonight over dinner and he thinks that your best bet will be to mount it to the front of the roof rack, I don't know what your plans are but my plans are to use the cb to talk to my fellow wheelers and use the ham to reach out to the rest of the world. So far my best with a handheld is 1880 miles using an arrow antenna to bounce off a satellite.
 

rayra

Expedition Leader
Much the same. CB for convoy ops / line of sight, 2m/440 HAM for local neighborhood or wider if I can hit a repeater. I'm not worried about going very far with these radios. I'll have a handheld and the aforementioned larger antenna setups along with me on any excursions. And cell phones. And my astronomy gear. And guns. I'm not much worried about signaling gear.
I've got too many hobbies and not enough money or time to do any of them full justice.
And I've no doubt that should I get further into mobile HAM ops and find a regional group to do field day stuff with, I'll get more rigorous about 'best practices' and bigger antennae. My initial goals are simply to get operational with minimal effort and expense. Along with my other 'daily driver', 'stealth', suburbia criteria. So I'm still pressing ahead with my bumper layout. Next time I open things up I'll likely add the 3rd cable lead, to the roof.

I experimented a bit with the pre-fab 18' RG-58 double-ended PL-259 cables I purchased, turns out I need almost every bit of them to make my runs. And would need even longer to make a roof mount with my intended cable routing. I'm basically going out the rear hatch at the bottom corners of the seal, thru a U-notch in the pinch weld which the hatch seal is mounted to. Couple pics to illustrate the area and intended layout -

Looking down on the corner, trim pieces laying roughly in place

antenna07_zpsnxjv9yow.jpg


A closer look at the intended perforation. The pinch weld / flange is nearly an inch deep. I intend to drill a 1/2" dia hole in the midst of it, then cut the outer bit out to form a U-notch. I'll use dikes to cut a matching notch in the plastic channel of the hatch gasket. I'll cut a wiring grommet to fit it around the coax and nest it in the flange to protect the cable. Then inject a good gob of silicone caulk before re-seating the gasket and tucking everything back together.

antenna08_zpsl5ili2st.jpg


How I intend to route the cabling. Lots of gentle curves and sheltered spots. In the cargo area it will be totally behind and under the hard trim panels. Along the wheel well tubs it will be sandwiched between the edges of the rag insulation and cargo carpet mat with its hard spun backing. And that whole area is under the edge of the cargo area sidewall. Can't be more protected than that.

antenna09_zpscrfmpfck.jpg
antenna12_zpsibmuhryg.jpg


The cables are then routed towards the central tunnel. I could have continued up the edges, under the back door sill plates and on to cut across the fronts of the front seats, but elected to go up the middle after some fitting tests left things pretty short at the radio end. Somehow the way I've looped things inboard and straight up the tunnel gained me about 10" more slack. I had intended to use a fish tape and go right under the central area of the front carpet to the firewall, but after pulling the center console I was dismayed to find a huge steel saddle bracket over the hump, OVER the carpet and under the front seats, bolted down under them. F that. I've already pulled out too much of the guts of this thing.

An overall look

antenna10_zps6yqrgjog.jpg


My compromise of a compromise. It's very compromising. You can see the carpet impressions from the consoles. The whole central console rests on its internal bucket on those four raised bolt-down locations. The base of that bucket is scarcely larger then those locations, well inside my cable runs. The outer skirt of the console is loose enough that you can work your fingers under it when things are in place. It doesn't bite down hard into the carpet, sort of floats. I went ahead and slit the carpet about a 1/2" within the rear outer corners of the center console. The floor hump falls off sharply around there, I was able to wiggle my fat fingers up under the console there before I dismounted it.

antenna11_zpsuo6h4335.jpg


So I routed the cables down and outward under those console corners and then along the side of the hump between the 2nd row seats. The cable is along the 'military crest' of that slope, if you are familiar with that term. Hard objects on the floorboards will hit the hump before they hit the cable. Objects on the hump or bridging from hump to floor again can't touch the cable. And it's got the sturdy carpet mat over it all. The front of the factory center console was a hole, with a bottom stirrup / strip connecting the sides. I went ahead and cut that off to remove any source of trouble with the cables.

antenna13_zpsadgdtfam.jpg


The rest of the cabling snakes between and around behind the 2nd row seats in the notional footwells for the 3rd row seat, which is removed generally and will soon have a storage platform / drawer unit in its place. The cables then snake up to the cargo sidewall trim protection. So overall I'm pretty sanguine that the cables will live in peace and comfort the rest of their days.


As to the butyl rubber flashing, I did a bit of work with it back around the fan area of the rear AC. That was a bare metal tinny area, now it's more of a tunky area. The 6" x 75' roll was $23, I'm likely to use most of it on what I've exposed already. There's large exposed metal under the rear side windows, above the subwoofer and around the 2nd row seatbelt rolls. The rear hatch pillars are also a good target. The rear wheel tubs themselves have a 1/4" thick paper-covered fiberglass mat covering them. Tomorrow I'll see if those can be dismounted without being destroyed (they seem loose) and I'll thoroughly laminate those tubs with the butyl flashing.

This flashing stuff is quite thin. Maybe as thick as 8-10 sheets of paper. But it's .64/sq', while Dynamat is $45/sq'. 70x as much. So one could put 2-3-4 layers of it down and still be VERY economic compared to Dynamat. Its glue surface is very tacky, much like 3M PSA, the obverse is plastic like (vulcanized?), no tack, it's relatively easy to handle without residue on your hands. Has no odor that my old nose can discern. Is fairly easy to work with, you just have to be careful about accidentally touching it down where you don't want it as it instantly sticks. It can be readily pulled free, but it's kind of a pain to try and insert it behind anything. This is NOT roof / vent / gutter flashing, which is typically asphalt based and reeks. This is sold as window flashing and can be found around duct tape and metal duct fittings and metal flashing in most hardware stores.

Also, if you are working with compound curves like the sheet metal stampings of vehicle bodies, I suggest making some rough patterns with paper, just mash it in there with your hands and you'll see where you need to cut out or notch the flashing before application. A little practice and you can do most of that by eye. Or just cut the flashing into smaller strips so it's easier to work with. And since it's going in concealed spots and maybe overlapping layers anyway, no harm in just slapping it down with some cockeyed overlapping in places that will never see the light of day.

I'll have a bunch more pictures of this mess tomorrow.
 
Last edited:

rayra

Expedition Leader
Got the thru-hole in the pinch weld worked out on both sides. Sheet metal is where a step drill really shines.

antenna14_zpsytc9qm5r.jpg
antenna15_zpsilwjfluy.jpg


I used a ratchet extension as a punch and drove down the edges of the U-notch as a sort of 'drip edge', worked in a cut grommet and relieved a bit of the soft gasket edge on the back side of the hatch weather seal. The cable is snug but not pinched.


Next trouble was drilling the bumper holes. The plastic top cover is held in place with a bunch of integral fastener studs pressed into rectangular holes in the bumper. The fastener nearest the outer corners happens to be just where I want the antenna mount to be. But that then becomes a problem, how to use two different sizes of holes saws when there's no center for the pilot bit to bite into? Some after some fiddling with some scrap lumber. I wound up roughly notching a 2x6 so it would fit up into the angled end of the bumper and hard up against the top surface. The wood becomes the 'center' of my hole.

antenna19_zpsgiohkmgq.jpg
antenna16_zpsdjmkmepm.jpg
antenna17_zpshlbtrrl5.jpg
antenna18_zpsrystpbng.jpg


I'll sand / burnish the cut edges of the hole in the plastic bumper cover tonight. I touched up all my metal cuts with some dremel work, cleaning them up and smoothing things up, before shooting some rustoleum on the bare metal.
The idea of the stair step holes is part of the finished look I'm going after. I'm using Firestik's stud mount, 1/2" bolt, 3/4" overall dia. The top of that mount will be flush with the top of the bumper. I'm using a pipe end cap in similar grey plastic that is made to fit a 1.5" ID pipe, so the hole in the bumper steel is 1.5". This also give a bit of clearance around the non-protruding stud mount to get a wrench on the top of the mount when tightening down an antenna. The bumper plastic is then further relieved to a 2" dia to provide clearance for the edge of the pipe cap

I'm working tonight / tomorrow to fashion my antenna mount brackets. I'm using a pair of L-shaped brackets for each mount, using a factory bumper mounting bolt hang the antenna stud mount centered in the hole. Some paint stripping and some star washers should give me a good ground connection.


---

The butyl flashing was interesting. Went smoothly (no pun intended) but a little tedious fitting the stamped metal, compound curves, installed equipment etc. I went with large but manageable strips where I could, smaller squares of strips when needed. And was planning at least double coverage so overlap didn't matter. And went triple over the wheel tubs themselves. The tub paddings were loose, but the passenger side was trapped by the backseat A/C hardware and I wasn't messing with that so I applied the butyl on top of the factory tub insulation mat.

The surfaces by the factory subwoofer -

butyl01_zpsonvjm2wr.jpg


The tub mat and jack mounting on the driver side

butyl02_zpsov7yqxar.jpg
butyl03_zpsg4bhjm45.jpg


The application process was pretty straightforward, only comment beyond my remarks yesterday was don't let its glue surface touch itself or you can forget that piece. Never get it apart without shredding the butyl sheet itself. The glue is stronger than the rubber.

butyl04_zpsypqetqji.jpg
butyl05_zpseftvf2lj.jpg
butyl06_zps73plrfzy.jpg
butyl07_zpsfteutbut.jpg


Just remember to slit open the panel mounting clip holes etc. There's a lot of additional unused openings in some places. I went ahead and covered them over on the theory that I wanted to trap the sound within those structures. Just noticed that last pic I managed to capture all three of our trucks in one shot.

The A/C side was more problematic. Lots of brackets, ducts, and the wiring looms where also pinned in many locations with plastic locator pins, the not readily removable kind. So on that side I did a lot more fiddly piece work with small patches. And again since I wanted multiple layers the overlapping didn't matter at all.

butyl08_zpsetdxof0i.jpg


Haven't driven it yet, but was already noticing some sound attenuation from this, radio, conversation, the higher freqs were flatter. I got most of the interior trim back in this evening, The mounts tomorrow and the seats and then I'll take it for a spin. I'm looking for info on waterproofing those antenna connections and even thinking of wrapping them in a butyl 'shield'. And have to dig some plastic split loom for wiring to put on the exposed antenna cable to armor it up some. That or cover it up with some split fuel hose. Maybe both. Desert wheelin' won't be kind to that wire location. Maybe I can route it in the lee of the bumper skeleton as much as possible.
 

rayra

Expedition Leader
Well I got the brackets made up, stud mounts attached and antenna cable hooked up and tuned up the bumper cladding a bit and got Humpty Dumpty back together with scarcely any parts left over.

The Firestick K4A stud mount and my homebrew bracket. The bumper bolt and the antenna hole centers are 2-1/2" apart. I got pretty close clamping the L-brace in my bench vise and bending it with a 3-lb maul. Crude, but it worked. About life-sized -

antenna20_zpsvx2nea6z.jpg


View from the top, pretty close to centered in the opening. The bumper bolt nearby with the chipped paint is where the bracket is attached.

antenna21_zpszjtle4ie.jpg


View of the other mount, I'm a bit off-center there.

antenna22_zpsqchvtc14.jpg


View from the spare tire. Split loom isn't secured, haven't decided what to wrap the stud mount in. I put the split facing downward so any wayward water drains out.

antenna23_zpsgjfz9yzx.jpg


With the cleaned and rejuvenated bumper pad in place. I expect it to be a close match with the pipe end plugs / caps I have inbound. I might paint that revealed bumper steel gray to match, so when the plug is in things are even less noticeable.

antenna24_zpscti9ao1c.jpg


Already planning to do it again. The bracket while rigid in the hand just isn't anywhere near sturdy enough with a 4' (or longer) whip bobbing around off-road. Going to have to remake it in thicker bar stock, welded probably. I also erred on the low side on the height, the top of the stud mount is 3/16" below the metal skin of the bumper. Partly because I don't know how deep or shallow the center of the pipe plug is, how much height clearance there is with the stud mount. And bending **** with a hammer is just plain imprecise. so overall I give myself about a B- on the execution.

I'm also unsure about the ground path, and may just run a grounding strap right to the main frame rail nearby. The angled bumper bracket the antenna is bolted to seems to have a layer of something between it and the main frame rail. Have to poke at that a bit.
 

rayra

Expedition Leader
none that I can detect. Even the whole roll fresh out of its celophane wrapper has no discernible odor other than a small bit of adhesive. The rubber itself none at all.
 

rayra

Expedition Leader
The butyl has definitely reduced high-frequency road / tire noise from the rear. Ran some errands today on both boulevards and freeways and there's a marked difference. The air is 'dead' back there, if you take my meaning.
 

rayra

Expedition Leader
got the pipe-end plugs I ordered for the bumper antenna mounts. Both their inner core and top cap diameters fit the drilled holes just right. But the ridges meant to lodge the cap in a pipe are too rigid, or a 'permanent' nature. Would take some work to get them in and even more work and tools to get them out. And the parts are themselves a bit more rigid than desired.

antenna25_zpsg51hgavs.jpg
antenna26_zpsxmgt9qed.jpg


Funny part is they are a paler gray than the bumper caps, but I just scrubbed those clean and rejuvenated them, they would have matched the way they were.

The flanges on the inserts are in three layers, increasing in thickness / width. I'll experiment with sanding down the first smallest flange until the cap goes in without too much effort. Then repeat with the other two flanges. I want to be able to quickly dig these out of the bumper with a key or screwdriver, in normal use.

---

no action on the radios / antennas themselves, that will be a couple months at least.


late eta I ground down the ribs / flanges on the plugs pretty far until the plugs could just be pressed into the holes. They're in there nice and snug, but fish out fairly easily with a screwdriver. So as far as my plan for concealed mounts go, I'm calling it a qualified success.

antenna27_zpsv3psrub4.jpg
antenna28_zpsnwfduw2s.jpg
 
Last edited:

technoweenie

New member
But beyond all that, I just don't get the whole conductive ground plane with a vehicle mounted antenna anyway, since the whole vehicle is sitting on four rubber tires.

You're confusing electrical ground with a groundplane. Don't.

Think of it as half the antenna, something for the signals to want to get away from... (easiest, but not the most accurate, way of explaining it)


Dratwagon, antennas don't have 'built in' groundplanes, there are designs to minimize the need for one, such as a half wave, but you will STILL see gain on a half wave with a groundplane (~3db) vs a 1/2 wave WITHOUT a groundplane (0db).
 

rayra

Expedition Leader
No, I'm not, I know they are different, but you can't have a good ground plane without good conductivity, regardless. And due to where and how I chose to mount things, they are in this case effectively the same thing. If I had no conduction beyond that bumper end bracket, things wouldn't work even without the bad antenna location affecting things.
 

rayra

Expedition Leader
Just an FYI, you're looking at about -3db from mounting it on the bumper vs the roof...

Yes, that bad.

I'm not gonna re-litigate it. Go back and read the topic. Or feel free to provide a more detailed argument about impacts on performance in a mobile dual-band 50-65W context with a wrapped 5/8-band antenna.
 
Last edited:

Forum statistics

Threads
185,913
Messages
2,879,551
Members
225,497
Latest member
WonaWarrior
Top