Project LRDG - 1984 FJ60 Land Cruiser -

usnrigger

Observer
Some, photos after I cleaned her up and finished a good portion of getting maintenance up to date.

This is just a local short run to the top of a butte, it was nice to runs as it have me a chance to get a feel for 4H and 4L in the gears. The grades going up it are pretty steep, so she had a good load one her. Enjoy -- this weekend the Knuckle rebuild, U-joints and Tie rod & Drag links are going in.


usnrigger

Observer
What I did today:

- went ahead and put all new plugs in as I pulled the old ones and generally not that bad, they had light white ash build up and were Autolites. I think Japanese motors need NKG's so put in factory v power plugs.
- I was going to time it but no one rents a timing light anymore and all the local places wanted big bucks, I'll grab a less expensive one this weekend. Found a timing light, set timing to slightly advanced, 9-10 degrees. I'm at 6500ft and will be taking it up to 12,000ft in August. Figured it would help alittle a higher altitudes.
- was thinking about putting new shocks in as the lift will be a while and the ones under her could be decades old. Any suggestions for 30-40$ price range each.
--- Was looking at KYB AJUSTAGAS - but some places are listing 3 different part numbers for the rears, with different specs, any idea what I would need. KG5401, KG5475,KG5466 -??
 
Last edited:

usnrigger

Observer
Okay so thoughts on water cross/fording mods for the cruiser. this is more forward thinking as im not quite there yet, but I was working on the Cruiser today and noticed that the air intake runs pretty much right behind the left headlight. Now it does set pretty high. Now I know the snorkel is not just help in the water area it also helps pull air from higher up which is a form of cold air intake as well as getting up out of the road dust created on trails and running in convoys. I also know I will need to treat all my electrical connections, as well as extent all my differential, trans and transfer case breathers.

So here is the start of my plan please come in a say "your doing it wrong" or what not, just keep it civil.

--- I will make my own Snorkel, most likely from mandrel bent aluminum seamless tubing. I was thinking of running on the drivers side vs passenger side as the factory air cleaner assembly already heads that direction and I could just plumb in into the inner fender and come out right next to the A pillar and up. I figured I could also run my differential ext.. breathers into the snorkel which give them plenty of air and get them up nice and high. I guess to visualize think Land Rover setups from the Camel Rigs. I'm not a huge fan of the little "Safari Snorkel" toppers and would probably do a old school tractor looking air separator type thing. Also I remember the Land Rovers having a Seed/Wadding Flap/Cover that could be dropped down over the front grill to move water away when crossing, I really only see these with them and wondered it was just a gimmick or had off road credibility? I could make one pretty easy with my sewing machine and 1000D Cordura and some Mesh(Both of which I have in brown/Tan). I'm not looking to have to cross deep water but if I can set it up to do so and give me colder/cleaner charged air it works both ways in my favor.
--
-----Thoughts------
 

mep1811

Gentleman Adventurer
Great write up. You will have fun building up your 60 from stack and do it exactly your way. My 60 was stock when I got it 17 years ago and I am still at work on it.
 

cruiseroutfit

Supporting Sponsor: Cruiser Outfitters
...--- I will make my own Snorkel, most likely from mandrel bent aluminum seamless tubing. I was thinking of running on the drivers side vs passenger side as the factory air cleaner assembly already heads that direction and I could just plumb in into the inner fender and come out right next to the A pillar and up. I figured I could also run my differential ext.. breathers into the snorkel which give them plenty of air and get them up nice and high. I guess to visualize think Land Rover setups from the Camel Rigs. I'm not a huge fan of the little "Safari Snorkel" toppers and would probably do a old school tractor looking air separator type thing. Also I remember the Land Rovers having a Seed/Wadding Flap/Cover that could be dropped down over the front grill to move water away when crossing, I really only see these with them and wondered it was just a gimmick or had off road credibility? I could make one pretty easy with my sewing machine and 1000D Cordura and some Mesh(Both of which I have in brown/Tan). I'm not looking to have to cross deep water but if I can set it up to do so and give me colder/cleaner charged air it works both ways in my favor.
--
-----Thoughts------

Keep in mind the air intake inlet on the factory air cleaner is not seal well, you either need to weld/seal it up or replace it with round tube that is 100% sealed. As for the snorkel head, standard ram head versus pre-cleaner, totally up to you and your uses. I've not found any need on a Land Cruiser for a radiator screen outside of grass protection in places like Aus/Africa... not a factor in the Americas.
 

usnrigger

Observer
I will look into getting everything sealed up when I do the modification. I may go ahead and make a seed cover and water fording flap. It wont cost me anything as I already have the material.
-
-The knuckles are rebuild, went ahead and put in the heavy duty axel seals. Everything went together real nice as far as the Knuckles. I did run into a few thing that I just had to live with on the fly with the rebuild. the 54mm nuts last time the rebuilt was done, someone used a flat blade screwdriver to install these. So the nuts had some very un-fun scares in them. I was able to de-burr them and use them as I had no new ones and I needed to get it back together by weekends end.
-Tie Rods and Drag links were more of a PITA, overall. Ball Joints did not want to come free, and no one rents a decent or good size tool. the last person that put on the castle nut for the steering stabilizer cross threaded it so we had to adapt on that one as well. All in all a good 2 days work for be and my buddy. I still need to go back and make a few adjustments. and we did not have a chance to get the U joints In.

==== So I think in the Drag ling installation or the difference in parts, my drag link now is just a hair long. when I install the new Steering Damper I will give I a turn or two in t correct this.


--
I few side notes/Questions: On the drive up to my buddys to do the work, I was about 60miles in and the temp gauge start to rise and when it when into the bottom half of the red, I pulled over heat on and the gauge was still raising to probably maxing out. the radiator cap did not blow and it didn't smell super hot. I waited a full hour for cool down, during that time I would turn the key on see where the gauge was reading, it stayed high for a very long time, after a full hour I said I can get to next exit with service station. As soon as I started the truck the gauge fell to below normal running temp and made the rest of the 50 mile drive with no problem. the way back the truck made the while trip of 90 miles without so much as a tick above normal operating temp. Does the FJ60 have a record with bad sending unit giving false reading once and awhile? checked coolant all good, hoses good, no leaks. Any ideas?
-
-
Also now after I did the tie rod and drag links my wheel is not indexed correctly, I have to slightly left on the wheel to track straight. I looked at the steering arm and its eyeball forward, when I have the wheel corrected to track correctly. I have 2 full turns left and right from the center. should I just adjust it by pulling the wheel?
 
Last edited:

txnight

Adventurer
Have you replaced any equipment in the coolant system or flushed the system? If so it sounds like you had an air bubble in the cooling system. This is very common and you can search how to burp the system.

Yes, the water temp sender is very prone to failure. You can fi d a new one for less than $20 from cool cruisers and it is an easy install.

On centering the wheel; you should adjust it till it is centered. Pulling the wheel is bad form.

Looking good so far!
 

cruiseroutfit

Supporting Sponsor: Cruiser Outfitters
It could have been an air bubble if you have done any cooling system work. Otherwise I'd suspect a faulty sending unit. We stock a nice Japanese sending unit with a fantastic track record.
 

usnrigger

Observer
== I have not done any coolant work past popping the cap to make sure it was full. I will probably go ahead and have the radiator flushed, filled with fresh coolant. As well as getting a new sending unit, I don't like not knowing what my temp is at.... Or if I can trust the gauge.
---
== I think I know where I messed up in connecting the drag link, we had to deal with the Steering stabilizer and I bet we got of a turn or so. The wheel is only off 20-30 degrees so im guessing one maybe two turns in and I will be on. I checked the turns left and right again and I do have just a bit more on the right, so 2 full turns left and like 2.25 in the other direction. So when I put a OME Steering Stabilizer in I will correct the wheel issue, and will most likely put some KYB shocks in till I get the Full OME kit in.
== When I go into upgrade the front brakes I will change out wheel bearings, stainless brake lines, new 54mm nuts, and I will rebuild or replace the calipers as on of the pistons was not working right.
-
-
-
== Was working on some drawings for the roof rack, what footprint do need for most/general roof tents?
 

lugueto

Adventurer
Awesome 60, looking forward to the build.

As well as fording goes, you'd be surprised how deep the stock 60 can go without drowning, but if you're going to do it regularly, at least extend the differential, transfer case and transmission breathers as prevention. These things take in water easily, the mod is extremely easy and lasts forever.

I remember as kids my dad used to use a tarp when we were to cross deep water in our travels, he simply opened the hood, put the tarp (tightly) over the engine and shut the hood on top of it (some of it had to cover the grill) I think it created a bubble inside the engine compartment for the brief moment we crossed water, or at least allowed air to stay in there longer? . We never drowned a vehicle using this technique. Although since a bunch of years back we have snorkels in all our vehicles.

Sure the snorkels look funky, but the peace of mind they bring is well worth the cost. If you dislike the Safari ram intakes, you can always replace it for an air separator ("turbulence") be it an OEM Toyota unit or a universal one from heavy machinery. Another plus I've found from quality snorkels is that they're damn near indestructible. I've seen severely rolled vehicles with flattened roofs (some of them on the snorkeled side) with the snorkel simply standing unscathed.

Ive seen a few local (to me) 60's with color coded steel tube snorkels and universal air separators that look pretty cool and work perfectly. If I come across one soon I'll try and snap a picture of it for your inspiration. I think it's one of the cleanest, most factory looking setups I've seen.
 
Last edited:

usnrigger

Observer
Well I wasn't to concerned on what I could do, but I will extend all the breathers so I know I'm not getting water in the cases. I need to see what room I have behind the fender and go from there in I need more room I could always do a "aircraft" style blister as it comes out of the fender.

The steering wheel is fixed, three turns out/lengthen and she's almost perfect. Two turns was very close and three closer but still tracks a hair left with three, not enough to worry about and really no way to correct as far as I see.

Past having a good shop do a alignment I'm calling it good. I checked with a measuring tape and I'm ballpark'd. I'm going to hold off on the new stabilizer as it looks like the bolt modification will hold and when the OME kit goes in then I'll replace it.

Going to change the rear diff oil today and grease all the U joints and call it good for now. I'll be taking her up to Breckenridge Co in August and I think she will be good to go with what we have now. I'm going to try and get the trans and transfer case oil changed before then but need to look if I can fill those, as I don't have a bucket pump right now. Update== I went ahead today and changed Rear Diff, Trans and Transfer case, so all the gear lube has been changed.

So the to do list as it stands currently:-(copied from earlier post)
=
Things I have knocked off the list so far:
- Oil Changed F/R Diff, Tranfer and Trans
- new sway bar down links w/poly bushings 4.125"
- Adjust valve lash - Gasket on order
- Front Knuckle Rebuild, Inner Seals
- Tie Rod/Drag Link Kit
- Battery Cables upgraded to 2/0 and Military terminals installed. All grounds are new as well
- All Grease Zerks have been serviced
- Oil Change 15w40 Mobil 1 w/new oil & air filter
- Replaced all exterior lights that needed it(Rear Side Markers L&R)
- New Wiper Blades
- Alternator belt Tightened (New OEM Belts on order)
- All window seals restored
- Door welting has been fixed, they were sagging In the corners
- White Lithium deployed on doors and any other place that could use
- Front Bumper corners removed, they were rusted and gone. New bumper will be made down road.
- Basic cleaning inside and making list of need and things to do.
- Carb Tuned
- Center Console Repaired

Things on the "to do list" -(copied from earlier post)
- Temp Sending Unit
- U Joints x3
- Front sway bar bushings
- Front Brakes - Might do the upgrade or new calipers
- Braided Brake Lines
- Vacuum lines replaced
- Carb Rebuild
- OME Heavy/Heavy with Firm shocks
- Rust Repair with welded in panels
- Interior Re-Upholstered and rear cargo are installed
- 16x7 Tacoma Wheels w/FJ40 Hub Cap Clips welded on + Spacers
- Cooper Discover S/T 255/85r16 Tires x6
- Custom Front Bumper with swing out tire and carrier
- Custom Front Bumper with winch mount, trail lights and shackles
- Custom Roof Rack
- Full Repaint in factory color and the pinstriping put back on
 
Last edited:

usnrigger

Observer
Wanted to go over this as it looks like it could be a issue with other FJ60's. When me and my buddy was doing the knuckle rebuild and tie rod/drag links we noticed the Drop links on the sway bar was shot. the sway bar had a good 1/2" play as the bushings had compressed and shrank with age. I will have to change bolts and spaces when I do the OME suspension. I did want to address this issue as I thought it could be part of my clanking issue. A local chain auto parts store has some Energy Suspension units, these are complete units as in the past I have never had good luck, and the sleeve is always rusted solid to the bolt. the measurement on the ones I bought was 4.5" (spacer measurement). I wasn't sure what I needed for my truck, so I got the longest ones they had in stock, and since its just a sleeve I can always shorten them to a point. Bolt needs to have enough threads. I found to get them to work/set parallel on my truck I needed 4.125" so I put lay out dye on the part and scribed a line using a caliper marked .375", then I went to town with a hack saw and then dressed it out with belt grinder and finished it out with file and cloth backed paper. With the way the upper bracket is setup on the FJ60 I did not need to shorten the bolt. I had to take a cutoff wheel the the old drop links to get them off and I greased the new bushings and installed them. Made a unexpected difference in corners afterwards very happy with the 25.00 upgrade and hour work time
-
== Would strongly suggest that anyone with a new FJ60 project check the these and if need be replace. they make a huge difference it they have excessive play
== Also wondering for future reference what upgraded engine parts are out there? Forged piston, Forged rods, Cams, upgraded valves ext...?
-
== Was doing some reading on other forum and here, any down sides to de-smog the girl? I don't need to pass emissions here in CO or in KS where its tagged. I don't want to did it if it just brings up other unknowns in the vacuum system or it helps the motor overall. Let me know might add this to the list and since it doesn't look all that difficult might do it within the next couple months.
 
Last edited:

usnrigger

Observer
Well, a good weekend. Didn't do much to the truck but drive it. It been rainy and I was getting ready for my trip up to Breckenridge, for family and fishing.

I did want to show my garage sale find. Picked the pair up for 40.00 - the red one is a Hi Lift and the black is Lincoln, but pretty sure made by same company, just under different name. I ordered rebuild kits for them and I'm painting both right now.

I will probably make a mount for front bumper here next week


Still need to paint the bracket mounts but all set up and ready to go.
 
Last edited:

usnrigger

Observer
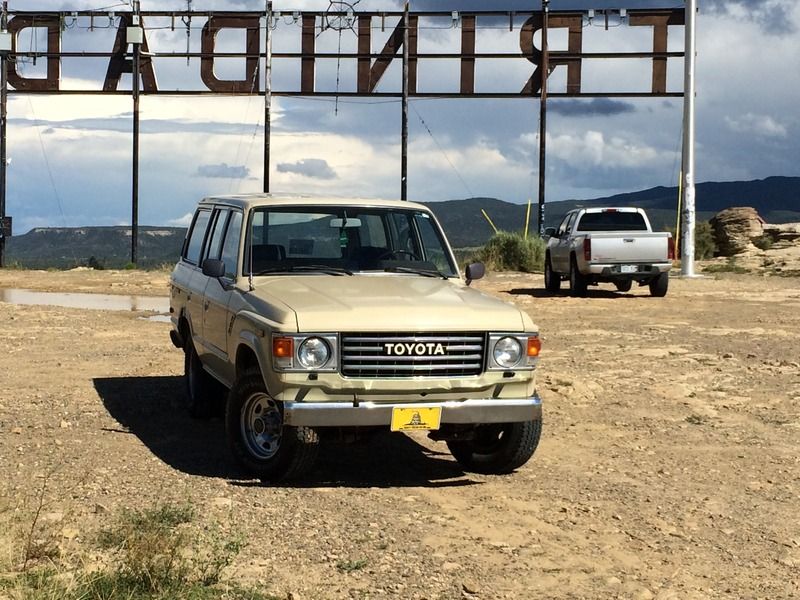
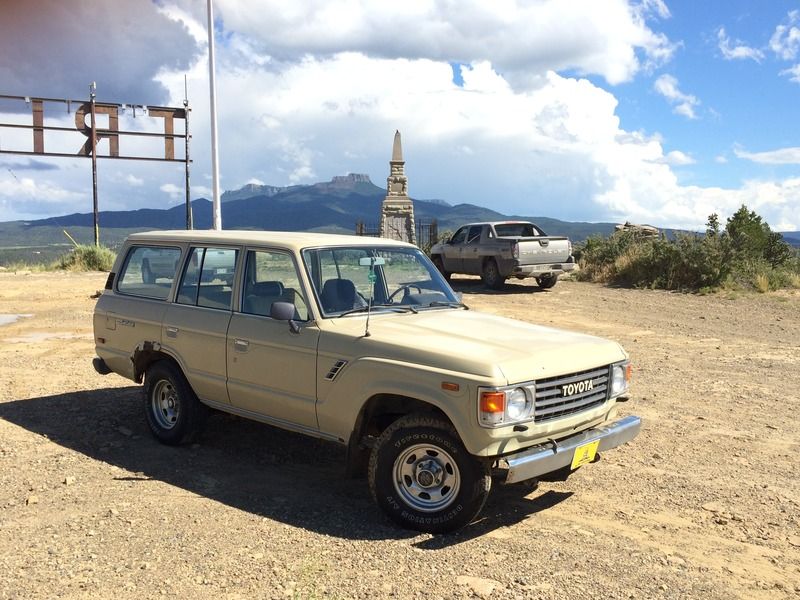
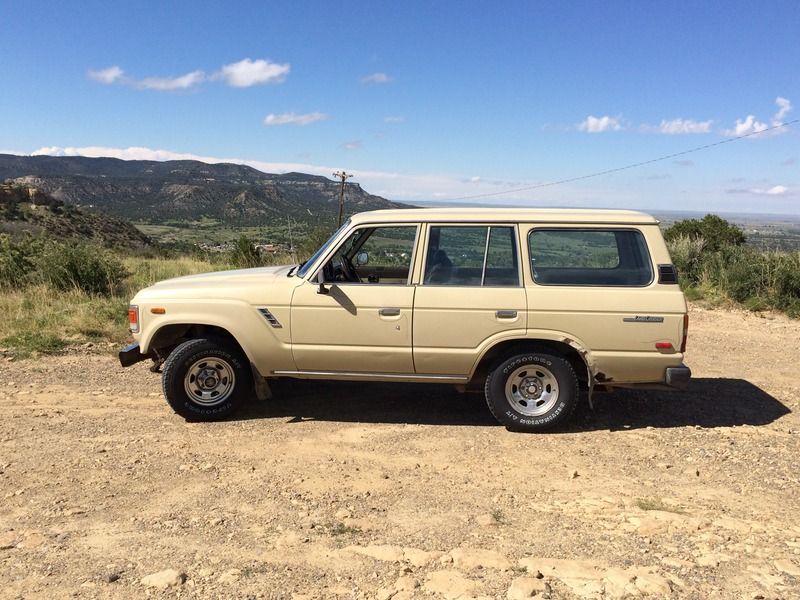
Going to pull this thread back from the depths as its summer and I have some time to put into the FJ60

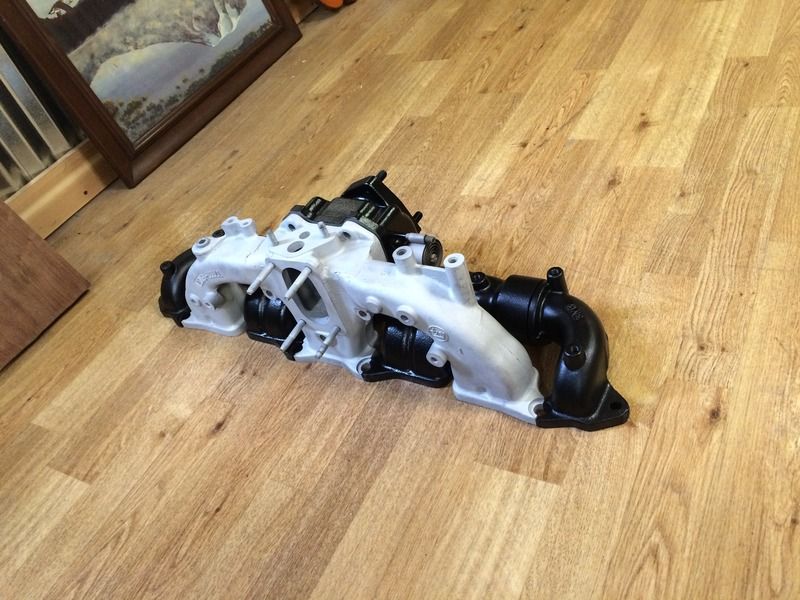
So I decided to pull the carb, both intake and exhaust manifolds off and rebuild/refurbish this side of the motor. So here is what im going to be doing to get this side back to like new

- Carb has been fully rebuild, new float and diaphragm
- New Carb Base Isolator as mine had a crack in the "plastic black stuff" in the common area that it breaks
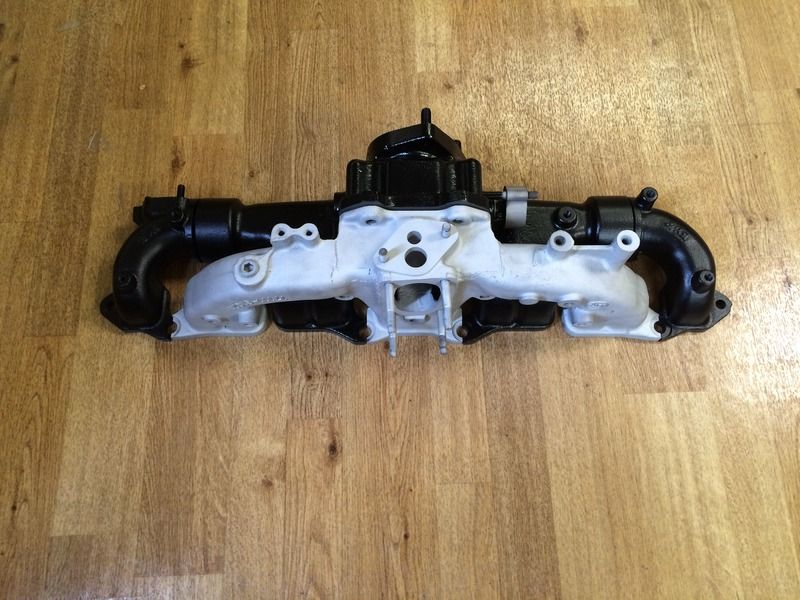
- Intake has heli-coils put into 4 holes & then was fully media blasted
- Exhaust manifolds was media blasted and just came back having been powder coated with hi temp black
- New gaskets all around
- My plate between the intake and exhaust manifold was MIA so I have a SOR solid in and will be trimming the flapper thing
- New vacuum lines for all the 3mm & 6mm lines (this will be all the lines and not just intake exhaust side)
- New Temp Sensor
- The EGR setup that goes into the intake manifold was cleaned, media blasted and painted
- The Air Manifold was blasted I used epoxy putty around all the joints for extra insurance, as it looked like the factory has some form of sealant that had disintegrated from the years
- Air manifold was also painted and cleaned up.

My reasoning behind this is I had a rough ideal until the engine got to operating temp and then it smoothed out. I figured the carb needed rebuild, and I could have a leak in the intake/exhaust. I did have a leak for sure in the exhaust as the plate between the two intakes was missing and the gaskets pretty much had fallen apart, also had soot around this area and the long bolts that hold two together. not sure about intake leaks but this should give me a fresh start in both the carb and intake and exhaust manifolds. the vacuum line will give me fresh lines with less chance of holes and the factory are very brittle. so my plan was to do this to eliminate any variables of just old or hidden problems. Im hoping that the problem will just not come back after all this work, but it it does it will make things easier and eliminate many possible problems. I have all parts, gaskets and everything is back from paint, and rebuild. I will be putting everything back together starting this week and mainly this Wed afternoon. I will get photos up of all the rebuild parts and some of the process of getting back together.


Cheers

--Wanted to get a updated list of things done and things still to do, as I changed my mind on some of the setup.

--- Also if anyone has a powder coat color info that matches the off white color used on the FJ40 Wheels please let me know as I have changed to just keeping the stock wheels and having them coated

Things I have knocked off the list so far:
- Oil Changed F/R Diff, Tranfer and Trans
- new sway bar down links w/poly bushings 4.125"
- Adjust valve lash and new gasket
- Front Knuckle Rebuild, Inner Seals
- Tie Rod/Drag Link Kit
- Battery Cables upgraded to 2/0 and Military terminals installed. All grounds are new as well
- All Grease Zerks have been serviced
- Oil Change 15w40 Mobil 1 w/new oil & air filter
- Replaced all exterior lights that needed it(Rear Side Markers L&R)
- New Wiper Blades
- Alternator belt Tightened & all belts now replaced
- All window seals restored
- Door welting has been fixed, they were sagging In the corners
- White Lithium deployed on doors and any other place that could use
- Front Bumper corners removed, they were rusted and gone. New bumper will be made down road.
- Basic cleaning inside and making list of need and things to do.
- Carb Tuned
- Center Console Repaired
- Front sway bar bushings
- New Firestone Tires

Things on the "to do list" -(copied from earlier post)
- Temp Sending Unit (In-Progress)
- U Joints x3
- Front Brakes - Might do the upgrade or new calipers
- Braided Brake Lines
- Rebuild/Refurbish Exhaust/Intake Side (In- Progress)
- Vacuum lines replaced (In-Progress)
- Carb Rebuild (In-Progress)
- OME Heavy/Heavy with Firm shocks
- Rust Repair with welded in panels (Later Part of Summer 2016)
- Interior Re-Upholstered and rear cargo are installed
- Factory Wheels blasted and powder coated in the off white/crème color
- Unsure on Tires as of now as I can find many 33x9.5r15
- Custom Front Bumper with swing out tire and carrier
- Custom Front Bumper with winch mount, trail lights and shackles
- Custom Roof Rack
- Full Repaint in factory color and the pinstriping put back on
 
Last edited:

Forum statistics

Threads
185,911
Messages
2,879,530
Members
225,497
Latest member
WonaWarrior
Top