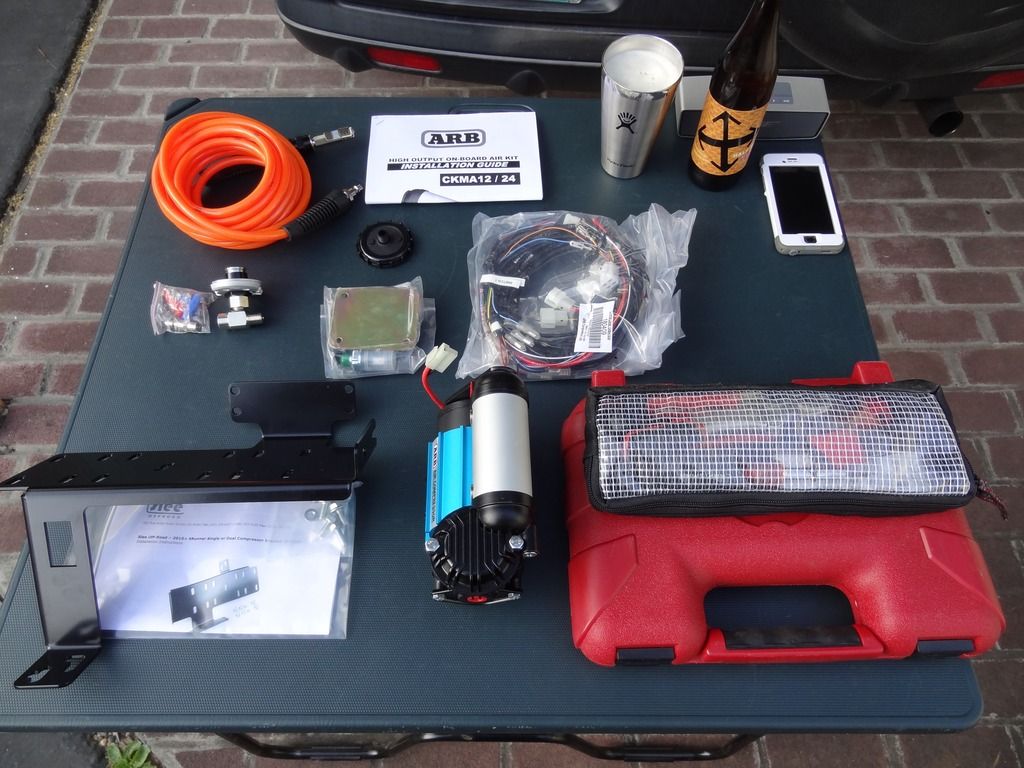
Building, Driving and Adventuring the MTN4RNR

jgilbreath

Observer
I have thought about a similar water solution for our family of four. How will you be filing the tank though? Garden hose?
 

MTN4RNR

Adventurer
I have thought about a similar water solution for our family of four. How will you be filing the tank though? Garden hose?

Not sure what the easiest option will be... I just got plumbing hooked up, so filling will be the next thing to figure. I'll keep you posted!
 

MTN4RNR

Adventurer
ARB compressor install

One of the things that I learned early on when it comes to driving off the beaten path, is that air pressure is king. Too much, and you'll lost teeth. Too little and you'll lose a bead or be so squirrely that you'll never feel comfortable. And there are different pressures for different environments and road conditions. Having the ability to adjust tire pressures on the go is a big advantage when you are driving on the highway to the trail, then offroad, then back on the road between segments, then back off..... You get my point. Airing down is easy, you can use your key, a nail, or an ARB Deflator which will cut down your air down time dramatically. Well, if you go down, at some point you'll need to come back up. This need drove me to purchasing a single ARB 12v High Performance Compressor (CKMA12r) with the new mounting bracket from Slee Offroad. Lets get to it.​

Parts used:
- ARB 12v High Performance Compressor, and wiring harness (CKMA12r)
- Mounting bracket from Slee Offroad
- ARB pump up kit
- OEM style compressor switch from Slee Offroad
- Mini-blade Add-a-fuse
- Scotch Extreme Fasterners
- Waterproof butt connectors
- Shrink wrap
- Heat gun
- Dielectric grease
- Teflon tape
- Enough zip ties to hold it all together
- Crux Fermentation - Half Hitch Imperial Mosaic IPA (currently my favorite IPA)

DSC09525_zpspibs7bik.jpg


Install:
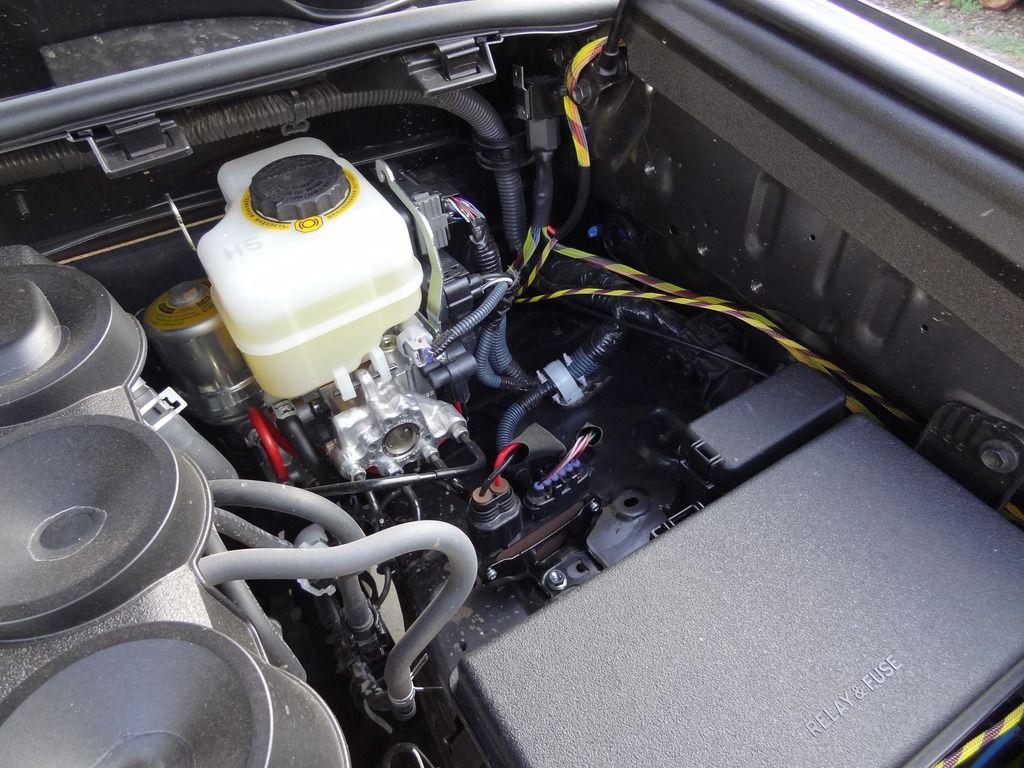
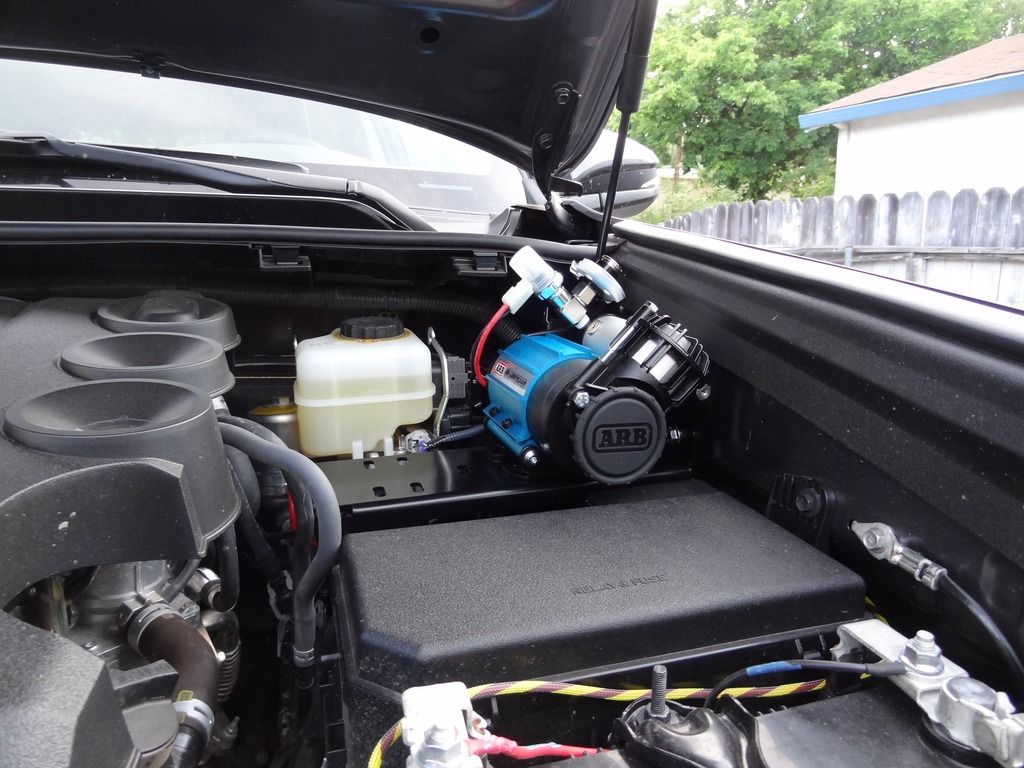
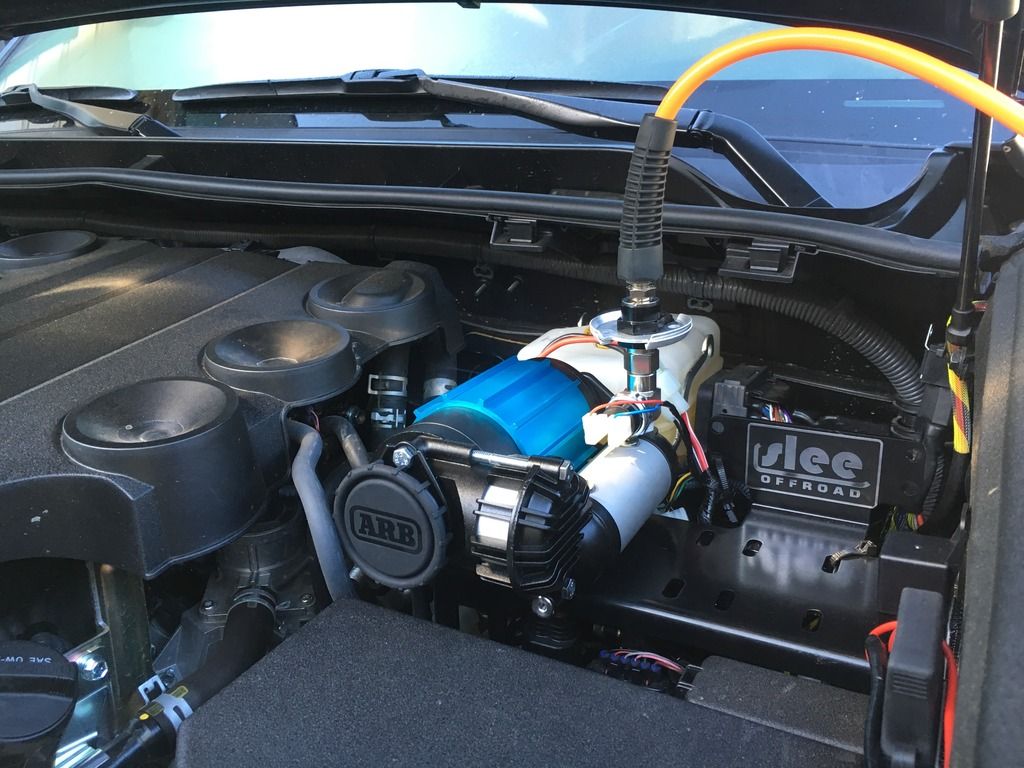
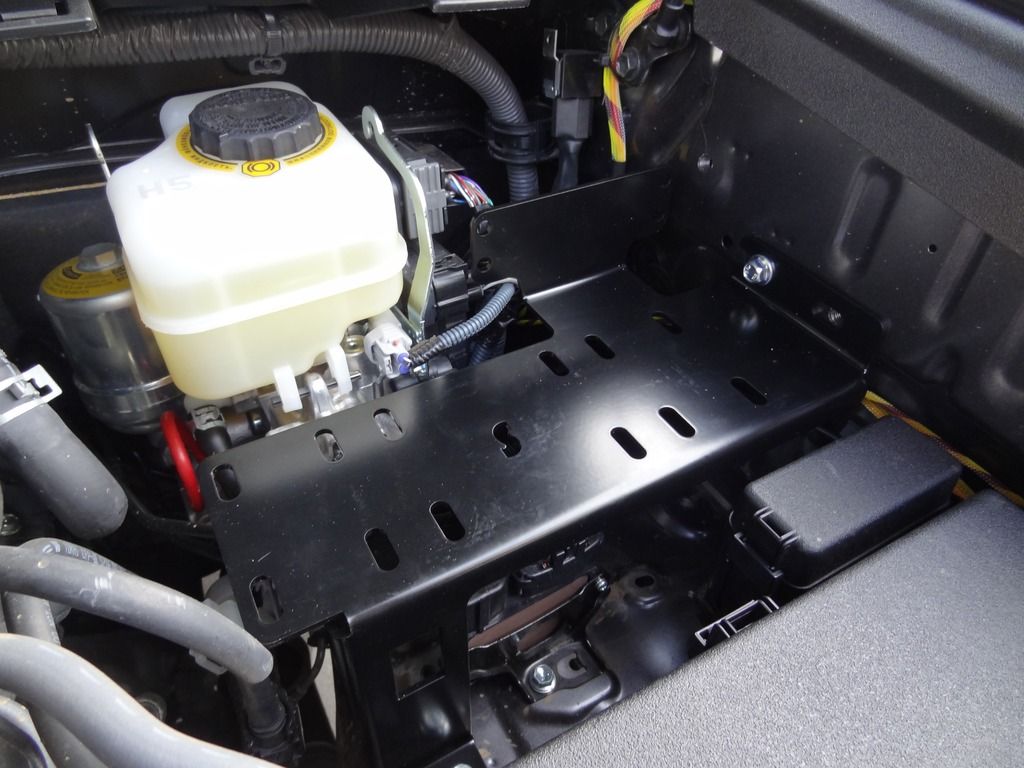
Here is the new location for the compressor, between the fuse block and the brake master cylinder.
DSC09526_zpsk5kwjshk.jpg


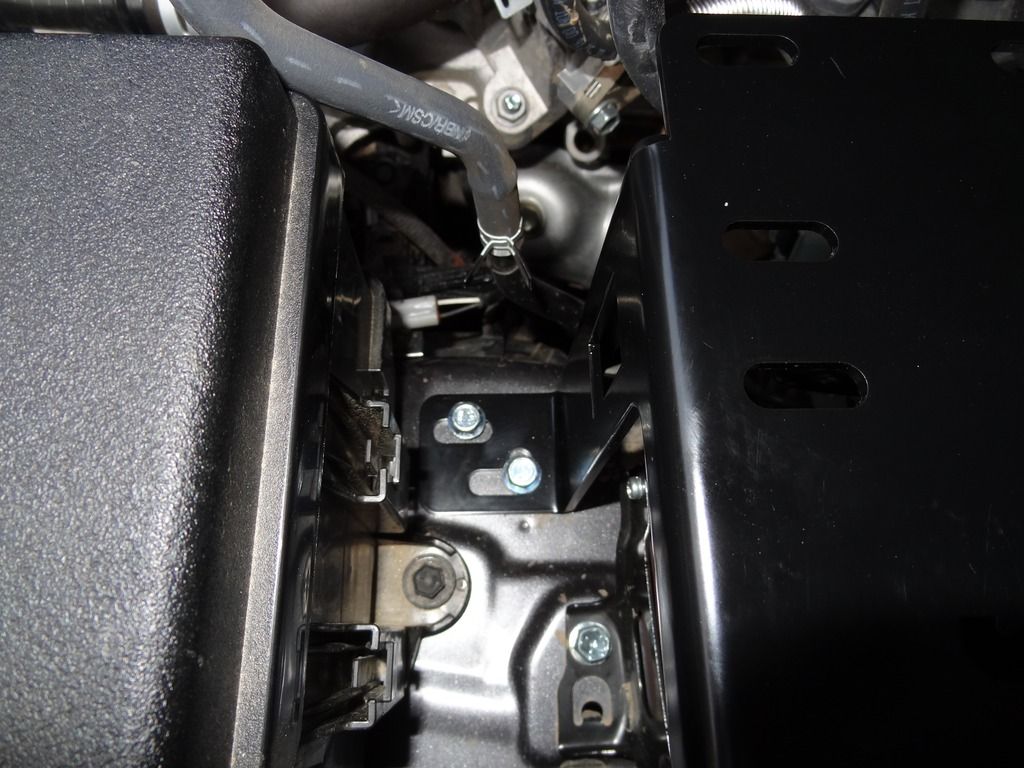
I mocked in the bracket to move the compressor around to see where I wanted it positioned, as the single can be positioned on the left or the right of the bracket. I chose this mount because I wanted to keep the passenger side of the engine compartment free for possible battery upgrades later on down the road. The hidden beauty of this mount, is that when used with the single ARB unit, there is plenty of room for a Blue Sea/Bussmann fuse box or a Switch-Pros unit. Basically you get a 2 for 1, something I will explore later on. This mount will also work with the dual ARB compressor, but it is centered and has only one mounting position.

DSC09534_zps0oq8z3yv.jpg


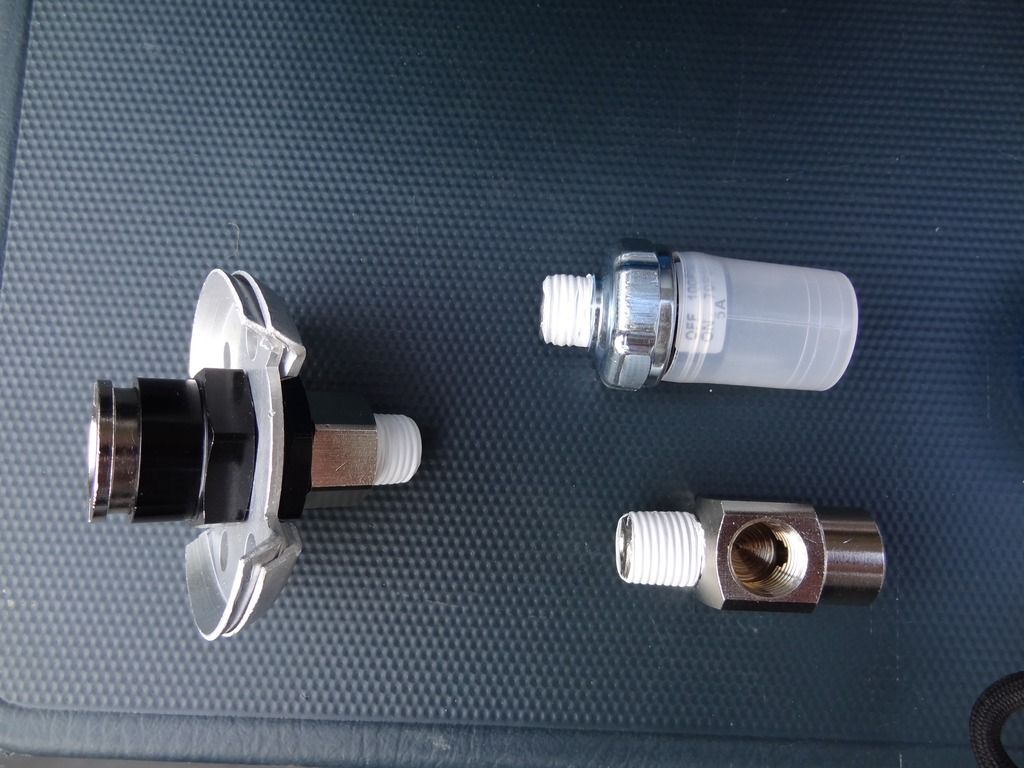
I then prepped the compressor using the supplied fittings from the ARB pump up kit. The “diverter” is screwed into the master cylinder of the ARB unit, and then the pressure switch and chuck can be arranged however you need to suit your application. I wrapped the male ends in Teflon tape to prevent air leaks and installed them on the unit. (you’ll see them installed in later photos)

DSC09538_zps9smyckr0.jpg


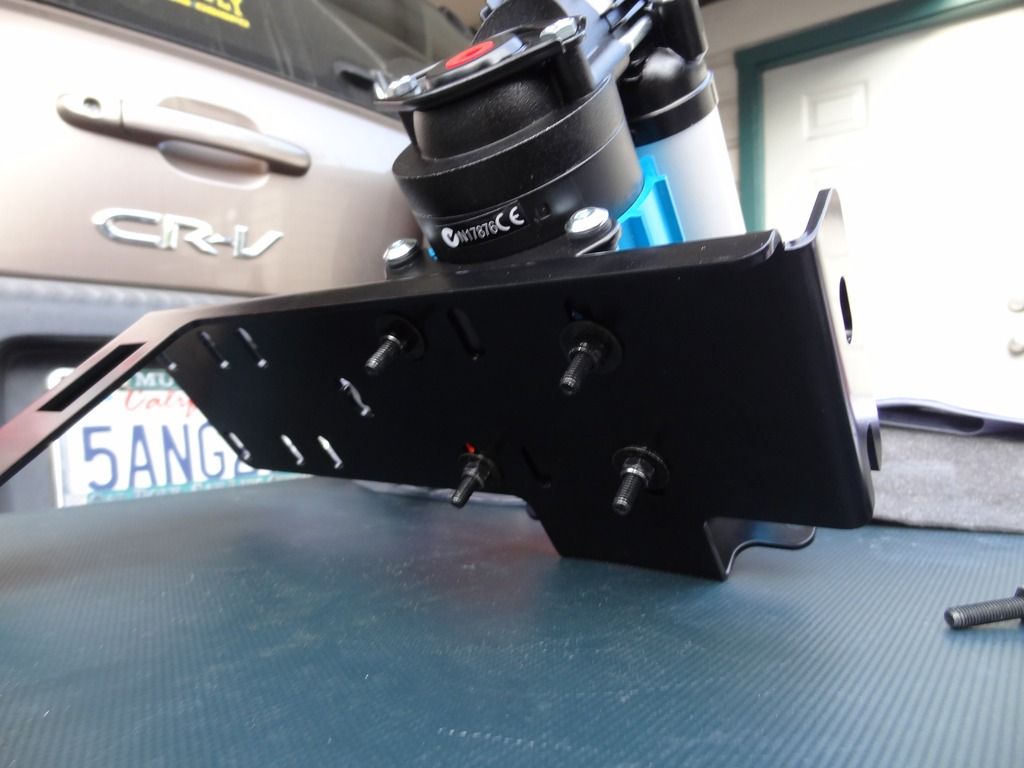
I then mounted the compressor onto the bracket using the ARB supplied hardware. This was the position that I thought I wanted it mounted, but as you’ll see in a bit, there is a complication!

DSC09540_zpss6oi0mju.jpg


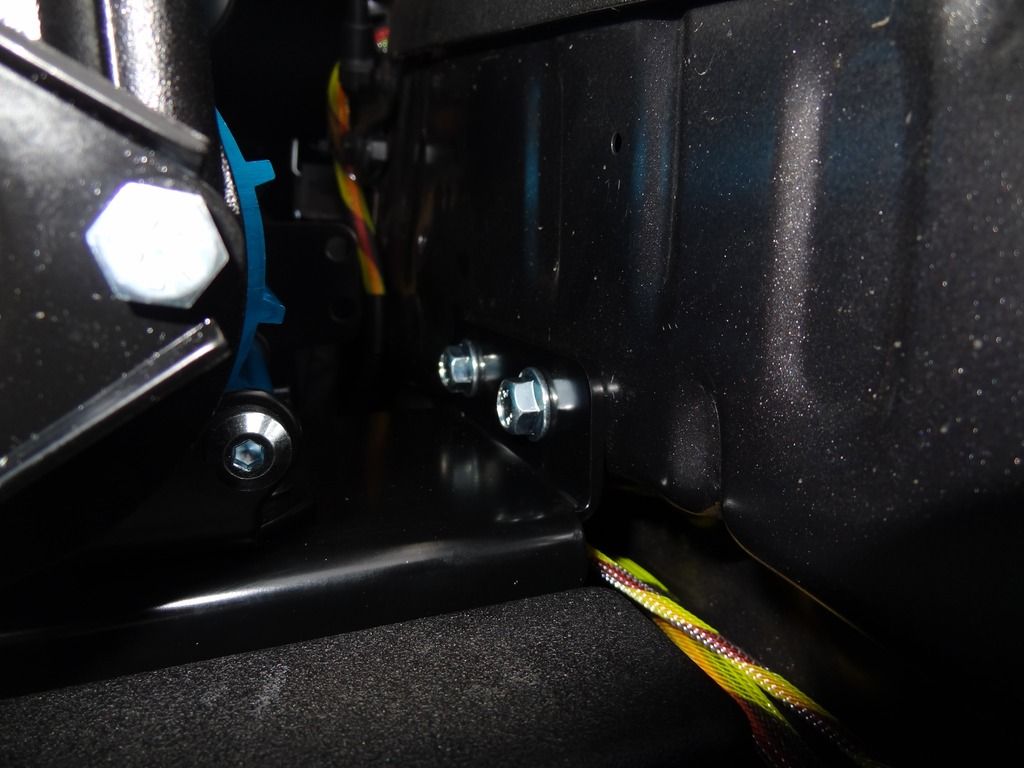
I bolted the mounting bracket and the compressor into the engine bay using Slee’s easy to follow instructions and hardware. Two bolts in the fender sheet metal using factory unused threaded holes, and two on the wheel well sheet metal again using unused factory threaded holes.

DSC09543_zpsogksmy5g.jpg

DSC09546_zpsgmhztoyl.jpg


This was my original orientation, with the compressor angled, so that when the hose was connected it cleared and didn’t rub the paint on the front quarter panel.

DSC09551_zpsz5oux9lg.jpg


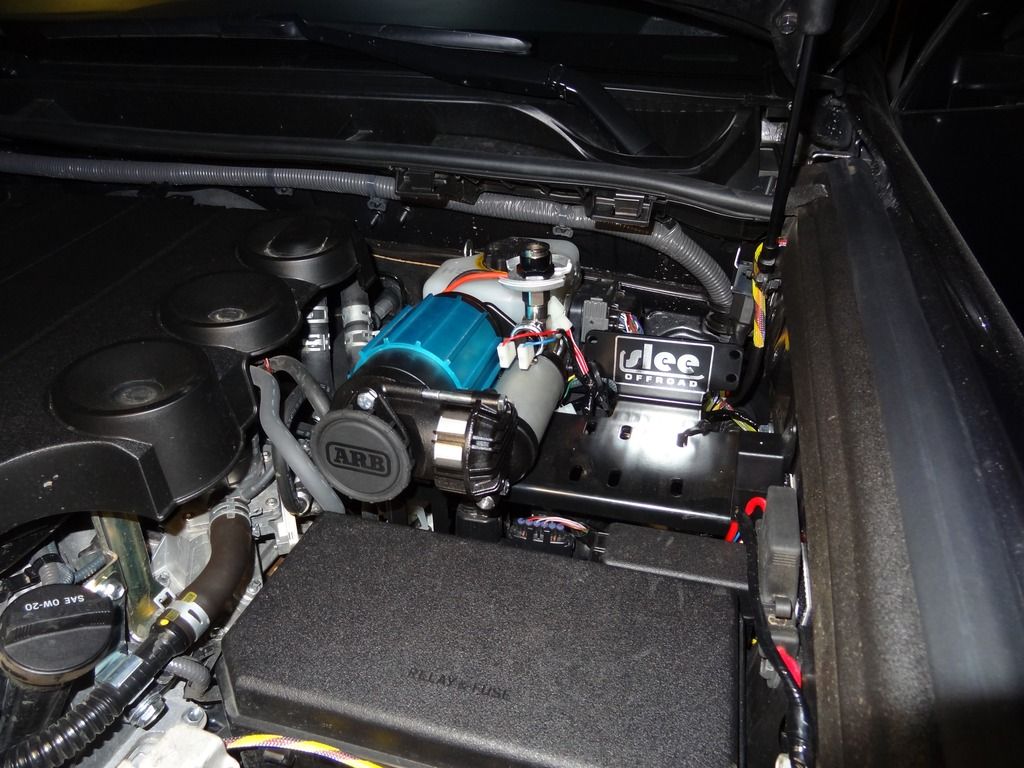
The problem arose when i went to close the hood, and the gas strut came in contact with the air chuck. Having noticed this, I put things on pause and really thought about the placement. One thing I failed to notice, mounting closer to the edge is more convenient, but it will limit my access to the firewall for feeding through future electrical lines. With the clearance issue, and the access issue, I reoriented and decided that mounting far left would be the better overall placement. So, I unbolted everything and installed again. Better now than later on down the road though. Here is where things ended up.

DSC09603_zpsztqtj8dw.jpg


Much better.

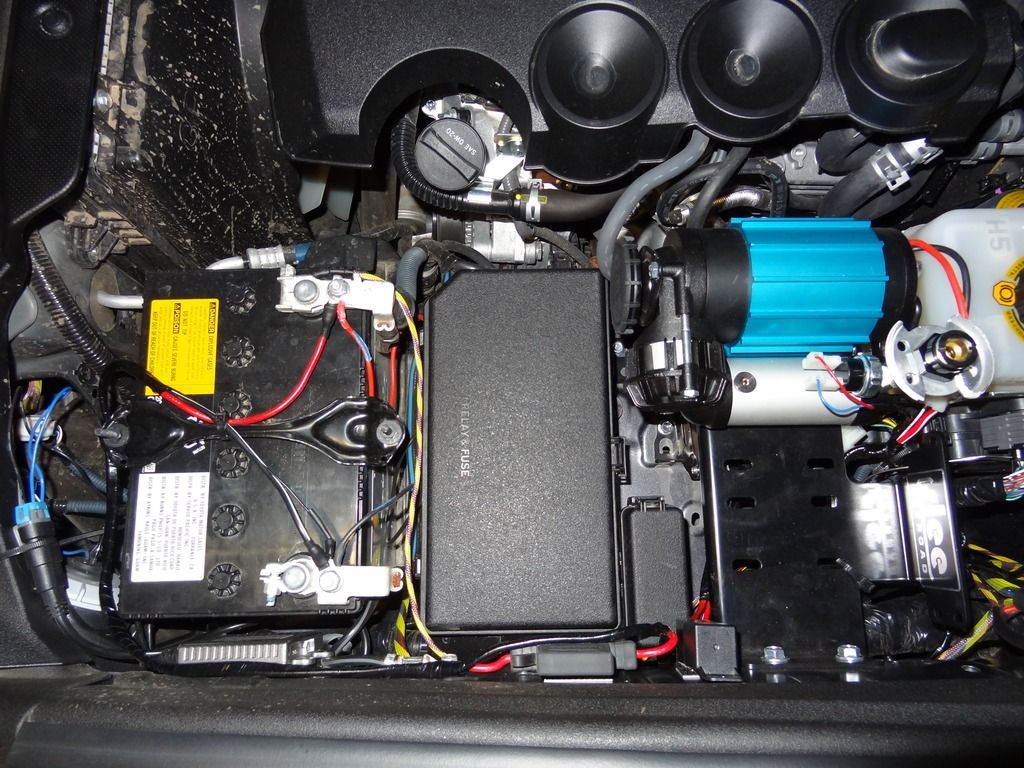
Wiring. Once the hardware was installed I connected the wiring harness to the compressor and routed the wiring loom under the bracket. I ran the 40A Max fuse and the associated wiring behind the fuse block and to the battery. I attached the provided battery terminals, and then used the 3M fasteners to attach the fuse and the relay to the inner fender, above the fuse block. (note: the below photos shows the wiring hooked up, this was taken after I was finished installing. DO NOT hook up the wiring to the battery at this point, unless you like electrocuting things or yourself)

DSC09601_zpsfvwzodo7.jpg


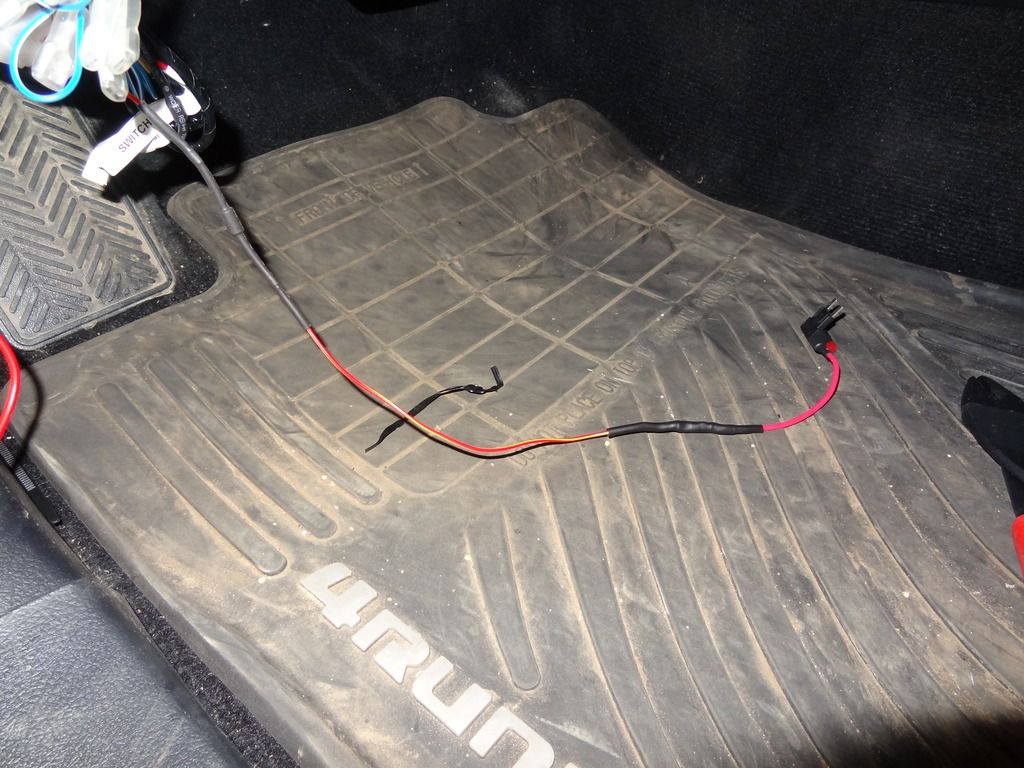
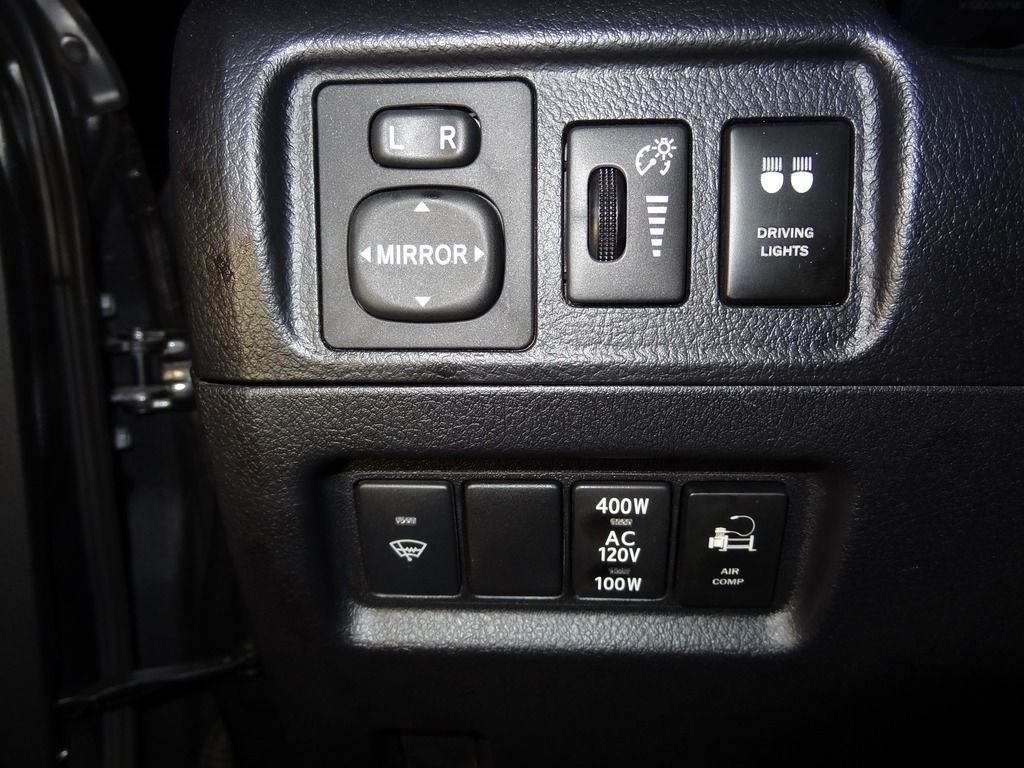
I then ran the other end of the wiring harness into the cab via the firewall (which I have gotten much better at doing). The compressor bracket didn’t interfere with being able to access the firewall port, so I am glad I thought of it when I did! ARB supplies a wiring harness intended for running a main switch, and the associated front/rear air lockers, as this compressor is used in locker applications as well. I could have wired it without the additional harness, but this gives me options down the road, and it isn’t sacrificing too much space in the interim. On the left is the wire loop fed through the firewall, and the right is the 3-way wiring harness which I will connect the “main switch” wires to the OEM style switch as shown.

DSC09591_zpsscxp7bts.jpg

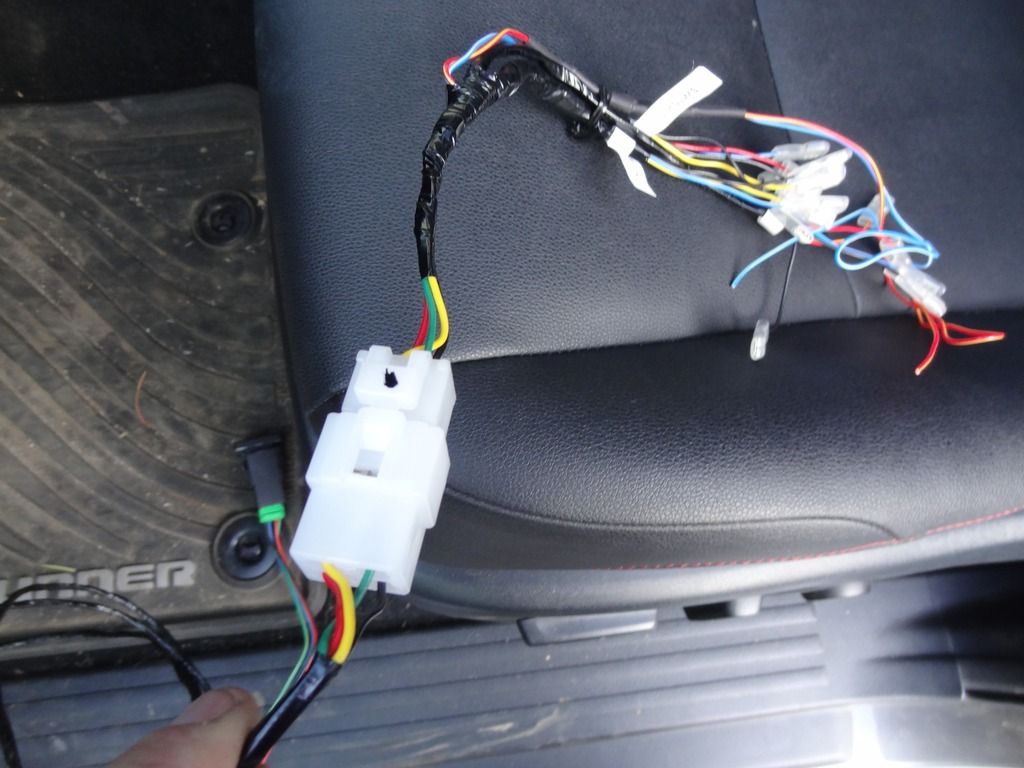
Switch black to harness black. Switch green to harness red/yellow. Switch blue/yellow to harness blue/white (this would normally be tied in with the dimmer to illuminate the switch at night when not turned on, but I elected not to do this because I don’t feel it’s needed). Switch red to harness red.
DSC09594_zpskttblha4.jpg


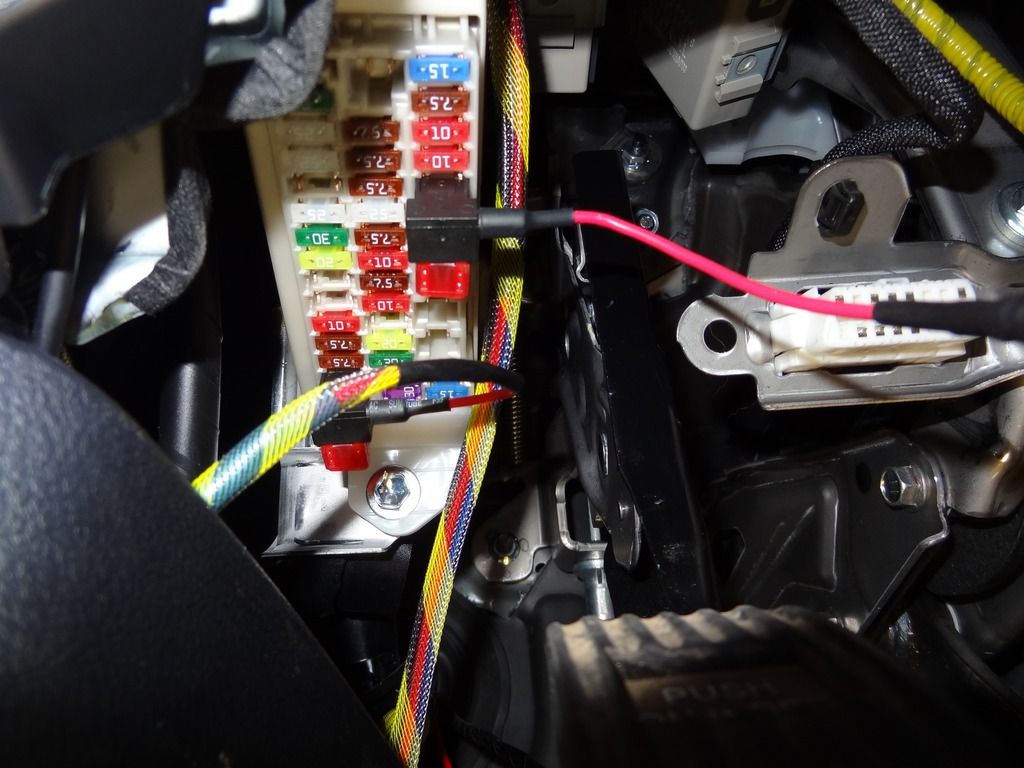
The red/yellow harness wire is the 12v supply for the switch, so I connected it to an add-a-fuse and connected that to an unused, switched fuse spot. This way, the compressor can only come on with the car running, which is what you want anyways to keep your volts up while the compressor is running.

DSC09598_zpsodh69bzd.jpg


[Note: the add-a-fuse in the lower slot is for the amber markers on the S8 light bar]
DSC09599_zpspxrkicyt.jpg


Then, bundle the wires in whatever way you prefer and stash them under the dash and secure them in whatever way you prefer. I used zip ties because they’re like duct tape, but less sticky, and more convenient. And duct tape fixes everything.

And you’re done! Here are some completed photos.

DSC09607_zpsinofjnxp.jpg

IMG_7186_zpsnvehwlhg.jpg


Impressions:
The compressor has plenty of grunt to fill my tires with it’s +/-3CFM flow rate and 30 min duty cycle. I performed a test when installed. At a few hundred feet above sea level, it can inflate my 275/70R17 Cooper ST Maxx’s from 18psi to 40psi in 2 minutes. Pretty impressive for a small unit. I am sure that at altitude the time will increase, but it just means I get to stay in the mountains that much longer. One thing worth noting is that without a tank, this unit is too small to power an air nozzle for blowing off the bumper or engine bay or whatever. With the dual you can do it, but I don’t think it’s a huge sacrifice for the money and space saved. If I want that capability, I can install an air tank later down the road. For my needs this unit will work great.

More to come….​
 

MTN4RNR

Adventurer
I have spent a good portion of my life in and around the north and west Tahoe shores enjoying skiing in the winter and boating/biking/hiking in the summer. I have always wanted to explore the roads West of highway 89. This weekend while vacationing at nearby Soda Springs, I took the initiative to head out and make a trip of it. The target being Ellis Peak, west of Tahoma with an elevation of approximately 8,500'.

I left the cabin we were staying at and decided first to cruise through the valley there at Soda Springs, which turned out to be a fun, fast cruise through some of the trees and the relatively smooth roads. The cool moment was seeing a train on the tracks above me, and “racing” to the next crossing. If I had a drone, a team of cinematographers and some time, it would have no doubt been an amazing shot (or at least I will keep thinking that). I made it to the next crossing first and got to enjoy the loaded Locomotive cruise by as it prepared for it's descent into Truckee via the Donner Pass.

F0A15F7B-4F52-43B8-B027-55CEB6C8E2D0_zpsmcuvderd.jpg


I then headed down Old Donner Summit, and into the Tahoe Basin, eventually cruising past Tahoe city and onto Barker Pass Road. This is a paved section that brings you to the Blackwood Canyon campground. You can take a paved option to the top of Barker Pass, or the 4WD option. You guessed it, 4WD for me.

Air down. 20psi front, 18psi rear as I was unloaded during this trip except for a few beers.

D1E40C39-34C3-4A56-B357-B376C277CEF9_zpsycsqxqdj.jpg


The trail remained fairly consistent and easy, I was in 2WD 75% of the way, stopping to enjoy some of the scenery.

B2C3C92D-151D-4031-A806-E98BB75B85F2_zpslvr1dlxn.jpg

5651782E-F31A-41B1-BBE7-D7366FE4E6DF_zpstd8brsfe.jpg


I found a parked new TRD Pro on the trail, just below a rock obstacle. I connected with the owner after posting the photo on Instagram. She had bought the truck a few weeks earlier and was using it to get outside and enjoy the mountains. She mentioned that she was looking forward to more practice off road, and illuded that something like that wouldn't stop her in the future! A side note: At first I made a caption for the photo comparing the “abandoned TRD Pro” on the side of the trail being passed by the Trail Edition with stock suspension, reflecting and joking on some of the views that some of us express here on this forum. It's all quite negative really, and I didn't really think much of it at the time. But when the owner spoke up about who she was and what her story was, I quickly took the foot out of my mouth and remembered that regardless of what you drive or how far you get on the trail, it is about being out there, doing SOMETHING instead of nothing. Needless to say I felt terrible that I had acted like a tool, and quickly recanted my original statement. She was kind to me after I had apologized, and I appreciated the reality check.

4DD18DAD-4CD5-468A-8E1D-718D47C016BA_zpsackfiyhs.jpg

8E1277C6-AA9C-4FE2-B01B-0B20B57CE712_zpsyblj1mnt.jpg


Back to the story:
Reaching the top of Barker Pass, I headed down the other side of the ridge and pointed towards Bear Lake, finding it full and pristine with plenty of future camping spots. This is where I realized I didn't have any bug repellant *itch itch*

87C72313-BF34-4E25-92A1-86CF369C5861_zpswc5mud4w.jpg

BB9A34F3-0990-4D82-8116-DD559D224EE5_zpsnpyhimr6.jpg


Time to make a break for the summit. Oh wait… there's still snow on the trails… Made it through this bit

52BEED66-4B02-402D-944E-049F443A8167_zpse8uwk8yg.jpg


More trail

24C96E6A-9765-4099-AD23-E8B6B0858B14_zps0sarbdji.jpg


More snow. I lost forward momentum the first time trying this drift, but after the photo and reversing, a little more speed was all that was needed to get up and over.

E324F1F5-30D4-4630-B1D4-A2B1E8E5BD2F_zpsbg4rvcj1.jpg


This was the turn around point for this trail. I could have made an effort through this patch, but a few hundred yards up trail, there was a drift I knew I wouldn't be able to pass.

121483FF-5F33-4E13-BAC0-04A44931FE43_zpseofzto1g.jpg


I double backed to a smaller trail that was half creek half trail. I picked up some new custom striping through this section, which I have ultimately accepted as a part of the gig with a darker truck. It's going to happen. I just try to moderate the difference between avoidable and careless scratches. It brought me through a scenic meadow with more creeks and water flowing through it

9B6628A8-B3BF-45FA-BA58-D800359698FF_zps7sta6kyy.jpg

CAA44791-924E-4E4F-8EAB-CB540A54F7EF_zpsrf86hqv2.jpg

83072461-D13D-4A25-A7D2-6B598FF79C3C_zpsowbxxsyd.jpg


I then ran into a couple who were fellow Overland Bound members, who had met this snow drift and opt'd not to try passing in their Jeep as they had been solo before I showed up. I told them I'd give it a shot. Engaged the locker and took a hard right line.

EDEC4DB9-024A-4E5C-B3DA-098762641B24_zpst6m2vu8u.jpg


No problem! And I got first use of the 4x4 Labs sliders with that rock on the left that I ended up moving anyways afterwards. Oh well…

F89CAEA5-F561-488D-9B7F-2B7E6FAC68EC_zpsojxpahum.jpg


My new trail buddies followed me in the Jeep to the point where we couldn't venture any farther due to snow. .75 miles from the top, stopped by a trail wide, 3' deep drift that was about 50' long. Not willing to spend the day shoveling snow when I didn't have the proper equipment to get me through safely. It was time to hike from there.

B2027376-3905-4693-9458-DD097DD2F21F_zpsrzea1x2u.jpg

037253F6-D1F1-4F08-B87B-EC1F5A166E2D_zps5gs4l06i.jpg


This is the final ascent to the peak that I had seen videos of other 4x4's charging up. Next time….

9C32F2F6-B2DC-4D3F-A614-733C0BE35B43_zpsyziz3wap.jpg


See 2 of 2 below
 

MTN4RNR

Adventurer
The view at the top sucked. What a waste of a day….

C00F900A-9E30-4AAC-841A-ED25C5EDDC91_zpsebnwhsvg.jpg

911F0527-B077-4A6E-9F50-24CA0EEDA6CB_zps5pncj8cc.jpg


Back down the mountain, I split off from the Jeep (not on purpose, but they were ahead of me and went right when I wanted to go left) and headed down towards Buck Lake.

AD449569-570F-47D6-93FF-D11F2288F0AF_zps3jxae3jy.jpg

1479F416-F076-457F-84DF-5FB221D79E2A_zpskwfwdpnr.jpg


The trail was great until I hit a rock garden that was something I feel I could have navigated, but with a lack of experience, armor and a spotter, I decided that this would wait for another day. Double back to head right where I initially went left.

4B3D740A-F63B-48D2-BB61-4E2A56B3A888_zpspba99txk.jpg

2D89A076-B538-4344-A31C-E0D34BCF22EB_zpsqu4ijfjf.jpg


A few miles later, I met up with the lake side access for the Rubicon Trail. With time against me on this trip, I headed down to towards the staging area to conclude this trip.

EF88D75E-F616-4AA2-A170-0A756B3E424C_zpsnt6cneqg.jpg

138F21FE-B5C6-4A06-A850-5EC4B8BEC8BA_zpsoq1piplb.jpg

9085F9CE-5AC7-47B6-92F8-1B5E8EB0575A_zpsi3cjvbp2.jpg


It was a great trip with some good things learned, and a whole new world of trails to explore. I have pinpointed a number of trails and waypoints that I want to explore more of on my next trip up to the area. Maybe I can convince a few other members to head up for a weekend camping trip to show me around and to spot me when I need it. My stock skids don't like me….

95565342-9BBF-48DA-9E6D-E7F618E7F594_zps2qwbkdsy.jpg

DD2E1EFB-5EE5-462F-A3CE-6E42CA41F7CA_zpsxxtmrhkz.jpg


More to come….​
 

pyrate

Rollin' along
Thanks for sharing. The pictures and the descriptions / story are always great. And even an admission to "foot in mouth" that we all do at some point. Well Done.
 

MTN4RNR

Adventurer
Downieville to Sloat - July 2016 (Part 1 of 6)

A while ago, my buddy Andy mentioned to me that he would be putting together an “expedition” to travel the Backcountry Discovery Trail in Plumas National Forest. He convinced me that it was something I needed to do, so that’s what I did. I looked at the calendar, picked the dates I could join along, and booked it. I would be joining on the first leg from the town of Downieville to Sloat, approximately 60-70 miles north. The only roads between the two points that we were going to take were dirt, because that’s just how Andy rolls. And I have never been the type to argue over getting dirty. So join along as I share some photos and dialogue of my portion of the trail.

I met Andy and his dog twin Taco in the Bay Area at a donut shop early Saturday morning. Well stocked and anxious, we left and headed through San Francisco (Taco’s first time over the Bay Bridge), and east on Interstate 80. Stopping in Fairfield, we met up with Phil, an Expo/Tacoma World member and his 2nd generation Tacoma/Four Wheel Camper combo. We then met up with Alvin and his 1st generation Tacoma along with his co-pilot Eric, both Tacoma World members. One thing that we did notice, we all had Cooper Tires; Andy with STT Pros, Phil with ST’s, Alvin with STT’s and myself with the ST Maxx’s (fitting). After a brief chat, we took off eastbound on I-80 towards Auburn. There was a bit of radio chatter discussing the rigs, and the route planned on the way up, and ultimately we ended up in Auburn traveling North on Highway 49. This area was very familiar to me as my family has land and a cabin not 15 minutes from 49. We passed through Grass Valley, Nevada City, and then followed 49 on to Downieville. This was new territory for me as I had never been past South fork of the Yuba River before. In Downieville, we agreed on some pizza and a quick fuel up before heading to the beginning of our off-road journey.

Taco ready to go in his section of the truck
DSC09712_zpsakdka3uy.jpg


2 Rig convoy
80EB33A6-86EF-4EB2-9836-4D108E3AA894_zpsooqakmf4.jpg


Phil joining the group in Fairfield
6F19FCE5-7D62-4B63-AED3-93264A3D21FF_zpsmrvedes6.jpg


Heading North-East on highway 49
DSC09715_zps4dyut5bp.jpg


We had to “hunt” for gas in Downieville because we clearly missed the small station on the way in, but after a quick shout out to someone on the street, we found it
DSC09730_zpsbukltttw.jpg


I parked next to a bridge crossing the Downie River before heading in for some good pizza before hitting the trail
236CFF06-2D2F-4F0F-B0C0-E4C79F3B1A0A_zpsrmg92x5f.jpg


A quick air-down at the trailhead, and we were on our way!
DSC09731_zpsrp88optc.jpg


The theme of this trip was to make it to the campsites in a reasonable amount of time, but anywhere along the way was subject to change on the fly. We made our way up the first fire road, took a quick offshoot that looped out and back from the main road, and then reached an intersection. The Motor Vehicle Use Map (MVUM) showed the trail being 4x4 accessable, but a forest service sign at the beginning of the trail noted the trail as being ATV/Motorcycle. We decided to venture up the trail to see if things got too tight. We fought through some narrowing spots on the trail until we reached a section that was really tight, and mostly manzanita which isn’t forgiving on paint. Everyone in the group was ok with the pinstriping, except for me. I am more than willing to scrape along a trail, but this was too much. I took my shaming as we headed towards the top on foot to catch the view.

DSC09732_zpsasgn0obc.jpg


DSC09734_zpsrad3vicw.jpg


The “narrow” part of the trail
DSC09741_zpsne4cqplv.jpg


The view towards the Sierra Buttes
DSC09738_zpsxums5dhn.jpg


After getting back to the trucks, we drove to the last intersection where we diverted, and made our way to the next waypoint, Saddleback Mountain Lookout. It was an entertaining ascent to the top at nearly 7,000’ elevation. The lookout itself was manned by a Forest Service employee and his wife and son. He was the relief watchman and was there for a 4 day stint. Talk about an epic job. We got to tinker around with some of the tools up there, my personal favorite being the Osborne Firefinder. Talk about a cool tool that was built almost 80 years ago! After chatting with the FS guy for a bit, and snapping a photo together, back to the trucks and on to the next bit; a 4x4 side trail.

Side note: I think that I am going to incorporate more of these Forest Service lookouts on my adventures, because they are just plain COOL!

DSC09743_zps0gfi9i6u.jpg


DSC09745_zpsc13ovgt9.jpg


DSC09746_zps6cm7ezrg.jpg


DSC09748_zpsodp25xna.jpg


DSC09749_zpsm5ahqeyk.jpg


DSC09757_zpsrof8dswv.jpg


Forum statistics

Threads
185,842
Messages
2,878,770
Members
225,393
Latest member
jgrillz94
Top