Lord Al-Sorna's 5x8 Cargo Hut

Lord Al Sorna

Harebrained Scheming
Greetings fellow Expo members! I am throwing up a build page for my latest undertaking, and that is to convert a 5x8 Wells Cargo utility trailer into an off-road capable camp trailer.

Previously, I had built a sweet little off-road trailer modeled loosely off of some of the Adventure Trailers offerings. This thing went everywhere with us for two years without missing a beat, but over that time the wish list began to become more clear and change a little from what our trailer and RTT offered. My old trailer has found a new home with some of our good friends, who could not be more thrilled about it. Here is a pic of one our her last outings with us:


The decision to make this change came about in a few areas we saw that would improve our camping enjoyment even more than the previous setup. First, we wanted our two dogs to be in the same area as we were at night. With the RTT, they had to sleep in the back of my Jeep. Usually this worked ok, but it is a change that we both had strong preference for. Secondly, we wanted a more comfortable spot to sleep and spend time when the weather was less than picturesque. High winds, rain, and snow will have a lot less impact on our travel plans and enjoyment by making this transition. Lastly, we wanted a quieter and more private arrangement for the times that *god forbid* we camp in campgrounds and closer to civilization. We try to avoid doing this when possible, but there are plenty of reasons to do it on some trips. I want to be happily tucked in a sound insulated foam box when people around me are making noise, running generators, and generally detracting from my desire to experience peaceful surroundings.

So I started scratching around and thinking about how to do a trailer with hard sides. I looked at building my own teardrop from scratch, tearing apart my old trailer and re-building from the frame up, or buying a teardrop from a place like AT or So-Cal trailers. Buying a trailer was out because for me, what you get is not worth the price tag. I found a buyer for my old trailer as it was setup, so that was out. I then decided that the most efficient way to get what I had in my mind out on the road was to start with a common utility trailer. This would allow me to modify an existing assembly over starting over again from scratch, saving significant manhours in the overall build time.
So... The candidate for surgery was found:


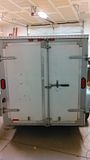
2003 Wells Cargo. Desirable features for my purposes were 1) The bent up-sweep in the front frame rails for added clearance and better alignment for the raised hitch modification I did to my Jeep. 2) The double barn door config in the rear (vs. the drop-down ramp a lot of these come with). The combination of these two features and a decent price made it my winner.

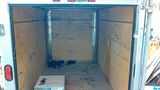
And now we transform it from a tired, rusty construction workhorse to a plush and luxurious backcountry condo!
 

Lord Al Sorna

Harebrained Scheming
So far I have made some executive decisions on build direction and parts, and I have begun collecting them in preparation.
First was a Timbren 2000HD Axle-less suspension setup w/ 4" lift spindles. This to me seemed like the perfect solution for gaining an independent suspension, clearance for larger tires, and more clearance under the body of the trailer.
http://timbren.com/products-page/2000hd/asr2khds03/

I also procured a side entrance door 31"W x 50"H with a latch you can open from the interior along with two 30"Wx22"H operable windows with screens and interior trim rings. This all came from Mirage Trailer Parts, and I am super happy with the quality and finish of the parts from these guys: http://www.mirageinc.com/


The basic layout will be kitchen and working area inside the back doors with fridge, stove storage, and shelving/cabinetry of some kind. There will be a full-height wall to the living space, which will have an elevated bed platform and floor area in front for the dogs accessed by the side door.

My dad also luckily had a perfect set of tires for this project laying around - 285/70/R17 Cooper Discoverer S/Ts

I have started deconstructing the trailer and preparing for the structural frame and wall modifications. This will include installing new 2x3 frame rails to accommodate the Timbren parts, a tongue extension for more clearance and maneuverability, creating fender-wells to mount the tires slightly inboard so that it matches the track-width of my Jeep, framing for the doors and windows, and welding a full skid plate on the bottom.

Removed the ball hitch assembly and jack in preparation of longer tongue.


Removed axle and fenders.


Removed inner plywood sheathing and floor to expose framing and wiring.
 

Curtis in Texas

Adventurer
Subscribed!

Sure going to enjoy watching what you come up with and what ideas I might incorporate into my trailer remodel.

I have a 18 foot, dual axle, cargo trailer I've thought about stripping down and redoing for a more dedicated camping / toy hauler duties.

One of my main desires is to raise the roof a few inches for more headroom. Once it's insulated and paneled I would not be able to stand up inside without hitting the interior lighting and Roof Top AC if I go ahead and install it.

Having interior shower, closets and sleeping accommodation's are a priority. Plus having the option of inside/ outside kitchen, refrigerator, dining and entertainment systems that can be relocated without a lot of tools or effort.

Maybe just have a refer that can be accessed from outside as easily as inside.

Will you be adding solar panel systems as well?
 

Lord Al Sorna

Harebrained Scheming
Thanks! You could have a lot more fun on a build with a bigger trailer, and I totally approve. For this project, I had to keep it small and light enough to take it on rough fire roads, two-track, and moderate 4x4 trails.

I will do a battery system with solar panels in this rig and add some LED interior and exterior lighting. It will also have a water tank and pump and propane heat on the mechanical side. Planning on fabricating an open-top basket on the tongue to hold firewood / loose items and the spare, and fabbing up a low profile roof rack.

There are some things I am on the fence about that I warmly welcome the thoughts of others on:

Hitch - Currently I have a Max-Coupler that I used on my last trailer. I was planning to use it on this project, but I am re-considering this. The main reason why, is that the max-coupler is a PITA to hook up and disconnect. This was not a big deal on the last build because of how light the trailer was. I could easily pick up the tongue and move the trailer. That will be less possible with this setup. I would be totally unable to hook up and disconnect the new build by myself, as it is usually a two person job.
Has anyone converted their max-couple to a pin connection instead of the large bolt?
Have people had good luck with pintle hitches? This is the direction I am strongly considering for this build.

Walls - I want good insulated walls, and I would also like to back the aluminum skin with substrate 100% to strengthen it from external impact. I see a lot of people just put ridgid insulation in the cavities, but I am wondering if the ridgid foam is strong enough? I am toying with putting ply in the walls and insulating over it or something like that. I am totally open to and looking for ideas here.
 

Lord Al Sorna

Harebrained Scheming
How much was the base trailer? Seems like it might be easier to build one from the ground up.

I paid $800 for the trailer. Having welded my last trailer frame and all from scratch, I feel that modifying something existing will definitely save me a lot of time (not money). It also means I am not trying to source all of the little aluminum trims and extrusions, lights, door handles, etc and figure it all out. I am just doing some easy cutting and welding, and then I am on my way quickly toward finish work.
 
Last edited:

rnArmy

Adventurer
Pintle hitch and lunette ring.jpgJeep and trailer from PA trip.jpg

I've had good luck with a pintle set-up. Extremely easy to connect and disconnect. And I haven't had the noise issue some have complained about.
In the past I've thought about taking a small trailer like yours and converting it as you're doing. It will be interesting to follow your build.
 

Lord Al Sorna

Harebrained Scheming
I've had good luck with a pintle set-up. Extremely easy to connect and disconnect. And I haven't had the noise issue some have complained about.
In the past I've thought about taking a small trailer like yours and converting it as you're doing. It will be interesting to follow your build.
Thanks for the feedback, especially re: the noise issue as I have heard of this plenty of times before. Sweet trailer and Jeep! Can you point me to where you got your hitch parts?
 

RagnarD

Adventurer
I am also a fan of the pintle coupler. Superior to a ball for a lot of reasons. Never noticed much noise with mine but I tend to keep plenty of tongue weight and use a properly sized hook. Those hookl/ball combinations will drive you crazy. I would only consider a max coupler if you were 100% certain that you would always be traveling with someone. Seems like you are begging for trouble if you need to hook up the trailer and you are not on nice flat/hard ground with a caster on your landing gear.
 

rnArmy

Adventurer
The lunette ring slides into a 2" receiver; I've got one (2" receiver) mounted on the front of my trailer (as do lots of folks).

The Pintle hitch and lunette ring are both easily found. My pintle hitch is mounted on a 2" receiver adapter so it just goes into a regular 2" receiver hitch. Places like tractor supply company and etrailer all have these three items.

One interesting option is to get a Dixon-Bates pintle hitch (pictured below). It mounts like a regular pintle hitch (should work on a pintle hitch adapter), but it has a pin you can pull, and once pulled, the pintle will rotate 360 degrees. So you can have the option of having it fixed (still gives you better range-of-motion compared to a ball hitch), but pull the pin and it becomes a multi-axis hitch. It's a European hitch, sometimes called a NATO hitch (NRC2051). Sometimes you can find them in the states, but generally they're sold in Europe (and shipping can be expensive). But even with shipping it's not too much more than the multi-axis hitches they sell here in the states, and I think they're way more easier to connect/disconnect than the non-pintle multi-axis hitches out there.

http://www.lrparts.net/dixon-bate-nato-hitch-heavy-duty-tow-equipment.html

Lunette ring.jpgDixon bates NRC2051-ROTATING-TOWING-HOOK-FV.jpg
 

Lord Al Sorna

Harebrained Scheming
Got all of the fab work done on the tongue. Put an extension in for more clearance, converted to mount lunette, welded on new jack mount.

Went from this:


To this:


Lord Al Sorna

Harebrained Scheming
More updates and a major milestone in the project today.


I welded Timbren suspension to the frame of the trailer and assembled the brakes, drums, and bearings. I welded on the outside, and then had to adjust camber such that it was square / flat on both sides. This required a long bar to levarage the axle-less brackets and wood shims against existing crossmembers to hold it in place. I then used the built-in pockets on the Timbren components to weld in a 2x2 3/16" steel crossmember that solidified everything.


I found a set of factory JK wheels for dirt cheap on the local classifieds and snatched them up. I was excited to see how they would look on the trailer, and check bolt pattern. In doing so for the first time I discovered that my newly acquired find was not going to work, as the center hole in the wheel did not accommodate the center axle portion of the hub. I was dreading the thought of taking the wheels to get machined, as this would be an expense that would convert my great deal to a total mistake. I then had a moment of... "******* it, lets give this a shot"

I used a square bit on my router (with the fact burning in the front of my mind that this is a WOODWORKING tool), and to my elated surprise it started shaving the alloy down evenly and with a fair degree of speed and ease! Not the easiest thing in the world, but it ended up working great in the end and saved me from a significant added expense to clearance the center hole.


I got the tries mounted up today and... it's a ROLLER!


Towed it around on the dirt roads in my neighborhood, and it is obvious the Timbren setup was the way to go. Very little vibration transferred to vehicle. Trailer is super light right now and still had zero bounce. I am extremely pleased with how it tows and the overall scale. This thing has a very burly stance now, and some serious ground clearance:

5 gallon bucket under the lowest part of the frame for reference. Though it is much taller, the size and height still make sense in context and look good. 98% of the weight will be mounted in the bottom third of the trailer vertically, so I am confident is will remain highly stable when loaded and be easily towed over rough terrain.

I really like the pintle hitch so far as well. I was slamming on the brakes, accelerating, and driving over washboards to see what kind of noise it made. There is one, but it is barely noticeable at all. The best part is that I was easily able to hook the trailer up solo. Mission accomplished :cool:

Super stoked, and feeling the pressure to make progress before camping season! More to come as soon as I get further along. The next steps will be to add a receiver in the back and beef up the rear crossmember for a recovery point, weld framing for the door / roof vent / windows, and weld a trick set of wide fenders.
 
Last edited:

Sb_Moto

Adventurer
I dig it. I almost went this route on my trailer, but ended up building from scratch. Given the headache I have I almost wish I just converted a cargo trailer.
 

Forum statistics

Threads
185,798
Messages
2,878,294
Members
225,352
Latest member
ritabooke
Top