Blender, My LX450/FZJ80 + FJ45esk + GM + Land Rover crazy concoction

Metcalf

Expedition Leader
Bigger parts are showing up!


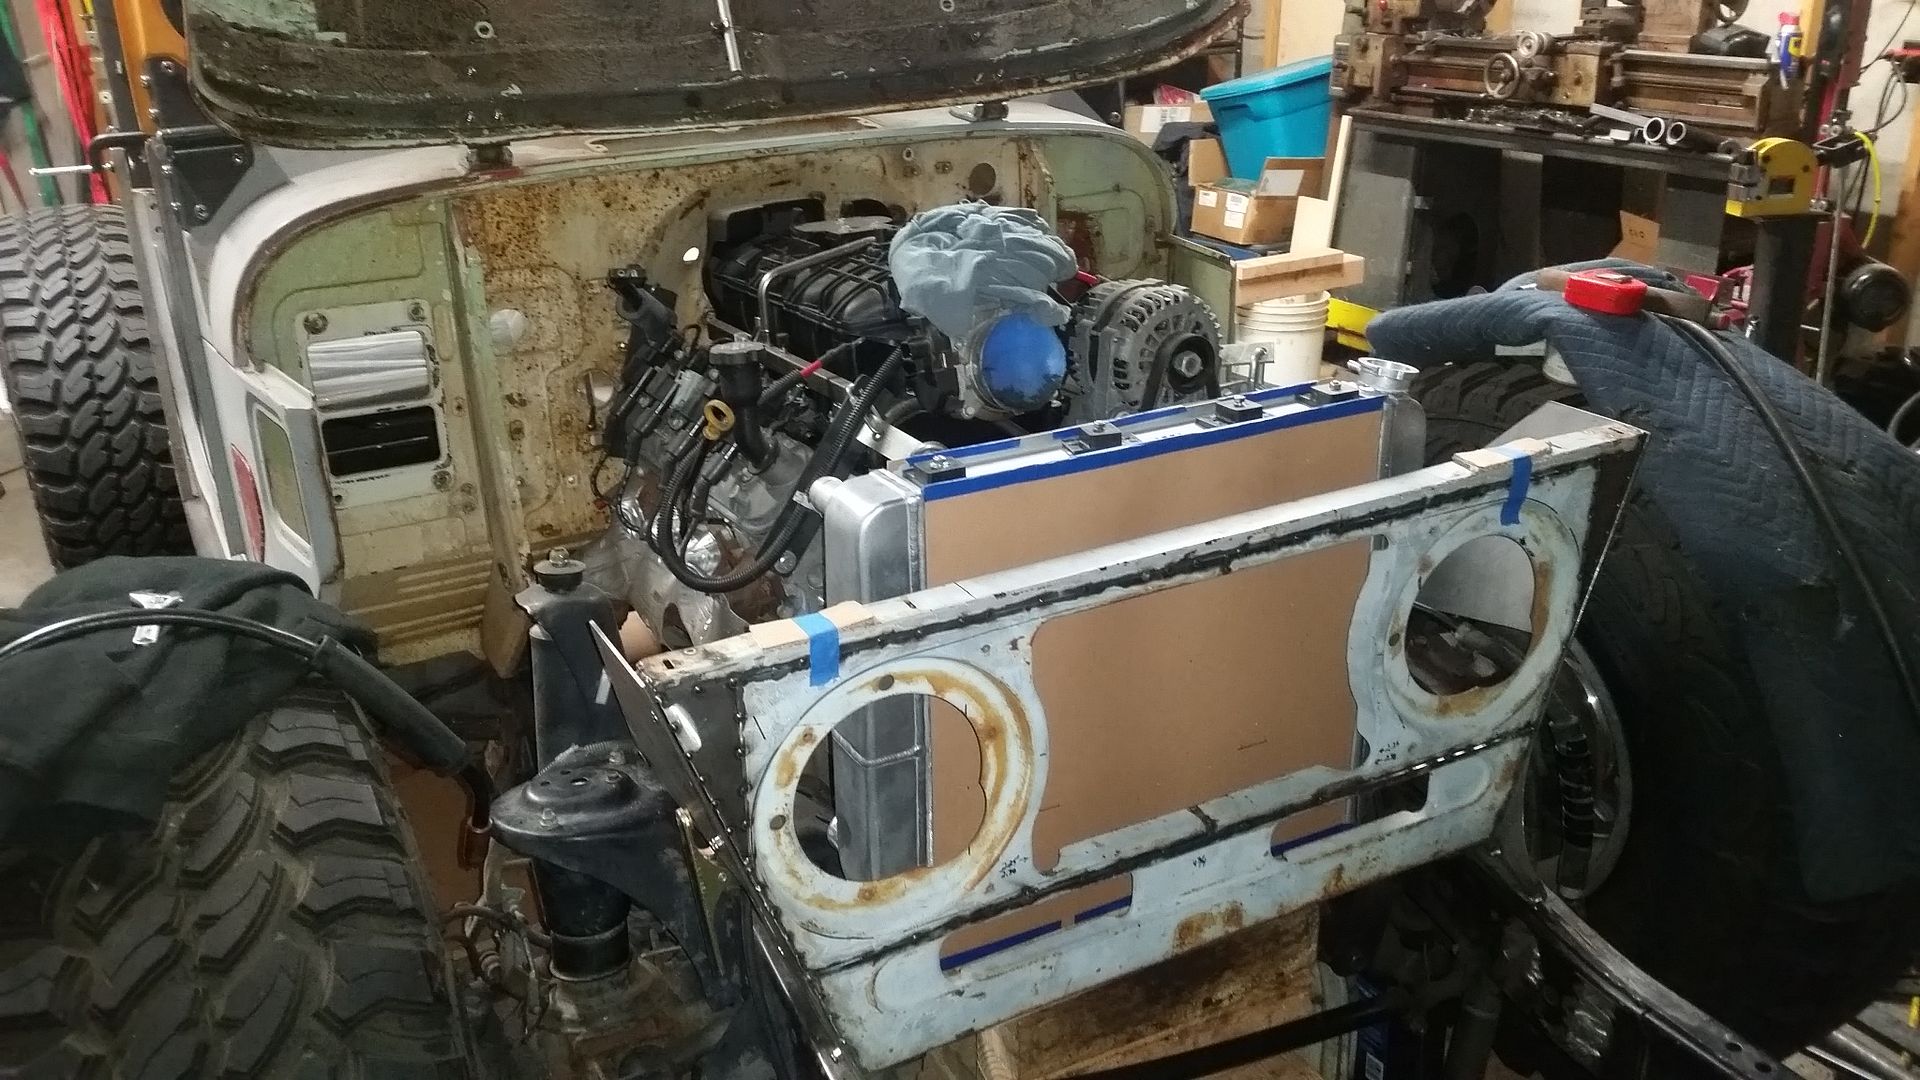
I was able to finish the mockup on the upper grill mounts and get them tacked into place. Once that was done I decided to mock up the radiator into position since it showed up today.

Radiator specs.
Brand:Griffin Thermal Products
Manufacturer's Part Number:1-58202-XLS
Griffin Aluminum Circle Track Radiators
Radiator Style: Crossflow
Inlet Location: Upper passenger side
Outlet Location: Lower passenger side
Radiator Material: Aluminum
Radiator Finish: Natural
Overall Width (in): 24.000 in.
Overall Height (in): 19.000 in.
Overall Thickness (in): 3.000 in.
Core Width (in): 19.000 in.
Core Height (in): 19.000 in.
Core Thickness (in): 2.680 in.
Row Quantity: 2
Transmission Cooler: No
Inlet Size: 1 1/4 in.
Outlet Size: 1 1/2 in.
Tube Size: 1 1/4 in.

This is about the largest radiator I can fit in this chassis. The steering box is mounted on top of the frame rail on this chassis just behind the grille. The radiator is offset slightly to provide clearance on the steering box. I ended up trying to center the radiator top to bottom on the fan clutch centerline. That should make building the radiator shroud a bit easier.

I edited the above post. I have the wrong fan clutch. New one on the way. I must have got my numbers crossed somewhere. I think the proper clutch I had planned will give me even more clearance....and match up to the fan that showed up today too.


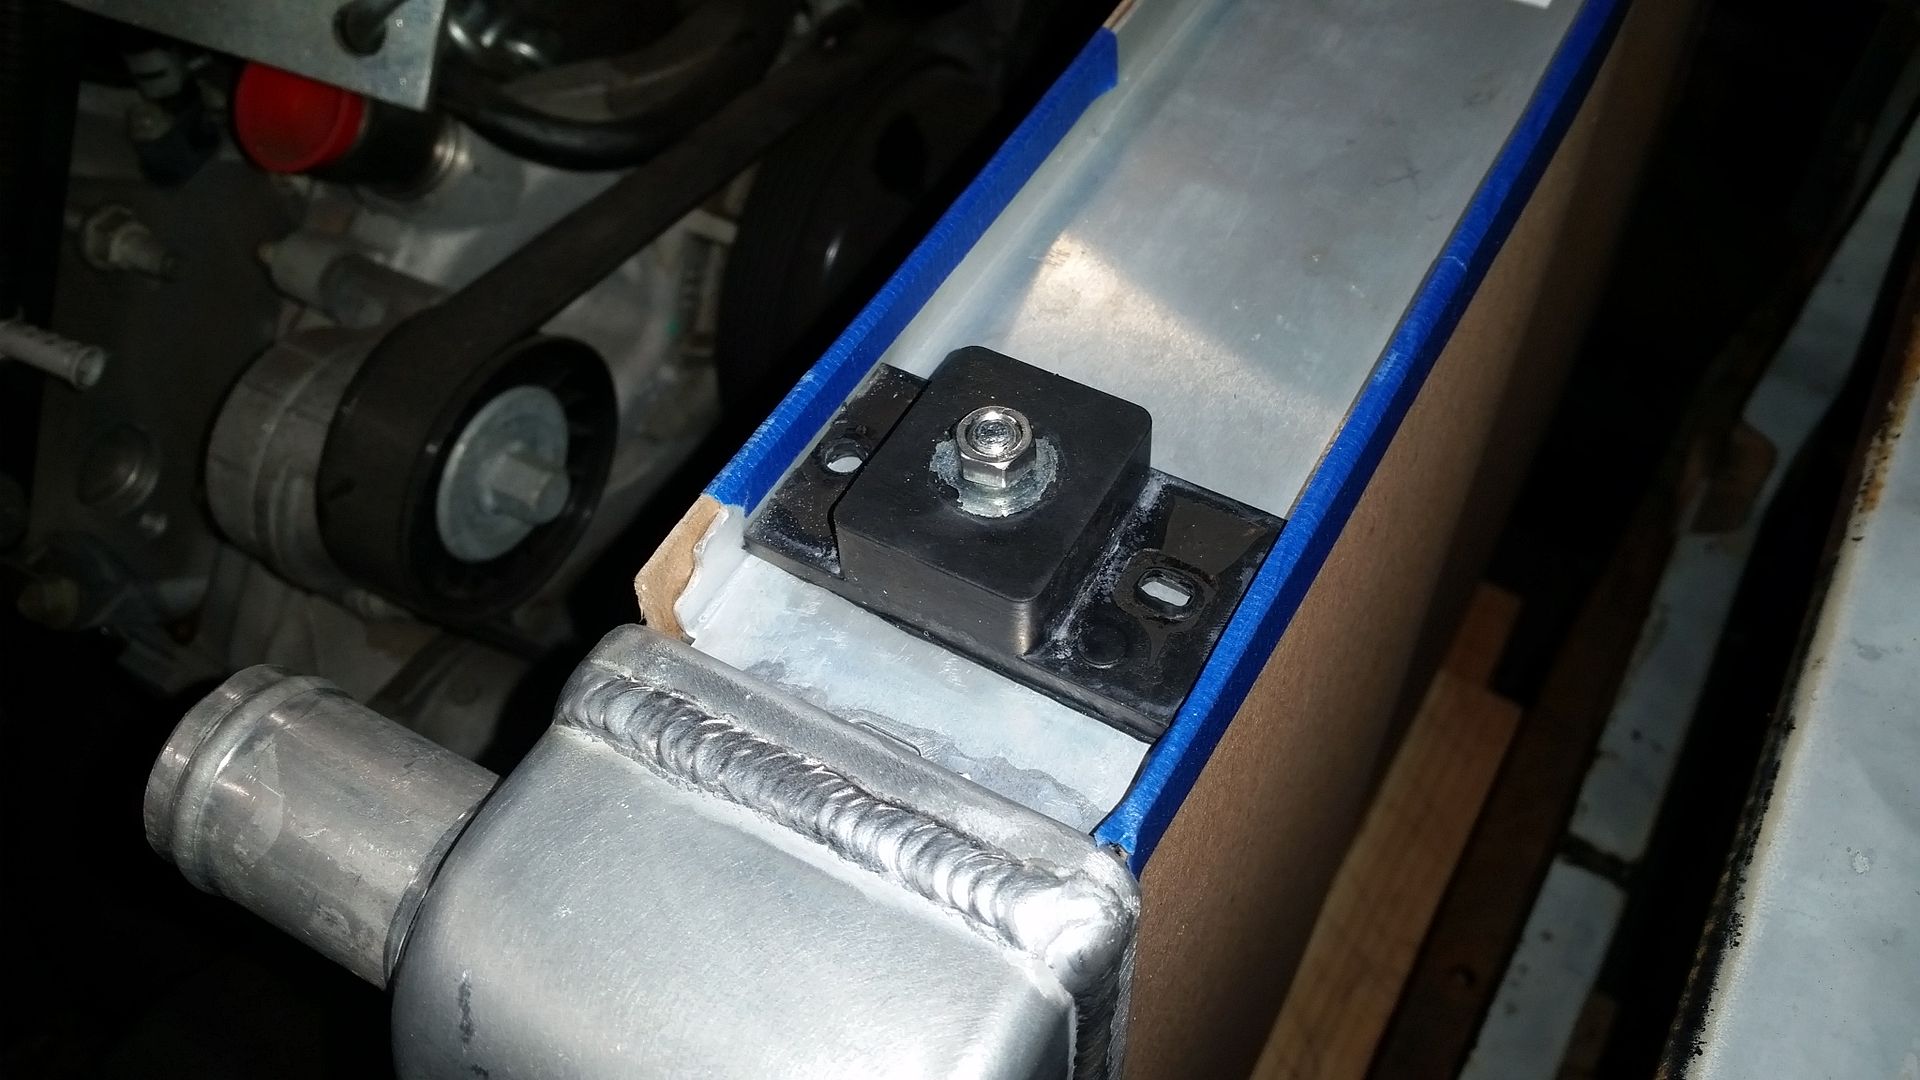
I stumbled on these little rubber radiator mounts from a Jeep XJ. The are a nice stud mount rubber isolation mounting system. They where SO close to fitting in the stock core u-channel. I ended up having to trim about 1/8" off one side of the mount. They have a 6mm stud on the top. They also clear the height of the u-channel by just enough. My hope is that I can use these to isolate the radiator from the frame mounting of the grill a bit. I am going to wait to do another mockup till I have the proper fan clutch. I think it is a bit shorter in length....
 

Metcalf

Expedition Leader
After a slow snowy weekend I was finally able to make something new.


I decided to use a 2013ish GM Silverado 2500 transmission cooler from a Duramax/Allison application. That seemed to be one of the larger coolers from an easy to replace oem application I could find. The fittings are also pointing up instead of pointing forward ( or back? ) like previous generations. With a little bit of work I was able to trim down the factory mounting system to work in my sectioned/narrowed FJ40 grill shape.

Overall it went pretty easy. I was able to trim down the GM mount and even reuse their 6mm clip nuts for the upper mounting points. Those mounting points attach to a small 16 gauge L-bracket that I welded to the grille shell.

The bottom mounts are the factory GM rubber isolation mount. They basically slide into a 1/2" hole I drilled through the bottom ( double thick ) flange on the bottom of the grille shell. There is another hole in the GM bracket on the transmission cooler for another rubber mount. If I could find those in the aftermarket or OEM replacements I would love to add it into the system. I cannot find that bushing for sale anywhere yet however....

I wanted the cooler to be behind the lower holes in the grill to prioritize air flow a bit. This cooler will sit over the lower 1/3 of the radiator. The fan should pull air through the entire unit when the shroud and funnel system is finished. I think there is JUST enough room for the headlights when using a tight 90 degree JIC/AN swivel adapter fitting.....I think....

My plan to use VW headlight adjuster buckets didn't work with the LED headlights I had laying around. I found another style of adjuster/mount for the LED headlights that I am going to try. These JWspeaker LED lights are a bit deeper than I remember also. I may have to 'bugeye' the headlight ahead of the grill slightly to get the clearance I need.

I am going to move forward with making the new crossmember under the grill shell, but I need to get in the correct clutch fan before I can build out the final radiator position....
 

Metcalf

Expedition Leader
Testing tools!


I started on the front crossmember that will be under the grill. This will add some structure to help support the steering box along with provide a home for the power steering cooler. It will also provide somewhere to attach the lower radiator mounts.

This is the first time I have used the wide bottom die in my new press brake which I designed for bending thicker materials. This was 26" or so of 10 gauge cold roll material ( 0.135" ). It didn't even break a sweat. It only required light pressure on the jack handles. This press 'should' do a full 5 feet of this material with the 2" bottom die.

I am using a neat little Derale cooler for the power steering. It was a neat little unit that was the right size for what I had in mind. It also came with JIC/AN fittings from the factory. This should make the plumbing a little more robust in the end.

Next, I need to dimple die the vent holes. Then it can be trimmed to fit in the frame along with some frame pads. Hopefully my new clutch fan will be here soon do I can determine the final radiator position and built the lower mounts off this crossmember.
 

94Discovery

Adventurer
Love the idea but what about the air flow the 3 holes do not cover all the surface of the cooler cant you make more holes ?
 

Metcalf

Expedition Leader
Love the idea but what about the air flow the 3 holes do not cover all the surface of the cooler cant you make more holes ?

I could make more holes, but it is only a power steering cooler. While having it in the direct air flow path, or fan cooled, would be better, many oem PS coolers are positioned just as radiant coolers with very little air flow from vehicle motion. The holes still need to be flared which will increase their diameter a bit. This crossmember will also be directly behind the drum of the winch too. The distance between the mounting brackets of the cooler didn't lend itself to a very friendly hole layout....and I am using the largest size dimple/hole that will fit down in the profile.

In the end compromises always have to be made with vehicle design and packaging....
 

Metcalf

Expedition Leader
That trans cooler is huge. Got any pics of what it looked like before you cut off the excess?

I can look for one tonight, but if you Google ACdelco 22819356 many will come up. That is the part I used.

Automatic transmission cooling was a bit of a concern, I figured a little overkill would be good in that department.....
 
I see. That's a great price too. You can't buy a custom cooler for that.

More than one of the trucks on UA 2016 had trans temp problems, so I agree that it's a very important piece of the puzzle.
 

Metcalf

Expedition Leader
I see. That's a great price too. You can't buy a custom cooler for that.

More than one of the trucks on UA 2016 had trans temp problems, so I agree that it's a very important piece of the puzzle.

Yup, good value I thought especially with the mounting system I could use the majority of. The duramax/allison combo has a hefty tow rating from the factory. My hope is that the slightly larger cooler will augment the deletion of having the additional heat exchanger in the radiator. I didn't want to risk cross contamination in this build and decided to keep the systems totally seperate.

A concern brought up by a friend is over-cooling the transmission under light loads. Derale makes a thermostat bypass I can add into the system. I believe that keeps the automatic fluid at 180f. I am undecided on that right now.....
 

Metcalf

Expedition Leader
I believe I am also going to run an obd2 driven transmission temperature gauge in the primary dash cluster. That should let me keep tabs on things a bit better than normal.
 

furbucket

Observer

Metcalf

Expedition Leader
I finished up most of the details on the grille crossmember.


I had a few people mention that they didn't think the power steering cooler was going to get enough air flow with only the 3 large holes. I let it eat on me for a bit and I finally relented and added some more ventilation. All the holes are dimpled also to make make the panel a little stiffer.

The crossmember was fitted into the frame with some 10 gauge frame plates to spread out the load onto the inside surface.

I have a few little details still, like adding a few holes for the winch power cable grommets. I also need to decide what I want to do about the lower radiator mounting pedestals. I need to figure that out before I final weld things....
 
That's the great thing about forums. They are a sounding board for ideas.

I use the Ford style radiator mounting whenever possible. Sometimes I get lucky and the radiator works with OEM mount bushings, but in the case they don't, there are some generic rubber isolators that work.
 

Metcalf

Expedition Leader
That's the great thing about forums. They are a sounding board for ideas.

I use the Ford style radiator mounting whenever possible. Sometimes I get lucky and the radiator works with OEM mount bushings, but in the case they don't, there are some generic rubber isolators that work.

Do you have any pics of what you have done for radiator mounts?
 

Forum statistics

Threads
185,901
Messages
2,879,334
Members
225,497
Latest member
WonaWarrior
Top