1997 Explorer Build

ExplorerTom

Explorer
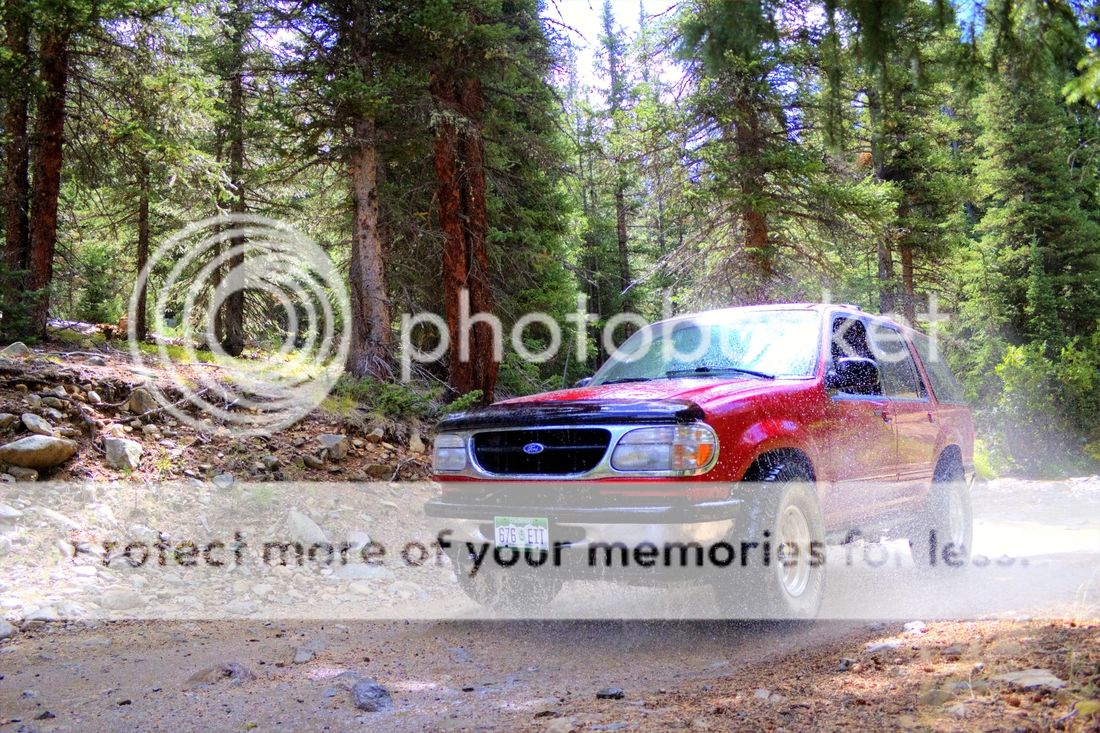
I've had this truck for awhile now. I bought it in October 2010. I didn't buy it with intentions of doing what I have ended up dong with it- I got bit by "the bug" somewhere along the line.

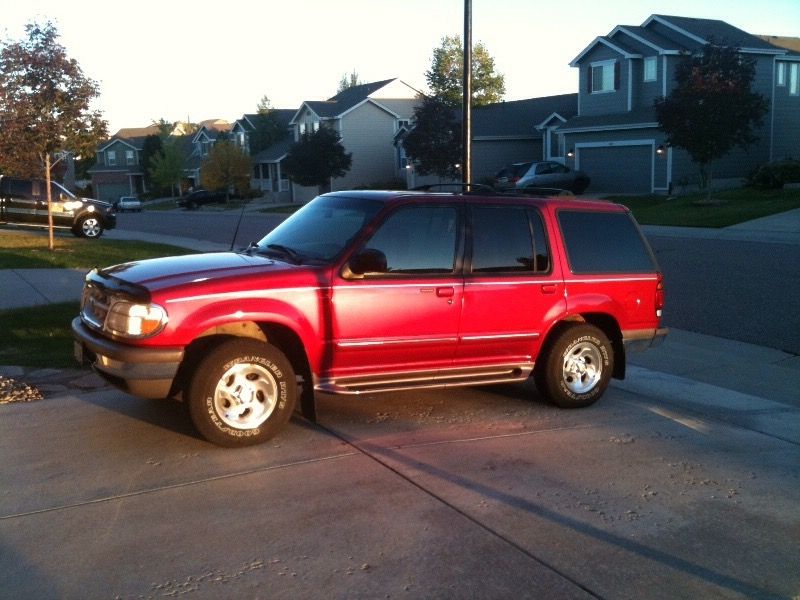
When I bought it, it was your typical 2nd gen Ford Explorer:

It had about 117,000 miles. V6 SOHC motor with the 5 speed auto transmission, 3.55 gears, open diffs, and the "Control Trac" 4wd system. The Control Trac is Ford's take on the "auto" 4wd where it engages the front axle when the rear slips. Luckily there is still a switch on the dash to engage 4hi or 4lo.

When I first bought it, I spent a bunch of time going through it. The brakes pulsed at speed, the temp gauge never fully warmed up, the coolant looked bad, the plugs were original, the tires were probably what replaced the Firestones during the recall in 2000......

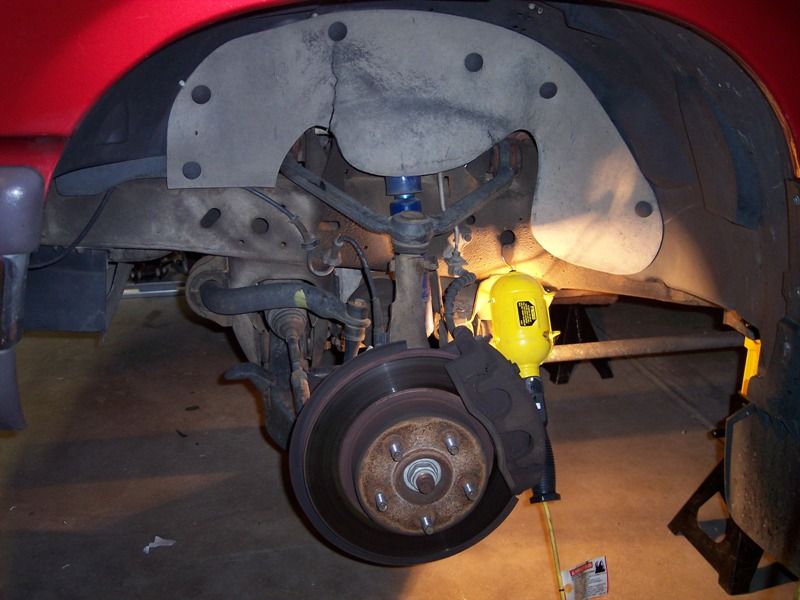
Brakes were up first. I went with some Duralast Gold Cmax pads and Duralast Gold rotors. The old rotors needed the BFH to remove:


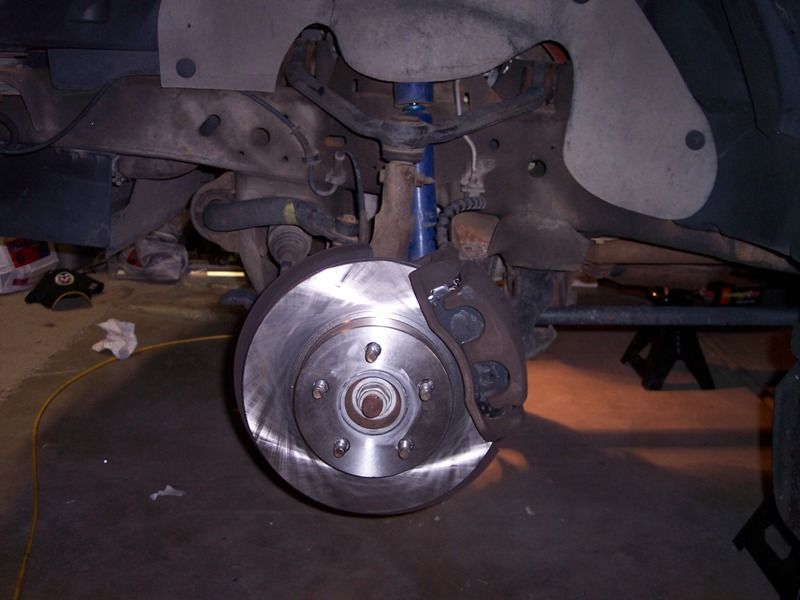
This solved the pulsing problem but I wasn't thrilled with their cold bite. That initial application of the brakes on the highway wasn't the greatest.

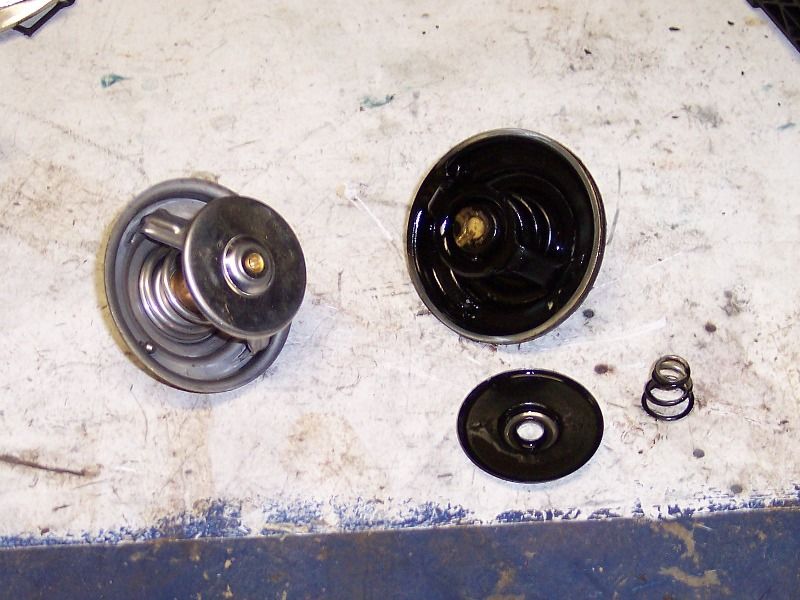
Next was the thermostat and coolant. I immediately figured out why the temp gauge and heat output wasn't very good. The thermostat is supposed to be a single piece- not 3:


And the coolant was probably original. This is what I drained and flushed out of the radiator:


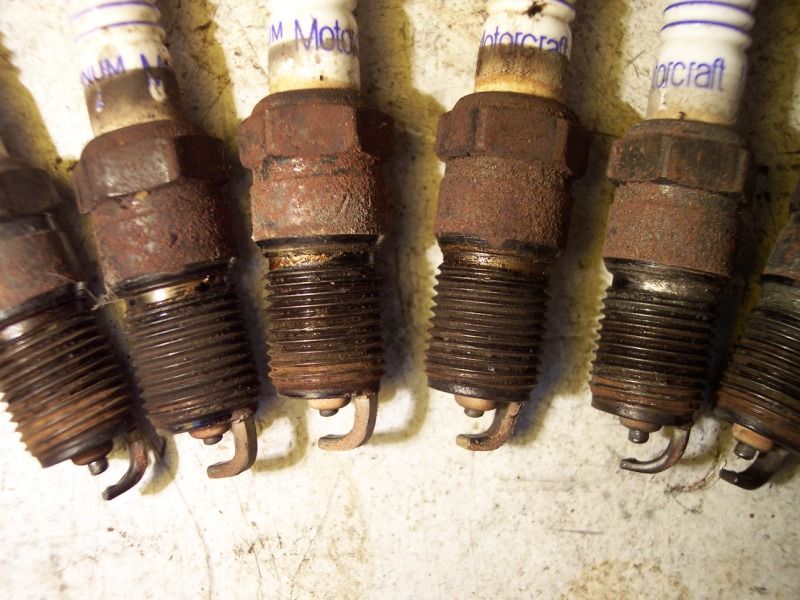
Next up where spark plugs and wires. Again, pretty sure these were original:


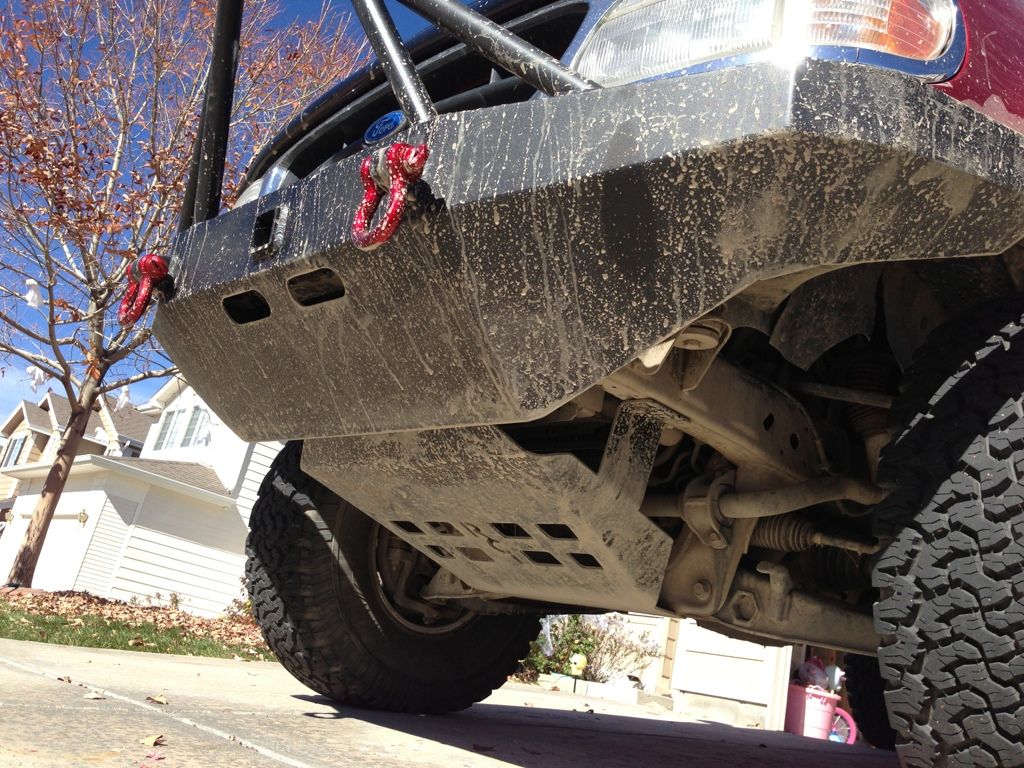
Rancho RS5000 shocks were put on to replace the unknown "blue" shocks that felt pretty horrible. The ride improved.

I'll update more later.
 
Last edited:

ExplorerTom

Explorer
I soon adopted the mantra that everything is original. So I put the little one to work pulling the fuel filter:

Turns out she isn't very handy, but she sure is cute:


I've long been a fan of the BFG KO tires and I finally had a vehicle worthy of having them- my Saturn VUE just didn't seem right. I remembered being excited that they had the 3 mountain snowflake symbol and could be run year round. The previous several years I had been switching between winter and non-winter tires on my different vehicles and was glad to be getting a break from that. Out with the old:

In with the new:

These were a mild upgrade in size: 30 vs the stock 28 or 29.

I remembered being excited to try them in the first snowfall of the season. And I remembered thinking that the 3 mountain snowflake thing didn't mean squat. I was less than impressed with these tires. They were a far cry from proper winter tires that I was used to.
 

ExplorerTom

Explorer
So back to the original purpose of buying this truck- it was to get a popup camper to take the family camping just like I had done as a kid with my family. We got a 1996 Jayco:


We took it on many trips and had a great time with it.


I decided that the 3.55 gears weren't cutting it pulling through the mountains and regeared to 4.56. I know it's a pretty big jump in gears- I swear I wasn't planning anything more than making it a towing mule. And a towing mule it was- but the trailer still towed like it weighed a lot. The trailer tires wore really fast on the inside edges and I'm pretty sure the tires were pointed outwards slightly.

I also added an add-a-leaf to the rear springs. Explorers are known to sag over time and the weight of the trailer wasn't helping. The add-a-leaf helped a lot.
 

ExplorerTom

Explorer
Along the way I did some appearance upgrades. I like my vehicles to have as few colors as possible on the outside. The trim was sun faded and looking purple:


I painted the trim and side steps black using Duplicolor black bedliner:
 

ExplorerTom

Explorer
If I had to pinpoint exactly when I got bit by "the bug", I'd say it was when I went up to an easy trail above Central City, CO with my oldest daughter.


At this point I still didn't have a clear picture as to where I was going with this build, but on this trip, the factory side steps took a few beatings and realized that while useful for the kids to get in and out of the truck, they did little

It wasn't long after that and I had ordered materials for a 2" body lift.


I said that I ordered the materials for the 2" body lift- not the entire kit. I didn't get the bumper relocation brackets because I knew these bumpers offered zero protection or tow points.

With the body lifted enough to clear larger tires in the future, I found a local fabricator that did stuff for 4wds. I had a set of his sliders welded up:

I didn't even get a picture of them before I went 4wheeling with a friend.


Soon after I got some 33x12.5r15 BFG KOs:

And I organized a 4wheeling trip with some friends to test them out:


IMG_1651_tonemapped.jpg

IMG_1769_tonemapped.jpg


Next I added a skid plate from RCi:


I needed to gain some height, so I added some shackles from Warrior Offroad:


Getting them off was fun:


In the front all I could do was to turn up the torsion bars. I got the clearance, but the resulting ride was pretty bad.

To address my lack of front recovery points, I went back to the fabricator that did my sliders and had him do a bumper:
F4309354-E491-4867-B97E-8B8342F023BA-14326-000009953CD22FCA.jpg

0DBB0D40-CDCA-45A8-83ED-E0A235987DBA-14326-0000099522453AEF.jpg

(And took it 4wheeling right away)
 

bijanjames

Adventurer
The evolution of a rig...I know it well. I like what you've done thus far, and it's a great way to get your family outdoors. The 2nd gen explorers are overall fairly reliable trucks. I think a rear locker and cradle winch are in your future. Keep it up!
 

ExplorerTom

Explorer
After another 4wheeling trip, I returned home and my rig was a mess. Sure it was sloppy out on the trail, but others in the group weren't nearly as messy as me. I figured I needed better wheel coverage since these tires stuck out of the fenders.


Bushwhacker pocket flares or anything similar is out of the question. There is next to no aftermarket support for the Explorer. A thread on Explorerforums came up about "flexy flares" or "city bus flares". They are universal wheel flares. They don't quite offer the coverage I was looking for, but they are better than nothing:


And of course, I had to go 4wheeling to test them out:


I added a CB mounted in the center console where the Kleenex box is supposed to go:


At about this point I was evolving my storage situation. I started out with this handy organizer and all weather mat:

But when bouncing around on the trail, having stuff secured is a good idea.

The next iteration was a Plano storage box:


I really liked this box but mounted like this, it made the front half of the storage area really hard to get to. I went to the junkyard and got some addition tie downs:


I installed one in the center along the back and 3 just behind the backseat.


The allowed me to mount the box like this:


This was better but still not great. If I was on a trip and needed something in the box, everything that was on top had to be unstrapped and removed- and then of course restrapped and put back in. I eventually ended up with these drawers out of the ARB catalog:


And I simply would not trade them for the world. I love these drawers. The right drawer has my tools, recovery gear, air pump, bow saw, a couple vehicle spares.....

The left drawer has my stove, trash bags, stove fuel cans and various other odds and ends.
 

ExplorerTom

Explorer
Since I had upgraded to the 33" tires, I wasn't carrying a spare tire. It couldn't get it to fit under the vehicle and it wouldn't fit I the roof without removing it before I pulled into the garage (and using ratchet straps to secure it to the roof isn't smart). So I went back to my fabricator for a rear bumper with a swing out tire carrier and fuel can holder:

And of course...... had to take it 4wheeling to test it out:


I think it was on this run that my lack of clearance was becoming an issue. There was a section of the trail (not this one pictured) that was really rocky and I was hung up on a rock on my gas tank skid plate. It was making horrible noises as I readjusted my mine to get off it. While all this was going on, the truck was at a slight angle sideways- but not in any danger of rolling. My youngest daughter was hysterically crying like we were going to die. Funny to think about and look back on, not funny at the time while I'm trying to get us off the rock.

It was about this time that I planned my first 2 day trip. All my other trips were day trips. This trip would start us in the town of Alma, CO (highest municipality in the country), up Mt Bross (which is one of few 14ers you can drive to the top of offroad), over Mosquito Pass into Leadville, camp for the night and then go see Champion Mill on Halfmoon Creek. While this trip was only a single night, it really got me hooked on this whole idea of "overlanding". It took me several days to come down off this trip.


ExplorerTom

Explorer
That popup camper we bought was getting used less and less. My wife likes to camp in state parks with electric hookups. To get those sites, you need to reserve ahead of time. You can reserve 6 months ahead of time on the website. 5.5 months is too late in many cases. Nothing like thinking about camping in June while shoveling snow in January. We sold the camper and bought new living room furniture with the money. The furniture gets used more.

About at this point, I had racked up roughly 35 unique trails around CO- and some I had done a few times. I felt like I knew my rig fairly well. One of the downsides I kept coming back to was the same weak link: the IFS. Now to be fair, I hadn't actually ever had a problem with the IFS but the torsion bar twist ruined the ride off road. But I felt like I had been lucky so far. The open diffs required some wheel spin to get through stuff and that is just asking for an axle to snap. The rear axle is stout and can take a locker, but putting a locker in the front still didn't solve the issue of the CV joints. Breaking an axle on the trail would not be fun. I wanted to build for reliability. And if I could gain some capability at the same time: GREAT!

I made the decision to ditch the IFS in favor of a SAS setup. The same guy that did my gears also did my SAS. I went with a Dana 30 from a '96 Cherokee and had it trussed and gussetted for strength. The rear got a spring over conversion using some Chevy 63s from a Chevy 1500. Shocks are Rancho RS9000 while the front is the 7000 series. Front springs were Rubicon Express 5.5" lift for an XJ. The steering box is from an F-150 and I ditched the automatic transfer case for a manual transfercase from a Ranger. The steering links are all heavy duty tubing with heim joints. Both diffs got Trutrac torsion diffs. I didn't go with a locker because I had heard some really good things about Trutracs.

Before it went into surgery I flexed it out as far as I could go:


And then after:


I really wished I could take back my 2" body lift but my sliders and bumpers are all built to that height. It could be done, but there's a lot involved. And the extra space underneath is nice while changing the transfercase fluid......

Soon after the SAS was done, I did my first 2 night trip. I called this one The Goldbelt Bonanza. Details can be found at that link, but here are a few pics:


It was another great trip.
 

ExplorerTom

Explorer
Up next was a winch. I went with a Superwinch Tigershark 9500i. I had it installed on a plate that was welded between the frame rails:


The SAS conversion wasn't kind to the wheel liners. The engine compartment is now exposed to the wheel well. I had been noticing that my air filter would get very dirty, very quickly. So I added a snorkel for an 80-series Land Cruiser:


I had to make a compromise with placement. I felt the area between the fender and the engine compartment was too tight to have the intake tube routed in there. Just no room for a couple 90 degree turns. I needed a straight shot. It's not ideal, but it works. And works quite well. My filter stays really clean now.

The next big trip was The Kokopeli Trail part 1 and part 2. Again, details at the link.

I was really liking the new capability that the SAS gave me. While I don't search out intense rock crawling, I don't like having to turn around because of an obstacle or skip a section because of a known obstacle. Part of "exploring" is finding the unknown and dealing with it when you get there. Outside of Moab is a section of the trail called Rose Garden Hill. A couple of the guys in our group decided to skip this section based on what they had read about this section and just head into Moab to meet up later. At the end of part 1 (above) we did Rose Garden Hill. I had zero problems- didn't even scrape. If I wasn't SAS'd, I would have had more issues on this section than the Rubicon did.

However, on this trip I realized my front springs weren't stuff enough. I was in a very off camber situation on a narrow piece of trail with a deep canyon out the driver side window. I got through it but it wasn't pretty. I would also fully bottom out by just coming off a rock too fast- and by "too fast", most times were still very slow. The Rubicon Express springs have a spring rate of 182 in-lbs. I looked high and low for a new solution and eventually found it at Iron Rock Offroad with their 7" ZJ springs. But I still had to cut 2 coils off to keep the same height. Cutting the coils has an additional benefit of further raising the spring rate. I figure my end spring rate is around 280 in-lbs: 100 in-lbs higher than where I started. The new springs have really improved the on-road manners as well as the off-road.
 

ExplorerTom

Explorer
Next up was a platform rack from Eezi-Awn:


I only took one trip with this rack. I worked well but the SAS means it's WAY up there. Loading a rack at 9500 feet is tiring.


But this rack isn't light- even empty. And having that weight up high still makes it a little tippy at times. So I took it off and transferred it to my Expedition. Now I've got my sights set on taking the factory Expedition rack and putting it on the Explorer. The Expedition rails are 10.5" longer.

I may just add extra factory cross bars and add some custom tie downs for stuff to keep it lightweight.

I've had less than perfect success trying to charge my iPad using the cigarette lighter adapter. So I went with this USB nit wired through an on/off switch. It's always hot, but the switch cuts power when I don't want it on.

Now I can charge reliably while on rough roads.

The axles in the Dana 30 were upgraded to chrome moly shafts. I didn't get any pictures. I also upgraded the ball joints to AlloyUSA units. The junkyard ball joints fell apart during removal. The unit bearings were also replaced.
 

ExplorerTom

Explorer
While on a day wheeling trip, I came across a campsite that was empty but the fire was still warm. One of the guys I was with had onboard water and put it out like a fire truck. It was pretty sweet it got me thinking about a setup of my own. Also at the fire was an axe. I also carry a Katana Boy bow saw, but an axe could be handy as well:


I professed my love of my drawers earlier, but digging them in the dark in the forest in the middle of the night wasn't easy. Turns out that it's very dark up there at night. A member of my local overlanding group got a set of these LED motorcycle accent lights. I installed 4 on my lift gate trim panel:


Stole power from the door unlock switch in the back and added a switch:


I've been using a RAM mount with a suction cup for a couple of years. It works most of the time but occasionally falls off the windshield. I swapped the suction cup for a surface mount:

Now it's much more stable.

So now I'm caught up. I still have plans for more mods and plenty of adventures. Stay tuned.
 

Forum statistics

Threads
185,829
Messages
2,878,656
Members
225,393
Latest member
jgrillz94
Top