GMT800 Snorkel Install

Jelorian

Adventurer


WARNING! Looong Post!!

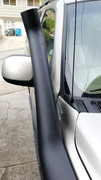
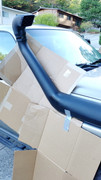
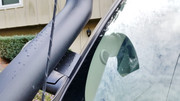
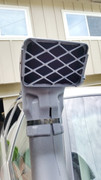
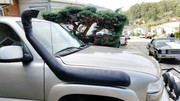
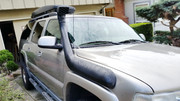
TL;DR - Installed a snorkel on my 2003 Suburban Z71. Pic above.

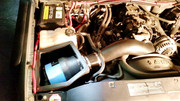
So I finally got around to doing a snorkel install on my 2003 Suburban. The steps should be very similar across all of the various vehicles based on the GMT800 platform running the 5.3L V8. I'm not familiar with the other engines offered for the GMT800 series so I cannot comment there, but I suspect the layout of the air box location is very similar. YMMV!

I know that there are many different ways I could have done this. Some methods, techniques, and materials being different and possibly a lot easier than others. However, this is the method I went with with the materials I had access to and the tools I had on hand (or bought for the job...I love excuses to by tools...especially power tools!)

After being inspired and seeing the pics of 02TahoeMD's Tahoe as well as reading other write ups on the interwebs, I knew I had to do mine as well. Like mentioned eariler, I love any excuse to go buy more tools! I ended up getting a small compressor from California Air Tools, with the idea that I'd use an air chisel for the inner layers of sheet metal in the engine compartment, and air chisel from Harbor Freight, a sawzall, and a bi-metal hole saw kit.

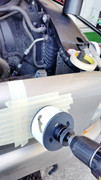
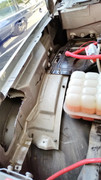
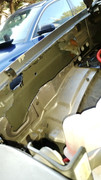
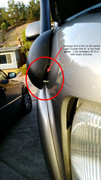
I did some research and decided I wanted to try mine with the 80 series snorkel instead of the 60 series like 02TahoeMD's. The snorkel for the 80 series Land Cruisers are a bit longer than the 60 series reaching all the way to just outside the air box. This cuts out having to run flex tubing from the 60 series snorkel tube's entry point in the fender to the air box.

So I ordered a knock-off from Amazon.com as well as a Volant Cold Air Intake. The snorkel kit was only $68 shipped with Prime membership. $68 vs $400+ is a no brainer for me. At that super low price you can totally mess up on one (more on this later) and have money left over to buy a new one and still come out WAY ahead than if going with the real deal. While I would love to support the effort and engineering it took to create the original, I can't justify it especially when it wasn't even made for my vehicle originally.

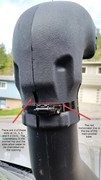
I was pleasantly surprised at the initial quality of the snorkel. Only time will tell if it holds up, especially to UV, but I suspect it will do just fine. The plastic was marked LLDPE which is supposed to be more impact and puncture resistant than LDPE.

Info on that here. http://www.usplastic.com/knowledgebase/article.aspx?contentkey=508

Parts and tools for this mod with part numbers and place of purchase.

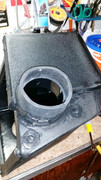
1. Volant Cold Air Intake - Part. No. 151536 (or any other CAI that has an enclosed box) - $254.06 with Prime Membership

2. TMS Snorkel Air Ram Intake Kit for 90-97 Toyota 80 Series Land Cruiser - $68 with Prime Membership. EDIT: As of 11/1/2016 the price has gone up to $71.95. No longer a Prime item but shipping is still free.

There is another seller on Amazon that sells what I think is the exact same snorkel. - $69.95 with Prime Membership.

3. 8"x10" sheet of ABS plastic from Tap Plastics - $1.00 - these guys have brick and mortar stores along the west coast of the US.

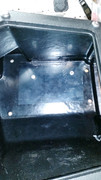
Used to seal the fender side opening in the Volant air box.

4. 5" x 7" sheet of ABS plastic from Tap Plastics - they gave it to me free!

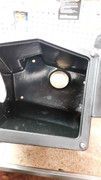
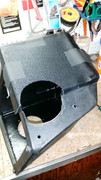
This is used to cover the 3.5 inch hole in the bottom of the air box.

5. Tube of black silicone glue - had some left over

6. Screws and bolts to attach the ABS sheet to the Volant air box

7. Rustoleum paint to rust proof all the exposed metal from cutting/drilling

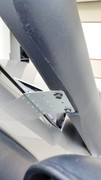
8. A 3 1/8" x 7" nail tie plate from Home Depot

9. Bi-metal hole saw kit from Harbor Freight

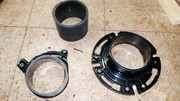
10. 3 1/2" hole saw from Lowes (similar to Home Depot)

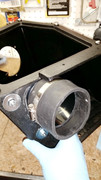
11. 3" flange from Home Depot.

12. Blood sacrifice in the form of being cut by sharp sheetmetal. :)
 
Last edited:

Jelorian

Adventurer
Like I mentioned previously, one benefit of the 80 series snorkels vs the 60 series is that it is much longer. and because of that, you don't have to deal with running a length of flex hose to the air box. You can pretty much just get an almost straight shot from the outside of the fender into the air box!

First steps involved removing the stock air box, the MAF sensor, the stock intake tube. Later, I also had to remove the 2nd battery and move the coolant reservoir out of the way. Make sure you are careful when removing the wiring harness from the MAF sensor. Hang on to the airbox mounting bolts as you will reuse them when mounting the Volant air box.

Don't use the template that came with the snorkel. Just do your own test fitting and marking.

For some, there is that weird gut wrenching feeling of putting a large hole in a perfectly good fender. Well....here goes nothing!


After cutting away the first layer you will soon discover that there are other layers behind it and at different angles. I had to switch to my 6.5A corded drill to keep the hole saw spinning. The cordless didn't have enough torque.


And here is the view from inside the engine bay.


After cutting the 3.5" hole in the fender and installing the mounting bolts on the snorkel I put some water based paint on the bolt ends. While the paint was still wet, I did a test fit and the bolts ended up marking the exact locations of where I needed to drill.

I ended up drilling the holes 2 sizes bigger than the bolts to allow for a little play and fitment.


Time to start cutting the sheet metal in the engine compartment to gain access to the bolts on the snorkel.


Gotta cut out more sheet metal. After removing what I could I painted the exposed raw edges with some black enamel paint I had.


As you can see the snorkel doesn't really line up too well with the Suburban's A-Pillar.


A little heat at the elbow should do it. It ended up being a LOT of heat over a long period of time (probably 5 minutes, but it felt like 30). This takes forever with 1 heat gun. Also, I didn't know about the sand trick to keep the snorkel from folding in on itself when bending it. While mine didn't really fold or collapse that much, I think it will be better to fill the snorkel with sand before trying to heat it. A 2nd person with a 2nd heat gun would probably speed up the process as it takes a long while for the plastic to get hot enough to make adjustments.


There is a big gap at the front of the snorkel as you can see in the pic. Will fill it in with something....right now black silicone is the first choice but I'm open to other options.


The snorkel still wasn't quite where I wanted it to be as far as lining up with the A-pillar, but I wanted to move on to something else. I'll come back to it later.

Now to mod the Volant air box.

The Volant air box has 2 openings that needed to be closed up. One was the big square opening on the fender side of the box.


I decided to use a thin sheet of ABS to seal up the square opening on the Volant air box. I used a heat gun to heat up the ABS sheet so I could form fit it to the air box. I then trimmed off the excess. I then use silicon adhesive and screws to attach it. Later I will use a 3.5" flange through the sheet of ABS to so I can connect to the snorkel tube using a rubber hose. If you use power tools with ABS, put them on the lowest speed if you can. Too high and you melt the plastic. Trimming was a pain. I used a combination of jig saw and tin snips.


The other is a 3" hole on the bottom of the box. This hole allows you to fit an optional ram air duct that leads to the front of your grill. The 3" hole was covered, bolted down, and sealed with black silicone. I debated just putting a cap on the bottom of it, but then decided I didn't want stuff gathering in the hole. In hindsight, I would probably act as a sort of catch'all for debris and moisture if it gets past the snorkel head but it's sealed and done now.

Before.


After.


The snorkel tube doesn't exactly come straight to the middle of the air box....it's a bit off center which means I had to cut a half circle in the air box and a half circle in the sheet of ABS plastic I had used to seal the square opening.


I had to figure out a way to connect the snorkel tube to the air box and waterproof it. I found a flange at Home Depot which would fit the bill. They were out of the standard version without red gasket so I had to pay extra for this one.

I had to hack away a bunch of the flange to get it to fit. Here is my 3" flange cut down and compared to a larger 4" flange just so you can see what the 3" flange looked like before I started cutting off pieces. You can see that I cut away a lot of the material leaving just 2 holes to screw to the air box.


I also had to cut off enough of the tube on the flange to get it to fit, while still allowing me enough to use the hose clamp. I cut the rubber connecting hose down to size and then attached it to the flange with a stainless steel hose clamp.


Then I used 100% black silicone adhesive to seal it up all the seams and openings. After it dried I filled up the tub to test for any leaks. None were found, so then I went to test fit the whole assembly. A problem I ran into when trying to fit the air box and attach it to the snorkel was that the snorkel tube is too long and hits the flange in the air box. I had already cut down the flange leaving enough to use the hose clamp,, so now I had to cut down the internal snorkel tube. Now they basically touch each other and the rubber hose just holds the 2 together.


After finally getting everything to fit, I attached the CAI and finished up that portion of the install per the instructions included with the CAI.

 
Last edited:

Jelorian

Adventurer
Next was heating up the snorkel near the elbow so it would sit closer to the A-pillar. The first attempt with the snorkel off the vehicle got me close. It took a long time to heat up the plastic and I think I used too much heat as it started to get glossy.


After mounting it back on, I decided I wanted to get it even more close. I covered what I could with cardboard and started heating up the snorkel at the elbow again.


Unfortunately for me with my impatience and over zealousness, I heated it up too fast and not enough on the back of the snorkel . When bending the snorkel towards the A-pillar the snorkel snapped back without my constant pressure and I ended up creating a weird fold on the elbow. It doesn't affect performance but just looks weird.


I'm still debating on getting another snorkel and doing it more patiently and filling the snorkel with sand to prevent the inside portion from collapsing. I will also use a ratchet strap to keep constant tension so that it has no chance of bending back causing the folds.
The last part of the installation was the bracket that attaches the snorkel to the A-pillar. The one provided does not work so I had to "fab" something up. I don't know jack about working with metal or sheetmetal or otherwise. I was looking for some thin aluminum that I could use to make a prototype that would follow the curves needed. Instead I found what's called a 3 1/8" x 7" nail tie plate in the lumber section. It was thin enough to work with (to an extent) and thick enough to hold its shape and actually be usable.

Here is it while I was doing some test fitting. I used my vise and some wooden scrap to help get the bends. Still not perfect but it works.


Here's how it looks with the door closed.


Painted it with some Plastidip. I'll probably bring it to a real metal shop and have them make a better version, but for now it works just fine.


Now for the top section of the snorkel assembly....the snorkel head.


The snorkel head has some open slots cut into it along with some cleverly molded indentations. These are supposed to channel incoming water to the open slots and theoretically prevent water from going down the tube. I'm sure it works to some degree, but I'm also sure that some water still makes it down. However if you look at the design of Volant's new air filter it would take a significant amount of water to even get past it.


I'm still debating on ordering another one and get the bend done right, but for now I'll live with it. I haven't driven much to do any real testing. The engine seems to be happy. We'll see if mileage was affected after a longer drive.

Overall I'm happy with the product and the look. For $70 shipped to my door, I felt it was a no brainer. The only real question was my skillset in overcoming any issues I ran into. I did this in different stretches over different days. I have a daily driver, so it was ok to just take my time.

The real test will be on an actual water crossing in the near future.

If you've read this far, thanks much!

I would love any comments or suggestions on how I could have done this better, more efficiently, etc. Especially when it comes to massaging the snorkel with heat to get it adjusted to the correct angle for my application.

 
Last edited:

rayra

Expedition Leader
Nice use of the toilet flange!


Heat gun is tricky, gets easier with experience. Hard to ride the margin between too little heat and melted. Shallower angles with the hot air wafting across an area work better than aimed directly at an item. You build up heat slower and more evenly.

Another method is soaking the part in very hot water, first. Less work with a heat gun. And when it comes to ABS and things like LDPE / HDPE a hot water soak is almost enough.
I've also bent some 4"dia thin wall PVC drain pipe with a heat gun by capping one end and setting both it and the heat gun on the concrete floor so the gun was blowing into the pipe. Heating it from the inside.

Some eyeglass places also use hot silica sand as a heat transfer method when fitting plastic eyeglass frames to the customer's crooked ears.


The bracket fab, as good as anything else. Something that curves and supports the rear face of the pipe would serve better, but you'd have to really abuse the snorkel in heavy brush etc to really tell the difference. Thicker more robust bracket, as that thing is under a lot of wind drag at highway speeds. Look at external CB and HAM radio bracketry to get design ideas for the vehicle attachment. But it isn't much different from what you've already done.


And lastly, the bimetal hole saw is a fine tool for the cosmetic needs of the outer fender skin. But they are quite spendy in those larger diameters. Another tool to consider - especially for those inner convoluted metal areas - is an air-powered sabre saw.

$_35.JPG


Harbor Freight has a decent one for $19. Sans blades. If you already have a decent compressor etc, it's a small price. And cheaper than the big hole saws. A little practice with one is recommended. As is a thinner coiled air hose, so you aren't fighting a heavy rubber air line at the same time.

/I'm going to use one in a couple weeks to work on extending the grill slots on my rear AC intake, as part of my rear storage / power inverter completion.
 

rayra

Expedition Leader
When you try the second one, rig a secure cradle for your snorkel, so it can sit on the ground with the bend on the ground, ends raised. Fill the bend / middle third with boiling water. The stuff has a melting point of ~248F. Fill it with boiling water and let it sit for a bit. Then lift it out of your jig, put it back on a thick foam pad or folded blanket and gently push both ends towards the ground to open the bend further.
If it won't go, hit it with the heat gun. The water will also help soak and spread the heat, preventing a hot spot. But watch out, it will be close to temp already.
You want the outside elbow on something cushy so it doesn't flatten out. When you are opening the bend, push out towards the ends more than towards the ground.
I did something like this long ago, trying to make something fit / align where it wouldn't. Wasn't a snorkel, but the same technique ought to work.

Would be a good idea to make a crude cardboard pattern on your fender / A pillar angle first, so you can spot check as you are bending, without having to dump out the snorkel and fit it on the vehicle.

Wear heavy gloves. Cover your feet / legs. Be prepared for an accidental spill of boiling water.
 

Burb One

Adventurer
Been waiting on you to post this for awhile:) Saved for my use next year. Hopefully we will have a writeup on the hopefully nonexistent performance differences! Great job!
 

ExplorerTom

Explorer
Nice job - that's the same snorkel I put on my Avalanche.

And I use that same snorkel on my Explorer. Works great for keeping the filter clean. If I get in deep enough to actually use it for water, that water is DEEP. Water around here doesn't get that deep- unless I drive it into a lake on the boat ramp......
 

Stryder106

Explorer
Who said performance differences are non-existent? My Avalanche runs a whole lot better with the snorkel than without. First, it is getting far more at lower speeds due to a much bigger air opening than the stock air intake in the fender. Second, it is getting some ram-air benefit at higher speeds which reduces vacuum in the engine, thus providing more available power a the same throttle. As far as MPG benefits - I've definitely noticed a benefit on longer highway trips, but haven't noticed any benefit around town.
 

Jelorian

Adventurer
When you try the second one, rig a secure cradle for your snorkel, so it can sit on the ground with the bend on the ground, ends raised. Fill the bend / middle third with boiling water. The stuff has a melting point of ~248F. Fill it with boiling water and let it sit for a bit. Then lift it out of your jig, put it back on a thick foam pad or folded blanket and gently push both ends towards the ground to open the bend further.
If it won't go, hit it with the heat gun. The water will also help soak and spread the heat, preventing a hot spot. But watch out, it will be close to temp already.
You want the outside elbow on something cushy so it doesn't flatten out. When you are opening the bend, push out towards the ends more than towards the ground.
I did something like this long ago, trying to make something fit / align where it wouldn't. Wasn't a snorkel, but the same technique ought to work.

Would be a good idea to make a crude cardboard pattern on your fender / A pillar angle first, so you can spot check as you are bending, without having to dump out the snorkel and fit it on the vehicle.

Wear heavy gloves. Cover your feet / legs. Be prepared for an accidental spill of boiling water.

Thanks for the tips rayra! Very much appreciated. If I decide to get another one and give it a second go, I'll definitely look into your methods. Makes total sense...especially the boiling water.

Been waiting on you to post this for awhile:) Saved for my use next year. Hopefully we will have a writeup on the hopefully nonexistent performance differences! Great job!

Yeah, it took me a while to get the write up done. Hahaha...why wait till next year? :)

Very cool. Loved the detailed writeup, too!

Cheers Martin!

And I use that same snorkel on my Explorer. Works great for keeping the filter clean. If I get in deep enough to actually use it for water, that water is DEEP. Water around here doesn't get that deep- unless I drive it into a lake on the boat ramp......

I agree, Tom...if I'm in water deep enough to cover the airbox then it is way too deep....I would think the radiator fans would have busted fans by then.
 
Last edited:

Burb One

Adventurer
Who said performance differences are non-existent? My Avalanche runs a whole lot better with the snorkel than without. First, it is getting far more at lower speeds due to a much bigger air opening than the stock air intake in the fender. Second, it is getting some ram-air benefit at higher speeds which reduces vacuum in the engine, thus providing more available power a the same throttle. As far as MPG benefits - I've definitely noticed a benefit on longer highway trips, but haven't noticed any benefit around town.

Sorry, meant, IF there are any problems. Good to hear your experience (and hopefully Jelorians) will bring positive other benefits.

I don't know "ram air" will make much of a difference in a snorkel for power or mpg (You have to be going at much higher speeds than these trucks are capable of to see any effect, especially with a snorkel's bends, distances and curves). But good to know that it seems that the snorkel restriction is otherwise non-existent. I think the big one thing will help (Other than the benefits of reduced dust and water), is that you are getting clean COLD air in, rather than stuff that's been sitting around in the fender/ engine compartment. Intake temperature will definitely go down.

Good notes everyone else, I am sure many of us will follow suite, and thanks to jelorian for being a guinea pig with a writeup for these cheap snorkels:)
 

Jelorian

Adventurer
Just wanted to report how the snorkel performed on the highway at an average speed of 70mph in the rain.

It was raining pretty consistently on a recent road trip from the Glamis Dunes in SoCal back to the SF Bay Area. At some point I was even thinking pulling over and turning the snorkel intake so that it was facing the rear. Decided to just let it stay facing forward.

The open slots near the top seemed to be working as water was indeed getting funneled through.

When we finally got home I opened up the airbox fully expecting at least a little moisture, but there was none to be found. It was bone dry.

Good to know that I can drive in torrential rain and still be good to go.

Now the real test would be a water crossing.
 

Forum statistics

Threads
185,897
Messages
2,879,321
Members
225,497
Latest member
WonaWarrior
Top