02TahoeMD
Explorer
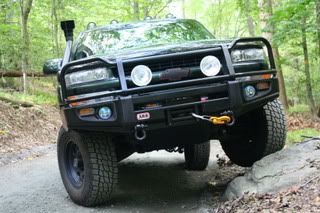
ARB Winch Bumper Conversion
Over the past year I have been looking for a winch bumper for my Tahoe. I wanted one with lines that went well with the vehicle ( at least, to my eye ) and didn’t weigh 300 + pounds. I liked the overall design of ARB's Chevy winch bumper but, it did not have bumper pads, the built in fog lights, and just looked too big for a Tahoe. After some research, and having seen a Toyota FJ bumper modded to fit a Trailblazer (thanks for the idea there AlekG!) I figured I would try my own conversion. After consulting with Lee "Hoser" who graciously provided me measurements and photos from his ARB install on his Lexus, I knew it was a reasonable possibility. So, I got the ARB winch bumper made for the 100 series Land Cruiser and set to work. As with my Safari Snorkel conversion, I am sharing this project here mostly to share techniques in case someone wants to try something similar. Here is what you will need if you want to do this project for yourself.
FIRST AND FOREMOST: ARB indicates Thall Shalt NOT modify THY bumper in any way, shape, or form, or the warranty is void, etc etc etc. And, I guess I should say that this is a proceed at-your-own-risk project.
ARB Winch Bumper part # 34013090
ARB Chevy Fit Kit part # 3562010
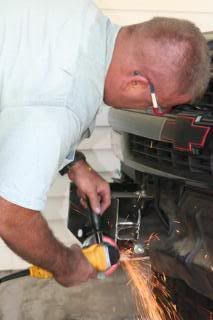
4.5" cutoff wheel/grinder
Sawzall
Assorted hand tools
welding equipment OR a shop you can go to for welding
pipe bending equipment (not mandatory) or a shop equipped with it
For starters, I took off the factory bumper. This is done by removing the grille shell and undoing the center 4 bolts that hold on the bumper to the frame, then removing the "wing" arms that are attached to the outer frame mounts, 2 bolts each wing. Before replacing the grille shell, snip off the 2 locating tabs that are on the lower portion of the grille, this will make removing it later much easier.
Next, discard the frame mounts provided for the LC bumper. Use the mounts from the Chevy kit and bolt them up to the appropriate holes in the frame. There are instructions included from ARB for the full install of their bumper for the Chevy product, just follow how to bolt up the mounts. Don’t tighten anything down for now, just snug.
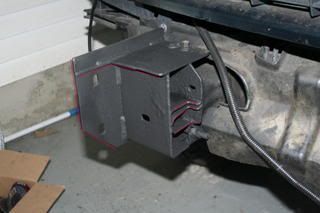
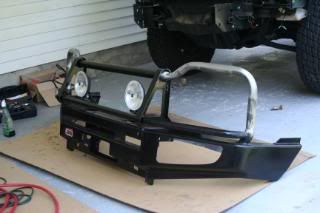
Set the LC bumper on top of the bumper mounts, this will give you an idea of how much you will need to cut off of the mounts to make it fit. I took off about 3" of the mounts, you can see the photo with the finished results of all the steel I cut off highlighted in red.
If you are using a winch, you will need to make some room for it on the mounts as well. Do this by cutting away the inner "fold" portion of the mount. Again, check the photos to see where I cut away. If you are not installing a winch, skip this step.
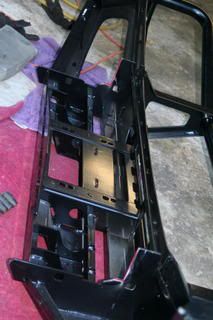
Next you will need to cut away about 1/4" off the inside portion of the bumper itself, the portion that sits on top of the bumper mounts. You can get the exact amount by measuring how much the bumper needs to drop down by test fitting the bumper after cutting the mounts. I got very, VERY lucky in that I was able to do all my cuts right the first time. Again, see photo with highlights….
Test fit the bumper to make sure you don’t need to trim away any more steel for the fit. You will need to drill one new hole on the bumper for the mounting bolts (grade 8) you will use to bolt to the Chevy mounts. You can find this hole by marking the spot during test fitting. These holes are visible through the fog light housing openings.
After drilling the holes, bolt up the bumper and snug down.
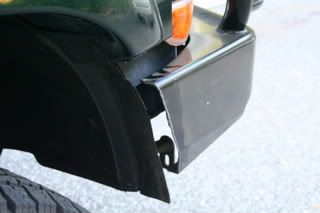
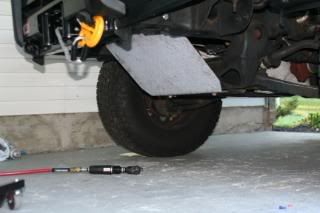
Now, you will need to cut off about 2" off the wings of the bumper, as you will see that they extend into the front wheel well. Mark two cut lines on each bumper, using the wheel well as a reference for the contour. One cut about 1/4 inch back from the edge of the "cap" portion, the other cut back on the line that will clear the wheel well.
Here is where the welder first comes handy - and you can do this cutting and take the bumper up to a shop and have the work done if you do not have access to a welder. Again, I got very very lucky and had a friend to help with this stuff. Weld the "cap" back on to the bumper to give it a finished look.

Also, take some scrap steel and weld in a spacer to fill the gap. (see photos) Clean up the welds in with a grinder, smooth up the finish with some Bondo, sandpaper, and paint.
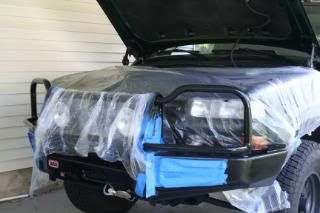
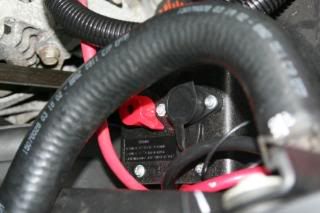
Also, paint all the mounts and places where any grinding took place. I put down several coats of black Rustoleum followed by 3 coats of spray undercoating on the mounts. Then mount the winch (I used a MileMarker 9000E) according to directions and bolt up the entire assembly and snug down all the bolts. Install the fog light assemblies according to the directions.
Now, you are basically done! Which is how things will look here, with a side by side comparison with the bumper made for the Chevy product.

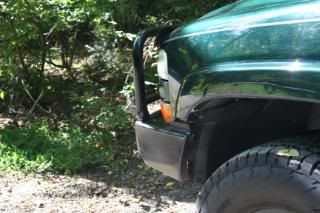
I did find that the bars across the headlights cut down the light output, perhaps by 30%. There was no shadow to be seen, just the lights seemed dim. After consulting the pics from ARB's site, it seems that the switched to using a tube that was about 2X thicker than the one in the initial production line, thus blocking the light a lot more than I think it would have originally. Of course, if you have some HIDs or really bright lights in the fog housings, this could be a moot issue. But I wanted to do something different, I decided to modify the headlight hoops. This ended up being fairly easy - I went to a shop, where they cut off the hoops at the junctures of the grille guard and lower light guard. They bent some tube steel to the design I imagined and welded them in place. Then I just went home and painted the hoops. The loss of light was completely fixed and it also made removal of the headlight assemblies MUCH easier.
I also got some shackle mounts off of eBay and had them welded on the bumper as well, no winch bumper seems complete to me without shackles!
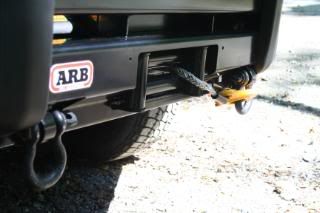
Also, other details - I painted the roller fairlead ( you HAVE to use a roller fairlead on this bumper, can't get away with the hawse type ) black to match the rest of the finish. I also replaced the entire spool of cable with 90 feet of 3/8" synthetic winch line from Viking Off Road. This stuff was so much lighter than the spool of steel cable it was nothing short of amazing. Not to mention, it is so, SO much easier to handle.
Over the past year I have been looking for a winch bumper for my Tahoe. I wanted one with lines that went well with the vehicle ( at least, to my eye ) and didn’t weigh 300 + pounds. I liked the overall design of ARB's Chevy winch bumper but, it did not have bumper pads, the built in fog lights, and just looked too big for a Tahoe. After some research, and having seen a Toyota FJ bumper modded to fit a Trailblazer (thanks for the idea there AlekG!) I figured I would try my own conversion. After consulting with Lee "Hoser" who graciously provided me measurements and photos from his ARB install on his Lexus, I knew it was a reasonable possibility. So, I got the ARB winch bumper made for the 100 series Land Cruiser and set to work. As with my Safari Snorkel conversion, I am sharing this project here mostly to share techniques in case someone wants to try something similar. Here is what you will need if you want to do this project for yourself.
FIRST AND FOREMOST: ARB indicates Thall Shalt NOT modify THY bumper in any way, shape, or form, or the warranty is void, etc etc etc. And, I guess I should say that this is a proceed at-your-own-risk project.
ARB Winch Bumper part # 34013090
ARB Chevy Fit Kit part # 3562010
4.5" cutoff wheel/grinder
Sawzall
Assorted hand tools
welding equipment OR a shop you can go to for welding
pipe bending equipment (not mandatory) or a shop equipped with it
For starters, I took off the factory bumper. This is done by removing the grille shell and undoing the center 4 bolts that hold on the bumper to the frame, then removing the "wing" arms that are attached to the outer frame mounts, 2 bolts each wing. Before replacing the grille shell, snip off the 2 locating tabs that are on the lower portion of the grille, this will make removing it later much easier.
Next, discard the frame mounts provided for the LC bumper. Use the mounts from the Chevy kit and bolt them up to the appropriate holes in the frame. There are instructions included from ARB for the full install of their bumper for the Chevy product, just follow how to bolt up the mounts. Don’t tighten anything down for now, just snug.
Set the LC bumper on top of the bumper mounts, this will give you an idea of how much you will need to cut off of the mounts to make it fit. I took off about 3" of the mounts, you can see the photo with the finished results of all the steel I cut off highlighted in red.
If you are using a winch, you will need to make some room for it on the mounts as well. Do this by cutting away the inner "fold" portion of the mount. Again, check the photos to see where I cut away. If you are not installing a winch, skip this step.
Next you will need to cut away about 1/4" off the inside portion of the bumper itself, the portion that sits on top of the bumper mounts. You can get the exact amount by measuring how much the bumper needs to drop down by test fitting the bumper after cutting the mounts. I got very, VERY lucky in that I was able to do all my cuts right the first time. Again, see photo with highlights….
Test fit the bumper to make sure you don’t need to trim away any more steel for the fit. You will need to drill one new hole on the bumper for the mounting bolts (grade 8) you will use to bolt to the Chevy mounts. You can find this hole by marking the spot during test fitting. These holes are visible through the fog light housing openings.
After drilling the holes, bolt up the bumper and snug down.
Now, you will need to cut off about 2" off the wings of the bumper, as you will see that they extend into the front wheel well. Mark two cut lines on each bumper, using the wheel well as a reference for the contour. One cut about 1/4 inch back from the edge of the "cap" portion, the other cut back on the line that will clear the wheel well.
Here is where the welder first comes handy - and you can do this cutting and take the bumper up to a shop and have the work done if you do not have access to a welder. Again, I got very very lucky and had a friend to help with this stuff. Weld the "cap" back on to the bumper to give it a finished look.
Also, take some scrap steel and weld in a spacer to fill the gap. (see photos) Clean up the welds in with a grinder, smooth up the finish with some Bondo, sandpaper, and paint.
Also, paint all the mounts and places where any grinding took place. I put down several coats of black Rustoleum followed by 3 coats of spray undercoating on the mounts. Then mount the winch (I used a MileMarker 9000E) according to directions and bolt up the entire assembly and snug down all the bolts. Install the fog light assemblies according to the directions.
Now, you are basically done! Which is how things will look here, with a side by side comparison with the bumper made for the Chevy product.
I did find that the bars across the headlights cut down the light output, perhaps by 30%. There was no shadow to be seen, just the lights seemed dim. After consulting the pics from ARB's site, it seems that the switched to using a tube that was about 2X thicker than the one in the initial production line, thus blocking the light a lot more than I think it would have originally. Of course, if you have some HIDs or really bright lights in the fog housings, this could be a moot issue. But I wanted to do something different, I decided to modify the headlight hoops. This ended up being fairly easy - I went to a shop, where they cut off the hoops at the junctures of the grille guard and lower light guard. They bent some tube steel to the design I imagined and welded them in place. Then I just went home and painted the hoops. The loss of light was completely fixed and it also made removal of the headlight assemblies MUCH easier.
I also got some shackle mounts off of eBay and had them welded on the bumper as well, no winch bumper seems complete to me without shackles!
Also, other details - I painted the roller fairlead ( you HAVE to use a roller fairlead on this bumper, can't get away with the hawse type ) black to match the rest of the finish. I also replaced the entire spool of cable with 90 feet of 3/8" synthetic winch line from Viking Off Road. This stuff was so much lighter than the spool of steel cable it was nothing short of amazing. Not to mention, it is so, SO much easier to handle.
")