You are using an out of date browser. It may not display this or other websites correctly.
You should upgrade or use an alternative browser.
You should upgrade or use an alternative browser.
Expedition TrailBlazer Project
- Thread starter JamesDowning
- Start date
JamesDowning
Explorer
Thanks, I do not, but I really appreciate the comparison.Awesome vid and great soundtrack!!! Do you edit video for Heartland Bowhunter? Same style and great production. By the way, how do you like the Superwinch LP8500? I am thinking of getting the LP10000 for my Titan.
The LP8500 seems to be doing fine for me so far. Only issue is that one of the motor lead boots has melted a bit from a few hard pulls. But otherwise it's still kicking.
Good luck with it all. My suggestion is: get it into a usable state and just use it for a bit. Don't get caught up in getting it to a certain point.Awesome!! diggn the colorado's pre-runner fenders n boxsides, straight axled goodness, and even the stock TB doin its thing! Im trying to have a fab guy thats doin jeep and explorer bumpers mimmick what you had done on the ends of the bumper, and how they line up with, and follow the bodylines. Thanks for sharin!! Now its time to save some cash for some bumpers....4x4 conversion, rtt...al in that order...err maybe")
As Barton said, GWNF. Mainly around the Rt 33 area.Awesome video. Very well put together. Where were you if you don't mind me asking? It looks east coast and I'd love to check it out...
Thanks for the kind words!!Twenty one minutes and thirty one seconds of pure inspiration and joy. That video makes me want to hit the trails ASAP! nice job!
onelow1ton
Adventurer
I have watched the vid so many times now and can't wait to go back , again thanks for letting me tag along with the ortb group , everyone I have shown the vid to is very impressed in the quality , good job James
I like the method. KV makes a similar shelving bracket system, the 182 Series Heavy-Duty Designer Series. http://www.knapeandvogt.com/Heavy-D...ards__~~~__Brackets.html?page=products.18.309 They are sold by many places. Ratings are in the couple hundred pound range per pair. The wall standards could be screwed to the tire carrier, or welded on. They have beveled holes for flat head wood screws to recess into. Flat head machine screws could be used instead. If you didn't have a tire carrier, some of the longer ones could be used, and the brackets attached to the bumper. I use the 24" long ones for supporting counter tops along walls that serve as desks. I've always gotten mine from: http://www.wwhardware.com/kv-182-decorative-heavy-duty-brackets-kv0182/ Looks like the 24" ones are rated at 400lbs per pair when the standards are mounted into 2x4 studs with the right size screws used. Scratches head. I was thinking it was 250lbs... If your metal is the right thickness and you have the ability to cut slots it would be possible to cut 4 or 6 slots in the right pattern and not use the standards. I'd de-rate the load carrying capacity some unless the metal is supported properly. This has gotten me thinking of modifying a KV shelf bracket set for 3/16" thick metal.
In my ongoing attempt to make camping better and easier, I rigged up a little table that hangs off my swing-out. I got this idea from TACODOC http://www.expeditionportal.com/forum/showthread.php?p=757041#post757041 and Safari Pacific http://www.expeditionportal.com/forum/showthread.php?p=423159#post423159.
I wanted it to be easily removable and to tear down in a snap. The result is pretty easy to pack away (though the table's a bit large... still working that problem out), and the whole system is very light.
The idea is that food prep will be done on this table, with the stove setting on a stand beside it.
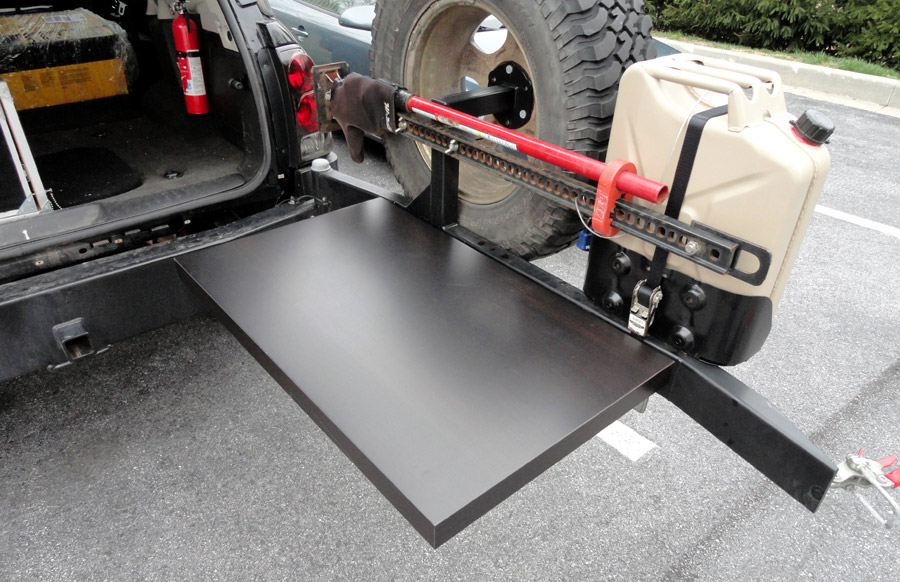
I used a simple shelving bracket system from Rubbermaid. Drilled a hole in the shelf bracket and added an eye screw to the bottom of the table. The eye screw goes between the halves of the shelf bracket, and the clevis pin is inserted through it, thus holding the bracket to the table (or vice versa).
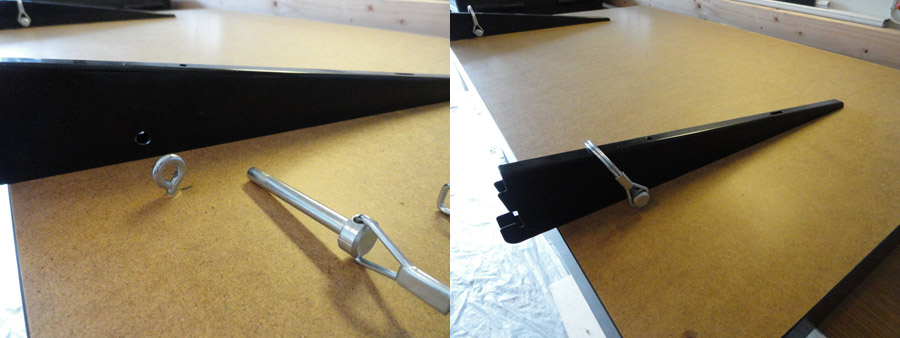
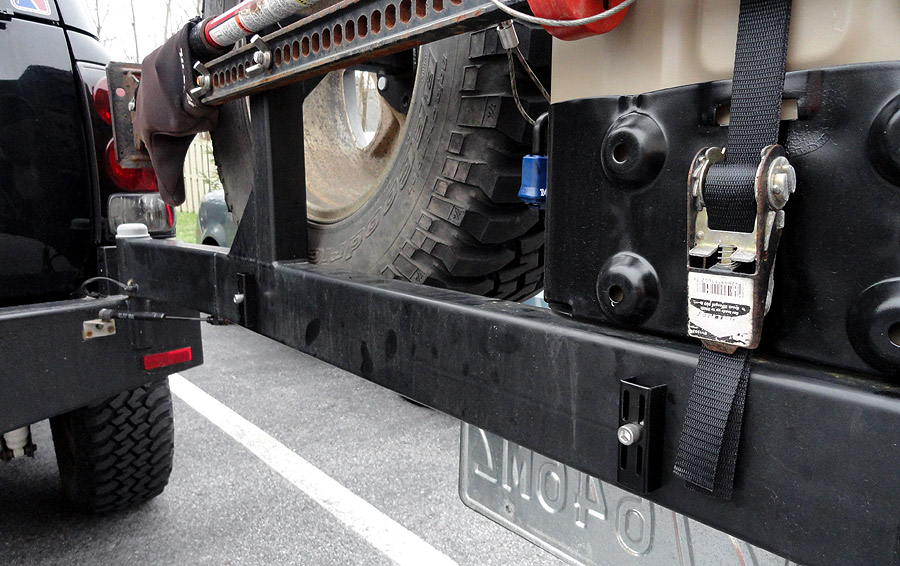
The vertical wall mount was cut into small pieces and mounted to the swingout arm. The swingout was drilled and tapped. The allen-head machine screw was key here because it didn't interfere with the bracket as a hex-head screw would.
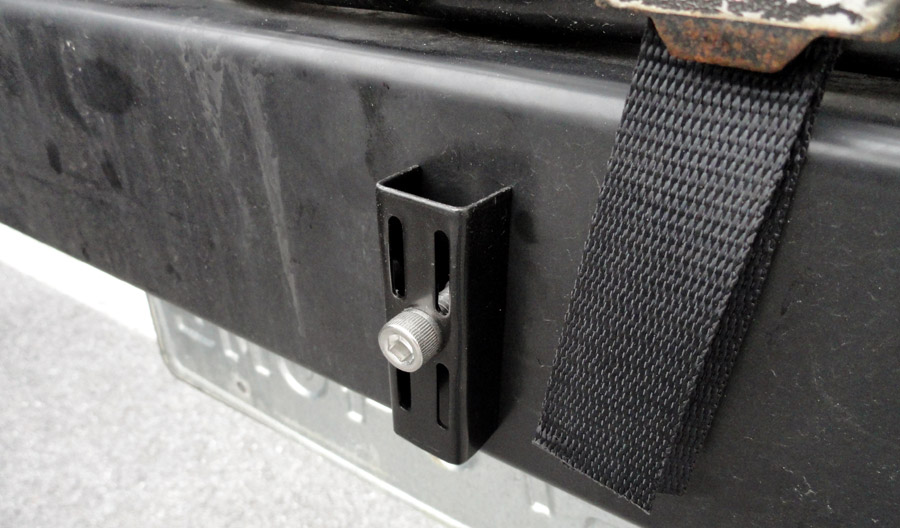
Both mounted... As you can see, it takes up very little room.
View from the bottom with the table mounted.
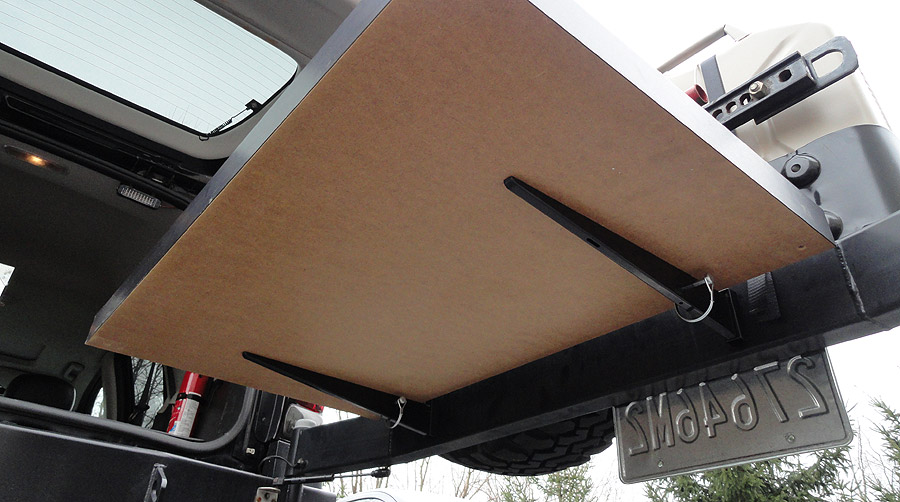
The setup is actually surprisingly stable. Easily holds up 40 lbs. No reason to worry about bumping it either, it's all locked in pretty tight.
I may go out and find a thinner/nicer piece of wood to use for the shelf, but for now I think this will work fine.
I like it because it doesn't use any guy wires as I've seen in other setups similar to this, and leaves the entire top of the table open for use. Also, because it's spaced away from the vehicle's rear hatch, it doesn't impede access to the items in the back of the truck.
HARDTRAILZ
Certified
I need to copy your table idea...
noJeepshere
Adventurer
I love this!! I love the tent, the bumpers, everything. I'm glad to see people are actually building the TrailBlazer, I think it's a great vehicle that is underappreciated. Especially the water pump idea, I might have to copy that one...
Speaking of the water pump, you could put a variable resistor on the pump motor power wire, so then you could dial in the amount of pressure you want. Just a thought.
Speaking of the water pump, you could put a variable resistor on the pump motor power wire, so then you could dial in the amount of pressure you want. Just a thought.
JamesDowning
Explorer
Hey, sorry been a bit absent lately and focusing some more on my photography. As for updates, still been trying to head off-road as much as possible. Nothing really new, finally was able to replace the MV-50 with a new one (wow big difference!).Any new updates?
Here's a picture from a recent Assateague visit:

great Build!!! as i have been going through your RTT build i was trying to figureout... how did you secure the tent to the Plywood?
The bottom edge of the plywood has a velcro perimeter that was stapled into place along with adhesive. Then velcro was sewn into the corresponding perimeter of the tent. So it's easy to take on and off by just undoing the velcro.
I need to copy your table idea...
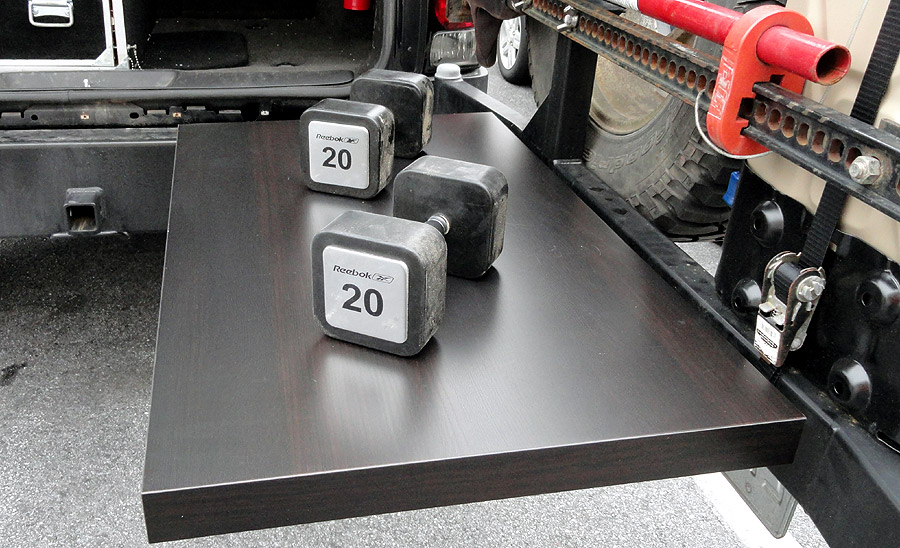
It's still working well! The new UHMWPE table top is much better than the old wooden table though.
I like the method. KV makes a similar shelving bracket system, the 182 Series Heavy-Duty Designer Series. http://www.knapeandvogt.com/Heavy-D...ards__~~~__Brackets.html?page=products.18.309 They are sold by many places. Ratings are in the couple hundred pound range per pair. The wall standards could be screwed to the tire carrier, or welded on. They have beveled holes for flat head wood screws to recess into. Flat head machine screws could be used instead. If you didn't have a tire carrier, some of the longer ones could be used, and the brackets attached to the bumper. I use the 24" long ones for supporting counter tops along walls that serve as desks. I've always gotten mine from: http://www.wwhardware.com/kv-182-decorative-heavy-duty-brackets-kv0182/ Looks like the 24" ones are rated at 400lbs per pair when the standards are mounted into 2x4 studs with the right size screws used. Scratches head. I was thinking it was 250lbs... If your metal is the right thickness and you have the ability to cut slots it would be possible to cut 4 or 6 slots in the right pattern and not use the standards. I'd de-rate the load carrying capacity some unless the metal is supported properly. This has gotten me thinking of modifying a KV shelf bracket set for 3/16" thick metal.
Good ideas. If you have access to a water jet cutter, that could really be a neat way to build the bracket into the arm. I have considered adding a second table surface to the bumper itself, but immediately realized I couldn't drill any holes in the bumper - due to the air tank, duh.
Wish we had access to trails like that here, all of ours are disappearing too fast
late post but really enjoy the video !
They're slowly going away everywhere it seems. And where they do exist, they're getting too popular.
I love this!! I love the tent, the bumpers, everything. I'm glad to see people are actually building the TrailBlazer, I think it's a great vehicle that is underappreciated. Especially the water pump idea, I might have to copy that one...
Speaking of the water pump, you could put a variable resistor on the pump motor power wire, so then you could dial in the amount of pressure you want. Just a thought.
Glad you like the ideas. I have considered a resistor of some sort. My only worry is too much heat. I guess that's really only a big deal if I run it on long duty cycles (like a shower), but I have yet to go that far with the design. If I were to go that far, a PWM controller would be needed - or a mechanical adjustment knob could probably also work.
Last edited:
LandRoverRock
New member
Great planning, great execution. Very inspirational. Sure hope I can get past my "have-to" projects to do my "want to" projects.
TACO BUENO
New member
You may have covered this, but where did you get that spare tire mount?
TACO BUENO
New member
wow, nevermind i should have looked a bit further.
Forum statistics
Members online
- 68camaro
- wazzubob
- bcats4life
- _Adam_
- Hoov
- LikeABoss
- trasko
- Koenbro
- Sunseed
- Todd n Natalie
- CHSjay
- Mud Dawg
- hdas
- nocean
- zeketpf
- Kingsize24
- timtyler
- Gladstone
- spinman
- Frodo of Texas
- Winterhawk
- dizzydom
- Dzik1000
- Clrussell
- shortbus4x4
- Savagenut
- SDDiver5
- pirranah
- outsidersoverland
- clift_d
- StrangerInAStrangeLand
- Dans12
- Skinhyfish
- modernbeat
- IdaSHO
- Spatch
- JulieM
- Herbie
- janders
- DriftingOverland
- bfj
- parabolD
- steve schleif
- Cummins_expo
- Lee
- BlueLeader
- jaywo
- mhiscox
- shoudabinacowboy
- jnr4095
Total: 934 (members: 57, guests: 877)