Unimogadventures - Our build and travel thread

Iain_U1250

Explorer
I finally got the laser cut steel and aluminium inserts. The inserts are currently sitting under a couple of sheets of MDF and about 200kg of weight, as they are getting the wood veneer glued on. Laser cutting is by far the best way to get very accurate plates cut up, the whole lot cost $70, and considering the amount of time it would have taken for me to make these, it was well worth it.

DSC05867.jpg
I got some spare one of each shape just in case I mess something up, so I used them for a trial fit. The switches are all wired up and working, but the radio is only a spare one I use for trial fits, the CB is the actual one, I will use the rear port for the microphone though.
DSC05871.jpg

The monitors fit quite nicely, and the camera system arrived as well. It works great.

DSC05856.jpg

I can have it in auto mode where it chooses the cameras base on various input, or quad mode. The touch screen monitors are pretty good, and will be part of the on board computer eventually. The buttons on the side are configurable, just have to figure out how. They are very bright, but have a connection for the headlight for dimming at night. They should be clearly visible even in bright sunlight the way I have them mounted.

DSC05866.jpg

The control pad will be recessed in next to the monitor on my side of the console, it has two outputs, so the passenger side can be the same, otherwise the monitors have three inputs, and I can use the buttons on the monitor to choose between high and low reverse cameras. The third input is a normal VGA input. With the two side camera mounted high up on the roof rack, we should be able to see when we are going to hit branches or rock overhangs. The forward facing camera is also high up on the roof rack, to see if we are close to any overhead obstacles.

Now I have to figure out how to get all the wires out through the roof - I have four camera wires, two aerials coaxial wires and three 12V power wires for various lights and things.
 
Last edited:

spencyg

This Space For Rent
Wow...just wow. People actually building their own trucks with their own 2 hands seems to be a rarity these days. Your craftsmanship is outstanding and your vision for what this rig will become is superb. Keep up the excellent work.

SG
 

stiff

stiff
Have just scanned this tread quickly with the intent on going back and reading it completely.
Went online looking for a larger version of the food replicator Captain Picard used on the Enterprise. Hoping I could use it to build a vehicle. Your patience is amazing.
One day. Just finding a proper chassis is difficult in the states. I would like to use a 2450L when the time comes.
If you could go back Would you stay with steel for your frame of choose aluminum?

Dan
 

Iain_U1250

Explorer
Hi Dan, I went with a Steel frame and aluminum to satisfy the local regulations. Over here if we want to have the two seats in the rear registered for passenger use, then the rear has to be "substantial". Discussing things with the engineers who have to certify the design, there is a set of regulations in regards having particular size and spacing of steel members for buses for roll over protection. I used these regulations in my design, and added some extra bracing. This should be enough to meet the "substantial" rule.

Welding of aluminium is a lot more difficult than steel, and apart from the OEM bed frame, the steel frame weights less than 150kg, as that is all the steel I bought. At most I would have saved 50kg in weight, but then I would have had to add an extra member around the bottom to attach it to the bed frame, so unless I re-designed the bed frame and made it out of aluminium as well, there would not be much weight saving. I was not keen on building my own bed frame, given the complexity of the OEM design, with it's oval tubes and formed members, it was not something I felt comfortable doing. I would try harder to get bigger aluminium panels for the side sheeting though, I'm sure the gaps between the panels on mine will no doubt crack the paint with the temperature differential from -20 Deg C outside to 20 degrees inside. I will have a vinyl wrap on the truck though, so that should not be a problem a far as rust of the steel frame is concerned.

I have been asked a few times why not go composite box, and the reasoning is the same, it would be hard to get the certification for the rear passenger seats. I look at what happens to fridge trucks when they roll over and it seems they just fall apart and fold flat. I'm sure that manufacturers would be able to prove their design or have it compliance tested, but at the stage I was at when I made the decision, I had to go with something I knew would comply and I could build myself.

When you find the replicator, send me link, there are a few things I could do with replicating as well :)
 

Iain_U1250

Explorer
that looks great

Thanks, can't wait to get it covered in the vinyl, just have to be patient and make sure everything is fitted and working before I send it off.


Wow...just wow. People actually building their own trucks with their own 2 hands seems to be a rarity these days. Your craftsmanship is outstanding and your vision for what this rig will become is superb. Keep up the excellent work.

SG

Thanks, there have been some very frustrating times when my ability did not match my imagination. Things are coming together now, and I'm back into an area where I have had a bit more experience. I used to build model boats from ply and balsa wood, then fibreglass skin them. I'm using the same techniques for the console, and I'm pretty happy with the result. I wish it was all finished though.

Wiring is always fun for me, as you get an instant result, either it works, or the smoke escapes :Wow1:
 

whatcharterboat

Supporting Sponsor, Overland Certified OC0018
I finally got the laser cut steel and aluminium inserts. The inserts are currently sitting under a couple of sheets of MDF and about 200kg of weight, as they are getting the wood veneer glued on. Laser cutting is by far the best way to get very accurate plates cut up, the whole lot cost $70, and considering the amount of time it would have taken for me to make these, it was well worth it.

View attachment 237384
I got some spare one of each shape just in case I mess something up, so I used them for a trial fit. The switches are all wired up and working, but the radio is only a spare one I use for trial fits, the CB is the actual one, I will use the rear port for the microphone though.
View attachment 237386

The monitors fit quite nicely, and the camera system arrived as well. It works great.

View attachment 237385


I can have it in auto mode where it chooses the cameras base on various input, or quad mode. The touch screen monitors are pretty good, and will be part of the on board computer eventually. The buttons on the side are configurable, just have to figure out how. They are very bright, but have a connection for the headlight for dimming at night. They should be clearly visible even in bright sunlight the way I have them mounted.

View attachment 237387

The control pad will be recessed in next to the monitor on my side of the console, it has two outputs, so the passenger side can be the same, otherwise the monitors have three inputs, and I can use the buttons on the monitor to choose between high and low reverse cameras. The third input is a normal VGA input. With the two side camera mounted high up on the roof rack, we should be able to see when we are going to hit branches or rock overhangs. The forward facing camera is also high up on the roof rack, to see if we are close to any overhead obstacles.

Now I have to figure out how to get all the wires out through the roof - I have four camera wires, two aerials coaxial wires and three 12V power wires for various lights and things.

Hi Iain,

Looking good.

One of our electronic reps just came and gave me a demo on a new camera system they are marketing.....very cool. Something they're trying to get onto mining vehicles. It uses a camera on all four sides of the vehicle, then software takes the four video inputs and creates an almost perfect birdseye view of the vehicle......you would swear the picture on the monitor was taken by a drone flying above you. Probably too expensive for a RV but as the technology becomes more accepted no doubt the software costs will come down.

I'll see if I can get a screen shot of the unit in use.

Hey, just thought I'd mention it.

How many sheets of Dynamat did you end up using in your cab? Am in the middle of doing a Canter and I think I'm going to run out with 9 sheets.

Take care mate.

Kind regards
John
 

Iain_U1250

Explorer
That sounds good, but I would need a bigger screen. Once I get the camera mounted, I should have pretty clear view all around, hopefully no blind spots.

I am on the third pack of dynamat ( one dynamat, and two "copies") but I went overboard - two layers on the floor and firewall, the whole roof, the back wall, inside the doors and some in the camper as well.

Talking about drones, I'm looking at getting one for making videos on our trip, I have a Parrot 2 but I'm waiting for the new technology before getting something better as things are improving so fast. I love one that could follow the truck or be set to hold at a specific location to video water crossings etc, then land back on the "helipad" on the roof of the truck :)
 
Talking about drones, I'm looking at getting one for making videos on our trip, I have a Parrot 2 but I'm waiting for the new technology before getting something better as things are improving so fast. I love one that could follow the truck or be set to hold at a specific location to video water crossings etc, then land back on the "helipad" on the roof of the truck :)

now that would be way cool for water crossings ..how do you like the parrot 2
 

Iain_U1250

Explorer
now that would be way cool for water crossings ..how do you like the parrot 2

The Main problem with the Parrot 2 is that in the slightest breeze it drifts, and unless you are in an open field, it is pretty easy to crash, and it is pretty weak structurally. The range of the wifi link is realistically around 15m or so, but the reaction time get slower the further away it is. I have a lot more success indoors chasing the cats around :)


Iain I've got just the drone for you.

Airdog Camera Drone

http://www.liveleak.com/view?i=ffb_1405089071

That looks exactly like what I want, hopefully they get some funding to build the thing. I will wait to see what comes in the next year, as the technology is getting so much better so quickly. I was looking a DJI F550, as it can track a pre-programmed flight path and hold location fairly accurately, but I will wait until I have finished my truck before i get into this type of thing, can only have so many toys at one time :)
 

Iain_U1250

Explorer
September Update

It has been a while since the last update, mainly due to work and other priorities I have not had much time to spend on the truck. I have managed to get a little bit of progress done though. First off is the overhead console, and much shaping and sanding, I was finally happy enough with it to send it off for upholstery. This is the finished console, all painted up ready to go off.

DSC05885.jpg

The were a lot of small details for fitting the radios and all the other systems that needed to be installed. Things like the opening for the fuse boxes, and accessing the rear of the radios, and a place to put the iPod that will live inside the console. I have an "iPod classic" with 160Gb of storage, which is more than big enough for my entire CD collection. This will live inside the console, permanently connected to the head unit but easily removed to add more songs. The Pioneer DEH80PRS head unit an control two ipods, and an SD card so I should never run out of music.

DSC05886.jpg

This shows the over all roof of the truck, the plywood panels will be covered in the headlining material. We are still deciding whether to go with a wood finish on the aluminium bit, or cover it in the small leatherette as the console. All the wood veneers are completed, a 3mm Jarrah veneer over the aluminium inserts to match the wood finish in the rear of the truck. It took a number of tries to get the wood veneer to work, as some of the sections were very thing and until I figured out which way to place the grain, I managed to break them when sanding and cutting out the holes. In the end they look great, and well worth the two weekends of effort to make them all. Once all that was done it was time to send the console off to be upholstered. The upholstery place promised to have it back in within a week, in the end it was a month.


DSC05892.jpg

In the meantime, I worked a bit on installing all the cameras. The right side view camera is mounted high up on the roof rack and well protected from branches


DSC05904.jpg
This is the view it gives, not only of the lane next to me, but more important the clearance to any overhanging branches etc. I can see the ground about 3m behind the cab door, so should be able to see any vehicles hiding in any blind spots, even Little sports cars unless they are right next to the passenger door, in which case the mirrors also give me a view, but then they don't do much of a job at the overhead stuff. The left side camera gives a similar view which so should make maneuvering in tight places a bit easier. The cameras ( of which there will be 6 in the end) can be selected from the screens on both drivers and passenger side. The passenger can select the quad screen view or the high mounted camera, and the driver can select the quad view or a narrow angle rear view camera mounted high up. The left side camera gives a similar view which so should make maneuvering in tight places a bit easier. The cameras ( of which there will be 6 in the end) can be selected from the screens on both drivers and passenger side. The passenger can select the quad screen view or the high mounted camera, and the driver can select the quad view or a narrow angle rear view camera mounted high up. I can set the camera to change view based on the indicators, or the selecting reverse, but that would add even more wires. The screen auto dim when the headlights are switched on as well.

DSC05903.jpg

The dual air con system is a bit complex, as I needed to have either the left or the right system being able to work independently. There are two solenoid valves, and they block off the flow of the refrigerant to the unit switched off. However, to ensure that the is no possibility of the compressor pumping against a closed valve, the solenoids are controlled by the same DPST switch that allows the system to switch on the compressor. This was each unit is completely independent and can either have cold air, or just recirculate the air, without affecting the other system at all. I also discovered that when the solenoids are switched off, there is a huge voltage spike flowing back into the power system which made the amplifiers give quite a load thump on switching off the solenoids.. A pair of blocking diodes to direct that spike back to earth solved that.


DSC05901.jpg

There are two fuse boxes in the overhead console, one wired to the Ign/acc position for things like the a/c system, heater mirrors, power windows, video cameras and screen etc. The other fuse block giving permanent 12V power for the interior lights, the CB and sound system etc. The fuse block have a diode that lights up if a fuse is blown, making it easier to see which one needs replacing.

DSC05897.jpg


The console finally arrived, and I fitted the monitors and all the other items, The wood/aluminium inserts had to be sanded down a bit more, as I had not allowed enough clearance for the leatherette, especially the double stitched sides around some of the holes. It was a bit nerve wracking fitting the inserts, being so careful not to damage the leatherette. I did make a few little scratches on it, but in the end if worked out great.


DSC05912.jpg

This is the finished result with the the radios and speakers all in place. I think it looks pretty good, and can't wait to finish the headlining etc around the roof of the cab.

DSC05924.jpg

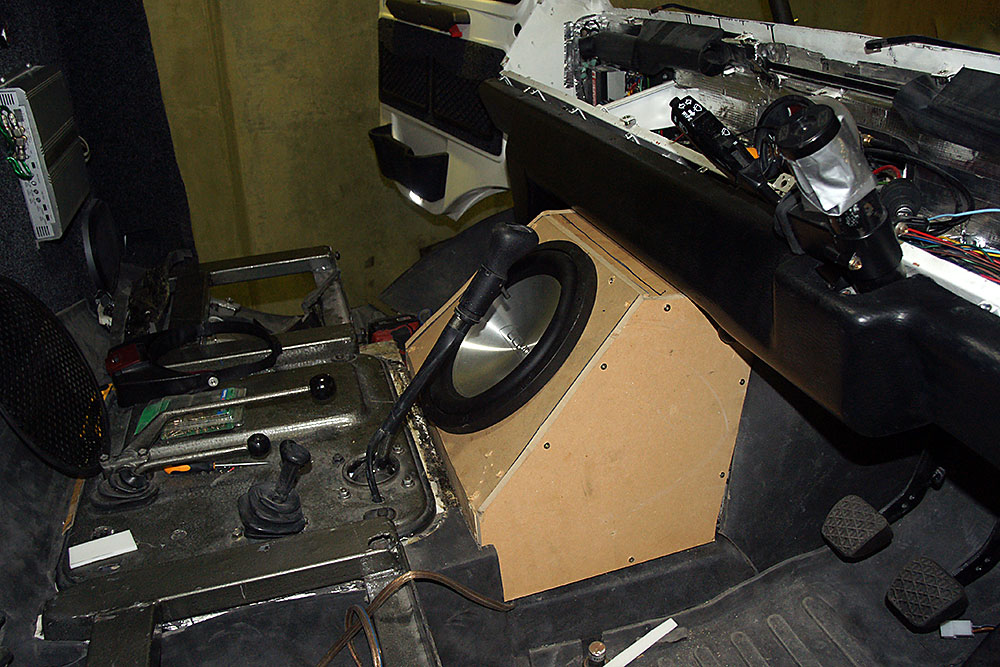
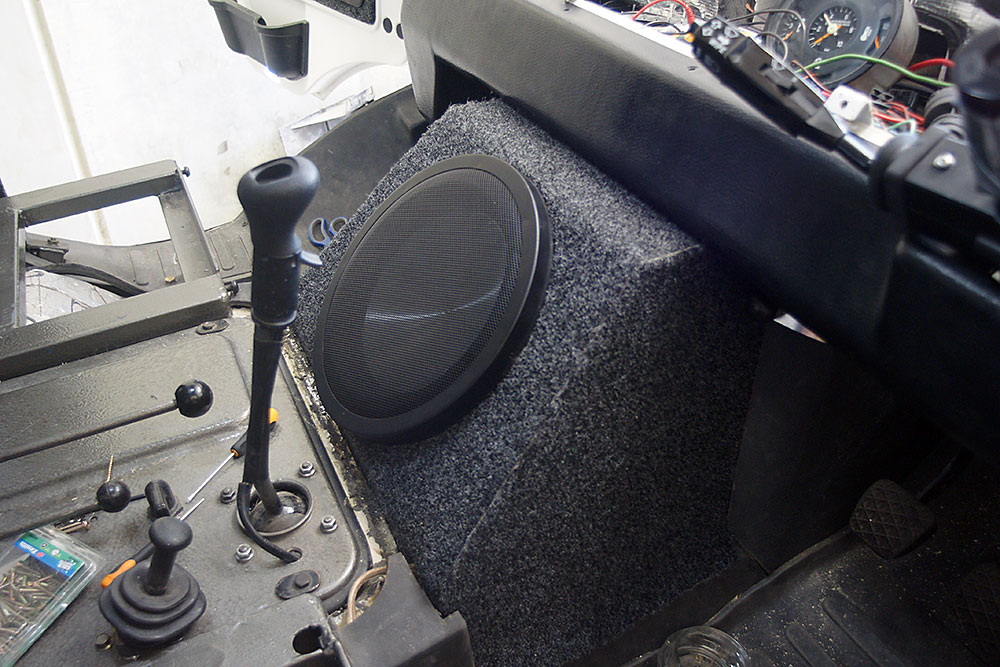
The sound system is very good, nice and clear yet able to go loud enough to really rock down the road. It is however missing one thing - a decent sub-woofer to provide the missing base that the 6x0 just can't produce. To this end, here is the planned box, for my 2000W 12" sub woofer. There is just enough space for the correct volume, and give me a reasonable amount of clearance to the gear stick on full forward throw.

DSC05926.jpg

I'm going to start building the box when I get back home again, and hopefully can test it soon. There is a huge amount of man-hours put into this overhead console, the a/c system and the sound system, but in the end it will be worth all the effort.
 
Last edited:

Iain_U1250

Explorer
Time for a quick update.

First of all i have made the subwoofer box. It was pretty tricky getting enough volume for it, but with a lot of compound angles and a lot of fiddling it fits nicely. The sound is really good, with the subwoofer adding the missing bass. It certainly is loud enough to drown out all noise. :)

DSC05929.jpg


With some carpet and a grill to protect it, this is the finished item. I will add something on top to hold stuff, and some netting pockets on the side for more things. The shortened shift on the gearstick means I have plenty of space for the gear shift, it looks close but I can't reach the box when sitting in the seat, I have to lean forward.

DSC05931.jpg


I am getting close to the end of the wiring. There is now a lot of wires in my mog, strange when the truck itself can be roll started and then doesn't need any electrics for it to run. So far I have bought and almost used up 700m of wire in wiring up the cab and all the various sensors, switches, a/c mirrors, windows, door locks, seats, lights, cameras, screens, speakers and amps etc. I have used 300 crimp on brass terminals for the terminal blocks, there are 14 terminal blocks on the firewall, 24 switches with an average of 6 terminals on each switch, more than 200 spade/ring/ connectors. there are 6 separate fuse boxes with 47 fuses, 12 relays, and a whole load of sleeving and split tubing. That is just for the truck itself, there is another 300m of wire in the camper :0 It loolk


DSC05942.jpg


I am going to label each wire using the press on numbers and letters below, I maybe should have started doing it from the beginning, but better later than never.


$_57.JPG


The switches are pretty good, OEM for quite a few cars. The ones I have are green backlight at night, and have orange LED when switched on. They only light up when switching a positive circuit, and most of my lighting relays all switch on the negative circuit. In order to make the LEDs light up I have to turn them around. This is something I will do later, and probably change the colour from orange to blue for the light circuits.


DSC05945.jpg


I trial fitted the whole of the dash as well, the heater unit has limited space for all the wiring, so a few of them have to go over the top of the heater. I put a layer of thin rubber on the steel dash to insulate any possible short circuits, and will be securing the wires to stop movement. I have used 15A or higher cable, and most of the fuses are rated at 5A, with a few at 10A. Each circuit is protected, I have a lot more fuses than the OEM loom, and all the heavy current is run via relays.


DSC05958.jpg


I have a USB accessory plug in the glove box, and will put some 12V plugs under the dash. I am still looking for a place to fit another USB plug on the drivers side. Once I have tidied up all the wiring, then I will finish off the instrument panel and dash top. I'm thinking of finishing the top of the dash with carpet, as we have seen most people end up with a lot of stuff on the dash. It makes a great shelf.
 

Forum statistics

Threads
185,819
Messages
2,878,553
Members
225,378
Latest member
norcalmaier
Top