NL Dual Battery Kit - Troubleshooting help

Fergie

Expedition Leader
I've tried Paul, but he is out of the country, and NL in SA, but that response may take a few days(that I don't have), so this is the next best bet.

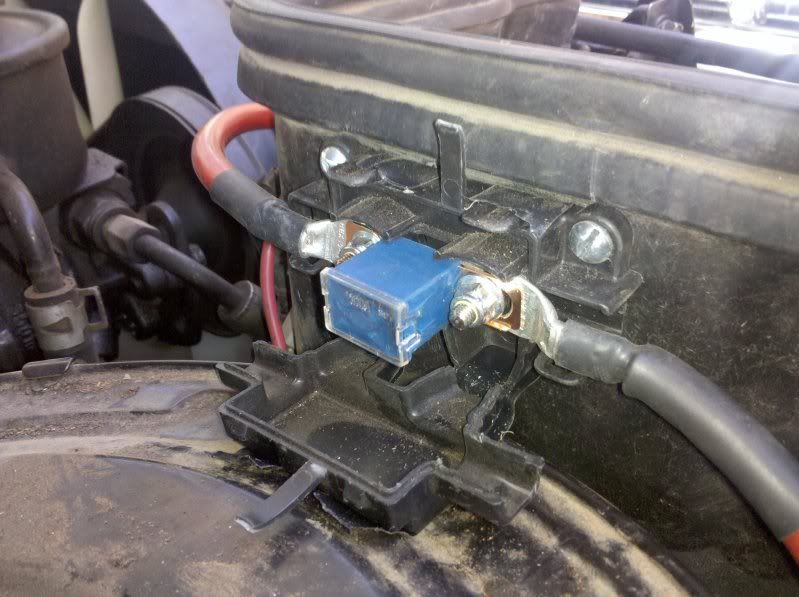
I installed a NL dual battery kit in my 80 series and had it operational for about 2 months, working just fine, no issues. I did some major maintenance on the 80 that required the 2nd battery to be removed for a bit, and the NL kit disconnected.

I reinstalled the 2nd battery last night, and hooked the system back up, making the small black wire connection last.

When I hooked up the monitor, the audible alarm was on, and the voltage was low on the main battery, and the 2nd battery didnt even register on the monitor. The voltages across both batteries were about 12.73 and 12.79, respectively.

When hooking up the solenoid wire, the top LED on the solenoid did not flash as it should. I disconnected the 2nd battery from the system, and reconnected the monitor wire. The top LED on the solenoid flashed once, but that was it.

I checked the system for shorts/nicked/grounded wires and found none; the fuses are all good too.

So, is the low voltage on my batteries causing the 2nd battery not to register on the monitor or is something else going on?

Please realize I am not 12V savvy...this install was the largest 12V thing I have ever done.

Any help is appreciated.

Thanks,
Gavin
 

cruiseroutfit

Supporting Sponsor: Cruiser Outfitters
You may have blown the internal fuse. Paul has them available (as well as the sticker you'll need to replace it). That is the only thing I can think of right now? I've got some tech notes I jotted down when I met with the National Luna rep & Paul last fall, he gave me some great insight as to how they work and failure repairs. I'll see if this rings a bell.
 

Fergie

Expedition Leader
Talk about service! I called Equipt1 to get a phone number and Paul answered in Germany!

He walked me through some check procedures to test the fuses, which he thinks are the issue.

Remember on hooking this system, positive cables first, then negatives, then small black wire.

I'll report back later.
 

flyingwil

Supporting Sponsor - Sierra Expeditions
I was going to say fuse too. It sounds like the internal fuse above the solenoid.
 

Fergie

Expedition Leader
Ok, here is the deal.

It was the 50A and 100A fuses that blew, due to my incorrect re-installation of the wiring.

Pos main, pos 2nd, neg main, neg 2nd, solenoid black wire is the correct sequence.

I did it differently and caused the two fuses to blow, not visibly or audibly though. And since the fuses are so large, there may be enough metal left to register continuity when checking with a multimeter, which I did.

Paul instructed me to pull the two inline fuses, and try to bend them in my fingers. If they bent easily or at all, they were bad and needed replaced...both were bad.

Paul pointed me to NAPA that has correctly sized fuses, albeit a different configuration, and with a little filing and the mounting hole, they fit fine.

So, check your instructions on wiring, espcecially if the product comes from a different country.

The first pic is of the damaged fuse:
2010-06-02_132222.jpg


Second is the replacement fuse:
2010-06-02_125206.jpg


Everything works just fine!

Thanks to Paul and you folks here too!
 

Ash

Adventurer
Just wanted to bump this thread. I had exactly the same problem when I changed out batteries - user error! Thankfully the kit included a spare 50amp fuse. Problem solved.

Ash
 

Sawyer

Adventurer
Having run into this issue in the past, I decided to replace the fuses that come in the kit. In their place I installed cooper bussman resettable circuit breakers. Paul and his team have always been great when needed. But, I was worried about when I was out there away from parts and help.
 

Equipt

Supporting Sponsor Presenting Sponsor of Overland
Thanks for the kind words guys. Much appreciated.

Here is another suggestion if you find yourself in a spot with a blown fuse and you need to get going. First, remove the fuse and try to flex it between your fingers and thumb. Any flex at all and the fuse is shot. There is no way to visually check these. If it is blown, here is a suggestion. The National Luna Dual Battery Users Guide shows several alternative installation options. One of which is to delete the fuse links from the cables for a winch installed application. So an easy way to temporarily bypass the fuse link until you get a replacement is to put both lugs in the fuse link on one stud in the link and tighten it down. Remember to disconnect the small black control wire and the negative cables first. This is to remove the possibility of creating an arc on the positive cables, which is what blows the fuses in the first place. So hook the positives under on stud in the fuse link, hook up the negative cables, and finally the small #12 wire coming off the Intelligent Solenoid Circuit Board. This should get you going again. We sell spares designed specifically for the MTA fuse links or you can get a fuse from NAPA that will work in a pinch.

If anyone has an issue with the National Luna system, please contact me directly and we'll get you back up and running.

Cheers,
 

Flagster

Expedition Leader
I blew a fuse this past weekend...NAPA now sells the blade style fuses...don't have a part number handy but no modification necessary
 

okcrich

New member
I definitely blew the internal fuse. The red lamp is on. I pulled the intelligent controller off. How do you open it up to replace the fuse? Do you remember what kind of fuse it requires? I sent an email to Paul May as well. Thanks for any advice you can share.
 

Equipt

Supporting Sponsor Presenting Sponsor of Overland
I definitely blew the internal fuse. The red lamp is on. I pulled the intelligent controller off. How do you open it up to replace the fuse? Do you remember what kind of fuse it requires? I sent an email to Paul May as well. Thanks for any advice you can share.

Hey. Sorry for the delay. Got back from Baja 1000 last night at 2 am. Just trying to catch up now. I'll get to your email as soon as I can too. If the light for blown fuse on the IS did turn on, then yep, it's blown. There are 2 phillips head screws behind the sticker on the face of the IS. Tear that sticker off or find the indents for the screw heads and pop through the material, and undo the screws. The cover will come off and you can replace to offending fuse. We have replacement stickers, and we have replacement fuses too. Before you replace the fuse, take one of the red positive battery leads off the terminal to open the circuit so that it not powered up. Safety thing. And disconnect the small black 12 gauge wire that runs the IS circuit board. This way when you replace the fuse we can bring it back to life properly and make sure it's working correctly. Replace fuse now, replace red positive line, and then the small black wire should be reconnected. When that small black wire is connected, you should see a single green light flash on the IS where it says solenoid engaged. That is the "Good to go" signal that all is well and it's ready to work.

Cheers,
 

okcrich

New member
I wanted to post a quick shout out to Paul May and Equipt Expeditions. He arranged to get the replacement part I needed fedexed the next day. This is the second time that I reached out to him at off hours and he quickly responded to help me out. Thanks for the world class (actually world class) service ;-)
 

Forum statistics

Threads
185,839
Messages
2,878,740
Members
225,393
Latest member
jgrillz94
Top