The TARDIS - A Four Wheel Camper Build

Overland Hadley

on a journey
The "stik" ladder is going to work great! This is the one I ended up ordering, Telesteps 500FLS 5-Feet Single Folding Step Ladder. It was just a tad to long to fit in the storage compartment under the couch, which is where I decided would be the ideal place to store it. So I drilled out some rivets, removed the feet and cut an inch off the legs, replaced the feet and it fits! The ladder will displace the camp chairs, but I rarely use them as I am either out and about or crashed in the camper. So I am even on space and weight, chairs out and ladder in.

Despite my best intentions I did not do any in-progress photos. :-( It was fairly cold (12*F) and I was tiered. Excuses. I will get some photos at some point, maybe when it warms up and stops snowing.... in June.
 

Overland Hadley

on a journey
0328141526.jpg


The "stik" ladder is going to work great! This is the one I ended up ordering, Telesteps 500FLS 5-Feet Single Folding Step Ladder. It was just a tad to long to fit in the storage compartment under the couch, which is where I decided would be the ideal place to store it. So I drilled out some rivets, removed the feet and cut an inch off the legs, replaced the feet and it fits! The ladder will displace the camp chairs, but I rarely use them as I am either out and about or crashed in the camper. So I am even on space and weight, chairs out and ladder in.

Despite my best intentions I did not do any in-progress photos. :-( It was fairly cold (12*F) and I was tiered. Excuses. I will get some photos at some point, maybe when it warms up and stops snowing.... in June.
 

Overland Hadley

on a journey
When I was getting ready for my travels last fall, a small QC problem came to a head.

From early on with the camper I had noticed the straps that connect the soft side to the lifting panels, and thus pull the front and rear sides in as you lower the roof, were breaking off. There are three elastic straps on the front and three on the rear, so losing a couple was not a big deal. Then late last summer another one broke and that was critical, as that lead the last one breaking and suddenly the top had no wish to fold in. Bad deal. I talked to the guys at FWC and they said it was an odd problem, one that they do not see. I did some digging around and I found the problem, the washer was put on the wrong side of the elastic strap. So the rivet was eventually working out of the elastic.

I could have had the problem fixed under warranty, but I was getting ready to leave on a trip and I did not have any plans to be near a dealer. I also had an idea of how to fix the problem and improve on how the fabric folded, so I dug in to make the fix myself.

Part one was to remove the rivets in the soft side, and run a thin bungee cord through the soft side and around the lifting panel. This pulls the soft side in as the lifting panel is lowered. I made a little loop in the bungee cord on the outside of the soft side. Then through these loops, and around the soft side I ran a thicker bungee. So I have lost the clean look of the exterior pop up material, but I am much happier with how the fabric folds. A big improvement is also in the soft side being quieter in strong winds as it has some tension around the middle. I used to scoff at campers with a bungee around the soft side, but now I am a fan of the design.

Only problem I had is when we camped through a big storm of wet snow. This caused the bungee I have to loose stretch. So I need to look at getting a better bungee material for the exterior bungee.

So that explains why there is a bungee around my soft side now. :)


IMG_3496.jpg
 

rotti

Adventurer
I think this is going to work! It is lightweight, does not take up much space, and it will fill my needs.

Here it is.


12301211.jpg


Yup, it is a bucket with a toilet seat, (and Wagg bags). Let me explain.

I wanted something that required little setup, so it could easily be used inside the camper with the top down. Something for those mid day camp food induced emergencies.

I do not mind using the Wag bags, and using them means no need for a wet toilet, and the associated weight of the water. I also find the bags easier to dispose of than black water.

So it just came down to finding something easier to use than the three legged folding PETT toilet. It is great for use outside the camper, but try setting up and using it inside the camper with the top down, no bueno. With the bucket, just pull it out, drop a bag in, and you are good to go. It takes up little space, as the space inside can be used to store TP and Wag bags. I went with a 3.5 gallon bucket so it is easier to sit on with the top down, and it fits nicely inside my storage boxes.


Time for some links.

Bucket - Link
Seat - Link

A note on the Wag bags: I have found that kitty litter powder works as good if not better than the "poo powder" included in the bags. At one point I was going to try and save money by making my own bags. But then I found that you can buy Wag bags on ebay for super cheap. Cheaper than I could buy plain zip bags for.

Hadley,

I am planning a two week trip to southern Utah and Expo and my unreasonable wife is demanding an upgrade from my bathroom solution:

HXGNgKE.jpg


I have been looking at the Thetford and other fancy flush types but your solution looks like it might be a nice and cheaper compromise.
Care to review your choice after a year in the field?
 

Overland Hadley

on a journey
I have been looking at the Thetford and other fancy flush types but your solution looks like it might be a nice and cheaper compromise.
Care to review your choice after a year in the field?

I still really like my setup, as I prefer to deal with WagBags than black water tanks. The big deal for me is this setup saves about 40 pounds over a Thetford Curve. The bucket also stores in a location that a Thetford would not, as it is too tall for my storage areas.

With your 2500HD weight is not so much of an issue. So I guess it all depends on if you want to buy WagBags* and wrap them up when used, or deal with emptying the black tank of a Thetford.

*As I noted in the past you can get some amazing deals on big sets of WagBags on ebay. You can also easily make your own with kitty litter.
 

Overland Hadley

on a journey
Trying to clean out some of the stuff I bought for the camper, but did not use.

Ok, I guess I am also going to sell my second GoLight Stryker. It is model #3051, selling for $210 shipped.

I bought this one with my other Golight, as I was planning on mounting it to the rear of the camper. Only mounted the one on the front....

photo.JPG
 

Overland Hadley

on a journey
Just looking through A Restless Transplant, and I noticed something interesting in this photo. There is a porch light mounted on the cabover above the truck doors. Hmmm, I like that idea. I am planning on switching my porch lights to small Rigid Industries units, I might add a couple lights up front as well.

76550014.jpg
 

Overland Hadley

on a journey
This is a great idea, for the when the dog kicks the screen door by accident. Um yeah, the dog, because I have never hit the screen myself, damn clown feet.

http://www.wanderthewest.com/forum/topic/8037-atc-bobcat-shell-owner-interior-build/
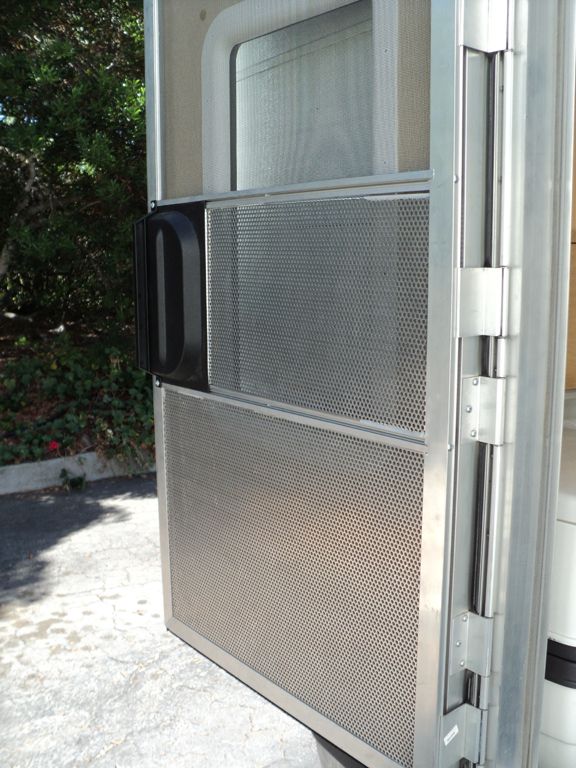
Rear Screen Perforated Aluminum Protector
Small dog protection for fragile window screen, no noticeable difference in air flow.
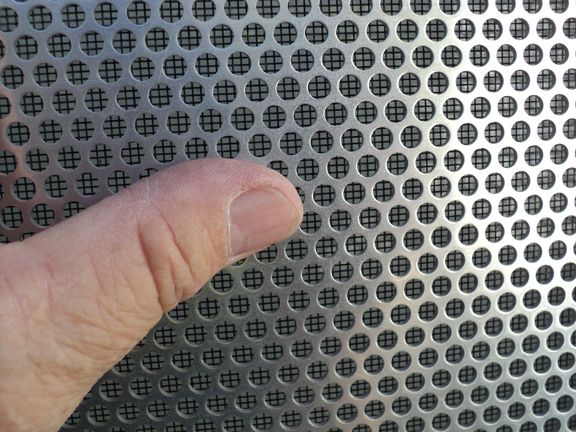
Same Aluminum perforated panel material as the compressor panels.
Perforated holes are not large enough to catch and hold small dog toenails, yet no noticeable difference in air flow, and I can still see out the back door when driving.

ScreenDoorProtector2_zpsed80dc73.jpg


High enough to protect the plastic screen material even if the dogs jump up.
Held in place by inserting in screen groove and with adhesive sealant.

ScreenDoorProtector1_zpsdfec3da1.jpg
 

Forum statistics

Threads
185,883
Messages
2,879,163
Members
225,450
Latest member
Rinzlerz
Top