Boomer the Quadravan 4x4 Camper

RIDGE

Adventurer
Ramsey and I had a great conversation on Friday. He is truly a fountain of knowledge and is extremely generous with his time. He guided me toward a far cheaper front spring solution and will be providing the front and rear dampers when the time comes. ExPo at its finest....Boomer is turning into a crowd-sourced project!

SG

;)
 

guidolyons

Addicted to Gear Oil
Rear disc brakes and a hydro boost. This should get interesting. Also, how do we feel about King coil overs?

:elkgrin:

SG

I've been going back and forth with the guys at F-O-A Shocks in NV and think I will go with these guys, at least for round 1. If this doesn't work out and I've spent $2k on a set of dampers...well...that doesn't work. I can get a full set of 2.5" body FOA units, Emulsion 8" travel in the back and Coilover 8" travel up front, for under a grand. Once I've got the right coil springs and new leaf springs I'll likely be a bit over that price, but not by a whole lot. The mounting between brands seems to be nearly identical, so whatever I fab up for the FOA could easily accept another brand down the road if needed. Of course all brands have their bad seeds out there making poor reviews, but overall folks seem happy with them and I like how simple the guts are to maintain and rebuild.
SG

SG- I think you are on the right track with Fox or King and getting some good advice from BajaSportsmobile, Chris (RIDGE) and his recommendation for Agile Off-Road on the pros/cons of separate coil/shock or coil-over shock and spring rates, etc.

I don't have any personal experience with them, but F-O-A seems to have problems with quality control and unhappy customers: http://www.pirate4x4.com/forum/general-4x4-discussion/940326-f-o-coilover-review-anyone.html


“The bitterness of poor quality remains long after the sweetness of low price is forgotten” – Benjamin Franklin
 

spencyg

This Space For Rent
So...brakes.

The brakes on Boomer have never been confidence inspiring. The pedal has always been firm but an increase in pedal pressure has never led to a proportionally significant reduction in speed. "Locking up the tires" just doesn't happen.

The master cylinder and booster are stock 1985 E350. Vacuum pump off the engine goes to a small vacuum reservoir (made from PVC end caps thank you very much...original rusted away long ago) and powers a standard single diaphragm vacuum booster. The master cylinder is a 1.125" bore with 2 isolated circuits (and isolated fluid reservoirs). There is no proportional valve or brake failure switch in the stock circuit, and a load sensing rear bias valve was installed in the rear connected between the axle and frame.

The front brakes are stock 2 piston 1985 Ford E350 calipers with what seem to be late 70's Ford F250 12.5" rotors. The brake pads have been upgraded to remarkably spendy (and just as remarkably good) Hawk Performance Extreme Duty units.

The rear brakes were stock drums with relatively fresh hardware and pads.

None of this ever really has worked right.

It was finally time to get a handle on braking.

Phase 1 involved swapping to Hawk Performance Extreme Duty front pads. This was a really good upgrade for the fronts. As they warm up they just keep clamping harder. A drastic improvement over the Napa brand semi metallic pads I was previously running. While I swapped pads I also blew out one of the seals on the driver side caliper, so I'm running a new one of those as well.

After phase 1 Boomer was run for around 1000 miles. It was decided that Phase 2 was in order.

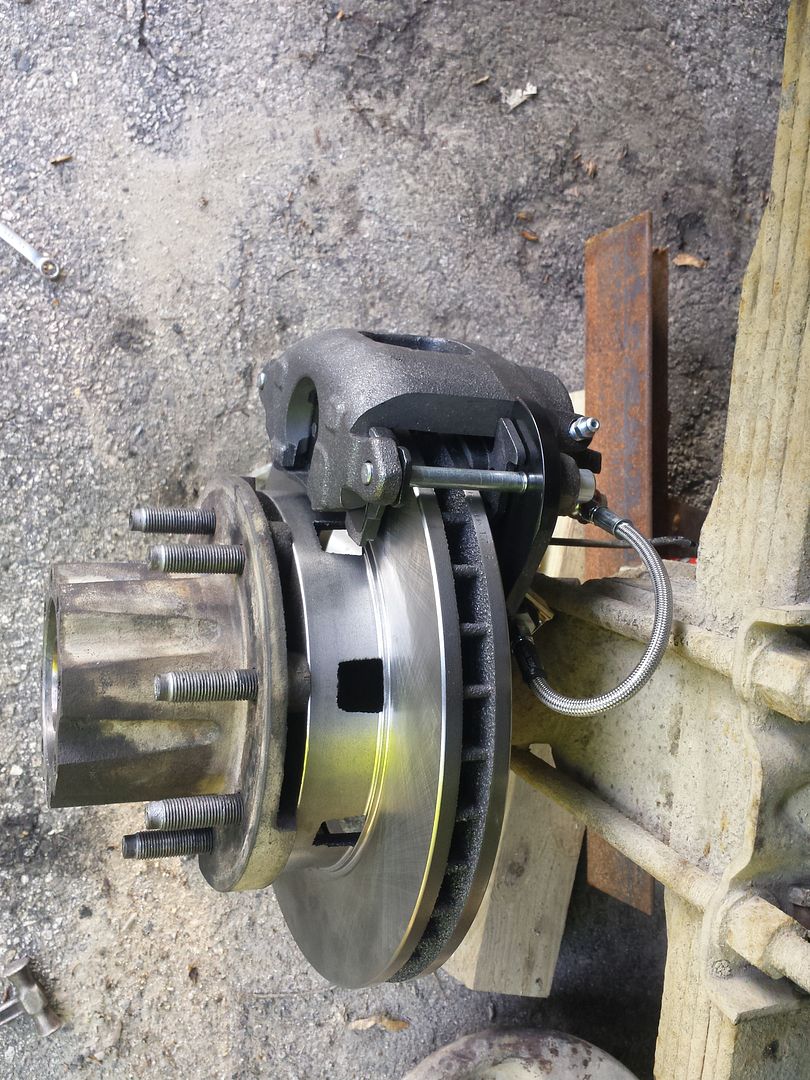
Phase 2 has involved a rear disc brake upgrade. After a bit of searching on the Googles, it became clear that upgrading a rear full float Dana 60 to disc brakes isn't much of a chore.

-1980 Chevy K20 (3/4 ton 4x4) Front Rotors
-1980 Chevy K20 Front Calipers and Pads
-Bolt-On Adapter Brackets
-Various adapter hoses
-Proportional Brake Balance Valve

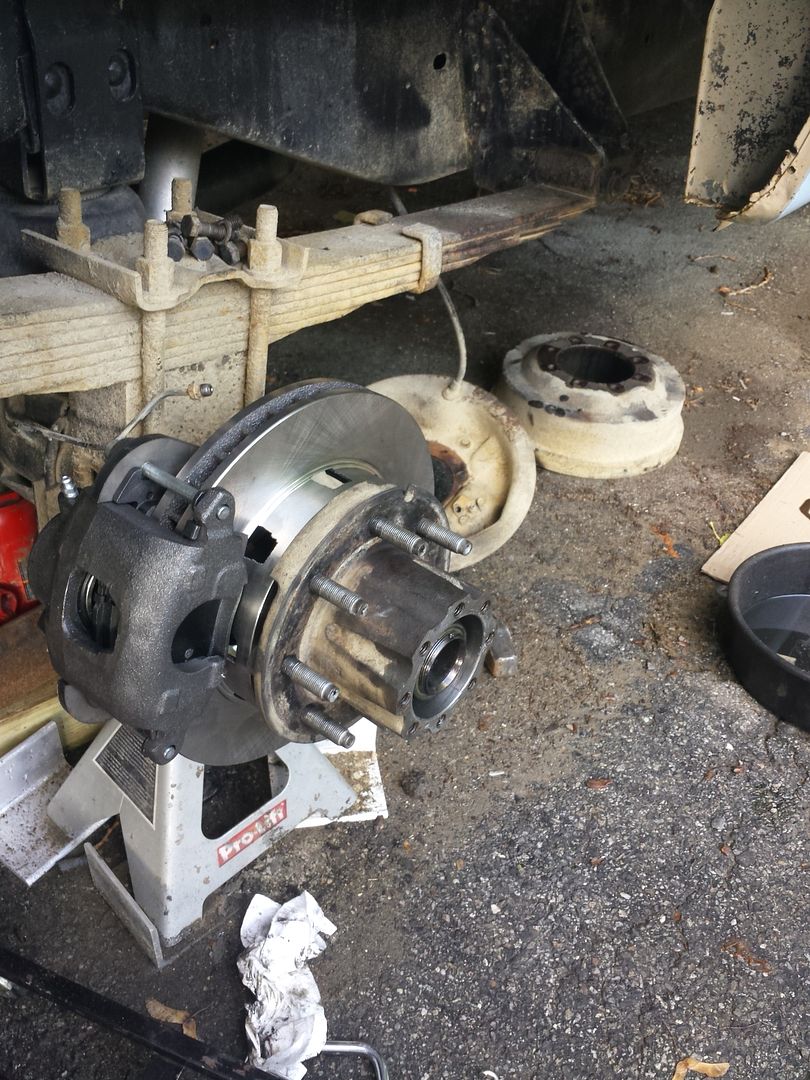
So after the parts all arrived it was time to disassemble.


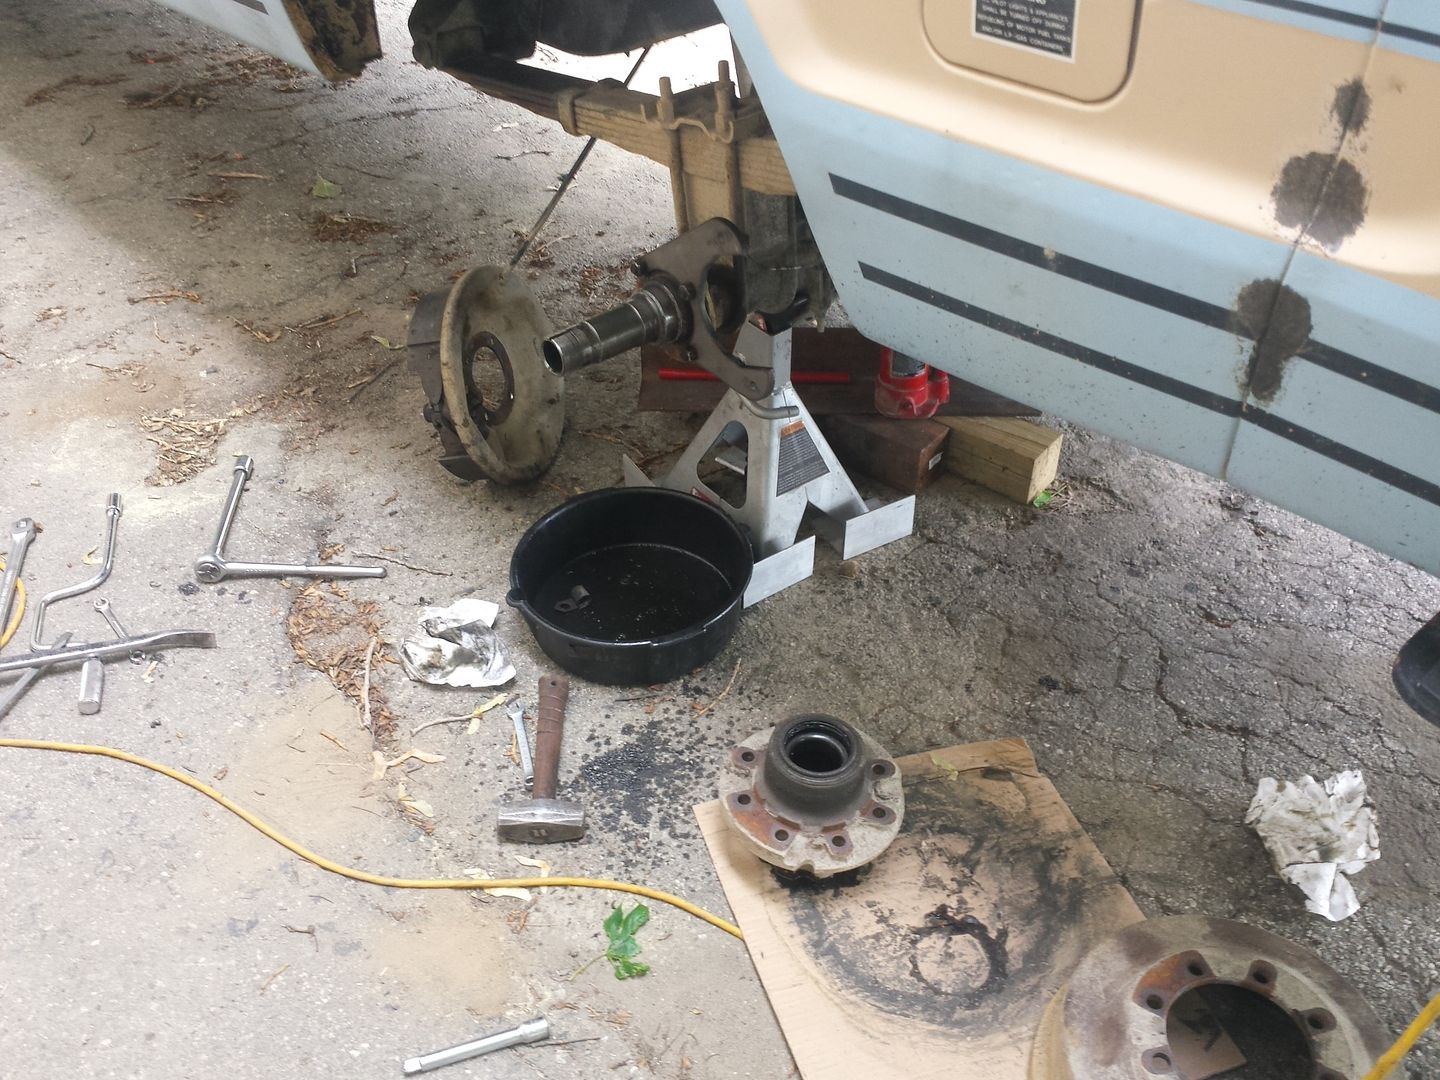
Everything came apart pretty well on the driver side. The rear backing plate was on there pretty good, but a few good hits with a 5lb sledge and it changed its tune.

The hubs required a bit of machining to play nicely with the rotors, so the thickness of the flange was brought down to 0.800" from 0.880", and the diameter of the rotor flange was brought from 5.375" down to 5.120".


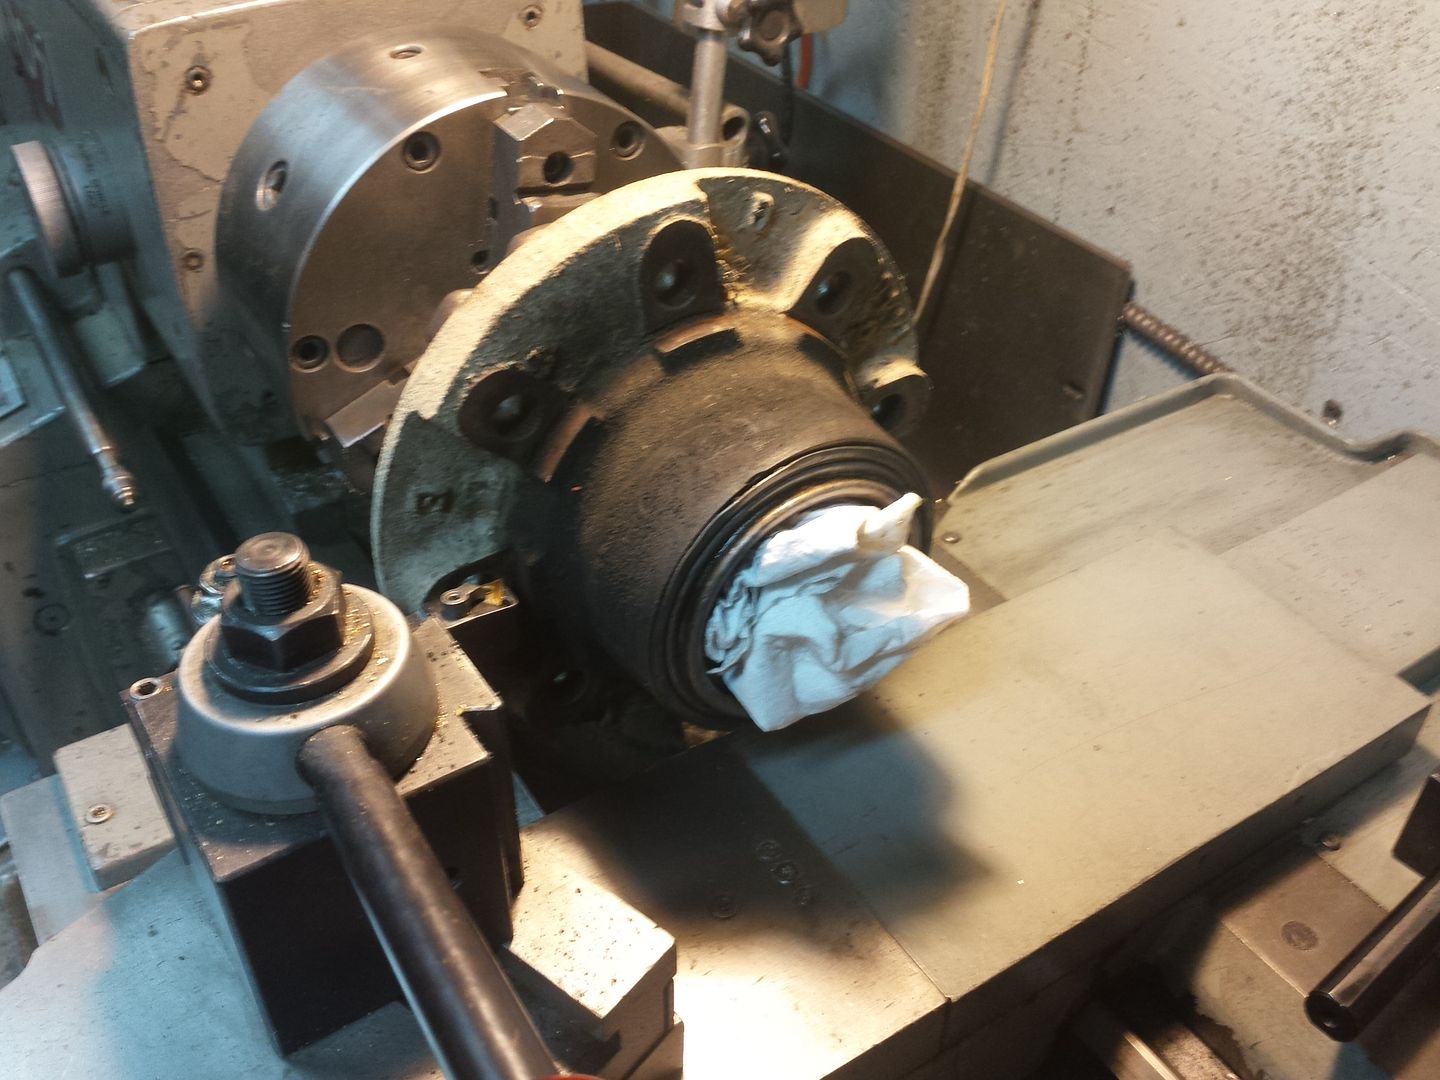
I opted to do this instead of modifying the rotors, since I want to be able to just buy a rotor and not worry about machining it before install. There is plenty of meat on the hubs so it seemed the obvious choice.

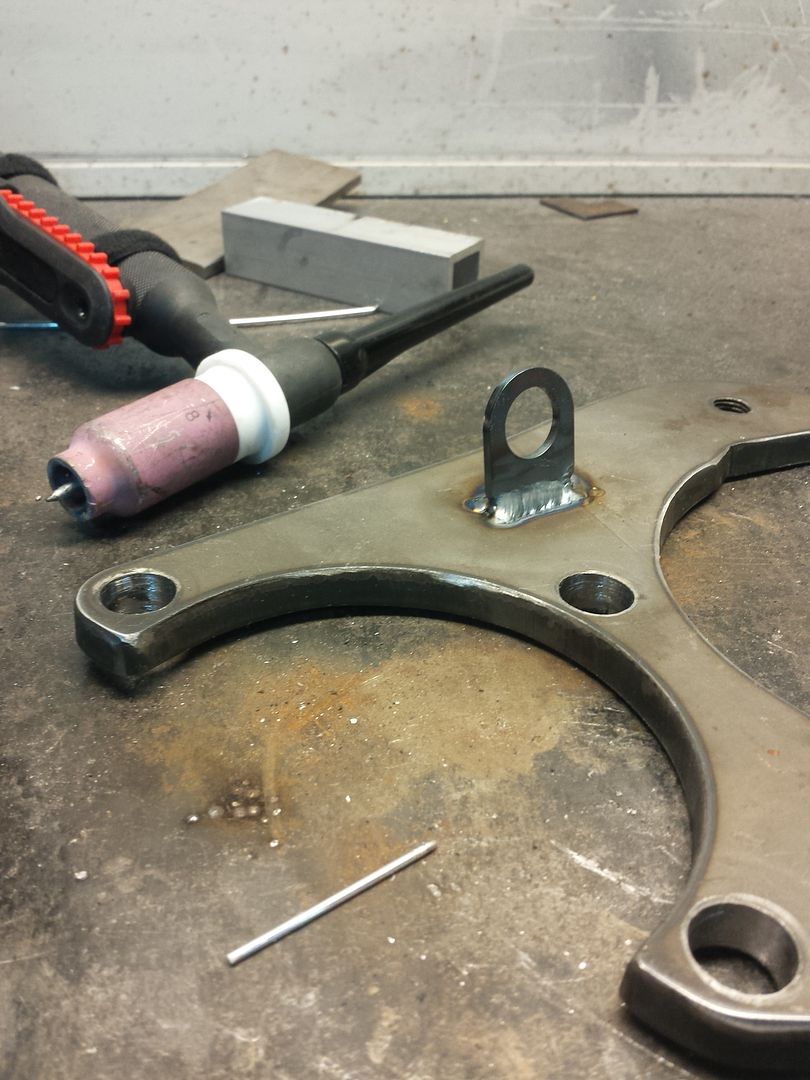
Pre-install of the new components went fine and I was able to locate the new position for the brake hose tabs on the brackets.


After that some paint and final assembly on the driver side.


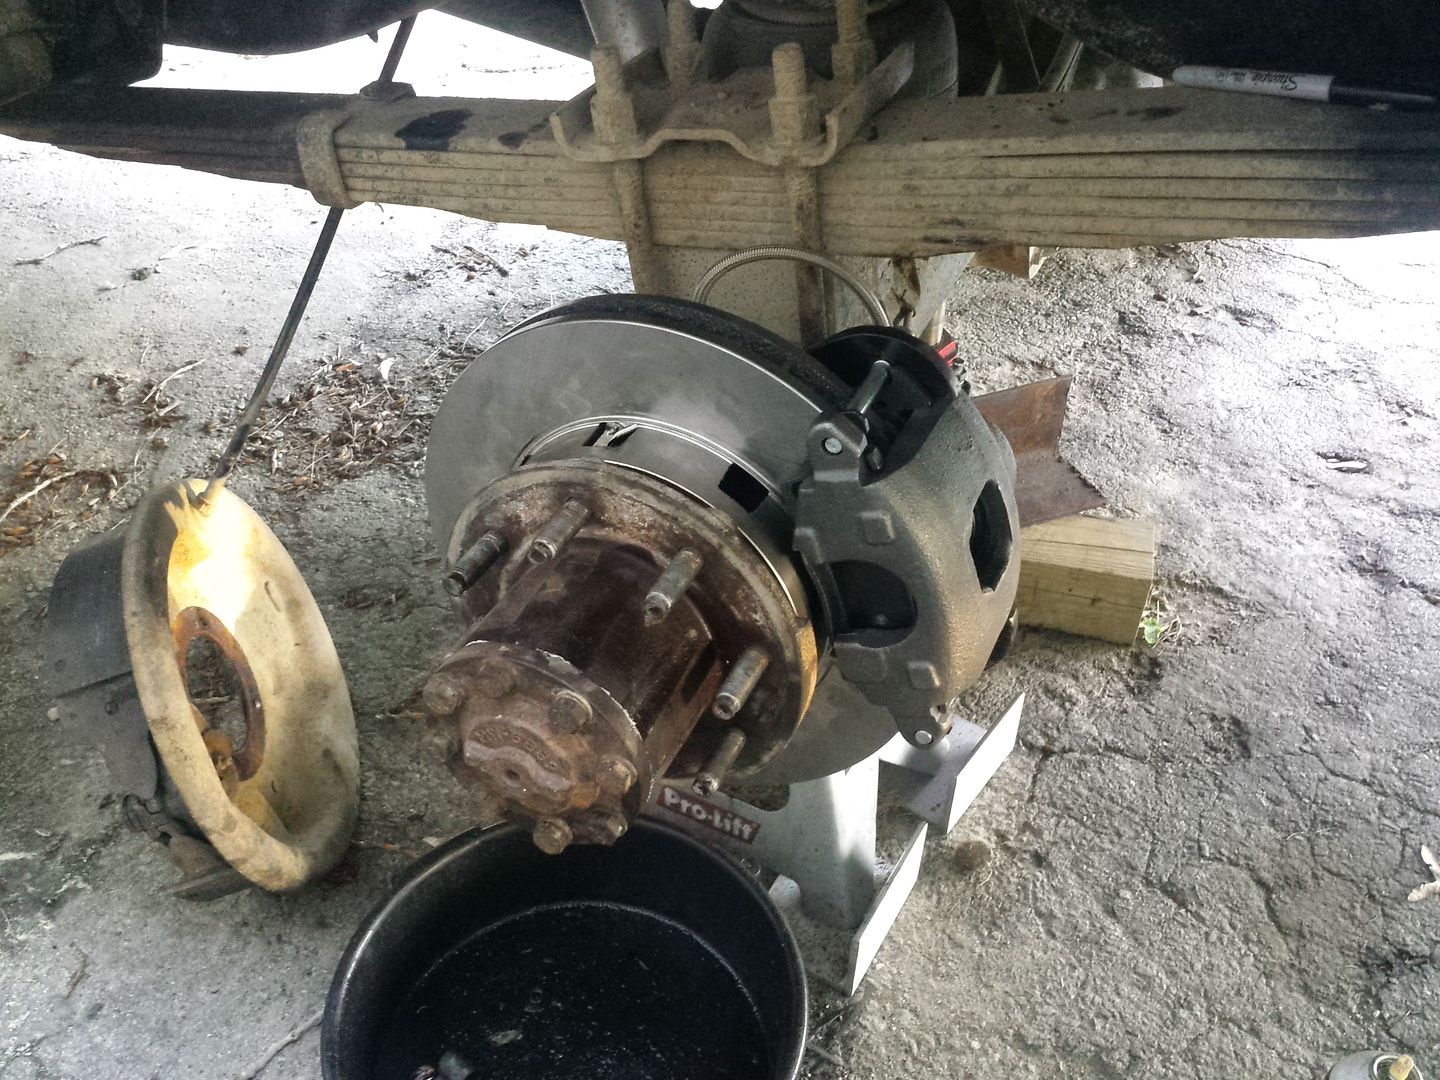
The hoses I went with are modular braided stainless units with AN-3 fittings on each end. I needed a 7/16" banjo on one end and a 3/16" (3/8 thread) conical on the other end, so this made the most sense. I went with 9" length units which have ended up being a bit on the short side for changing pads. I'll need to get some 12" hoses at some point so I can swap out pads without having to remove the brake hose.

The driver side went about the same except for a blown inner hub axle seal which I needed to swap out. The bearings all around seem to still be in good condition though the inner and outer races on both sides are showing a little "graying" which I suspect means I'll need to address them in the next couple years.


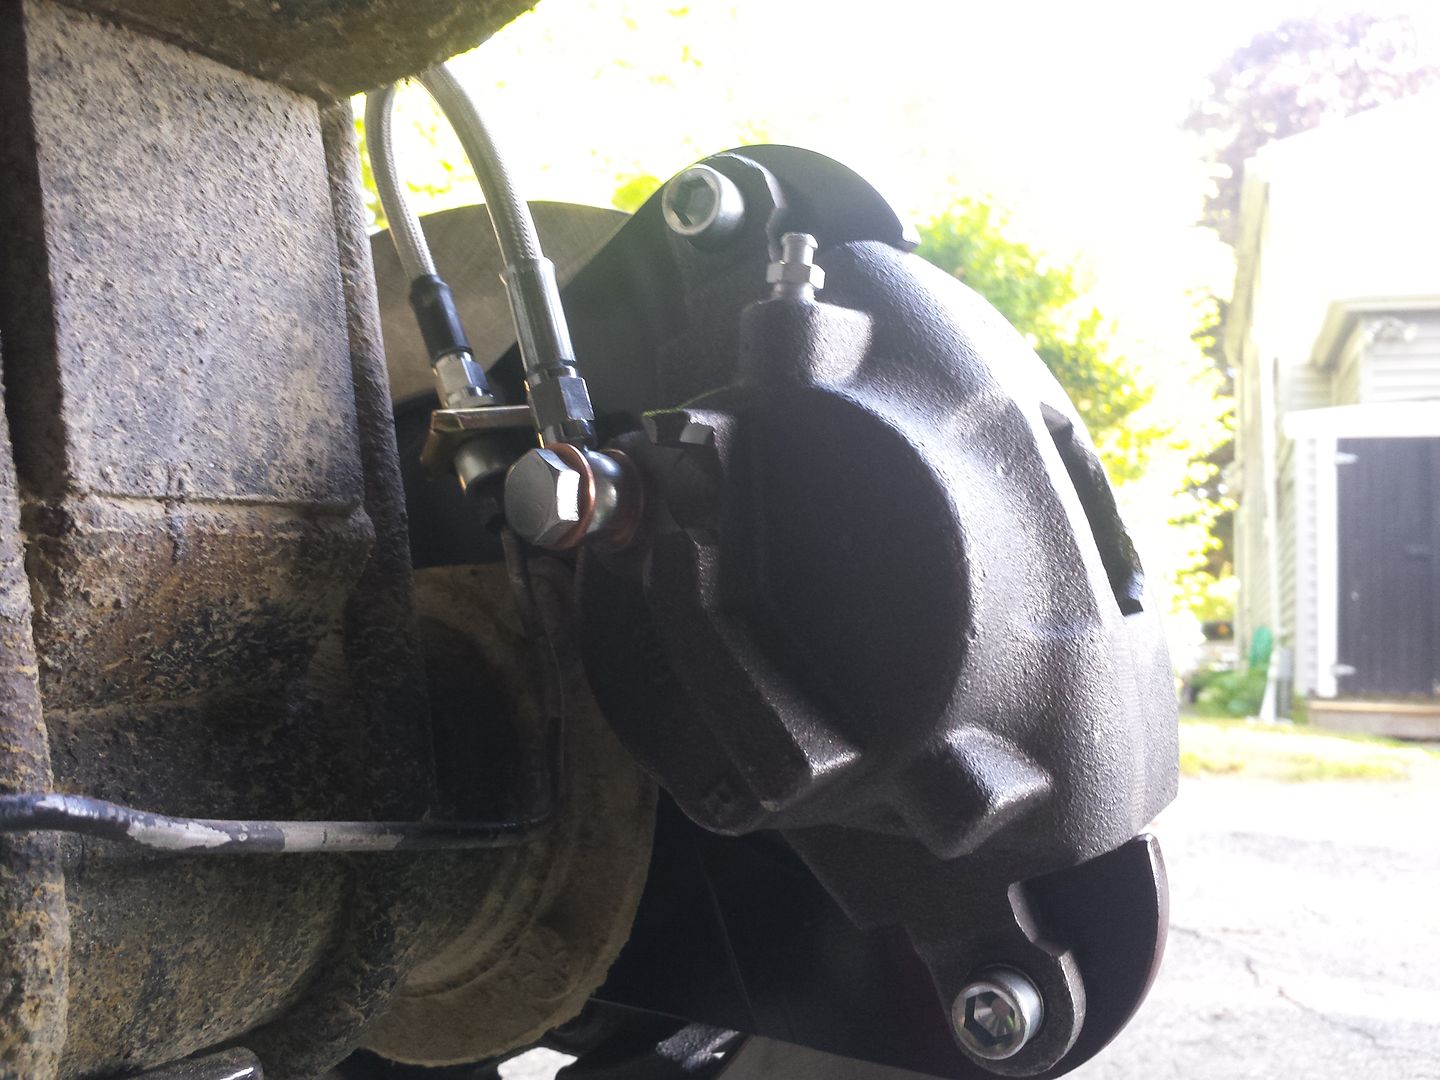
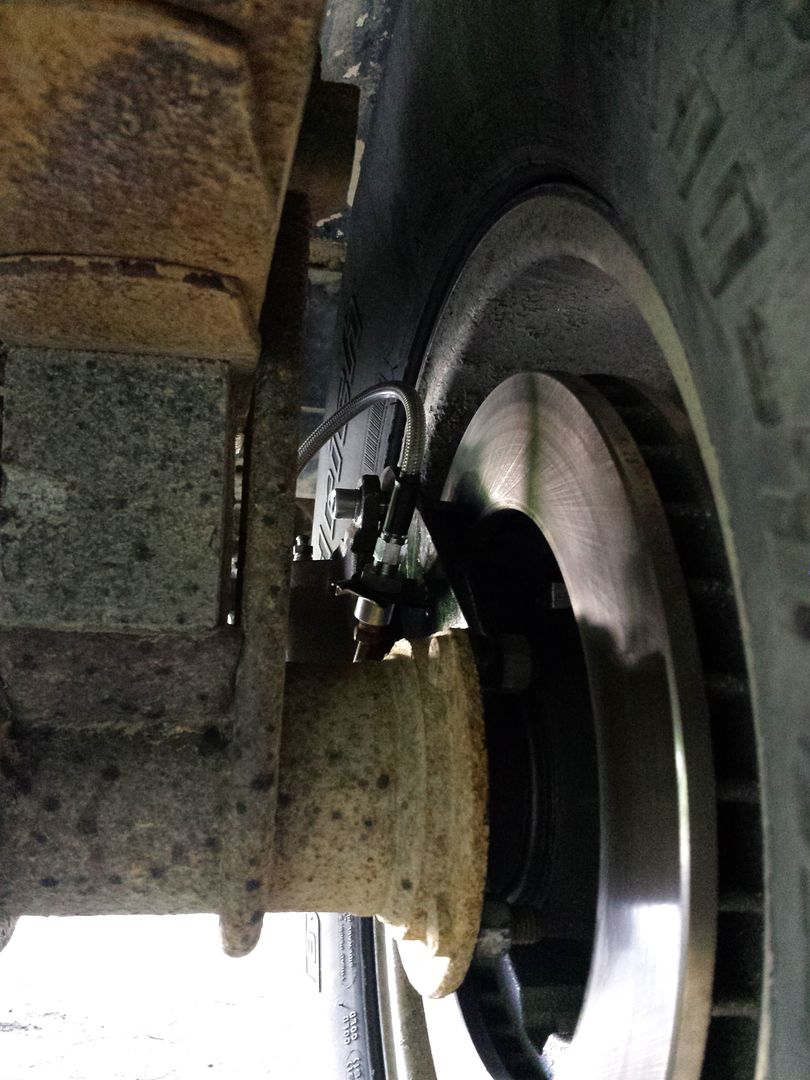
I was able to route the stock brake lines on the axle to their new locations on the caliper brackets without any problem. The axle to frame hose is also new so I could eliminate the stock load sensing rear bias valve (which hasn't actually been doing its job right for...ever?) and install the new proportional balance valve.


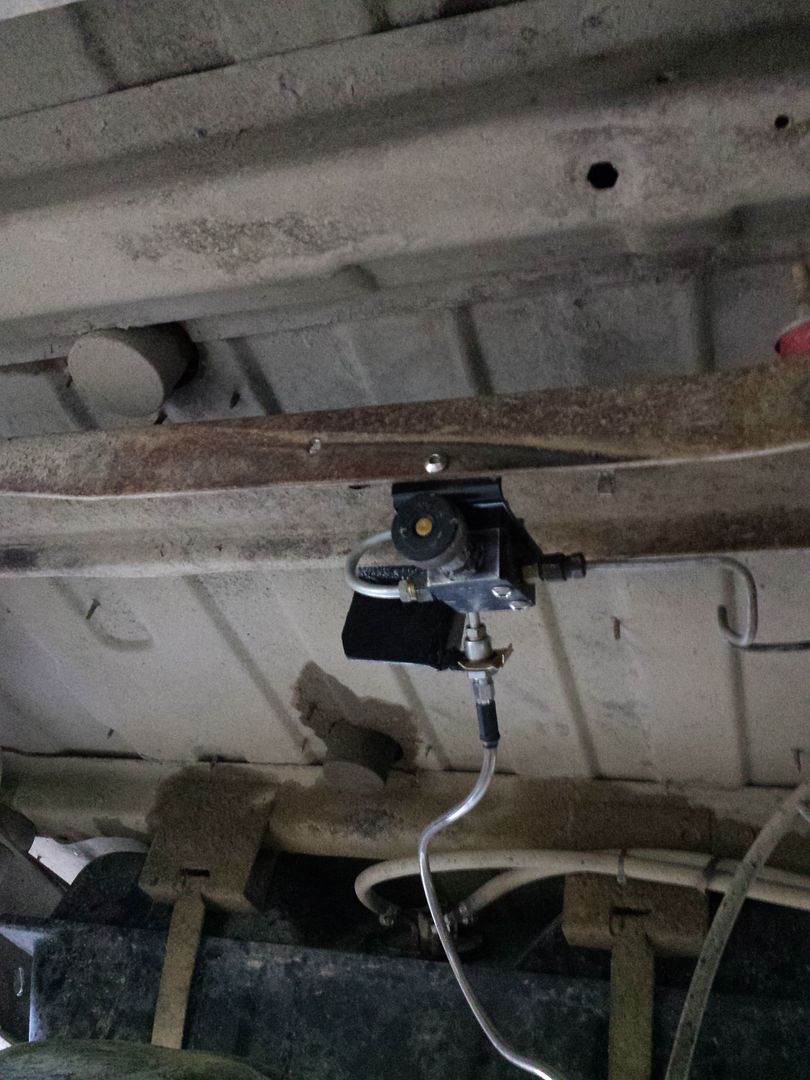
I put the valve back over the axle instead of next to the master cylinder mainly because there is no room for a clean install in the engine bay. This is a dirty location for the valve, but it is now set where I want it and I don't plan on adjusting it again any time soon. Everything is anchored so the brake lines themselves aren't experiencing any loading.

After a pretty intensive bleeding, the brakes feel firm and I'd say I've got maybe 10-15% better stopping power now with the stock master cylinder and booster. The new rear calipers do consume more fluid than the original drum slaves, so I do notice the pedal needing more travel for an equivalent brake response.

Phase 3 is likely to occur this week. I'm curious about whether the current master cylinder is actually a 1.125" bore unit. There were 3 available for the 1985 model year, a 1", 1.0625", and 1.125". The only one that SHOULD be installed is the 1.125 but I'm not sure I'm positive that this is the case. If the MC isn't 1.125 I'll replace it with one. If it is, I'll need to start searching for a 1.25" bore unit that can bolt up to my booster without much trouble and has a 3/8" front port and a 7/16" rear port. I know I can adapt if necessary but I'd like it to be a bolt in affair if at all possible.

I know the increase in bore size will drive up pedal effort, but I think a little more master cylinder diameter would be beneficial to overall brake feel.

After that is done and if I still feel the need for more brake response, we need to start talking about a hydroboost system. If I can avoid this I will since it adds complexity that I don't really want, but it is the last thing I can do before having to increase front rotor diameter. If I were to increase the front rotor diameter it would mean an all new tire and wheel package, so costs would clearly start going thru the roof.

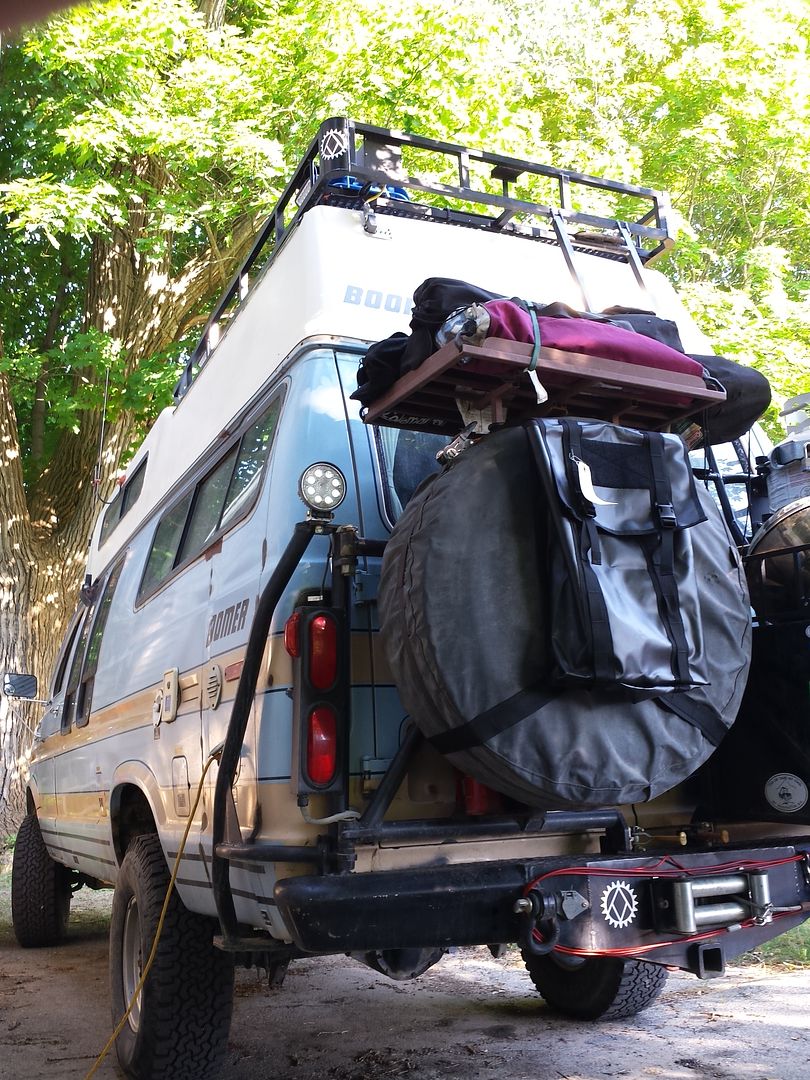
In other news, I just received a new bit of kit from Blue Ridge Overland Gear. This unit isn't commercially available quite yet but after traveling with Mountain State Overland last month I was able to get one from Matt who owns B.R.O.G. as a test unit. If you have never laid eyes on Blue Ridge stuff, you're really missing out. Everything is hand made and VERY well designed and built. This stuff is heirloom quality overland gear with prices that are totally affordable.

So Boomer has an awesome spare tire trash bag from them now which I love. Rubberized cloth with webbing loops all over it to attach whatever you want to the exterior. It also has a generous velcro loop patch on the flap for sticking your favorite patches to.


I'll be putting all these modifications and upgrades thru some paces on a trip up to the North Maine Woods in a couple weeks and will be reporting back how everything goes.

I need to start working on a positive pressure filtered cabin blower now....not exactly sure how this will go :)

SG
 
Last edited:

tgreening

Expedition Leader
I went through all this braking business years back on a Jeep I built. Factory booster and all that. First it was 33" tires and it was "ok". Then 37" tires it was not so ok. So called high performance pads and calipers and rotors and all that usual noise. Dual diaphragm booster, blah blah. I finally bit the the bullet and installed a hydroboost that came out of a Cadillac limo if I recall. First tap of the breaks about put me through the windshield I kid you not. Not properly adjusted. After I got that sorted I never looked back. One of the best mods I ever did to that Jeep and it'll probably end up happening on my Ambo at some point. Factory is doing "ok" (sound familiar?) but I wouldn't say the big beastie would stop with sufficient authority in a panic situation. Not to my liking anyway.

Besides other Ambo related projects to do, probably the biggest thing holding me back is just how much of a rat-bass-tard it is to do anything under the hood. :)
 

Mwilliamshs

Explorer
Hydroboost is a great solution but it's not a magic bullet. Go drive an Astro van. Most if not all of them have Hydroboost brakes. The parts are common for swapping onto other vehicles as upgrades. Their brakes are sufficient but not apt to alter the Earth's rotation should multiple GM minivans slam on their brakes at any given time. The keys are pressure and swept area. Speaking of swept area, according to RockAuto, a 1985 E-350 6.9 has 12 x 3 rear shoes and a 1980 K20 has a 12.5 front rotor so that's fine but 1 75mm piston per side is a lose IMO. It's 5:56 and I get of at 6 so I'm not gonna lay out all the math today but I really am surprised this swap works as well as you describe. The van wheel cylinders are under 6 bucks for new and 1-1/8" bore (28+ mm) and have two acting pistons moving two shoes much larger than the K20 pads onto a much larger surface further from the axle centerline. I know disc are upgrades from drums in every case in some minds but not in mine. Rear disc with front parts from a lower GVW vehicle seems like an uphill battle for an upgrade.
 
Last edited:

spencyg

This Space For Rent
I guess I forgot to mention that I despise drum brakes. I hate working on them. I hate not being able to see what's going on without having to remove the entire rear hub assembly (complete with bearings, axle nuts...everything) just to inspect the damn things. Then when something actually requires repair, the springs and spacers and retainers and those silly 90 degree turn locking pins. The devil himself invented drum brakes. No, they couldn't be more disliked on my end. Now, the math does suggest the drums should theoretically provide a higher braking force but I think the history of brake applications in cars over the last 50 years is evidence of a trend. The assumption that drum brakes are operating at near-peak efficiency isn't a good one either, as the minute the drums get contaminated or (in my case) historic, the auto adjusters no longer work. I've gone thousands of miles at a time without the rear brakes actually doing much of anything due to misadjustment. Disc brakes just work. And when they don't just work, you can clearly see pad thickness piston leaks, etc. I suspect in my particular case the addition of the aftermarket bias valve and all new brake hardware would have probably yielded a similar result in increased braking performance, but this is one of those things we will never really know. I just know I won't be looking back wishing I'd kept the sealed containers of mystery brake hardware. There is a new Dodge 1.25" brake master cylinder on the way along with some adapters to bring the M10 and M12 ports to 3/8 and 7/16 SAE. Hopefully it will be here for the weekend.

SG
 

tgreening

Expedition Leader
Drum brakes start to fall down when they see heavier use. Everything is encased inside that steel drum with no where for the heat to go. In standard use they're probably better at braking than a standard disk system. But disks hold up better under heavier use because they can shed the heat better, and will clean themselves up in the mud a whole bunch better than drum brakes.

Disks/drums, just like everything have their good and bad points.
 

spencyg

This Space For Rent
... E-Brake?

No e-brake yet. I'm going to get one installed on the driveshaft output at the T-Case before too long using just a small ~8" rotor and a mechanical caliper. I could have gone with Cadillac Eldorado calipers from the late 70's but it seems as though people tend to not like them due to the finicky adjustments between the hydraulic and mechanical actuation of a common brake pad. I'm all for trying new things and thinking for myself, but I also pay attention when multiple others have tried and gone a different direction.

As TG alluded, heat is a big enemy when trying to stop Boomer. 12.5" discs up front have been doing a majority of the braking work and I often can smell the brakes after a long downhill or a hard stop. I'm going to be getting Hawk Performance pads for the rear calipers with the hope that heat induced fade will be a thing of the past. It has all but gone away already with the front Hawk pads, so adding them to the rear should close out that issue. I'm really interested to see how a slight bump in master cylinder size affects brake pedal feel and response. I know I'll be cutting my overall available pressure envelope with an increase in bore size, but right now I can set the brake pedal on the floor with the vacuum boost engaged in a panic situation, so I think I have more available force than I have travel. Hopefully this new MC will be a balance between the two.

SG
 

spencyg

This Space For Rent
Master Cylinder Upgrade

Phase 3.

Really for as long as I can remember, the brake pedal on Boomer has always engaged deep in the throw. I have bled it countless times with the same end result. With the old brakes, it would never get to the floor, but in a panic situation you did wonder whether the hard stop you were feeling was "full brakes" or "full carpet". With the addition of the rear calipers this situation did not improve, in fact it got a bit worse.

I started looking around for alternatives. From the factory the largest bore master cylinder is a 1.125" bore unit. I wasn't convinced I had this master cylinder actually installed, but technically the 1 ton E350 was supposed to come with it. The next step up from a "factory standard" standpoint would be a 1.25" bore master, but no such beast exists as a bolt in option for the '85 E350 chassis.

I hit Google pretty hard for a few afternoons and came across Jeep guys who were swapping in early 80's E350 master cylinders into their mid-late 80's Jeeps after axle swaps and the like. From all accounts, the E350 master swapped "right in". Further searching came across other master cylinders that swapped "right in", so it seemed reasonable to assume that if one master cylinder bolted up to a Jeep, and another master cylinder bolted up to that same Jeep, that both of those would also bolt up to my van.

The master that was most interesting was a 1.25" bore MC from a 2000 Dodge 2500 with rear disc brakes. This master didn't have any residual pressure valve built in and is the correct bore diameter. Strangely, NOBODY advertises the pilot diameter or the mounting hole bolt circle spacing, so I just needed to try it.

The unit arrived and looked noticeably larger. A quick check with the digital calipers yielded the following:

1985 E350 Master Cylinder
-Pilot Diameter (what sticks into the booster): 1.600"
-Pilot Depth : 0.620"
-Mounting Hole Diameter: 0.400"
-Mounting Hole Spacing: 3.395"
-Primary Port: 3/8-24 Inverted Cone
-Secondary Port: 7/16-24 Inverted Cone

2000 Dodge 3/4"
-Pilot Diameter: 1.580"
-Pilot Depth: 0.650"
-Mounting Hole Diameter: 0.416"
-Mounting Hole Spacing: 3.196"
-Primary Port: M10-1 Bubble
-Secondary Port: M12-1 Bubble

I wasn't super thrilled with this as I'd need to modify the new MC for the correct mounting hole spacing and I'd need to install new ends on my brake lines up to the MC. I made one more trip to Napa to try a 2000 F150 MC and that was actually worse (and cost 2x as much). So instead of spending more money on a different MC, I bought a baller pro grade Double Flare / Bubble flare kit.

Once back at the shop I widened the new MC mounting hole spacing 0.10" on each side with the mill.


Old Vs New. I really like the new reservoir arrangement as well. The old one was a total PITA.

With the MC now able to bolt up, I cleaned up the booster and adjusted the pushrod to 0.030" clearance. I ended up having to machine the nose of the pushrod about 0.030" back because I couldn't adjust it back far enough. I also had to cut the pushrod threads maybe 1/4" because it also was bottoming on the female threaded portion of the booster. Not much space to work in there!


With that sorted I tried out my new bubble flare kit. At Napa I also picked up the appropriate fittings (M10 and M12) to connect my 3/16" brake lines to the new MC. It ended up working extremely well. I did find that lubing the die and the "press" threads made for a much smoother process.


With that, I installed the booster and "bench bled" it installed right in the van. Everything was nice and level in its' installed orientation, so bleeding the MC was pretty easy. It was a little messy unhooking the MC bleeding hoses and installing the brake lines (fluid dripping the whole time), but eventually I got it. Everything sealed up beautifully and looks nearly factory.


I have not had a chance to fully bleed the system yet, but even without bleeding the lines the pedal feels amazing. With the engine running I now have maybe 3/8-1/2 throw of the pedal for full panic brake and I can feel the brakes engage right as I step on it. I have only gone back and forth in the driveway so far, but I can already tell this new MC may be the missing link with the disc brake swap. I don't have an opinion yet on braking performance under way and will report that back as soon as I finish bleeding the system. Overall I'm very excited about this mod and feel as though going full hydroboost may not be necessary.

If it does end up being necessary, the 2000 Dodge 3/4 ton came with hydroboost, so this MC will bolt right up to an eventual hydraulic booster without further modification. I did widen the mounting holes to mate with the E350 booster, but it should still bolt up to its intended booster without any issue.

All in all, good stuff.

SG
 

Bikersmurf

Expedition Leader
:D

I'm a big fan of 4discs. I've got an Fj40 with 4discs, and now a 80 series master & booster from a 4disc setup. OMG does it stop easily without any effort. The original drums lasted two years after a full rebuild... The discs I replaced them with 19 years and 95,000 miles with almost no maintenance.

I hope you're able to reach this level of performance with Boomer... Or even close would suffice... Being able to lock all 4discs at 30 mph with finger pressure is almost too well :D
 

spencyg

This Space For Rent
The flare set is a Napa Pro brand with the typical SAE and Metric tube clamps, dies for Double Flare and Bubble and the "screw auger". I don't do it enough to justify the Mastercool type setup and this one seems to work just fine, even if it takes a few more minutes per flare.

My porch light which I installed maybe 6 or 7 years ago has been slowly giving up the ghost. Some of the LED's are dead and I could clearly see water ingress thru the now cloudy lens. I did a little searching for a replacement and didn't see anything that I thought would work better than what I already have. I did find a really cool combination white/red light bar on ebay but it didn't look like it could hold up over time. Unfortunately, there weren't any alternatives so I went ahead and ordered it with the intention of building a housing around it to turn it into something I could use.

The light bar arrived and after the brake project it was time to dig in. The idea was to fabricate an aluminum housing that positioned the light bar down toward the ground, both making the light more useful as well as protecting the array from weather and trail damage.

It started here.


After a bit of goofing around I ended up here...


and here..


The aluminum was painted with Rustoleum aluminum primer and semi gloss professional paint and mounted in place of the old porch light, bedded in silicone.


I had to run an additional wire to power up the red lights, and I designed and printed a switch plate to house the interior switches for both the white and red lights.


My poor old cabinets are showing their years....various configurations abandoned, leaving only screw holes as evidence. A new interior is coming very soon.


The red lights should keep the bugs away if they start collecting at night. This new light bar puts out probably 5x more white light than the last one, and it is directed down which is far less "intrusive" to other campers who may be in the area. The housing is very rugged and the light bar is entirely protected from any weather from the top and sides. Pretty cool outcome.

Next up, cabin pressure system.

SG
 

Forum statistics

Threads
185,908
Messages
2,879,441
Members
225,497
Latest member
WonaWarrior
Top