2001 Dodge Ram 2500 Cummins - Questions/Slow Build

rawlk

Observer
Shell Painted!

Another (sorta late) update... I did say its a slow build after all. Lots lined up, but its hard getting some of this stuff done when you now live in an apartment in the bay area and don't have access to the shop you once did back in OK :/ (also, my apartment doesn't allow 'automotive maintenance' in it's garage sooooo I've been avoiding doing anything during peak hours :) )


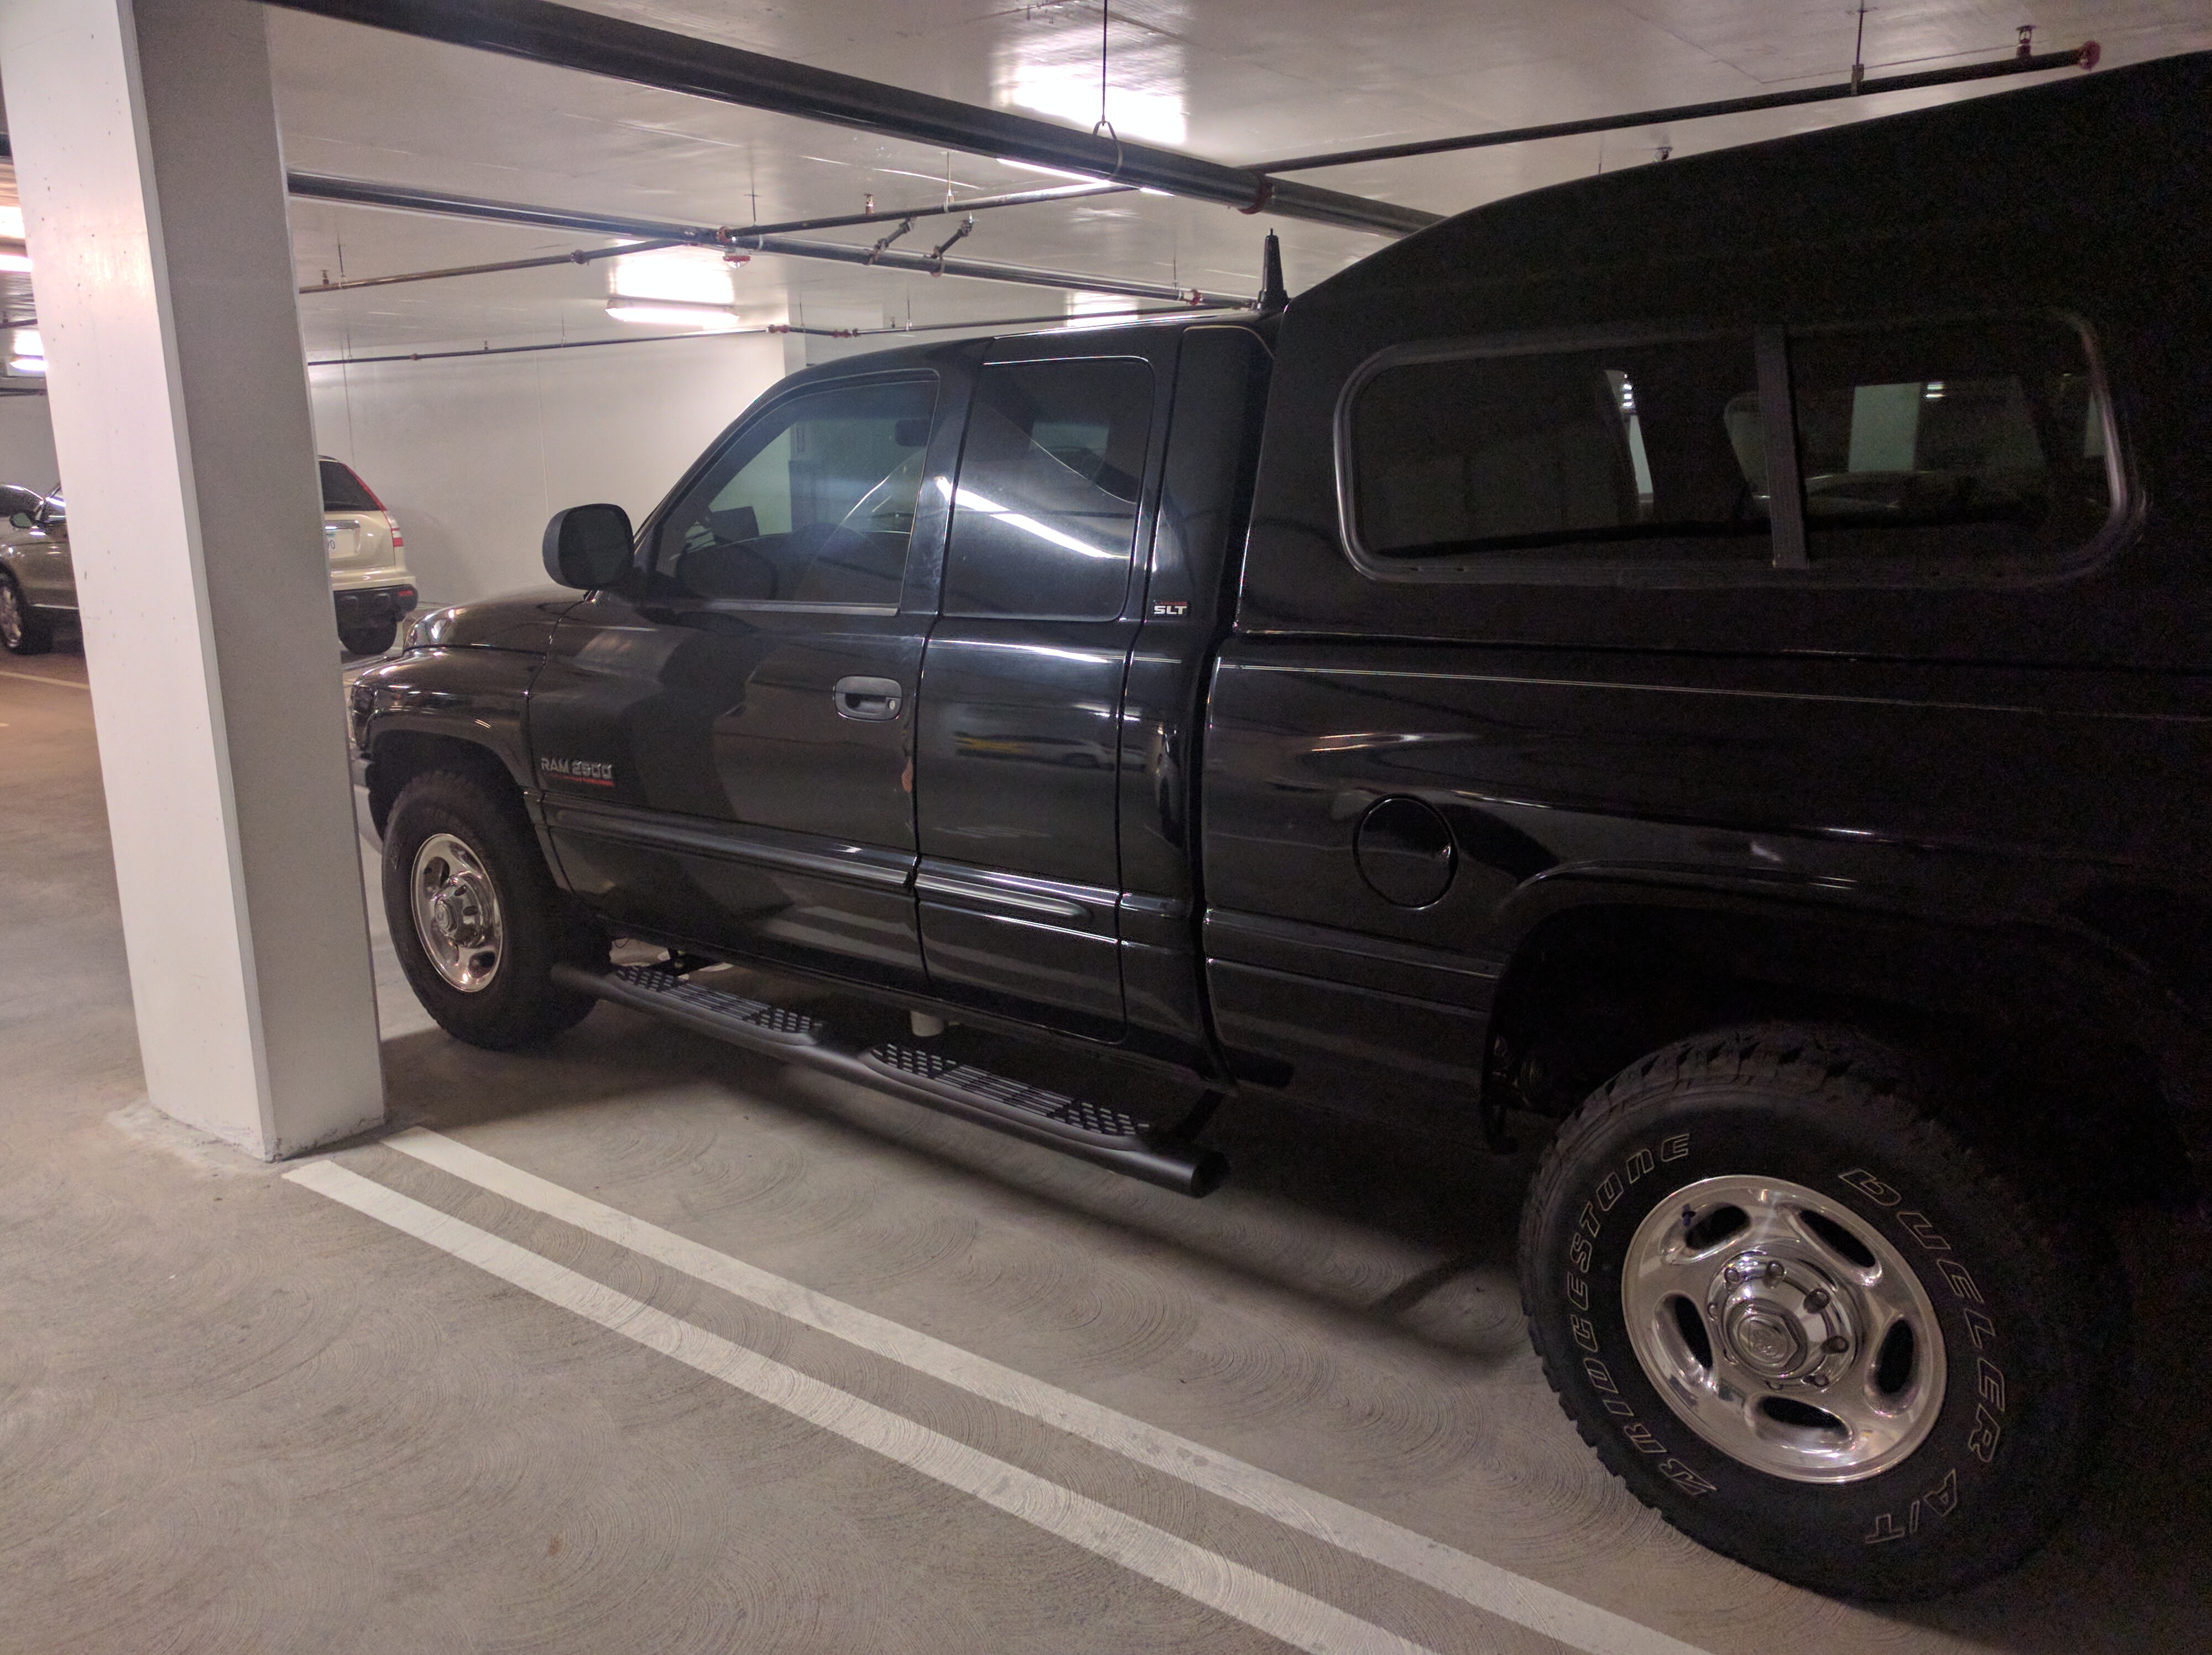
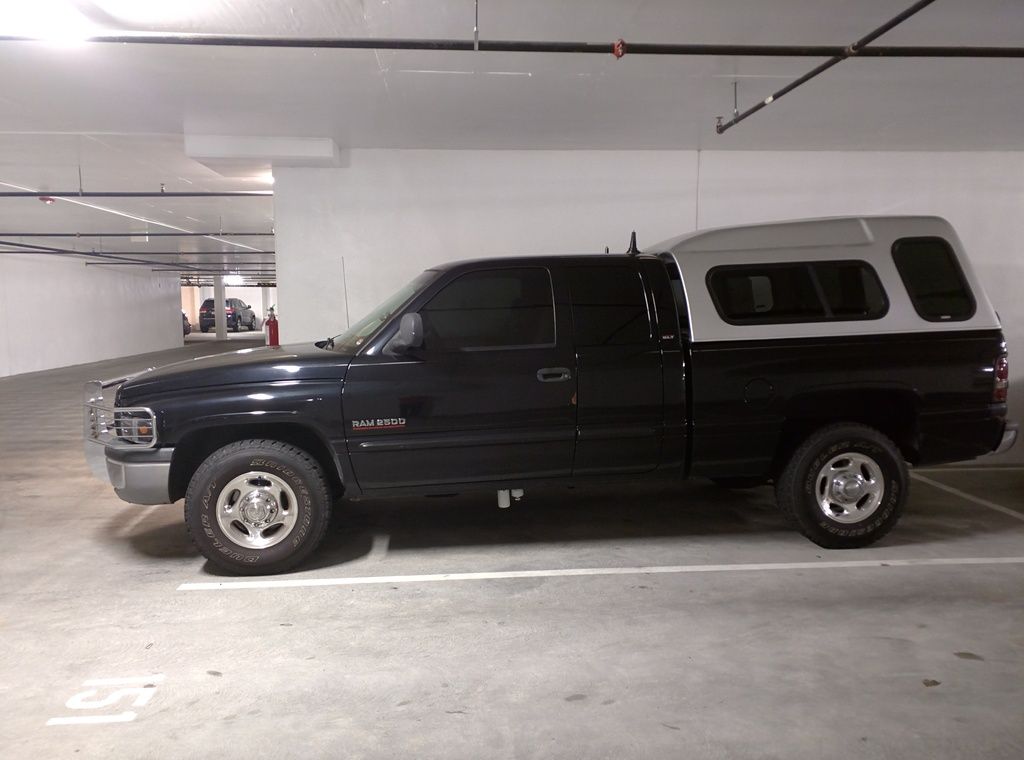
My first truck was a little black nissan and it had a 'super nice', matching, leer camper shell. The truck was ALL black and I got pretty used to it. When I got this one, that was a bit of a helping factor for that decision.
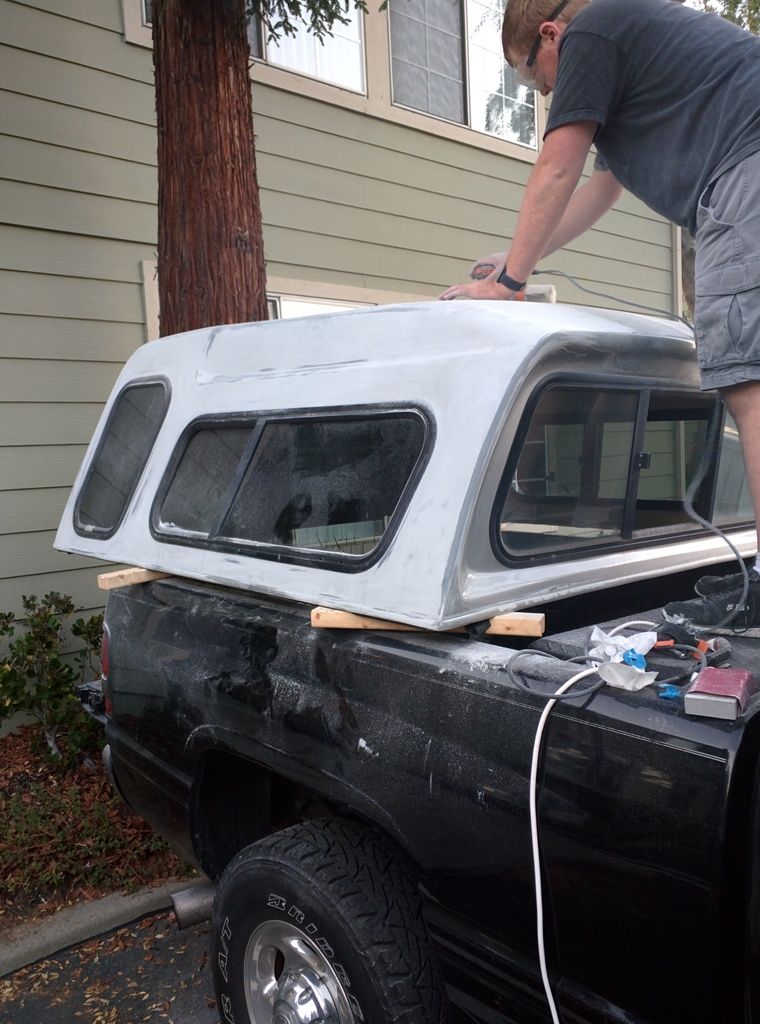
- - So, this is my truck + camper shell as of a few weeks ago. Nothing too crazy but i'm not super thrilled about the color of the shell... Mind you, i paid uner $200 for the thing, so I also wasn't interested in paying a lot for a terrific paint job (it doesn't even properly fit this generation truck...)


Luckily I had a couple friends who were willing to test their relationship with their landlord :p We hit up craigslist for a pretty decent rigid sander and some paper from home depot and got to work.


We made a pretty huge mess... this pic hardly puts it into perspective. After 2 days of sanding, we easily had enough dust that we were leaving foot prints in their parking lot. woops 0:D


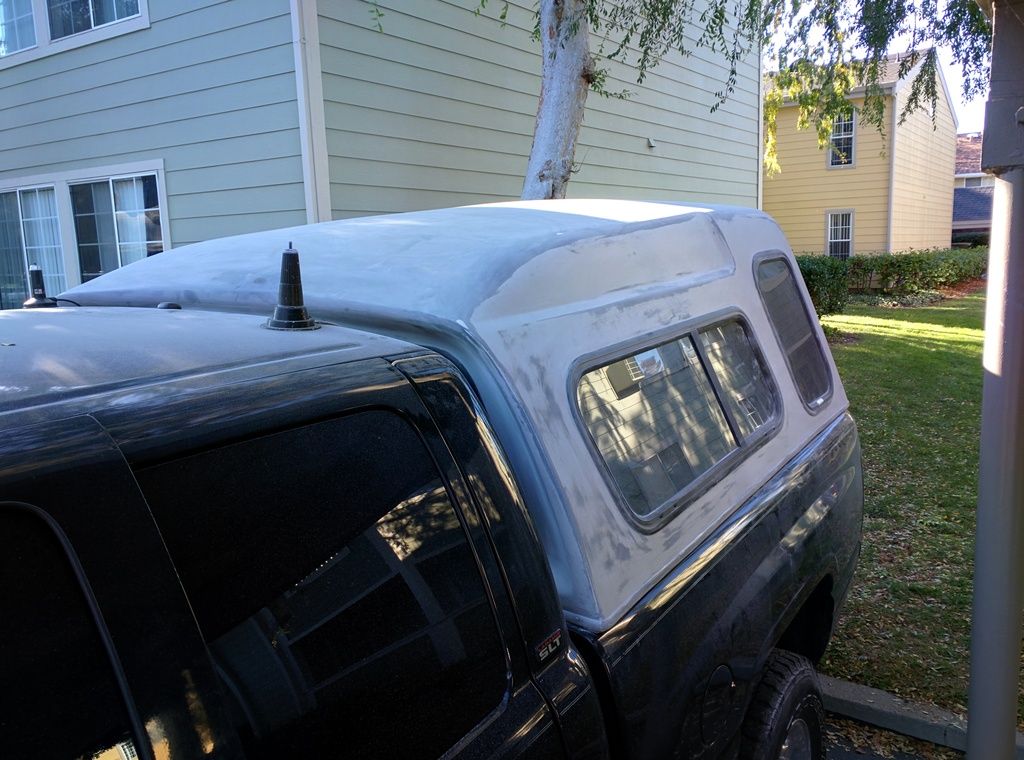
From this point, it was shaping up pretty well. In hindsight, I really should have spent more time with the 220+ paper on the sides by the windows, I left some pretty visible sanding marks that ended up showing through :( (I'd like to pass the blame on to the paint guy that said it shouldn't show... but I just didn't invest the time I should have and I was too excited to see it painted) . I had done a bit of research in the weeks leading up and called up several shops, but the quotes I was getting were far higher than I wanted to pay for a 2nd(+) hand camper shell that doesn't really fit. A new Leer 122 starts around 1,800 and that is what I was getting for quotes to paint it *facepalm*. BUT, after talking a bit to a couple guys at Maaco, we decided they would do JUST the painting for ~$200. Now I doubt thats a normal price, but hey... should be fine, right? . I've heard several horror stories about Maaco, but I was willing to take the risk.


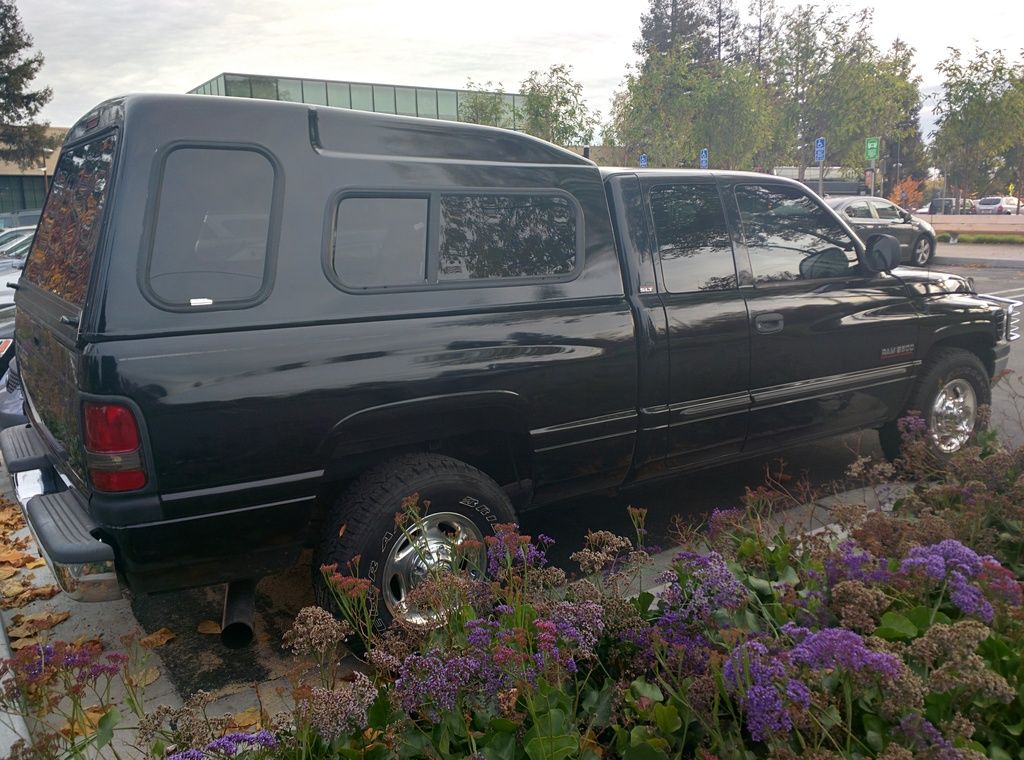
Lowe and behold, it came out quite well. for a ~$200 paint job, I'd said it look pretty damn good, aleast from +10ft


- for those curious, they did end up matching my truck's factory paint pretty well, though the painter REALLY wanted to paint my entire truck (there might be a few spots of rust and cracks in the paint all over the roof and hood) . Its a single stage paint, but should last well enough since it spends a majority of its time anymore, underground.
 
Last edited:

tyler.96

Observer
I like the black instead of the silver. :p Wonder if that'll make the inside of the bed any hotter in the summer.
Did you finish your OBA install?
 

rawlk

Observer
OBA Install & problem

Oye! I don't think I mentioned anything about actually DOING an OBA install... nevertheless, its in progress :) Several weeks ago I made a couple questionable craigslist purchases. I ended up with a Viair 380c. Along in the deal I somehow also picked up a 37" Grover air horn and a tank that looks suspiciously like a ~4gal version of the 2.5gal Viair.


Just about everyone on here has their own special way of mounting and controlling their on board air. I opted to try and keep it relatively simple. For the time being, I'll have it always on and tied simply to 12v 'acc' and a viair pressure switch. Since the compressor is rated to 200 psi and the tank is totally unknown, I opted to keep it relatively conservative with a top out of 150psi and a pressure relief at 175psi; I expect the tank could do more, but why push the luck ehh?

For mounting, just about everyone I've seen has found some clever way to hide it away in the engine bay. Now this does have two fantastic benefits of: 1. keeping the air intake clean; and 2. keeping the power run nice and short. I could not, unfortunately, find a good way to do the same. Instead, I decided to mount it to the frame rail just ahead of the airdog lift pump from the previous posts.

I'm away from the shop (1,700 miles away:( ) so I don't have any clean way to make a nice proper mount for it. I found some pretty fantastic metal bands available (yet again) on amazon. I would HIGHLY recommend anyone to pick up one of these for emergencies. Essentially, you decide about how long of a metal band you need, and lop it off of the spool. Then, affix the ends and voila, you have a super strong, adjustable, steel band clamp you can use for mounting things, affixing things, or reattaching that semi-important radiator hose. I was a bit concerned about them holding (I used two) but after 2 weeks of daily driving, they have yet to loosen up at all.


Once mounted, I added the electrical with some (apparently spotty) 8awg wire and a 100amp thermal breaker. I picked up the 8awg from amazon and some fantastic ring connectors from O'Reillys to simply wire it in to the 'main' battery terminal. I am taking suggestions on how to clean this up.. it works, but its not the prettiest thing in the world.


All said and done and it sorta works. It does fire up, but it seems that either the 8awg isn't quite as good as it is supposed to be for the run (<5ft) or the relay can't actually handle ~40amp or some of my connectors are sub-par since the pump looses all of its spunk and lags really hard. Haven't had the time yet to sufficiently diagnose but I'll probably end up swapping out the cables for some 4awg stripped jumper cables or something. Something for the next post I suppose!

The tank's final location is still tbd since I'm not sure where I can tuck it up in to and keep it out of the way. The Air horns, I expect I'll be mounting next weekend. 37" of a horn is a quite a bit of chrome to go hiding places, so the best place I've found is next to the frame rail on the passenger's side. We'll see I suppose :) I'm thinking it will be put to pretty good use :smiley_drive:

- Here are a LOT more pictures and I'll be updating that directly. Videos included! -> Google Photo Album
 

rawlk

Observer
LED Lamps &amp; OBA 'Finishing up'

Back in December I was given as set of led lights. These lights aren't anything terribly special; they're the most basic run-of-the-mill outdoor rated led lamps. Had to first start with a dry-fit (Luckily when I got the brush guard they already had aux light mount points :D )


Originally, I was going to run new cable and put in a switch panel. Ultimately, I'd still like to do that, but I'm still not super keen on cutting a hole into my dash :/ Maybe some day.


After I got the lengths of wire I needed, I removed the lamps and brought them back upstairs. We got the soldering iron, solder, lighter, wirecutters, shrink tubing and all those other tools dug out of my tool bag and spread out on the kitchen counter (good thing roomate wasn't home). We cut the wires to length, did some a real quick and dirty splicing and sealed them up with some shrink tubing. Then back to the basement garage to re-install. By this time I decided that I'd simply use the fog lamp circuit. The fog lamps are right there (lower bumper, yellow things) so they were convenient to get to. Lopped the fog lights off and spliced in the new lights. Simple enough.


So far I'm pretty happy with them. I think we'll take them out to a dark part of town tonight to see how much they really help. We'll see :)


A bit before this I went on an investigation spree to try and get the compressor working properly. Well I finally have good news. FINALLY figured it out and i'm not sure why I didn't try and fix it earlier. I'm pretty certain these are the original battery terminal connectors. Over the years and the servicing the lead connectors are a bit... warped. Fully compressed down on the tightening nuts and the connector is still relatively loose on the posts. Pulled both batteries off and got to work with a hammer, file and hacksaw :p - After pounding out the steel bolt used for clamping I opened up the 'compression area' with the saw. Being lead (as far as I can tell) it worked QUITE well.


Used the file to clean up the rest of the corrosion and junk on the terminals. lucky me, that seemed to work. Truck's start is even a lot more spunky (GFF).

Same day decided that I'd get the horn mounted. Instead of putting it under the passenger's side like I had intended, I just tossed it in the fender area infront of the driver's side rear wheel just behind the airdog and compressor. Tucked up out of the way and superbly easy to get to. Might be worthwhile getting a debris shield for it though if I can find one. AND, to make it super easy and since I haven't put in the switch panel yet, I just tapped into the main horn's line. works pretty well.


- Quick edit
I fixed a few of the leaks that I had mentioned previously... some was simply tightening/retaping things but one major set of leaks was on the tank. I was using a set of cast iron plugs to seal up the tank (since lowes and home depot didn't haven any brass). Ordered a set of brass ones on amazon (brass is a lot softer than the stainless tank so it'll deform a bit to help seal) and got them swapped in. World of difference.


- - Also, yep, I do certainly realize that most everyone on this forum is far more tech savvy than I. I'll continue to write this way :)
 
Last edited:

tyler.96

Observer
Glad you got the compressor working well. I still need to figure out what all fittings and all I need to get to put mine together. Wish I had factory fog lights to tie into. :p Lights look good though!
 

rawlk

Observer
Got a Trailer! and preliminary designs for a deck/drawers

I DID say it was going to be a slow build...

I have some plans that I drew up for a back slide deck+storage boxes that I think is going to happen. I'll make it mostly out of 1/2" and/or 5/8" ply with the intent of carpeting it when it's all said in done. That should give me a bit of wiggle room for not making it have to look perfect on the first go :p

I really like the look and functionality of this one, so I may have stolen some inspiration from there. I do not yet have a fridge, so the main thing for me is simply storage space and room for expansion later but still being able to haul stuff around.

dodge-truck-box-v1.png


The far front/back/towards-the-cab of the box will be room for an aux battery + electronics like a raspberry pi, relays, charge controller, inverter etc + air tank. each of the four corners will have boxes to stow other things that I wont need often (chains, liquids, etc). The hope is to do this in a build-sprint around christmas time since I don't have much in the way of resources out here to get this done by myself.

I also purchased a semi-questionable set of nerf bars from Amazon. I'll get those installed next week. Hopefully they'll fit nicely :D


In other news, I picked up one of the oh so popular M101A2 trailers off of craigslist. It seems to be in superb shape with nearly zero rust. The vinyl (not canvas) cover is practically new, only a few small holes where it creases in the corners but otherwise seems to hold out water just fine. At the moment I'm going to use it simply as a heavy duty cargo trailer for my future move back to Oklahoma. In the future though, I'd love to build it out into something closer to what others have done.

trailer-original-150_blur_half.jpg


It is very obviously running very nose-low on this pickup. My Dodge runs several inches higher, we'll see later how much of a lift I'll need to put on the hitch. Speaking of hitches, it has the standard-issue pintle hitch. A LOT of the builds i've seen with this trailer end up swapping the hitch for something else, like a MAX coupler or something. I assume that is mostly for the noise? The lunett on this trailer doesn't pivot so it COULD bind if I got into something super steep, but I doubt I'll ever reach it.

Either way, I'm looking forward to getting to test around on it
trailer-original-back-couple_quarter.jpg


If anyone else is looking for M101 threads, I'm going to keep this list relatively updated:
expeditionportal.com/.../Serenity - My current favorite, though I'm not sure I'd want a permanent shell
expeditionportal.com/.../M101A2 Purchase & Project - Nice build, a few trailers actually, matching paint with the FJ
expeditionportal.com/.../Military Family Hauler - REALLY like the 2" receiver's scattered about for things like a table, umbrella etc. makes for easy tailgating!
expeditionportal.com/.../Pikeman's M101A2 Slow build - Basic-ish build/conversion with lots of progress pics
 
Last edited:

chilliwak

Expedition Leader
Cool:Wow1: looking trialer Rawik. It looks like it has enough clearance to handle trails easily. I am looking forward to see what you do with it. Cheers, Chilli...:)
 

rawlk

Observer
Nerf Bars, Front Shocks and Ball Joints!

Well, I had a bit of a spurt of productivity. Lots of additions/changes so I'll break it out into a couple posts.

First up, Nerf Bars! - Wayyy back when I started this thread and got the truck, I wanted to add some steps. Michael/mib1392 gave me a set of steps a while back. After a lot of trouble and holding up where I thought they'd go, I caved; I just couldn't do it. The bars just didn't have any mount points I could use, not without access to a shop atleast. SO, I hit up amazon and got these cheap-o bars. After an hour or so in a parking lot, I had a set of pretty decent looking nerf bars!


Second, New shocks!
These weren't at all on my to-do list but mistakes were made and I needed a new set :confused: . Myself and a coworker put the front up on the jack to take a look at what it would take to replace the front ball joints. When lowering it back down.. well, the jack is a bit more sensitive than was expected and it came down hard.

I'm not an automotive expert, but I dont think that foamy oil is supposed to leave the yellow thing!
Shipping from tirerack was super quick and I had the new ones on in 2 days.
- Promptly added and the crossed off "new shocks" from the todo list :D


Lastly (for this post), the ball joints.
MY LORDY, the squeak was real. Ever since I got the truck (evidence by #15 ) It has had a pretty bad and annoying front end squeak. I lube'd up everything that had a port and sprayed down everything else but nothing helped. It was just one of those "fixed by turning up the radio" type problems. While I had it at a local shop for a potential AC leak, I asked them to take a quick look. 15 minutes later and a whole lot of bouncing on the front end he decided that all 4 ball joints up front needed replacing. "Great, how much?" yeah, wrong question o.o. I'm not exactly one that will pay $1,400 to fix a squeak!
... however, MOOG parts from amazon for $300 I can certainly do!
- I definitely lucked out with this one. The 2wd ball joints aren't pressed in like the 4wd so nothing special was needed.

When the shocks went on, the new ball joints did too!


The ride is SO much better and the squeak is totally gone. The truck is practically silent.... pardon the engine noise and whatnot...

Next post, New Lamps!
 

rawlk

Observer
ALL the lights

Ok, maybe not ALL of the lights, but a couple.

I just finished two crazy long drives. This post and the next one took place after the first, but before the second. On my way from California back to Oklahoma, I managed to loose the driver's side headlight. I actually hadn't noticed until a trucker called me up on the cb. Nevertheless, before I was going to drive back to california, I wanted to swap it out for a replacement.

The previous owner replaced the stock lights and reflectors with an HID kit. They looked great so I was rather fond of keeping HID's. Unfortunately, auto parts stores around home had no idea what I had in my hand when I walked in with the ballast/brick and the light. :( After a fair bit of research I decided on the Kensun HID kit on amazon. For $70 delivered in 2 days right next to christmas and a 4.5 rating with a staggering amount of reviews, I was sold.


On my drive out to oklahoma I passed through the northern tip of Mojave. That's approximately where I realized that the 18w flood lamps + my headlights really did nothing against the desert night when it's raining. I couldn't see squat. I can say that I've been through Mojave now, which is cool; just wish I could have seen it! ;P When ordering the headlights, I picked up a Senlips 180w 28" bar to replace the little cubes.


While back at the shop, got the new lights installed. Theres not a whole lot to say about them. The bar is quick and painless to install, its COMPLETELY unbranded (seriously, couldn't find a logo anywhere) and will pop a 15a fuse. Go figure, should have checked... 180W @12v is exactly 15amps. The headlights were a bit more of a pain to install. Instead of the dual xeon/halogen stack I opted for a bi-xenon kit which made the wiring harness a bit strange. My one main complaint about this kit was the wiring harness. The bridge between the two lamps was a bit too short. Instead of running it down along the fog lamp wires, I had to run it up on top of the radiator along side the battery cable. Not a biggie, but its not as clean as I would have liked.


New lights don't look too bad! Could have gone for a slightly larger light bar, but I think it fits nicely for now :)

Next post, STORAGE!
 

rawlk

Observer
STORAGE :D

Having a camper shell on the back of your truck is awesome. You can toss anything into the back and not really have to worry about theft or it getting wet or anything. I've always carried a toolbox of some caliber in the back. Super great to have, but with Bolton I got a large toolbox. One of those "I can carry anything you want and you'll never see it again because its buried under all the other junk you thrown in there" type toolboxes. Its perfect for exactly that, but getting into it requires hopping up inside and its just generally inconvenient.

I posted up this picture of my design that I wanted, but didn't get to work on it until just recently. The final design was pretty close to that drawing, but not exactly. The main difference was modularity. This beast that we ended up with is NOT going anywhere, its here to stay. That being said, the amount of clean and easy storage is incredible. 2 almost full length heavy duty drawers, cubbies along both sides and a large hatched and hidden box at the front for batteries, air tank, electronics etc.

I apologize in advance, this particular page of the build thread is already photo heavy and its about to get a LOT worse.

To make things simple, it was decided to use 3/4 ply for the entire thing. Yes, this does mean its quite heavy, but it also means its stupid strong and you can pocket drill everything :D The sliders were something I debated about for a while. Real sliders for this deep cost an arm and a leg as well as an organ or two, so those were right out. I've seen several other builds that use rollerblade bearings or the omnidirectional ball bearings. Those probably would have worked fine, but instead we went with a set of abs 'pads' and aluminum extrusion rails along the bottom edges.


Next comes the core slider/box install. This is generally about 7 stepspast where you should double and triple check the dimensions and not take the 'official' dimensions for the bed that you found online as gospel. . .guess what I did?? . . . the box was about 7" too long. -.- Woops. Circular saw and a sawsall later and we were back in business. Drawer faces on too!


Then the drawers came right back out for a prompt staining by my lovely partner in crime :)


One of the things I really wanted to do for this was to have the entire thing carpeted. This way I really don't have to worry about getting it too dirty or scratches or it being hard on the knees for getting in and out. A home depot trip and 5 billion staples later... progress!


Another feature request was tiedown points. Yet another one of those "should have thought everything through before this point" type things. We needed a good and SOLID way to affix the tiedowns. You COULD use some nasty threaded wood screws but those could certainly pull out since I'll be using straps. In comes blind nuts. They're great because with the proper sized hole, you slide them in from the bottom and tighen down your fine-threaded screws on top and it sucks it up flush, teeth biting in so they wont easily get popped out if you remove the screw. The downside here is that the box's top most definitely will NEVER come off, which means I had to go inside the hard way.


Finally, everyone likes a good 'completion' pic... a handful of days after the beginning of the project, it was done. Definitely a sprint-build if I ever saw one so a huge shout out to my dad and drew of clubhouse trailers for all the help. It definitely wouldn't have come out this nicely if I had done it by myself.


rawlk

Observer
Thanks!
Still debating about what to do inside the drawers. I have two fixed dividers cut to fit on the wide one, but I'm not sure if I want to do that or some adjustable ones. . .

At the moment, the drawer's are just lined with a moving blanket and the spare carpet to keep the rattle down :)
 

tyler.96

Observer
Looks good! How'd the light bar do on your trip back out to Cali? Got any pictures of them in action?
 

Comanche Scott

Expedition Leader
Thanks!
Still debating about what to do inside the drawers. I have two fixed dividers cut to fit on the wide one, but I'm not sure if I want to do that or some adjustable ones. . .

At the moment, the drawer's are just lined with a moving blanket and the spare carpet to keep the rattle down :)

I have learned over the years, the more flexible a setup can be, the better it works for me. Chaos can be a lot of fun. :)
Other people like a spot for everything, and everything in it's spot. There are definite advantages to this, but it just seems so... organized. :elkgrin:
 

Forum statistics

Threads
185,815
Messages
2,878,493
Members
225,378
Latest member
norcalmaier
Top