Battleship Jones: 2015 Tacoma DCLB Build Thread

Adventurous

Explorer
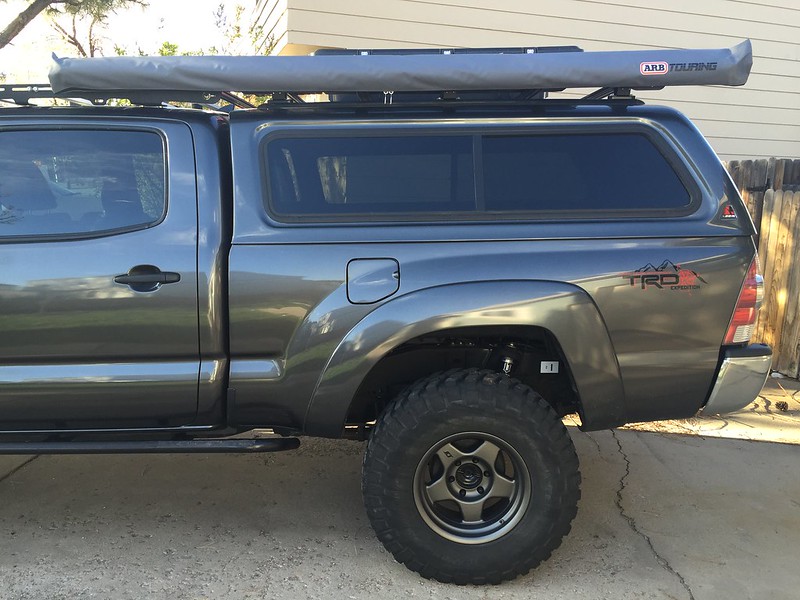
So the addition of the Prinsu rack meant that I had to re-think/re-work the awning brackets I had previously fabricated. Oh well, I wasn't too attached to those ones anyway as they looked sloppy and I just couldn't have that.

The Prinsu rack uses 80/20 extrusions which are perfect for the insertion of carriage bolts. I whipped up 3 brackets as such that utilize 4 1/4-20 carriage bolts to affix it to the rails, and 4 6mm bolts to affix the awning. Each bracket is made from 3" x 3" .250 angle iron so I am not that concerned about fatigue or overloading. They should be stout enough by themselves. The shake test reaffirms this.

IMG_1266 by Tim Souza, on Flickr

And a side shot. Tucked a lot closer to the truck to minimize the potential for ripping the thing off. The aluminum extrusion backer is in line with the top of the roof rack rails over both the topper and the cab.

IMG_1267 by Tim Souza, on Flickr

Clean.

IMG_1265 by Tim Souza, on Flickr

Going to have to do a test setup. I purchased the walls the other day so the wife and I can have an enclosed space for privacy sake. Something about her wanting to answer the call of nature in peace. I shall therefore declare the awning roof to be named, "The Dutch Oven."
 
Last edited:

Adventurous

Explorer
Outstanding! Good looking rack setup.

Thanks! It's still a work in progress as I have to get the traction mats, rotopax gas can, Hi-lift, and shovel up there. Bit of a juggling game to find adequate space and restraint mechanisms for all, but I look forward to getting it all taken care of.

Still to do list:
Un-mount sliders and trim pinch welds
Hook up LED pods on roof rack for camp lights
Build back seat platform
 
Last edited:

Adventurous

Explorer
Started the backseat platform last Thursday. I'm using 3/4" Baltic Birch plywood for all of it and must say that it is very high quality, solid feeling material. Certainly of a much higher quality than what can be found at Home Depot or Lowes. I can now see why it is the material of choice for all of the fancy expedition drawers.

I don't profess to be a woodworker so some of my techniques and methods may be a bit unconventional. All of the work has and will be done with a circular saw, router, jig saw, random orbit sander, and a hand drill. The design will be similar to what was done in the Boden Build with the exception of a few details and dimensions. I will be using a full width two layer section along the back and will be taking the platform all the way to the back of the seats. Motivation behind doing so is to provide as much space as possible for gear and our two dogs.

Step 1: Rip the 60" x 60" sheet of plywood down to 54.5" long by 39.75" wide for the main body. Rip an additional 54.5" by 8" wide strip for second layer at the rear wall. Rip a third piece 4" wide by 53" long for the second layer under the other piece of L-track. Get something that looks like this.

IMG_1336 by Tim Souza, on Flickr

Step 2: Route contour in the double layer to account for rear plastics still in place. Mess up when neighbor surprises you mid-router pass. Platform width now 53.75".

IMG_1331-1 by Tim Souza, on Flickr

Step 3: Spend an hour fabricating a wood template using the belt sander and hand sanding to get the contour of the rear portion of the center console perfected. Spend two hours explaining to the wife that you are just making a template and that this will be discarded shortly thereafter. Trace cut line onto cardboard and flip template over to see that it is not a mirror image. Back to hand sanding.

IMG_1335 by Tim Souza, on Flickr

Step 4: Measure once, measure twice, measure thrice and make a cardboard template to dial in proper positioning. Use newly acquired top bearing trim bit to cut contour into platform. Go inside to relax and get to thinking if all of the measurements were right. Run out to garage to verify that things are within 1/64 of symmetrical across the center line.

IMG_1341 by Tim Souza, on Flickr

Step 5: Glue on back reinforcement section and use literally all clamps available to secure.

That's as far as I have gone at the present. I will be using the same sharpened bolt method as Mike did to locate the mounting points except I'm using the 6 M8 locations where the seats brackets bolted to the chassis. I would have to imagine that 9 total (6 at the back, 3 at the front of the seats) grade 8 M8 bolts should be able to withstand the forces in the event of collision.

Next installment of the platform build to come at the end of the weekend. I'm hoping to have it completed by then so I can start the stain/poly process. I will not be carpeting/rhino lining afterwards and will instead choose to revel in the glory of the wood finish.

Cubbies will come at some point to access the storage area under the seats and perhaps I will at some point do the same for the foot wells. For right now I will be leaving the sides of the platform off so you can tuck stuff underneath.
 
Last edited:

Adventurous

Explorer
Spent quite a bit of time at the end of last week and over the weekend putting a bit more sweat equity into the platform and have it in a good place at the moment.

After routing the relief for the center console the platform was finally in a position to chuck it in the truck for a test fitting. It is a bit of a bear to get in there but I managed to manhandle it myself and get it set in there. It's a tight fit, but it was designed to be that way. It was quite a relief to drop it in and see that everything fit quite snugly and conformed to the contours.

IMG_1342 by Tim Souza, on Flickr

I'll have to see if given the flex of the truck this is too little clearance. Things should be bolted down snug enough to minimize movement, but you never know.

IMG_1343 by Tim Souza, on Flickr

And then came the nerve-wracking stuff; all of the surface operations that could potentially sink the project. First up was the rear mounting points. Without knowing the locations of those I couldn't locate the L-track, so they were highest on the list. I did the Boden method of cutting the heads off of some M8 bolts and screwing them into my mount points. I tried this a few ways, the first being the platform good side up but this was non-ideal as my intent was to counterbore the bolt holes and forstner bits, at least in a hand drill, don't like having a hole already there. So I flipped it over and put the good side down with the sharpened bolts at a height to simulate the piece of re-inforcement ply. This worked well with the only problem being I had a mirror image. After transferring the dimensions across the center line and checking three times I went at it with the 3/4" forstner and drilled my bore, then took the hole all the way through.

IMG_1344 by Tim Souza, on Flickr

IMG_1345 by Tim Souza, on Flickr

A post-drill test fit revealed that it was a great success! All bolts dropped in and bolted right up. Always a pleasant exercise when things work out like that.

And then came perhaps the most challenging aspect of the whole project, the L-track slots. While it would have been easier to cut a channel all the way across the platform I preferred to sink a pocket into it to completely capture the L-track. Wholly unnecessary and probably added a good 5 hours to the process given the tools I am working with but I managed to construct a wood jig to mimic the pocket profile. After carefully centering it and making sure it was square on all sides I went at it with a 1/2" bit with a bearing on top and followed my jig around cutting. It worked pretty okay except for the fact that the 3/4" thick wood wasn't tall enough to prevent taking a healthy depth of cut on the first pass. I took it slow and chugged through getting incrementally deeper over the next 2 passes.

IMG_1347 by Tim Souza, on Flickr

Success! I had to get into the corners with a 1/4" bit to reduce the radius a bit so the tracks would sit in there and they are about 1/16" below the surface with 1/16" clearance around all sides. I am quite pleased with how they turned out.

IMG_1350 by Tim Souza, on Flickr

That pretty much covers where I am up to at the moment. Next up on the list is:

1. Get aluminum edging on there, like so

IMG_1349 by Tim Souza, on Flickr

2. Drill countersinks and through holes for aluminum edging
3. Fabricate brackets to attach to the front side of the platform
4. Drill dowel holes to make front supports knock down detachable.
5. Drill counterbores and through holes to attach L-tracks.
6. Stain
7. Poly

Guess I have a bit more work ahead...
 
Last edited:

Dr. Cornwallis

Adventurer
How are you securing the back seat platform? I'm building the same thing for my access cab but I'm trying to figure out a way to use the mounting holes for the back seats after I remove them. The only way I see it being possible is to have some brakets custom fabricated.


Sent from my iPhone using Tapatalk
 

Adventurous

Explorer
How are you securing the back seat platform? I'm building the same thing for my access cab but I'm trying to figure out a way to use the mounting holes for the back seats after I remove them. The only way I see it being possible is to have some brakets custom fabricated.


Sent from my iPhone using Tapatalk

I'm glad you asked! I'm not sure what the setup for the access cab is but the double cab has a flat, foot wide shelf at the back where the seats bolt in. The six counterbored holes you see will utilize the M8 holes that held the seats in place. Those will serve as the primary fastening points although I may add some additional bracketry under the front L-track where it interacts with the front wall of the storage bin under the rear seat.

Do you have any pictures of what your emptied out back area looks like?
 

Dr. Cornwallis

Adventurer
I'm glad you asked! I'm not sure what the setup for the access cab is but the double cab has a flat, foot wide shelf at the back where the seats bolt in. The six counterbored holes you see will utilize the M8 holes that held the seats in place. Those will serve as the primary fastening points although I may add some additional bracketry under the front L-track where it interacts with the front wall of the storage bin under the rear seat.

Do you have any pictures of what your emptied out back area looks like?

I don't have the back seat out yet, I just picked it up a few days ago (3rd gen) but it appears to be identical to my second gen access cab too. With the access cab, the center console between the two jump seats sits up about half and inch higher than the two under seat storage compartments, so there is no flat area like the double can. So I have to have some kind of bracket to lift it up.

In my second gen I had just started really brainstorming the idea and I tore apart my rear seats to expose the frame. If the seats are the same (or at least the mounting brackets and guts) I may go pull the rear seats from a wrecked second gen access cab, pull them apart and have a metal fabrication shop fab up some brackets and weld them to the old seat frames, then the platform would not only be secure but able to be moved up/down as well.
 

Adventurous

Explorer
So I found this post on Tacomaworld where a guy removed the seats from his 3rd gen access cab. You could go the bracket route, or you could make a platform that rests on the area where the center console is, then put a few strips of wood underneath the sections along the seats to space it downward. Kind of like what I did for the section along the back except with a cutout at the center to account for the increase in height. Just an idea to save you the trouble of finding a fab shop.

https://www.tacomaworld.com/threads/removing-rear-seats-and-back-panel-from-2016-access-cab.411587/
 

Adventurous

Explorer
The platform is done, installed, and we made great use of it this past weekend. I spent the last 2 weeks taking care of the last few details that included drilling the dowel connections for the front support pieces, gluing the aluminum edging on, finish sanding/buffing, painting the L-track recesses black, and getting 3 coats of polyurethane on everything. It all went off without a hitch and I managed to get things finished just in time. A few pictures of the finished product...

20160526-IMG_1367 by Tim Souza, on Flickr

L-track details with tie downs:

20160527-IMG_1368 by Tim Souza, on Flickr

Back corner details. The 5 miter cuts on the 4 different pieces were a real challenge to get everything to fit correctly and cleanly. I did a regimen of sanding with 400, 800, then wet sanding with 1000 grit, then 2000 grit, followed by the buffing wheel in my hand drill with some rouge compound. Turned out pretty nice I think.

20160527-IMG_1369 by Tim Souza, on Flickr

Of course now I need to do something for the back wall to match. Thinking 1/2" baltic birch with accommodations to strap items to the back wall, like say a fire extinguisher, perhaps a few tools with quick fists, we'll see.
 
Last edited:

Adventurous

Explorer
Teaser of the trip we took over the Memorial Day weekend to Moab. All dirt from CO into Utah and some more after that. More to come!

20160529-IMG_3330_zpsxgevjeqo.jpg
 

Forum statistics

Threads
185,789
Messages
2,878,231
Members
225,329
Latest member
FranklinDufresne
Top