Blender, My LX450/FZJ80 + FJ45esk + GM + Land Rover crazy concoction

Here was one issue I had to work though. I had a bit of an oil can on the rear wall after welding it into place. Looking back I probably should have pressed in some ribs, but I intend to store the rear window panels in that area and I don't want to give up the depth.

To fix the oil can I used a cheap MAP gas torch to heat one spot at a time and force cool it with air from a nozzle on the air compressor hose. This worked very well. You could actually watch the metal move with each heat/cool cycle. I don't think it is good to do the same area over and over. I tried to start on the edge of the area and work in an inward spiral pattern.

I use a MIG to hit it with some quick spot welds, then cool it with air. You could also anneal the area and work it back into shape with a waffle head hammer, but that poses some risks, the chief risk being creating more of a problem than you started with.
 

Metcalf

Expedition Leader
I've been slacking on posting again....opps. FB and IG make it so easy.


I added a crossmember to help support the 5th body mount on the C-pillar. This crossmember will also provide some support for the battery mount, air compressor, air tank, muffler, and tailpipe ( and the driveshaft fits in that space too ). All the stuff will go under the front part of the bed. The ends of this crossmember also provide a spot for the little blocks that will be the mounts for the bed posts so this had to happen 1st.


Adding lightness sucks.


5th body mount tie in. This one uses the same hardware and bushing as the other 4 to keep the parts common.


It actually felt good to make some simple brackets again. Chipboard still makes the best template I think.


I think this is where the battery is going to go? I will build the mount to take any group 34 battery, but I have this Optima sitting around that needs a home....
 
I've been utilizing a soft rear cab mount approach on my body swaps. Basically, I make sure the cab is secured tightly at the front corners, but let the back of the cab sit on softer mounts, allowing greater chassis flex without the fear of the flex tearing up the body. I got the idea from "square body" GM trucks, with their huge, squishy rear cab mounts.

EarthRoamer uses a similar approach. They actually use a single rear pivot, much like a 5th wheel trailer hitch.

Your cab looks to be built very tough, so I doubt you will have that problem.
 

Metcalf

Expedition Leader
I've been utilizing a soft rear cab mount approach on my body swaps. Basically, I make sure the cab is secured tightly at the front corners, but let the back of the cab sit on softer mounts, allowing greater chassis flex without the fear of the flex tearing up the body. I got the idea from "square body" GM trucks, with their huge, squishy rear cab mounts.

EarthRoamer uses a similar approach. They actually use a single rear pivot, much like a 5th wheel trailer hitch.

Your cab looks to be built very tough, so I doubt you will have that problem.

I can't imagine that this frame is that flexible. I can see that on the older open C-Channel frames.
All the mounting points to the frame use poly bushings.

With what this vehicle should be capable of doing off road with the longer wheelbase and lockers, I wanted the cage system tied to the frame with a decent amount of structure. While the cage isn't traditional, it will provide a lot of structure and protection to the cabin area.
 

Metcalf

Expedition Leader
My weekend progress...


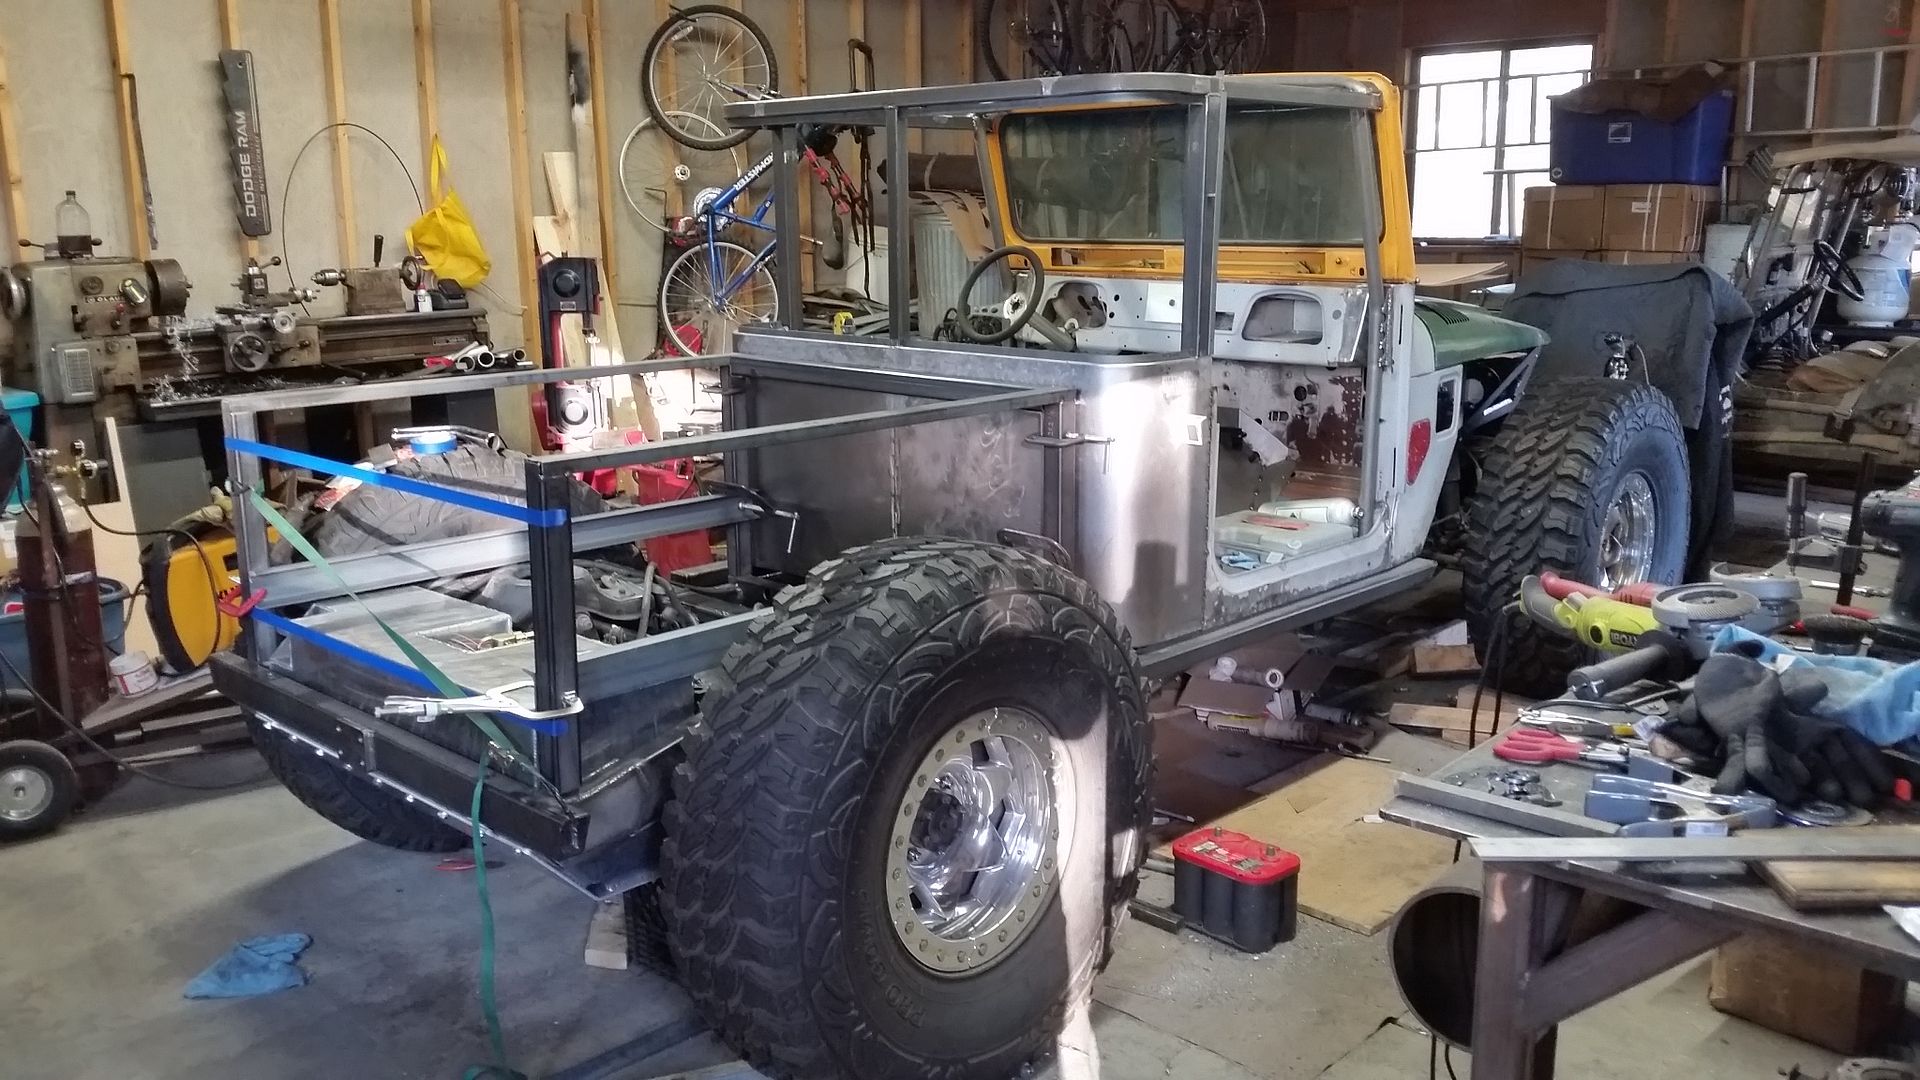
I was able to get most of the bed roughed in this weekend. Overall I am pretty happy with the proportions.

The uprights are 2x2 box that slips over some 1.75 square stock that was welded to the frame. Once everything is in its happy place I will drill and tap the square stock for some 10mm bolts. Basically, pull 4 bolts, a hose clamp, and a wiring plug....then the entire bed will come off.

The bed rail ended up being 2" channel with the legs down. This will let me have most of the features I wanted without having to make a complex shape. It was a compromise, but I would like to finish this thing sometime in this decade. I really wanted to be able to have a flat surface I could drill and tap for the bed panel mounting. I also wanted to be able to hook a strap over the edge of the rail.

Where it gets a little interesting is the bed floor 'drawer' rail. So one of the big design goals overall was to have a modular hard top of sorts where the panels could be stored 'in' the vehicle. While the rear 'window' panels are going be able to store in the tub behind the seats, the upper part of the doors need a home. I believe the best place for these will be in a false bed floor. I basically want to be able to drop the tailgate and slide out a foam lined drawer to stick the upper half of the doors into.

After going round and round with some possible ideas I decided to keep it simple. I am going to use a section of 3" channel, the lightest I could find ( which is still pretty heavy. The top flange will be used to bolt the bed floor down to, which will probably be some 3/16 or 1/4" aluminum. The lower flange will act like a drawer slide for a large aluminum/wood panel shelf which will slide out onto the tailgate when it is down.

The tailgate will be some aluminum sheet with a flange/hook bent on the top. I think I can use 1/8" aluminum for that. There will be 3 hinges on the bottom to help support the middle since it is about 45" wide total. I plan on using some 90 degree toggle clamps to hold it shut, kinda like the early toyota mini-trucks had.

There will a 5" tall panel under the tailgate that will cover up the tank up to the tailgate seam. The hinges, backup/tail lights, plate light, and a few other little things will attach to that. It is more a spacer, but will stabilize the rear uprights a lot also.

....fun stuff....
 
It looks really mean. Ride height will be 4 or 5 inches taller?

For the 3" bed channel, aluminum or steel? If steel, and you want to save weight, have a shop bend those out of 10ga or something lighter than regular c channel. You could try slicing one side off a piece of square tubing, but that never works out as planned, as the spring back makes the final piece bend like a banana. Not a lot, but it may be noticeable.

I like the idea of a storage area for the top and door pieces. Just make sure it doesn't trap water.

And I agree, instagram is a lot easier...
 

Metcalf

Expedition Leader
It looks really mean. Ride height will be 4 or 5 inches taller?

For the 3" bed channel, aluminum or steel? If steel, and you want to save weight, have a shop bend those out of 10ga or something lighter than regular c channel. You could try slicing one side off a piece of square tubing, but that never works out as planned, as the spring back makes the final piece bend like a banana. Not a lot, but it may be noticeable.

I like the idea of a storage area for the top and door pieces. Just make sure it doesn't trap water.

And I agree, instagram is a lot easier...

Thanks Matt.

I think the ride height will be about 5-6inches taller. Finding light enough rear springs with enough length to have some preload my be a challenge. I have the stock lx450 springs to start with to see where things end up. I think the stock front springs will be ok of my math is right. There are also a short and long spring so I might try and round up some more stockers.

Sometimes I have a problem sending stuff out to be done. The channel is so close to being the right shape. I just need it to be 50 percent the weight. I think I am going to attack it with a hole saw and see what happens. The slightly thicker flange will be nice for tapping to 6mm to hold the bed panels onto the framework.

I'm not 100 percent sure what I will do for the drawer thing, but I think an aluminum sheet and some closed cell foam would get me most of the way there. I don't think it need to be super fancy with drawer slides or anything. Getting both upper doors in that 51x42 area might be a little challenging game of tetris.....
 

Metcalf

Expedition Leader
My crazy idea for the night....


I am going to hide the stainless steel fuel filler tube mostly inside the drivers rear bed post. The only thing visible will be about 2-3" of the neck and cap which will point up and forward under the bed rail. Once the fender is on, and everything is color matched, it should be pretty subtle and almost hidden.

Still more to do, but I think it should work out pretty neat....
 

vwhammer

Adventurer
Your work is pretty stellar.
I wish I had your patience.
You build tools and fixtures and all that.
I end up just wingin' it because time is a factor.

Anyway I am excited to see the finished product.
 

Metcalf

Expedition Leader
Your work is pretty stellar.
I wish I had your patience.
You build tools and fixtures and all that.
I end up just wingin' it because time is a factor.

Anyway I am excited to see the finished product.

Thank you. I have a deadline this fall I am going to push for. I'm not going to force it, but I think I can see the horizon.
Once the bed frame is done I can pull the car off the blocks, roll it around, and stick the stock springs in it. That will be a big step.
 
Your work is pretty stellar.
I wish I had your patience.
You build tools and fixtures and all that.
I end up just wingin' it because time is a factor.

Anyway I am excited to see the finished product.

Well put. I don't put a lot of time into tools either as time is always a factor for me too. It is neat to see what Brennan comes up with for solutions to the many problems of building a completely custom truck.
 

vwhammer

Adventurer
Thanks guys. I'm just a guy in a garage trying to build cool stuff...

We all are.
Well some of us are.
No offence to some people but some people's "cool stuff" is cooler than others.

I thought I was doing some cool stuff with my 4x4 Vanagon conversion then I checked out some of the things you were working on and I was "maaaan, why didn't I think of that.

Just got my TIG welder up and running and will be building an aluminum fuel tank sometime soon so I was excited to see the progress on your tank.

You even took the time to show us your progress on learning to weld aluminum.
 

Forum statistics

Threads
185,911
Messages
2,879,534
Members
225,497
Latest member
WonaWarrior
Top