You are using an out of date browser. It may not display this or other websites correctly.
You should upgrade or use an alternative browser.
You should upgrade or use an alternative browser.
Coyote; aka my 96 D1 5 speed build thread
- Thread starter Ray_G
- Start date
Ray_G
Explorer
What is keeping the axles in pipes you made for them?
Prob difficult to see in the pics but the axle flanges are nudged up against both the metal frame that has the quick fists as well as the back of the SD rack.
Admittedly this isn't the final solution; I would call it secure at the moment because of the combination of the quick fists, and the inability for them to move fore/aft because of the rack but most of all because the entire arrangement is compressed and retained by the canopy/roll top tent/and folding up chairs that are lashed down to the roof rack above them (last set of pics).
Before VOT what I want to craft is a pocket of sorts for each flange that is bolted into the frame-when putting the axles onto the rack you'd place the PVC carrier into the quick fists and then slide the flanges into the pocket. Optimally the pocket would have holes where you'd secure the flanges using the flange bolts (and thus be carrying extra flange bolts which have a propensity to sheer at times). At that point the axles would be secured through redundant measures (and likely still have stuff strapped down over top for the purposes of VOT or other longer range wheeling-for events where you go and camp I'd likely remove the axles as I don't like carrying weight that is unnnecessary)
r-
Ray
fishEH
Explorer
Ray, I dig the build. Very nicely done.
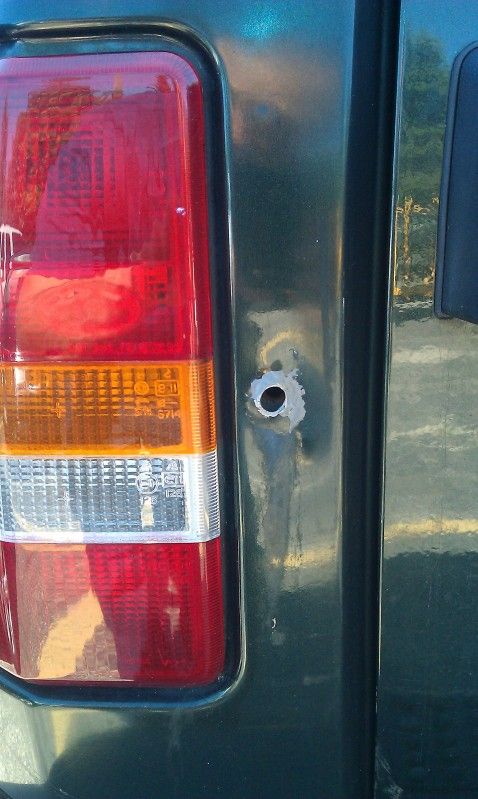
I would urge you to reconsider that style of tail light guards. Here's why. The rubber molding sticks out at least an inch. A tree branch will catch them as you're moving forward. The metal guard will pull out if the rubber and will continue to be pulled back until the single rivnut on the back is ripped right through the sheetmetal. The result.
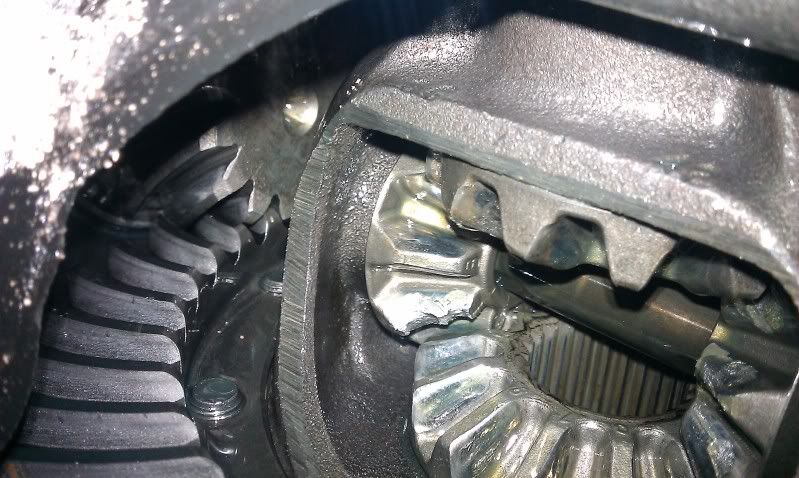
Do you have a locker? If not the chances of you breaking an axle shaft on 245/75's is quite slim. Your diff is more likely to chew through spider gears first. I ran an open diff on stock axles with 265/75's. Excessive wheel spin resulted in the spider gears getting chewed but the stock axles were straight as an arrow.
I would urge you to reconsider that style of tail light guards. Here's why. The rubber molding sticks out at least an inch. A tree branch will catch them as you're moving forward. The metal guard will pull out if the rubber and will continue to be pulled back until the single rivnut on the back is ripped right through the sheetmetal. The result.
Do you have a locker? If not the chances of you breaking an axle shaft on 245/75's is quite slim. Your diff is more likely to chew through spider gears first. I ran an open diff on stock axles with 265/75's. Excessive wheel spin resulted in the spider gears getting chewed but the stock axles were straight as an arrow.
Ray_G
Explorer
Ray, I dig the build. Very nicely done.
I would urge you to reconsider that style of tail light guards. Here's why. The rubber molding sticks out at least an inch. A tree branch will catch them as you're moving forward. The metal guard will pull out if the rubber and will continue to be pulled back until the single rivnut on the back is ripped right through the sheetmetal. The result.
Do you have a locker? If not the chances of you breaking an axle shaft on 245/75's is quite slim. Your diff is more likely to chew through spider gears first. I ran an open diff on stock axles with 265/75's. Excessive wheel spin resulted in the spider gears getting chewed but the stock axles were straight as an arrow.
Brett-
Ouch...looks like some fun sheet metal repair there. May have to disappoint the wife-or just put them on when wanting to look rugged in parking lots (their primary purpose anyway)!
Regarding the rear dif-I'm running a TT in the back (4 pin open in the front) with Rovertracks HD axles-carrying spares may be overkill and can't argue much with the idea that if an axle snaps the dif likely would have exploded too but having to balance spares vs luck and such...I'm running with just u joints to repair drive shaft(s) vice replacements, and focused on the back of the drivetrain vice the front figuring you can pull items off the front and go 2wd if need be...all a big balancing act with no right answers it would seem.
r-
Ray
mspeters
New member
Coyote D1 -- very respectable built-out and graet storage set-ups.
I did exactly the same black treatment to my sagging tan headliner. That is a project to remove and reinstall.
'97 D1 Rioja Red 5spd, owned since new. I mod'd it 10 years ago, still use for long NV desert camp trips. ARBs, GBR 4.10s, and a mix on rovertym, EE, OME parts, and some skid plates. The rear flexes very well with the 12" short-body bilsteins, and i use OME LTR-01 land cruiser shocks in the front. I have been distracted from Land Rovers with M422A1 mighty mite build ups; one of is a modifed with vw 1.9 turbo diesel.
Ray_G
Explorer
Coyote D1 -- very respectable built-out and graet storage set-ups.
I did exactly the same black treatment to my sagging tan headliner. That is a project to remove and reinstall.
'97 D1 Rioja Red 5spd, owned since new. I mod'd it 10 years ago, still use for long NV desert camp trips. ARBs, GBR 4.10s, and a mix on rovertym, EE, OME parts, and some skid plates. The rear flexes very well with the 12" short-body bilsteins, and i use OME LTR-01 land cruiser shocks in the front. I have been distracted from Land Rovers with M422A1 mighty mite build ups; one of is a modifed with vw 1.9 turbo diesel.
I've always loved that color red. I'll be switching over to 7100 remote res in the back at some point but the ones I have need a rebuild and I'm out of time for major changes before Vermont-did swap in OME springs which I'll cover in the next few days as I make the last surge of upgrades/fixes and a final shakedown run this weekend.
The Mighty Mite(s) sound interesting & fun!
r-
Ray
Ray_G
Explorer
What is keeping the axles in pipes you made for them?
A quick shot as we head out the door for the second VOT shakedown trip...
Took some 4" rubber caps from the plumbing section that house the axle flanges, which are bolted through a piece of steel on the bracket now (using axle flange bolts so there are spares of those on hand too).
More pics to follow after this weekend!

Ray_G
Explorer
VOT final build out
So aside from the redux of the pioneer rack on the roof, a few other things were tweaked over the past week of working on the truck and theoretically also working.
I decided that laden the LR HD springs just weren't getting it done and switched over to the traditional Old Man Emu setup which I think will prove much better for the intended application.


Gotta admit, I'm happy to do be done messing with the suspension.
So aside from the redux of the pioneer rack on the roof, a few other things were tweaked over the past week of working on the truck and theoretically also working.
I decided that laden the LR HD springs just weren't getting it done and switched over to the traditional Old Man Emu setup which I think will prove much better for the intended application.
Gotta admit, I'm happy to do be done messing with the suspension.
Ray_G
Explorer
Rear Bumper end caps
I've always loathed the plastic rear bumper endcaps and lusted after the Expo Disco's stock like rear bumper appearance with the added durability of metal-but didn't really want to throw out that much cash for the limited options on the D1 rear bumper in that vein. Nor did I want to return to the RTE bumper that I'd had on previous trucks.
So with free time and the quaint notion that it would be a 'fun' project I decided to make myself some 'light/medium' duty endcaps to go on the stock bumper. Mostly b/c I actually like the actual stock bumper appearance and didn't really want to go too far with it. A fair amount of mocking up with paper ->cardboard led itself to a template:


I took the step of getting a straight(er) rear bumper from Will Tillery to have something to build on without taking the existing one on/off:


After fit/finish and not a few times of taking it on/off, tightening things down at various times in various ways, etc. I ended up here:

Overall the project was a lot of fun, and a lot of learning for a novice welder (at best). Definitely don't claim that these will withstand shattering impact but do feel they'll do a lot better than the plastic endcaps. They're also bolt on-which was a compromise because I wanted to make the mounting more elegant but I was running out of time before VOT and desired having endcaps more than expending even more time working with the brackets underneath. In retrospect I can definitely see why D1 rear bumpers that are professionally built cost what they do given the little angles that require a lot of effort to make look even remotely complementary to the truck itself. Not perfect, but good enough for now and we'll see how the hold up.
I've always loathed the plastic rear bumper endcaps and lusted after the Expo Disco's stock like rear bumper appearance with the added durability of metal-but didn't really want to throw out that much cash for the limited options on the D1 rear bumper in that vein. Nor did I want to return to the RTE bumper that I'd had on previous trucks.
So with free time and the quaint notion that it would be a 'fun' project I decided to make myself some 'light/medium' duty endcaps to go on the stock bumper. Mostly b/c I actually like the actual stock bumper appearance and didn't really want to go too far with it. A fair amount of mocking up with paper ->cardboard led itself to a template:
I took the step of getting a straight(er) rear bumper from Will Tillery to have something to build on without taking the existing one on/off:
After fit/finish and not a few times of taking it on/off, tightening things down at various times in various ways, etc. I ended up here:
Overall the project was a lot of fun, and a lot of learning for a novice welder (at best). Definitely don't claim that these will withstand shattering impact but do feel they'll do a lot better than the plastic endcaps. They're also bolt on-which was a compromise because I wanted to make the mounting more elegant but I was running out of time before VOT and desired having endcaps more than expending even more time working with the brackets underneath. In retrospect I can definitely see why D1 rear bumpers that are professionally built cost what they do given the little angles that require a lot of effort to make look even remotely complementary to the truck itself. Not perfect, but good enough for now and we'll see how the hold up.
fishEH
Explorer
Famous last words!!!! Hahaha! :-DGotta admit, I'm happy to do be done messing with the suspension.
How are the bumper end caps secured? BTW if you need to straighten a stock bumper, stick a small 2x4 on the part of the bumper that needs to be pushed down and hit it down hard with an 8lb sledge. Works like a charm.
Ray_G
Explorer
Famous last words!!!! Hahaha! :-D
How are the bumper end caps secured? BTW if you need to straighten a stock bumper, stick a small 2x4 on the part of the bumper that needs to be pushed down and hit it down hard with an 8lb sledge. Works like a charm.
Valid point on the suspension...and I wasn't even being totally accurate whenI typed it since post VOT I'll sort further through this:

But that's for later...
End caps have a bracket underneath (angle) that rests up against the interior of the bumper (closest to the truck), the cap itself is tight against it rearward- all secured by two bolts vertically inserted that you can just barely see in the last pic.
Ray_G
Explorer
Kexby RRC seat covers + tire cover
One of the last things before VOT was the opportunity to get some of the Kexby products from Tony B (abrooks) via their Land Rover line at:
http://www.kexbylimited.com/stocked-products/land-rover/
Since the Coyote's rear seat is actually a RRC the currently in production RRC seat cover for the rear setup was ordered; in this case with MOLLE straps on the back to facilitate a little more usage of the otherwise dead space (covered in the canvas seat covers thread so I won't go on too much here)


I also got one of their tire covers which includes an expanding pocket for holding stuff, and a few loops for securing a trashbag, putting a carabiner or the temp storage of a shackle if desired. Like the seat covers it is extremely well made and I'm looking forward to trying it out.


One more update to round out before VOT!
One of the last things before VOT was the opportunity to get some of the Kexby products from Tony B (abrooks) via their Land Rover line at:
http://www.kexbylimited.com/stocked-products/land-rover/
Since the Coyote's rear seat is actually a RRC the currently in production RRC seat cover for the rear setup was ordered; in this case with MOLLE straps on the back to facilitate a little more usage of the otherwise dead space (covered in the canvas seat covers thread so I won't go on too much here)
I also got one of their tire covers which includes an expanding pocket for holding stuff, and a few loops for securing a trashbag, putting a carabiner or the temp storage of a shackle if desired. Like the seat covers it is extremely well made and I'm looking forward to trying it out.
One more update to round out before VOT!
Ray_G
Explorer
Shakedown run 2.0...kinda
So last weekend we did what was supposed to be the 2nd shakedown run to validate the truck's build out for VOT. In a manner of speaking that was what transpired...sadly however it didn't involve getting all the way to WVa to do some offroading. Essentially investing the time in the other half of the team's truck prevented that from happening...so we made it about out of NoVA but still got a little time to confirm the load plan:

Desire is to keep the load fairly light, and low. Can see out of the windows, and minimal weight on the roof rack

Peli on the front is still up in the air.
Some minor refinements on the interior like rigging up a carabiner<-bungee->carabiner which has a few more links on it to hold stuff in place inside the cabin. Not designed for serious loads, rather just to keep the backpacks from flying all around. Sorta like a ghetto fabulous gunner's belt.

Played with the new butane single burner stove, made coffee with the french press, etc

In doing all this realized that the rear door's functionality increased exponentially when adding one of the jetboils to the back door beside the first aid kit...the pouch that was holding ratchet straps went further into the interior. Coffee = critical...ratchet straps can be accessed with a bit more time.

In the midst of all this we did do some very light wheeling...which was beneficial for the copilot to play with driving the 5 speed in 4 low/locked and to chase down some squeaks from loosened up bolts and such.


We also practiced standing around in the rain, likely a good skill to hone in prep for 4 days/nights offroad

I would be remiss if I didn't point out that in the above picture my wife (aka the stunt driver, copilot, etc) was validating pair of shoes #2 of the trip...she had packed 6 total pairs, and over two days managed to wear at least 4 of those pairs...to her credit we didn't get the chance to run (#5) or nor did the backup flip flops have to be employed (#6) but they are there in case needed....
VOT will certainly be entertaining if nothing else, let's hope all this prep keeps the truck moving forward. Can't wait to see what happens next.
r-
Ray
So last weekend we did what was supposed to be the 2nd shakedown run to validate the truck's build out for VOT. In a manner of speaking that was what transpired...sadly however it didn't involve getting all the way to WVa to do some offroading. Essentially investing the time in the other half of the team's truck prevented that from happening...so we made it about out of NoVA but still got a little time to confirm the load plan:
Desire is to keep the load fairly light, and low. Can see out of the windows, and minimal weight on the roof rack
Peli on the front is still up in the air.
Some minor refinements on the interior like rigging up a carabiner<-bungee->carabiner which has a few more links on it to hold stuff in place inside the cabin. Not designed for serious loads, rather just to keep the backpacks from flying all around. Sorta like a ghetto fabulous gunner's belt.
Played with the new butane single burner stove, made coffee with the french press, etc
In doing all this realized that the rear door's functionality increased exponentially when adding one of the jetboils to the back door beside the first aid kit...the pouch that was holding ratchet straps went further into the interior. Coffee = critical...ratchet straps can be accessed with a bit more time.
In the midst of all this we did do some very light wheeling...which was beneficial for the copilot to play with driving the 5 speed in 4 low/locked and to chase down some squeaks from loosened up bolts and such.
We also practiced standing around in the rain, likely a good skill to hone in prep for 4 days/nights offroad
I would be remiss if I didn't point out that in the above picture my wife (aka the stunt driver, copilot, etc) was validating pair of shoes #2 of the trip...she had packed 6 total pairs, and over two days managed to wear at least 4 of those pairs...to her credit we didn't get the chance to run (#5) or nor did the backup flip flops have to be employed (#6) but they are there in case needed....
VOT will certainly be entertaining if nothing else, let's hope all this prep keeps the truck moving forward. Can't wait to see what happens next.
r-
Ray
Ray_G
Explorer
Vermont Overland Trophy: vindicating the build
So we survived...and it was amazing. Next few posts I'll dump in a bunch of pics with some comments.

The trip counter flipped once...so 1,525 miles up and back, about 260 of it off road.
Things that worked well:
Mud Terrains. Shoes make all the difference
True Trac. Traction was king
5 speed gearbox: 4 low & locked she did great. I pulled cable some but not as much as expected and in wet, muddy, rocky conditions it did fantastic.
Things that didn't work as well:
4.0 for the transit up/back! This will get resolved with a 4.6
Past that...most of the feedback was camping gear related, the truck performed exceptionally well given the challenge. More to follow!


So we survived...and it was amazing. Next few posts I'll dump in a bunch of pics with some comments.
The trip counter flipped once...so 1,525 miles up and back, about 260 of it off road.
Things that worked well:
Mud Terrains. Shoes make all the difference
True Trac. Traction was king
5 speed gearbox: 4 low & locked she did great. I pulled cable some but not as much as expected and in wet, muddy, rocky conditions it did fantastic.
Things that didn't work as well:
4.0 for the transit up/back! This will get resolved with a 4.6
Past that...most of the feedback was camping gear related, the truck performed exceptionally well given the challenge. More to follow!