You are using an out of date browser. It may not display this or other websites correctly.
You should upgrade or use an alternative browser.
You should upgrade or use an alternative browser.
Expedition TrailBlazer Project
- Thread starter JamesDowning
- Start date
JamesDowning
Explorer
I honestly have been lucky when it comes to needing an awning. The one time I needed one, I just rigged up something with a tarp and I was fine. A proper awning would be cool, but I'm not sure I'd get good use out of it. Maybe one day.
We just bought a house, so I've been putting all of my time and effort into that instead of the truck. Once I get some of the initial honey-do items done, I can focus back on the truck a bit more. Although, It's kinda at that stage where I'm happy with it, and would rather just use it.
An unfortunate update comes in the form of having to get a new Diehard Platinum battery. After 3.5 years, it somehow developed a periodic internal open circuit, and would kill power to the entire vehicle. Luckily it was still covered by a full warranty. Unluckily, I didn't realize the source of the problem until I was halfway into the dash trying to trace my ignition wires and look for bad connections.
onelow1ton
Adventurer
Sucks to hear about the battery problems , I'm thinking bout getting one for my truck sense my Oem one took a crap on me
What I love about this build is that it is stays true to an expedition vehicle and doesn't wonder off to a rock crawler or monster truck. Everything is practical as well with the whole idea of making your camping experience better while creating a vehicle to get you there and back time and time again. I will be watching your build and using se of your insight to upgrade my Grand Cherokee. You have some great ideas and ability. Keep it up!
Team Ball's Out
Adventurer
Mad skills for sure. You get man points for your build!
JamesDowning
Explorer
Tooner, I did purchase the hinge itself from CCC, but I had to modify it a little for my application.
JamesDowning
Explorer
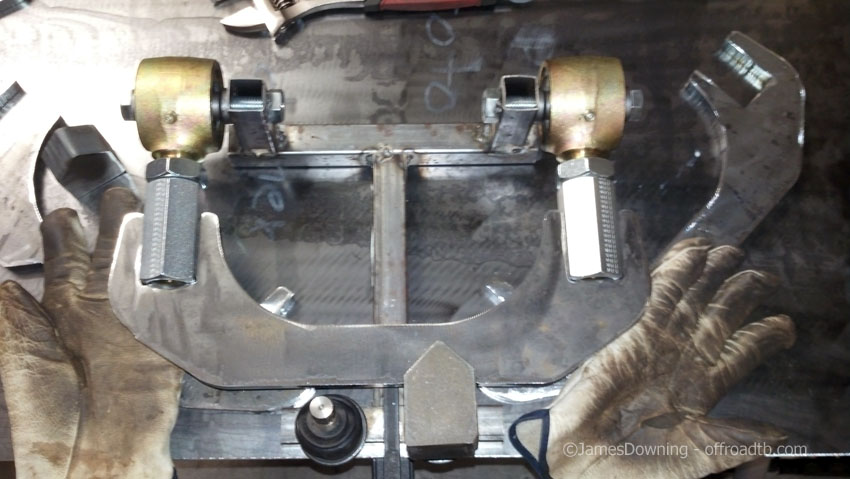
Due to the UCA failures I've seen in the past on trailblazers (the upper pinch joint necks down and sometimes fails in that area), and the constant replacing of upper ball joints due to the poor boot angle from being lifted, I decided to take on making myself some new UCAs that fix the angle and are much stronger than stock.
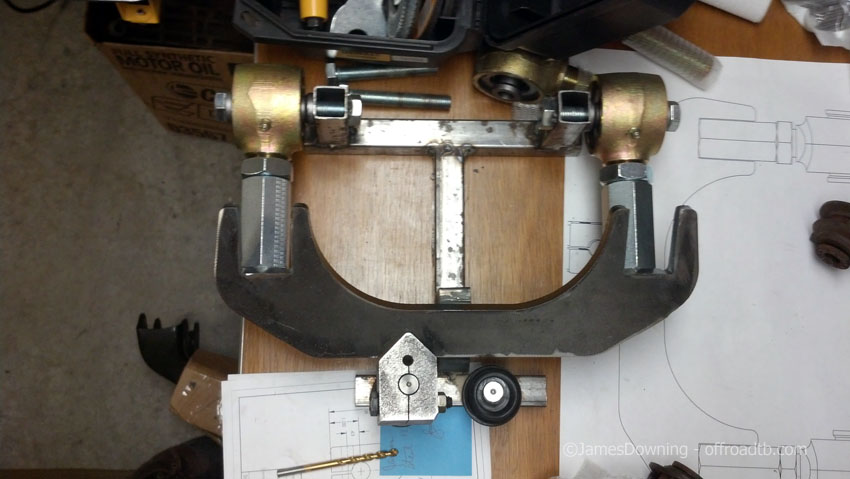
First step was creating a welding fixture with the stock arm:
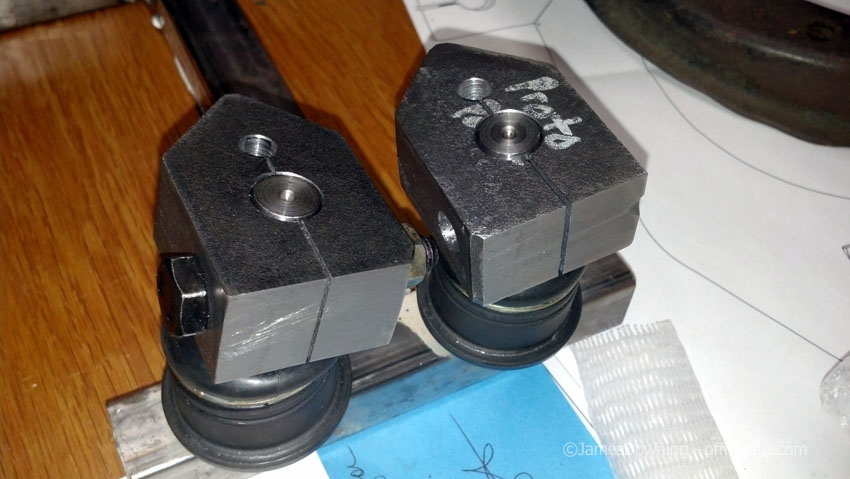
Here's my original plan, M14 heims with spacers:
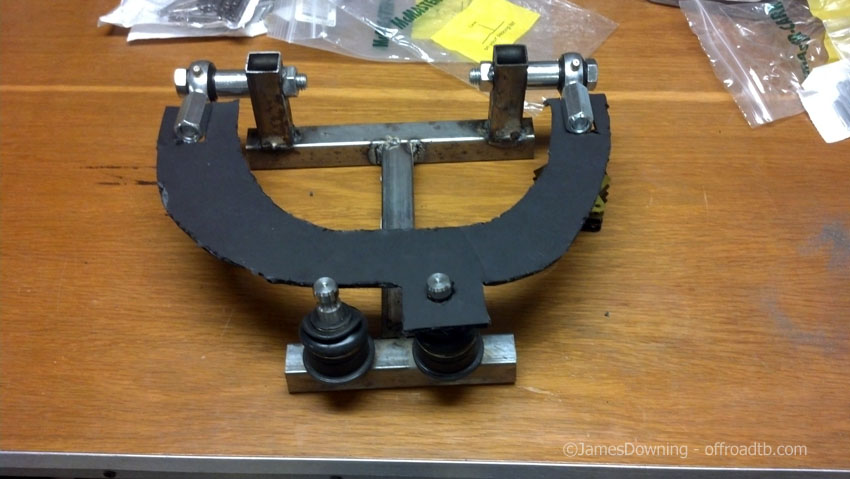
I didn't like the heims, thought they looked way too spindly (maybe I'll use them on my rear upper control arms). So I found some 9/16" Johnny Joints, and decided to see what they looked like. Much better, here's the comparison:
Computer layout of the design:
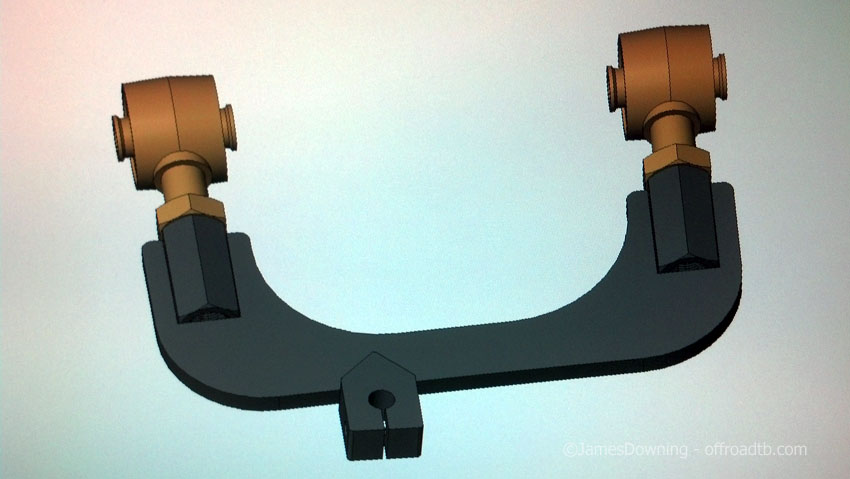
First rough layouts with the cnc plasmad parts. The main "wu tang" plate is 1/2" thick, the pinch is 1" thick:
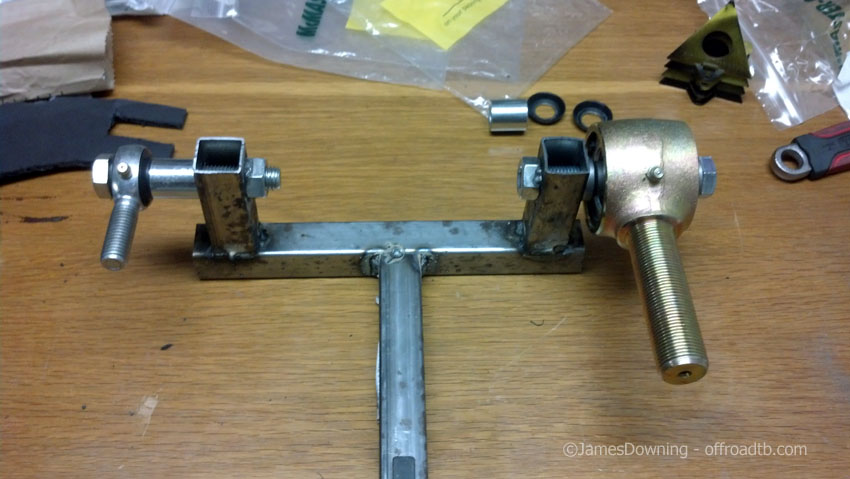
Coupling nuts are the connection points for the JJs. Thread is 1"-14
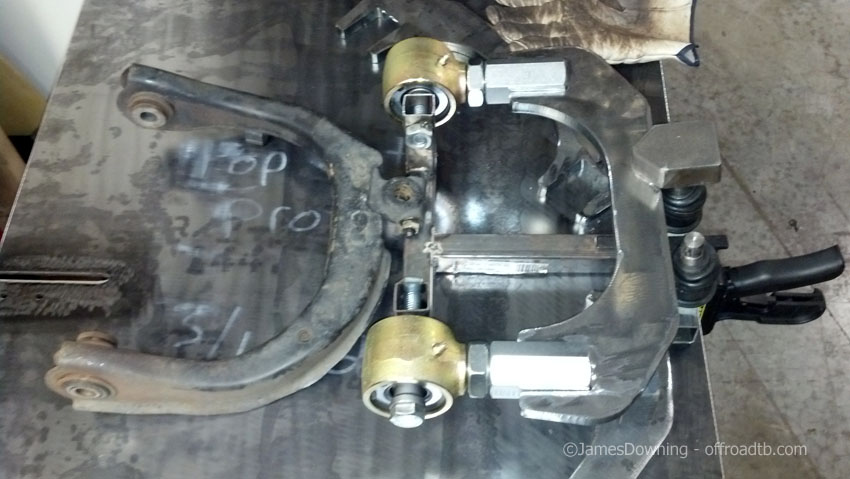
Comparison shot, stock vs new plan:
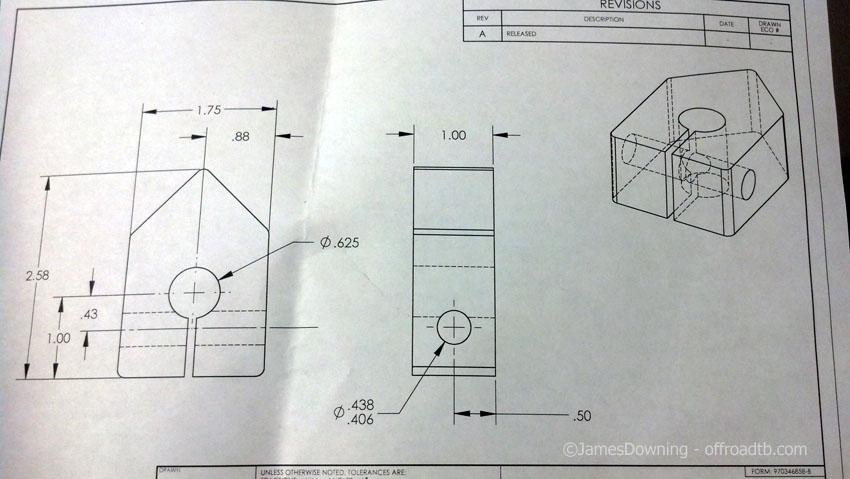
Machining drawing for the pinch bolts:
Machined, had to extend the slot a bit further so the bolt could actually pinch the stud... the original plan was too stiff. Terminated the slot in a hole so there's no crack propagation point.
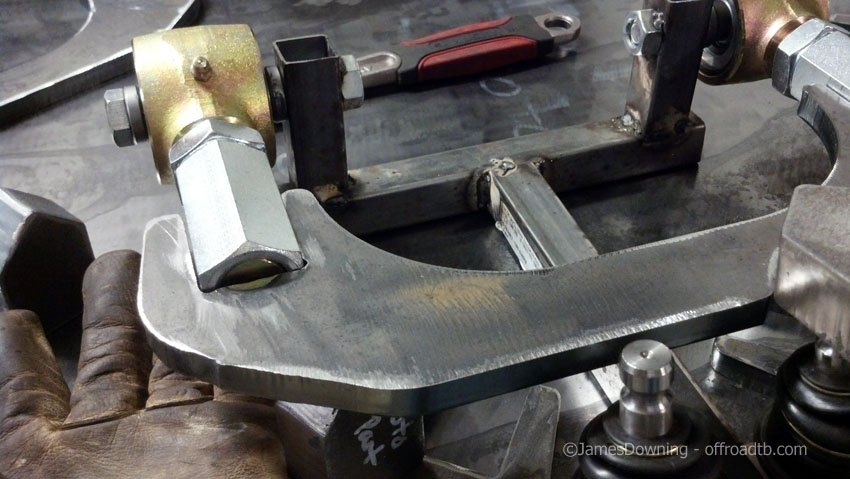
Layout didn't look perfect at first, had to take off a sliver of about 1/4" of material from the "wu tang" plate around the pinch plate.
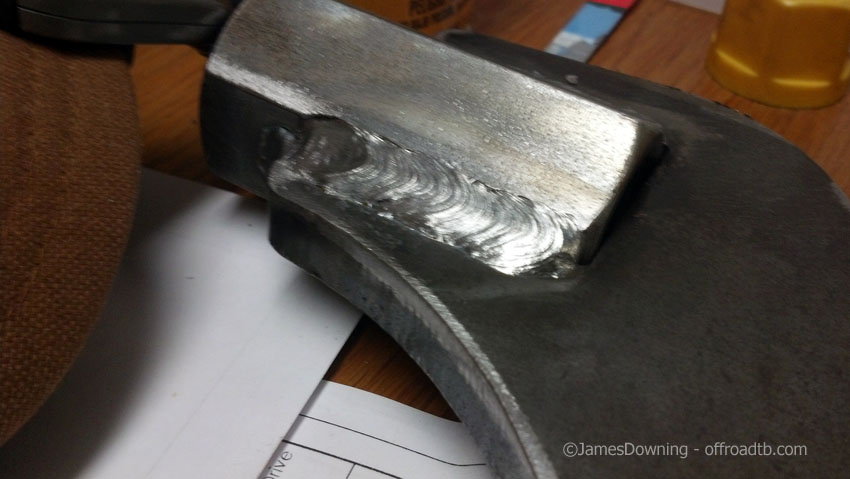
Welded:
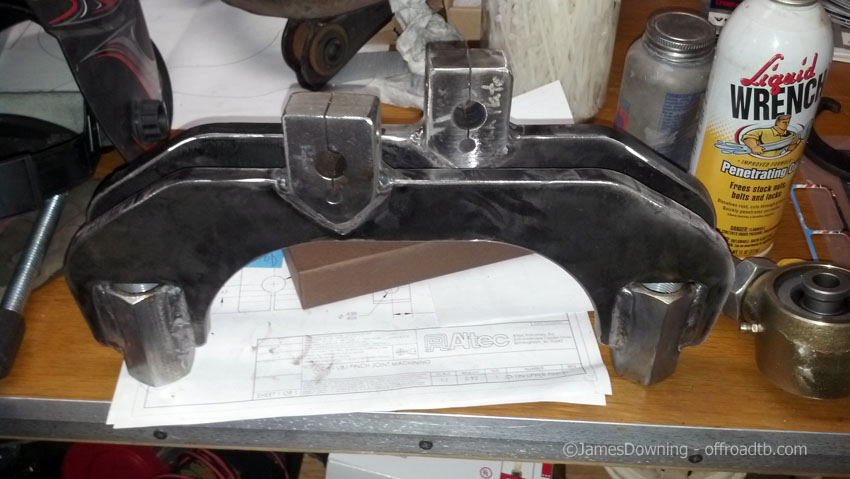
Detail of the welds, they weren't all perfect, but most of them looked good. Had to grind down a couple here and there:
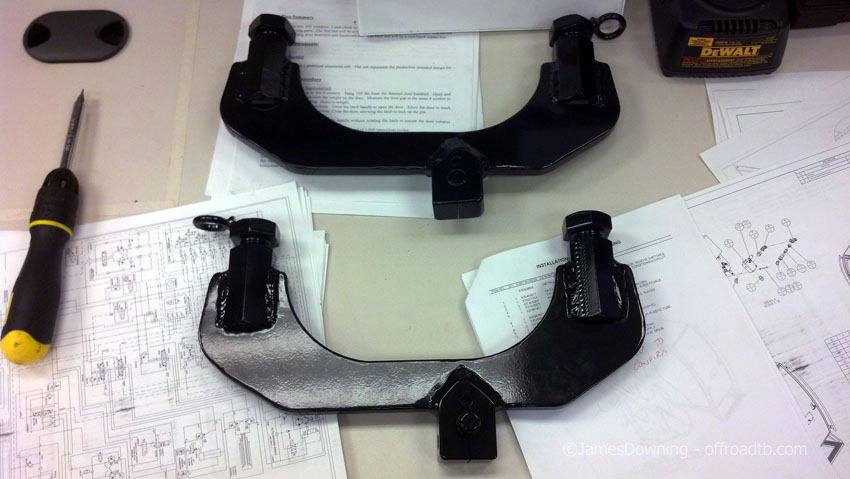
Masked for powder:
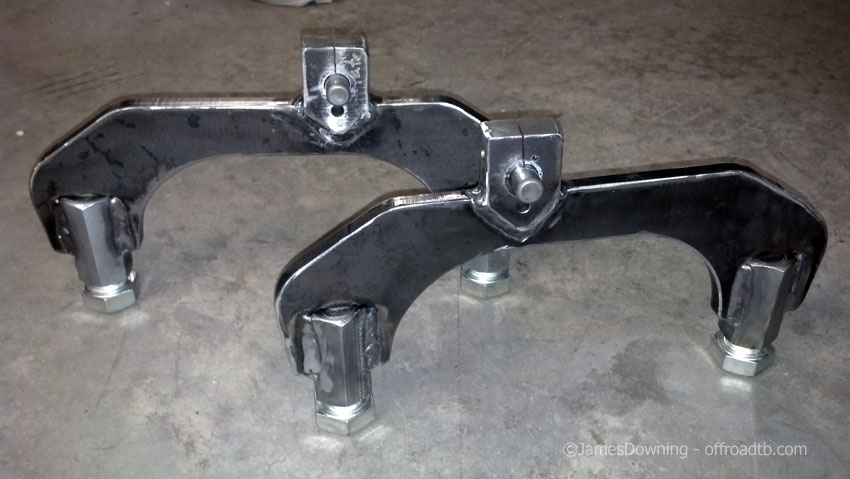
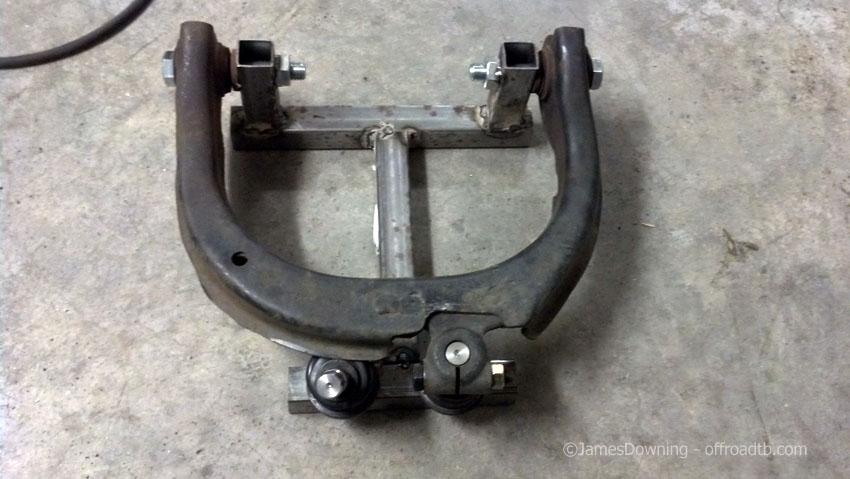
Finished products:
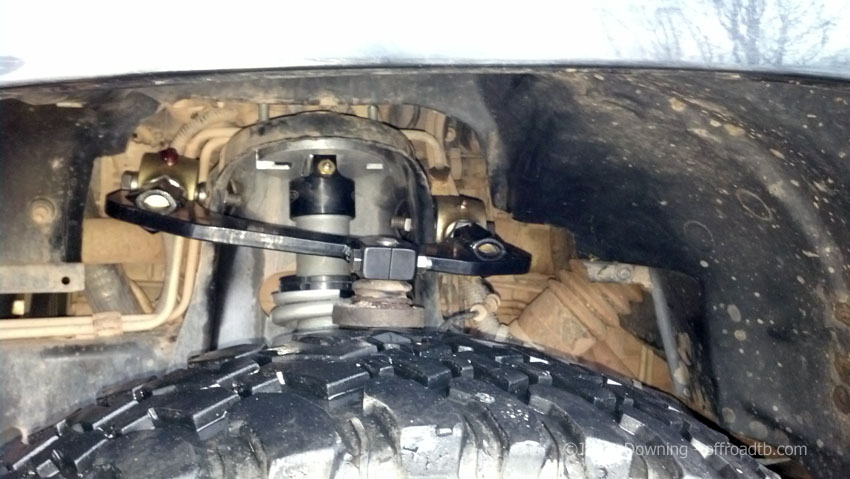
Installed left side:
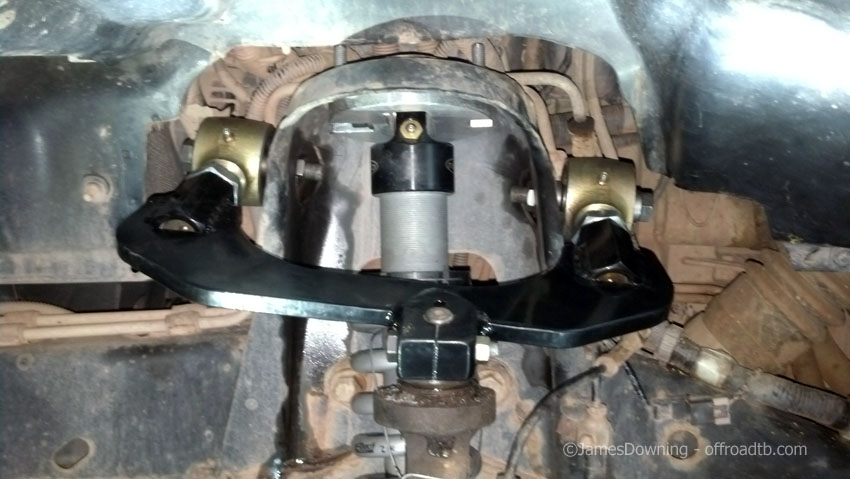
Fitment was a bit tight. What I didn't realize was that the bushings in the stock UCAs allow for some axial movement when installing the UCAs to the bucket. Mine didn't. So I had to grind out about 1/16" of material from the JJ arbors.
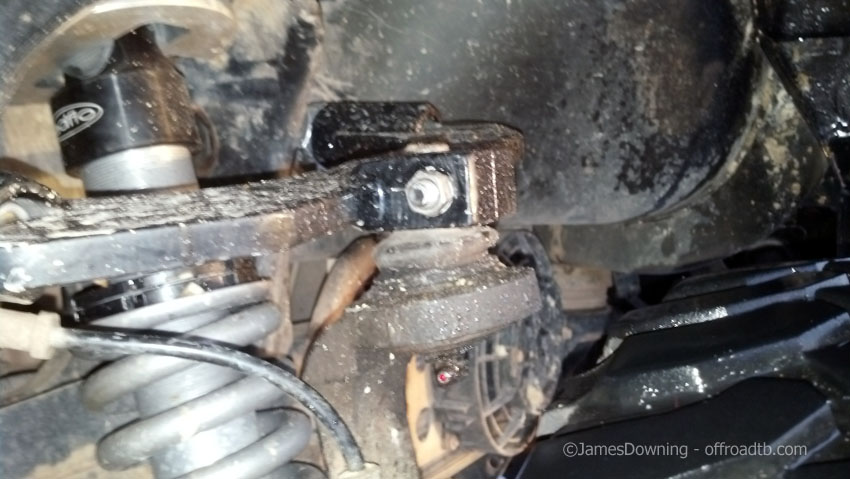
Note the lock nut on the inside of the bucket. I was worried that the tight JJs would work the mounting bolt loose. Also to note, the stock bolts are too short for JJs, had to get some new 10.9 class M14s, 100mm long for the attachment bolts. The front bolt on the pass side was too long though and hit the washer bottle upon my first attempt at install. Had to cut it down to about 90mm and it barely fit.
Also in these pictures, you can see the new Radflo front coilovers with 600 lb/in springs. They are a huge step up over the old setup.
Installed right side:
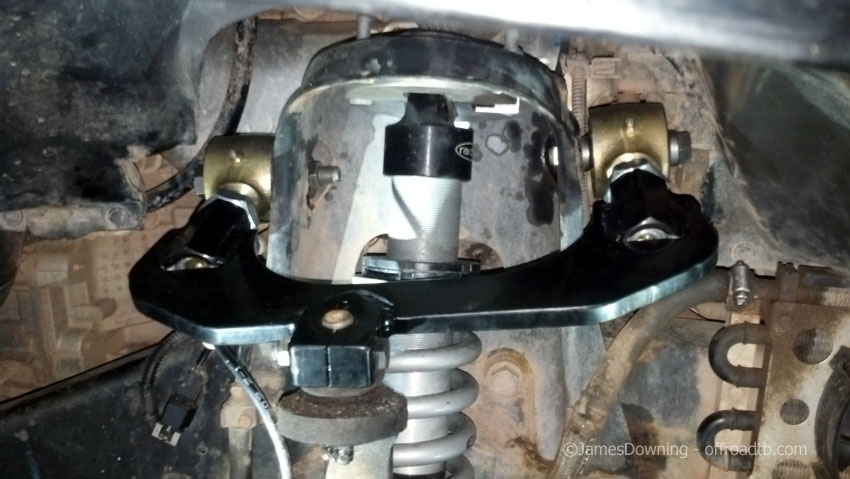
Better picture with better light:
Did a little testing at my local proving ground, and saw no issues. The JJs are a bit tight right now and groaned a bit at first (until the grease worked in), but everything seemed to work as expected. Really firmed up the front end (but found my outer tie rods were shot... DOH):
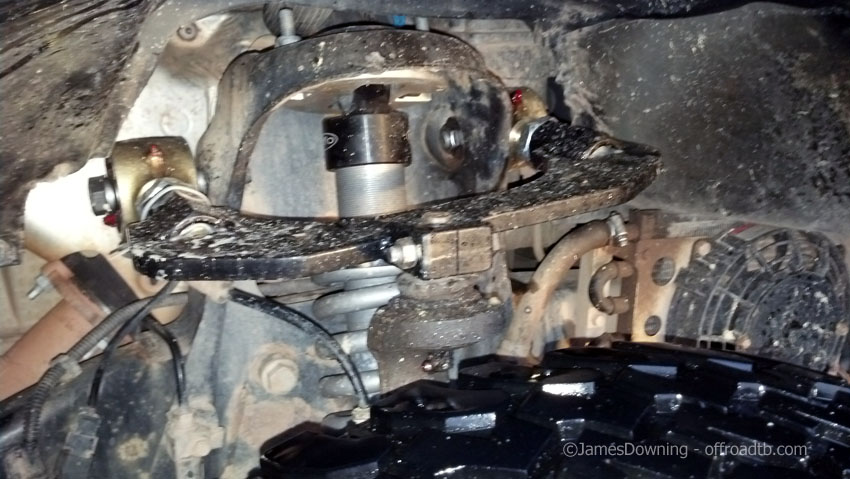
Ball joint angle is still not perfect, I guess my measurements were a tad off, but a ton better than the stock UCA... even flipped. I should have angled the pinch plate back a bit more, I did 9 degrees of tilt on that axis, must be closer to 14, the other axis was rotated 3 degrees, which seemed just right:
First step was creating a welding fixture with the stock arm:
Here's my original plan, M14 heims with spacers:
I didn't like the heims, thought they looked way too spindly (maybe I'll use them on my rear upper control arms). So I found some 9/16" Johnny Joints, and decided to see what they looked like. Much better, here's the comparison:
Computer layout of the design:
First rough layouts with the cnc plasmad parts. The main "wu tang" plate is 1/2" thick, the pinch is 1" thick:
Coupling nuts are the connection points for the JJs. Thread is 1"-14
Comparison shot, stock vs new plan:
Machining drawing for the pinch bolts:
Machined, had to extend the slot a bit further so the bolt could actually pinch the stud... the original plan was too stiff. Terminated the slot in a hole so there's no crack propagation point.
Layout didn't look perfect at first, had to take off a sliver of about 1/4" of material from the "wu tang" plate around the pinch plate.
Welded:
Detail of the welds, they weren't all perfect, but most of them looked good. Had to grind down a couple here and there:
Masked for powder:
Finished products:
Installed left side:
Fitment was a bit tight. What I didn't realize was that the bushings in the stock UCAs allow for some axial movement when installing the UCAs to the bucket. Mine didn't. So I had to grind out about 1/16" of material from the JJ arbors.
Note the lock nut on the inside of the bucket. I was worried that the tight JJs would work the mounting bolt loose. Also to note, the stock bolts are too short for JJs, had to get some new 10.9 class M14s, 100mm long for the attachment bolts. The front bolt on the pass side was too long though and hit the washer bottle upon my first attempt at install. Had to cut it down to about 90mm and it barely fit.
Also in these pictures, you can see the new Radflo front coilovers with 600 lb/in springs. They are a huge step up over the old setup.
Installed right side:
Better picture with better light:
Did a little testing at my local proving ground, and saw no issues. The JJs are a bit tight right now and groaned a bit at first (until the grease worked in), but everything seemed to work as expected. Really firmed up the front end (but found my outer tie rods were shot... DOH):
Ball joint angle is still not perfect, I guess my measurements were a tad off, but a ton better than the stock UCA... even flipped. I should have angled the pinch plate back a bit more, I did 9 degrees of tilt on that axis, must be closer to 14, the other axis was rotated 3 degrees, which seemed just right:
Jr_Explorer
Explorer
Wow! That is some excellent engineering AND machining! Great job! :wings:
 I don't know if they make them for your TB or not, but I just got RareParts tie rod ends for my Tahoe and they are over engineered close to the level of your new UCAs. Significant improvement in my front end after having them installed.
JamesDowning
Explorer
If a TB has wheel spacers, we can use the same tie rods as many other GM applications, many guys have used the ones made for the chevy HD pickups with a lot of luck (might be the same as used on the tahoe?). I like the look of the rareparts tie rods, but it would be nice to find a product that was designed for the tie rods to be attached on lifted suspension geometry. That's the Achilles tendon on tie rods... the boots rip and tear because of the bad angle, then the grease doesn't stay (or gets contaminated) and shortly thereafter the joint goes. The other issue I have with the super beefy tie rods, is that they might be TOO strong. Hear me out - if you do run into a rock face on, and something has to give, a tie rod is a very simple thing to change out. If the tie rods are too strong, that transmits a huge bending stress into your steering rack. A bent steering ram is much much harder to fix than a broken tie rod (and extra tie rods are also easier to pack!). If I don't just replace it with another stock-designed component, I'm not sure exactly what I will want to do with it. I guess I need to do some math to ensure the buckling strength of the tie rod is lower than the bending strength of the steering rack ram. The real challenge is knowing the strength of those steels they use.
HARDTRAILZ
Certified
The tie rod as the fusible link is definitely not a bad idea. Kinda been my theory and only broke one so far and 20 minutes to swap in another.
JamesDowning
Explorer
As a follow up, this is the breakage I've seen in the past on other people's trailblazers (and their trail fix) that my new UCAs were attempting to fix.

Image complements of user Gordinho80.
Here's another:

Image complements of user theroadie.
Image complements of user Gordinho80.
Here's another:
Image complements of user theroadie.
Last edited:
JamesDowning
Explorer
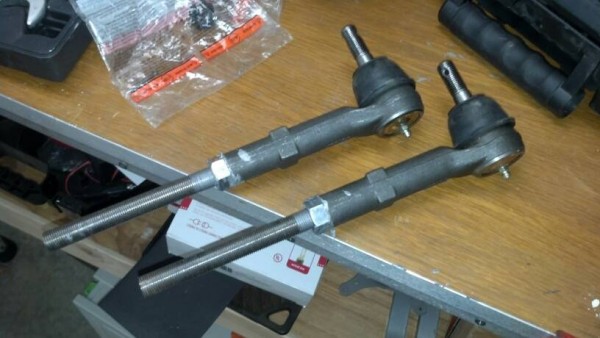
My outer tie rods were on their way out, and I couldn't just replace it with the stock TREs, I knew there would be a better option out there. Unfortunately there wast anything avaliable in the aftermarket that really fit what I was looking for.
So I used the outer TRE from the 2007+ HD trucks, and used the inner TRE from a trailblazer. Both accept the same male threads. So all I needed to bridge the gap was a 7.5" long M16x1.5 threaded CrMo (class B7) rod.
It simplifies my trail spares, because all I need to stock now is the threaded rod since that should be the mechanical fuse. I might also pick up some amount of strength from the CrMo rod, but I'm not exactly certain of the stock TRE cast/forged material properties to make a proper comparison.
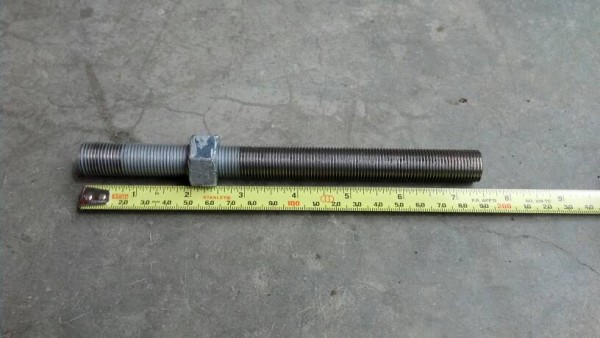
Last edited:
HARDTRAILZ
Certified
I like it. I got spare inner n outer. I just need to source the threaded rod.
Forum statistics
Members online
- Todd n Natalie
- jsandefu
- Hopeless Diamond
- PDXSting
- Gila Man
- Fores
- aaldape
- Malva852
- longboardface
- Roam.Wild
- Greg03XLT
- mhieatt
- DorB
- TuxStorm
- mfreidberg
- TommyG
- kmr99
- jbf
- 2 bikes 2 brown dogs
- MonsoonPress
- jlh6369
- 25.4
- Riversdad
- Power Wagon Family
- Long Rifle
- granthendry1956
- UglyViking
- K9LTW
- spr2022
- QuadRam
- rubonik
- Scooooooooop
- sburks737
- MotoDave
- driller
- 2auroras
- Obsessed2findARuggedHybid
- Dunzee
- lenny6753
- jetbuilt
- jbaucom
- Kingsize24
- buyrovers
- YukonMontanaTannerTrapper
- eddy_c
- Skippy T
- GetNorth_Overland
- BlueLantern
- Deleted Member 183
- CJD
Total: 570 (members: 72, guests: 498)