GMC Topkick 4x4 Expedition Camper Build

java

Expedition Leader
sounds like a used old electric meat knife to carve it down first would be ton faster. Or a heated wire running just long enough to slice down width across one stud to another or maybe even a wire saw for same purpose. Heat maybe not needed?
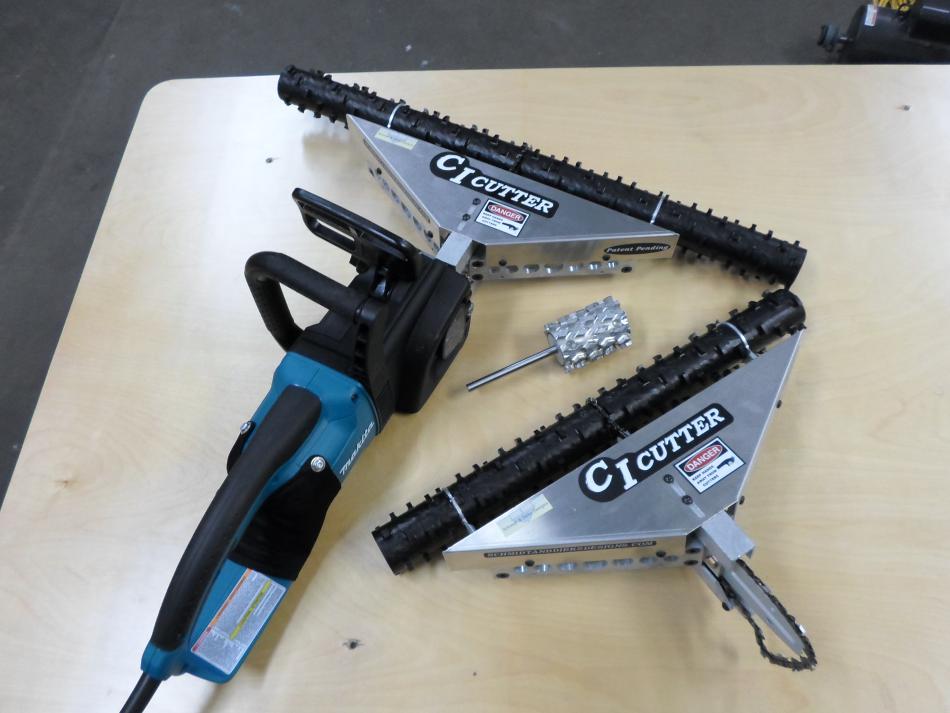
They make big ~36" sawzall blades, but the closed cell 4lb (IIRC) stuff was too hard to cut with them according to the installers. They just under wire cup grinders. Last time I did it (on a building) we used an CI cutter, its an attachment for a chainsaw, but they said it was only good on open cell soft stuff.

SAM_0113.JPG
 

Fatboyz

Observer
Cut my last window hole yesterday, which meant cutting through 2 ribs. Obviously this severly weakened the structure, so I braced with "headers" etc and it turned out pretty strong, I believe.
Installed first window as well. Turned out pretty good I think.
Next job is to sister up all the ribs with 1 5/8" studs to give me about 2 3/4" overall wall thickness.
View attachment 451911View attachment 451912View attachment 451913View attachment 451914
Are you going to put the inside trim ring on after you sheet the inside? I'm basically doing the same as you with an aluminum Uhaul box, also a 14'
 

Fatboyz

Observer
When you pop rivetted those windows did you have to drill the holes from the outside or were the outside holes there already? My windows all mount from the inside with the inner ring screwed through the wall to the outer.
 

Britboaters

Observer
My windows are standard RV windows with the inner trim ring designed to clam the window in against the wall. However it will be a while before my walls are installed. Also I really strengthend the structure around the window particularly the kitchen window bcause I had to cut through 2 ribs. So I decided to secure the windows to the aluminum skin and also some "Z" channel for stiffness. I drilled the rivets from the outside - 3/16 all aluminum rivets (for lightweight !! lol).
So now I have about a 1 1/2" gap around the windows, and the wall is about 2 1/2" thick whereas the trim ring is designed for 1 3/4" from memory. I'll probably build up this gap with styrofoam board cut to size, then get the walls sprayfoamed. Then when the walls are in I'll fit the trim rings with a thin strip of metal bent around the window to cover the gap left by the trim ring. Well that's my thinking for now.
I got a rough qute for closed cell foam spray of about $1200. Not too bad as the kits are about $600 each.
 

Britboaters

Observer
Fatboy, Your question on adhesives is good. Construction adhesive, such as Loctite PL, is designed for building construction. It has excellent bonding to metals, but not much flexibility. The adhesives designed for transportation industry, such as Sika 252 have a high degree of flexibility as well. This is critical as there will be so much flex in these bodies.
 

Fatboyz

Observer
Fatboy, Your question on adhesives is good. Construction adhesive, such as Loctite PL, is designed for building construction. It has excellent bonding to metals, but not much flexibility. The adhesives designed for transportation industry, such as Sika 252 have a high degree of flexibility as well. This is critical as there will be so much flex in these bodies.

Good point I can't seem to find Sika here in Canada but can get the 3M 5200.
 

Britboaters

Observer
Fatboy,
Not sure 3M 5200 is the right stuff, not sure its really designed for metals. Check out something designed for commercial vehicles, with flexibility. If you have a local commercial truck repair shop they may have something designed for truck bodies.
 

Brewdiak

kodiak conversionator
3M 08115 Automix Body Panel Bonding Adhesive Epoxy for Fiberglass Steel Aluminum

this... i've used it all over my rig from patching the light holes to attaching a strip of material to the cab roof to support my overhead console (screw into it) ... might as well be welded the stuff cannot be undone once it cures. it's nice too because you don't have to use the tube all at once - you can get extra mixing nozzles then use what you need ... the adhesive in the nozzle will dry, but you can just replace it and keep going days or weeks later.
 

Britboaters

Observer
Well I was getting a bit concerned on how much space I would need for all the Solar stuff. I need it anyway, so I went ahead and bought it all, except the batteries. It came today so I laid it out on the table to get an idea of the space. Oh boy, there's a lot of stuff and heavy.And did I say complicated ? I need to get all the heavy 12 volt cables as well of course.
Now I can plan the space, and start to put some of the cables in the wall....
 

Attachments

  • Solar parts.JPG
    Solar parts.JPG
    465.5 KB · Views: 123

patoz

Expedition Leader
You can't go wrong with the MagnaSine Inverter/Charger, and that's what I'm using also. What size did you get? I'm using the MS-2012 2000W model, along with their Mini Magnum Panel, Battery Monitor, Remote Control, Auto Generator Start Module, and eventually their PT-100 Solar Charge Controller. Now, if you want to talk about big and heavy, put all of this together.
 

Britboaters

Observer
Pat, Same inverter, Midnight Solar Charge controller, Midnight Solar combiner and other box, fuses, breakers,etc. I'll lay it all out and see what size cabinet I need.
 

Britboaters

Observer
I laid out all the solar components as if I was installing them in the camper, to see how much space I need in the cabinets. All the components, except inverter, will go in a space about 14" wide, in a cabinet under the counter. The inverter will go vertical on one of the cabinet dividers, leaving air space. I think we'll only use the inverter for microwave, tea kettle, coffee pot, maybe a small TV and computer charging. So I don't think we'll create much heat, and so will not bother with exterior venting. When hooked up to shore power, the inverter may do some battery charging, and create some heat. If this is an issue we'll have lots of power for AC while hooked up :):). By the way, we're planning a 12 volt AC split system.
There's lots of stuff to go under the counter - electical systems, inverter, water heater, water pump. Not sure if I can put a Webasto space heater there as well - we'll see.

One thing that may be worth sharing; I have 4 x 300 watt panels for the roof. I'm thinking a 5th panel which I can deploy away from the truck when its in the shade would be a good idea. That means I have to wire each panel separately to the "combiner", in parrallel, so they will all be at the same voltage. I can't wire in series to increase voltage. There may be a value to this in the case of one panel being shaded; it will only affect that panel. There shouldn't be much voltage loss as the max run from the roof will be about 12 feet, and I'm using 10 AWG cable for max 10 amps. Also if I do have a 5th panel, it will need to be similar to the other 4 for voltage compatability, etc.
Bob
 

Britboaters

Observer
Been working on frames to mount the panels on the roof. The front one is almost complete.
5" channel sides to give some protection from branches, etc.
2" square box across roof so that all the weight is on the edge of roof / top of walls.
2" angle frames to sit panels in.
This was my first attempt at aluminum TIG welding, so I'm fairly pleased with the results !
Cutting the 25 foot length of channel was fun, so I used my skil saw and it worked just fine.
The channel has same profile as steel channel with the angled flanges, so I milled one side flat on my little Bridgeport so the bolt heads will sit flat.
It'll be a bear to mount this frame at front of the box as I have to put the panels in while on the ground, so I can get to the bolts. So the whole thing weighs about 120 lb. We'll have fun with the install.
Bob
There were a couple of really good welds - "like stacked dimes"
The rest were like "stacked rocks" !!
Cutting channel.JPGMilling flat surface.JPGFront panel.JPGFront panel 3.JPGFront panel 4.JPGPretty weld.JPG
 

Forum statistics

Threads
185,830
Messages
2,878,685
Members
225,393
Latest member
jgrillz94
Top