Los Angeles -Class Attack Sub(urban), Build / Collected Werks topic - '02 k1500 Z71

rayra

Expedition Leader
Lot of rain today, couldn't get a lot done.

Did some CAD / 'cardboard aided design' for a firewall mounting plate for the big rotary switch. The top of the firewall / cowling area isn't wide enough for all four mounting screw locations on the switch in the area I want to mount the switch. So I'm going to use a plate to create the wider flat area that's needed. I'll use the two holes from where the solenoid was mounted and also use some self tapping screws in the top two holes on the switch. The bottom two switch holes will just be bolted to the plate.
Not sure what I'll use for the plate, yet. Delrin, nylon, something rigid that can take the heat and won't corrode.

winch120 rotary switch.jpg
winch121 rotary switch.jpg


Then I started messing with the bracket for the front grill plug. I got 1-1/2" strap steel, instead of 2". It should be sturdy enough and a bit easier to work. We'll see. The bumper bolt hole is deliberately way off center, so the bracket rises behind the grill. I may still have to notch it down low where the bottom edge of the grill runs. But I couldn't do any more fitting today. Tomorrow I'll get the bottom washers / spacers and grill notch fitted, get the bracket bolted in place and then make a stab at where to bend the other end to create the shelf the plug sits on / is bolted to.

winch122 front plug bracket.jpg
winch123 front plug bracket.jpg
winch124 front plug bracket.jpg
winch125 front plug bracket.jpg
 
Last edited:

rayra

Expedition Leader
2nd pass at the front plug bracket is done. It will work but could be better. The bracket leadign edge and the grill are a deep interference fit. I notched the bracket upright deeply in two places and the bottom inner edge of the grill itself a good deal to get things to fit.
The next version will be 2" wide flat stock, after all. I think it needs the material on the trailing side of the bracket. The 1-1/2" wide bracket is cut down to only 5/8" in two places. The bumper bolt hole in the bottom of the bracket can also be turned into a u-notch, allowing the entire bracket to sit further back.
If one doesn't care about the airflow obstruction, a simple 'C' shaped bracket with the width of the metal flat on to the wind could be made without any fitment trouble at all. it would run towards the radiator from the bumper bolt, rise vertically and then forward into the grill opening. With a bit of welded triangular bracing top and bottom, it ought to be stiff enough for the coupling / uncoupling forces of the SB175 connectors. I chose to orient the bracket edge-on for both the forces and airflow.

The red lines in a few pics are tracing the notched / interference areas. Bracket's done and painted, in a little while I'll go rush it with a heat gun and put everything back together again.

winch126 front plug bracket.jpg
winch127 front plug bracket.jpg
winch128 front plug bracket.jpg
winch129 front plug bracket.jpg
winch130 front plug bracket.jpg
winch131 front plug bracket.jpg
winch132 front plug bracket.jpg
winch133 front plug bracket.jpg


Time to take some measurements and figure just how much cable I need, and get the plate done for the rotary switch
 

rayra

Expedition Leader
Thanks very much.

between illness (minor head cold, so far), wu flu panic and steady rains, not getting much done the last couple days. Got a cabling / routing plan figured out on paper, just need to crawl around and make measurements and have an electrician acquaintance that may be able to save me a bunch of $ on the 1/0 welding cabling. Going to need about 30-32' of it and will probably go all black, not anal enough to care if the positive runs are red. I'll just mark their ends with red tape.

I have some textured black plastic offcuts that I'm probably going to fashion the rotary switch mounting plate from, but not sure it's thick enough, have to find it. Same stuff I made my dash tablet cradle out of. I might make the plate with some top cover, like an inverted L-angle, as I noticed in the past I was getting some water runoff from the coaming onto the solenoid in that area, so having a top flange extend out over the rotary switch has some appeal. And as with the tablet mount it's an easy process to heat up and bend the material.


In other news, I got the SAE plug / bulkhead fitting that will suffice for my rooftop solar connection. And will likely make that wiring install / finalization for my rooftop solar install when I disassemble my whole rear cargo area for the 1/0 cabling install in a few weeks. Both processes involve takign out the left cargo interior sidewall, which requires takign out some of the vehicle platform / drawer setup anyway. And I have to take the other side apart ot run a replacement backup camera too as well as making some wiring and power port changes on that other side. Will also be trying to add a power switch / rheostat for the rear vent fan, so I can run it when the key is off / while sleeping in back.


I've also found a vendor down in lower L.A. where I can get HDPE 'StarBoard' sheeting in black, 1/2" thick, 4'x8' for $200+tax. That's going to become the 'final' roof deck. No more MkI/MkII/MkIII plywoods. The environment here in the southwest is just too sunny / hot for any wood / paint / epoxy deck I can manage. None are lasting more than a year+. So MkIV is (U)HDPE. Still can't stomach the $400+ for a suitable aluminum (/ diamond) plate. Although by the tim eI finish my long drawn-out iterative process, I'll have spent that much total anyway.
 

rayra

Expedition Leader
Mostly dry sunny day today. I have a few more projects to complete on the Suburban and I'll effectively be done with it. The winch project will be finished in ~June. Finishing the power cabling in 3-4 weeks, just took the final measurements today, need 30' of 1/0 welding cable, about 15' ea of red and black if I want to get fancy. And a few more terminal lugs. Then the time to tear everything out of the back and complete several projects at the same time while things are dismantled.

New factory fuel pump is sitting on the shelf in the garage, waiting for me to have several days to replace it and do other things related under there, or until the whining pump fails, whichever comes first. Probably do that, (4) u-joints and make metal templates for my fuel tank protection plate all in the same go. Probably first week of April during my college spring break

By the Sub's 6th anniversary in November I'll be ready to futz with a bugout trailer. well really a triple-purpose utility trailer and welding re-education. Did some oxy-acetylene and arc welding decades ago, lately been farting around with a cheap flux-core wire feed welder with mixed results. want to step up to mig/tig with shielding gas.
Thinking to get an inexpensive HF 'SuperDuty' 1700# folding trailer and flip axle, reinforce, upgrade wheels and tires, put a flat/rectangular poly 20gal tank above the axle / under the deck for either water or fuel (probably fuel, I have an s-load of both water and gas 20L), ~20"T stakebed or solid sides, 3/4" exterior grade plywood deck. Maybe even a fitted canvas or 1000D cover. I can improve my welding as I improve the trailer.
Don't have room on our suburban residential lot for parking a trailer and the compactness of their folding design would work great to park on the side of my garage behind our gates. Keep a lot of our camping and prep supplies in portable containers. So setting up a trailer and loading it up would only take about 30mins. Last few years we've had 4 major fires drop ash on our house in Santa Clarita, from four different directions. I'd like to be able to take a lot of stuff out of here in a hurry if I have to. Even with decent insurance (USAA). Should have done the trailer thing many years ago.
 

rayra

Expedition Leader
Got measurements completed a couple days ago between rain days. And just yesterday found an affordable vendor for 30' of 1/0 welding cable via Amazon and ordered more Anderson-coupling stuff from Powerwerx.com. So in a few days I should have all I need to complete the wiring project. The front end almost right away. The rear is a lot more work as I have to dismantle everything in the back and am doing 4 different projects while I am at it, back there.

And the first week in April is my college 'spring break' and when I am doing the fuel pump replacement and fuel tank protective plate templates and replacing all four u-joints. And if there is enough time left I'll be doing the rear wiring too.

The April Harbor Freight catalog has a $289 coupon for their 12k winch and I'm probably going for it but might have to wait until the pandemic panic resolves and we're mostly back to work. Wife will kill me in my sleep if I spend any more cash on 'hobbies' before we're fully employed again.

eta cable supplier. At a first look his per foot prices are on par with everyone else. But they're including some copper terminal lugs and heat shrink with the cable and when the separate prices for that stuff is factored in / out, the per foot price on the cable is very good.

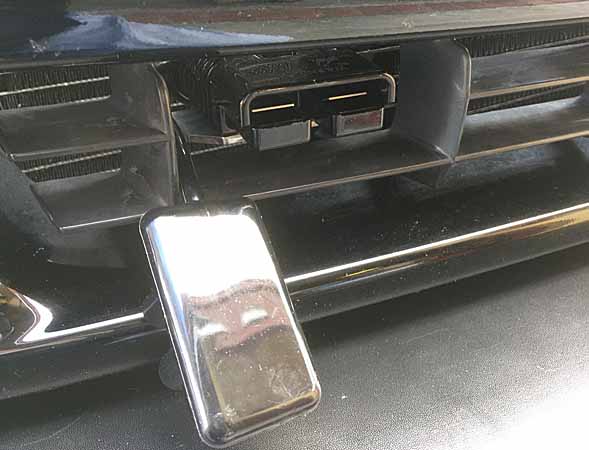
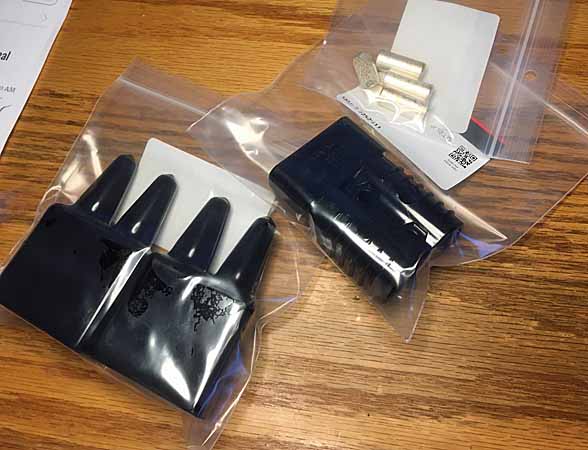
I got more rear boots for the SB175 connectors, I bought one to inspect, really like the fit so I got 2 more, one for the rear plug, front plug and for the plug I'll be fitting to the winch itself. I also got another black connector that, just for appearances. And I got some #4AWG reducer bushings for future jumper cables, so I can put a set of plugs on those and be able to plug jumper cables into the vehicle at either end.

Spent about $150 on all that. The whole wild cabling and rear power module project is ~$500-600 over the last four years or so. And about another $360 to go for the winch and a Smittybuilt snatch block. And then I'll have everything I need winching operations. Already have 30k# pull strap, 30k# tree strap, 9500# shackles, I'll have the steel cable from the winch kit re-fitted with saddle clamps to serve as a 60'+ anchor or extension cable. And the 100' dyneema rope is waiting to be installed. Gloves, hard rubber wheel chocks, got all sorts of other useful gear for winching. cheap moving blankets. Various types and sizes of shovels. Small tool bags / throw bags, walkie talkies etc etc.

I'll photo-document the last cabling installs, maybe do some front to back overall views, when I finish things up.
 
Last edited:

rayra

Expedition Leader
289 for a 12k winch is a hell of a deal... but man... I only buy from Harbor Freight if its stuff I plan on breaking.
well that's a shame. Other than some young men screwing around with a red jeep that manage to break one, I can't find any other negative reports on youtube from people actually using the thing.
They have some good stuff if you look into it. There's a multi-year thread on the Garage Journal forum that's devoted to member experiences with all sorts of products from Harbor Freight, giving ratings on usability and value. There's some stuff identified as junk, there's a lot of stuff that isn't. And it sure beats the hell out of snark and dismissive lore.
Lot of tradesman rating their tools in there, too. People that actually use tools hard, every day. .

And there's already a larger ongoing topic with your type of rote dismissal about these winches, in the Recovery Tools subforum.
 

rayra

Expedition Leader
This is the type of wire loom I'm looking to sleeve over the double run of 1/0 cable on the winch end of things. With the black connector and PVC boot on the plug, it should look pretty good.

iu
 

badm0t0rfinger

Raptor Apologist.
well that's a shame. Other than some young men screwing around with a red jeep that manage to break one, I can't find any other negative reports on youtube from people actually using the thing.
They have some good stuff if you look into it. There's a multi-year thread on the Garage Journal forum that's devoted to member experiences with all sorts of products from Harbor Freight, giving ratings on usability and value. There's some stuff identified as junk, there's a lot of stuff that isn't. And it sure beats the hell out of snark and dismissive lore.
Lot of tradesman rating their tools in there, too. People that actually use tools hard, every day. .

And there's already a larger ongoing topic with your type of rote dismissal about these winches, in the Recovery Tools subforum.

I was neither being snarky or dismissive. I was merely stating most stuff I buy from harbor freight I beat the crap out of, and sometimes it means that certain tools get doomed to their fate, partly because of the price point. If I am building a 4000 dollar all in offroader, you know what? I'll probably buy that 12k winch and its going to get beat to hell. Its not because I think its disposable. Sure I could spend half my budget on a Warn winch, but where the fun in that? I'm not some snob that thinks you must have this or that on the front of your truck or else you're asking to get have it break down on you; the type of talk you're referencing.

I follow many different forums, heard plenty of anecdotes and even from my own experience its hit and miss. I love a lot of the stuff they have. I don't think you need a drawer full of Snap-On when a tool from Harbor Freight will do the job. I use my tools every day as well, its literally part of my job.

Harbor Freight has a role and it fills it nicely.
 

rayra

Expedition Leader
Few more bits and pieces trickling in, the 30' of 1/0 is due in a couple days. My 'spring break' starts next Friday and I'll have 9 days to do about 7-8 projects spread across two interrelated groups.

winch134 last partst.jpg


Start with pulling the rear driveshaft, siphoning and dropping the tank and swapping the fuel pump; working up the templates for the fuel tank protection plates, and then swapping the u-joints in both rear and front driveshafts. And poking around at the apparent slack in the front inner axle / diff. Put it all back together and test.

Then it's pull everything out of the rear cargo area, drawers, platform, power module, both cargo area trim panels. Install the replacement camera and cabling. install the rear bumper power plug cabling. Install the rooftop solar bulkhead connector in the roof rack footing and route the wire down the driver side 'D' pillar to the cargo sidewall power connection area. Take a good long look, photos and measurements related to removing the factory subwoofer and replacing it with an onboard air system or pump. Then add a rear switch / rheostat and diode isolation for the rear AC vent fan, so I can turn it one when sleeping in the back.
And maybe create the baseplate for the rear drawers, for a better and more secure mounting of that stuff.

Before then I might get the upper rack foot modified for the bulkhead plug and feed the wire down into the ceiling.
I can make the two short lengths of cable for the rear power module which will be the path to the rear plug. As well as start fashioning the rear plug cable extensions.
And I could conceivably do the front plug and rotary cutoff cabling and new ground for the Aux battery. Could do that stuff this weekend, if the cable comes. But I have midterms to prepare for and take before next friday.
 

rayra

Expedition Leader
Well I got two more Amazon boxes full of rubber dog crap from China today and I don't really want to touch them. 30' of 1/0 welding cable, 10 1/0 terminal lugs, 6' of shrink-fit, and a 20' jumper cables with actual 4awg fine strand copper and thick copper jaws. And a centering punch. Last of the stuff needed for the vehicle wiring project. Which I've suddenly lost enthusiasm for.
 

Forum statistics

Threads
185,910
Messages
2,879,496
Members
225,497
Latest member
WonaWarrior
Top