OBI Dweller Review and Discussion

glennsmith15

New member
New forum member here; so glad I found this information resource and I look forward to contributing what I can for others.

My wife and I picked up our new '22 OBi Dweller 15 two weeks ago. We live in the Mid-Atlantic of the US, so this is off season for us, which is pretty anticlimactic after such a purchase. But in a way this is OK because, without a comprehensive manual, we can take the next few winter months learning as much as we can and making mods that will prepare us for adventures starting in the spring.

My first question/concern: the RV dealership had run antifreeze through the entire system. During our PDI I had requested that they demonstrate the proper operation of the plumbing and electrical systems. That meant that they had to "un-winterize" the unit.

Getting back home I wanted to re-winterize it but I found that there was no by-pass for the Truma Combi. When draining the tank I saw some remaining anti-freeze coming from the low point drain.

So I know that Truma recommends just draining and not loading it with Antifreeze, but there already was some in there. My winterizing when I got home involved blowing out all the lines with compressed air, draining the heater and all the tanks, reloading the unit with antifreeze and then draining just the Truma (out of concerns of the corrosive effects of the antifreeze.)

Any experienced RVers out there who can tell me if I've made my life more complicated/costly by taking this route?

Thanks in advance.
I had a similar question and decided to just do the drain and blow out step. It's gotten down to 10 degrees for multiple nights and I refilled and went camping and had no leaks or issues. If you don't plan on doing any winter camping maybe it is worth it but I believe the draining and blowing out is sufficient and a lot less work.
 

rblitz

Member
Anyone know what this little do hickey is on the door? Looks like it may have been designed to hold the door open on a catch, but the D15 has a hook for that down low.
20221210_073450.jpg
 

AMMO461

Member
@rblitz ,
We hang a dark pillow case pinched in between the 2 doors. Just drape the edge over the top to keep it from falling down, Remove it in the morning, all is good.

As for the wire loop, it's the handle that you pull on to separate the 2 doors. It kind of acts as a screen door handle.
 

RJWB

Member
Good morning, I'm looking for some advice for DC to DC charging for my OBI Dweller 15 travel trailer. As you know the Dweller comes pre-equipped with a Anderson DC to DC charging cable. I'd like to take advantage of this improved charging. At the same time I need to be careful not to damage the tow vehicle. My tow vehicle is a 2022 Toyota Tundra. As we all know today's cars have a lot of electrical equipment and I don't want to do anything to damage the truck and/or impact the trucks warranty. Looking for advice, has anyone done this before?
My plan is to purchase a Redarc battery isolator (SBI12). I've been told this is the correct product to use for cars with smart alternator's I'm making a bit of an assumption that my Toyota Tundra has a smart alternator.
I've attached an image of the basic wiring diagram. Looking for advice. Thanks
1670954720043.png
 

rblitz

Member
Good morning, I'm looking for some advice for DC to DC charging for my OBI Dweller 15 travel trailer. As you know the Dweller comes pre-equipped with a Anderson DC to DC charging cable. I'd like to take advantage of this improved charging. At the same time I need to be careful not to damage the tow vehicle. My tow vehicle is a 2022 Toyota Tundra. As we all know today's cars have a lot of electrical equipment and I don't want to do anything to damage the truck and/or impact the trucks warranty. Looking for advice, has anyone done this before?
My plan is to purchase a Redarc battery isolator (SBI12). I've been told this is the correct product to use for cars with smart alternator's I'm making a bit of an assumption that my Toyota Tundra has a smart alternator.
I've attached an image of the basic wiring diagram. Looking for advice. Thanks
View attachment 756460
I've been investigating this as well given that many of my trips are likely to be hours long and I don't want to reach a dispersed camping location and have to charge off a generator immediately.

I've found several youtube videos on how to wire up Anderson plugs, but what I HAVEN'T found are kits sold in the US for this. I also have heard that there are options to do direct wiring to the alternator. I'd be interested in anyone doing this in the US.

Here's one Aussie video on different kits:
 

WillySwan

Active member
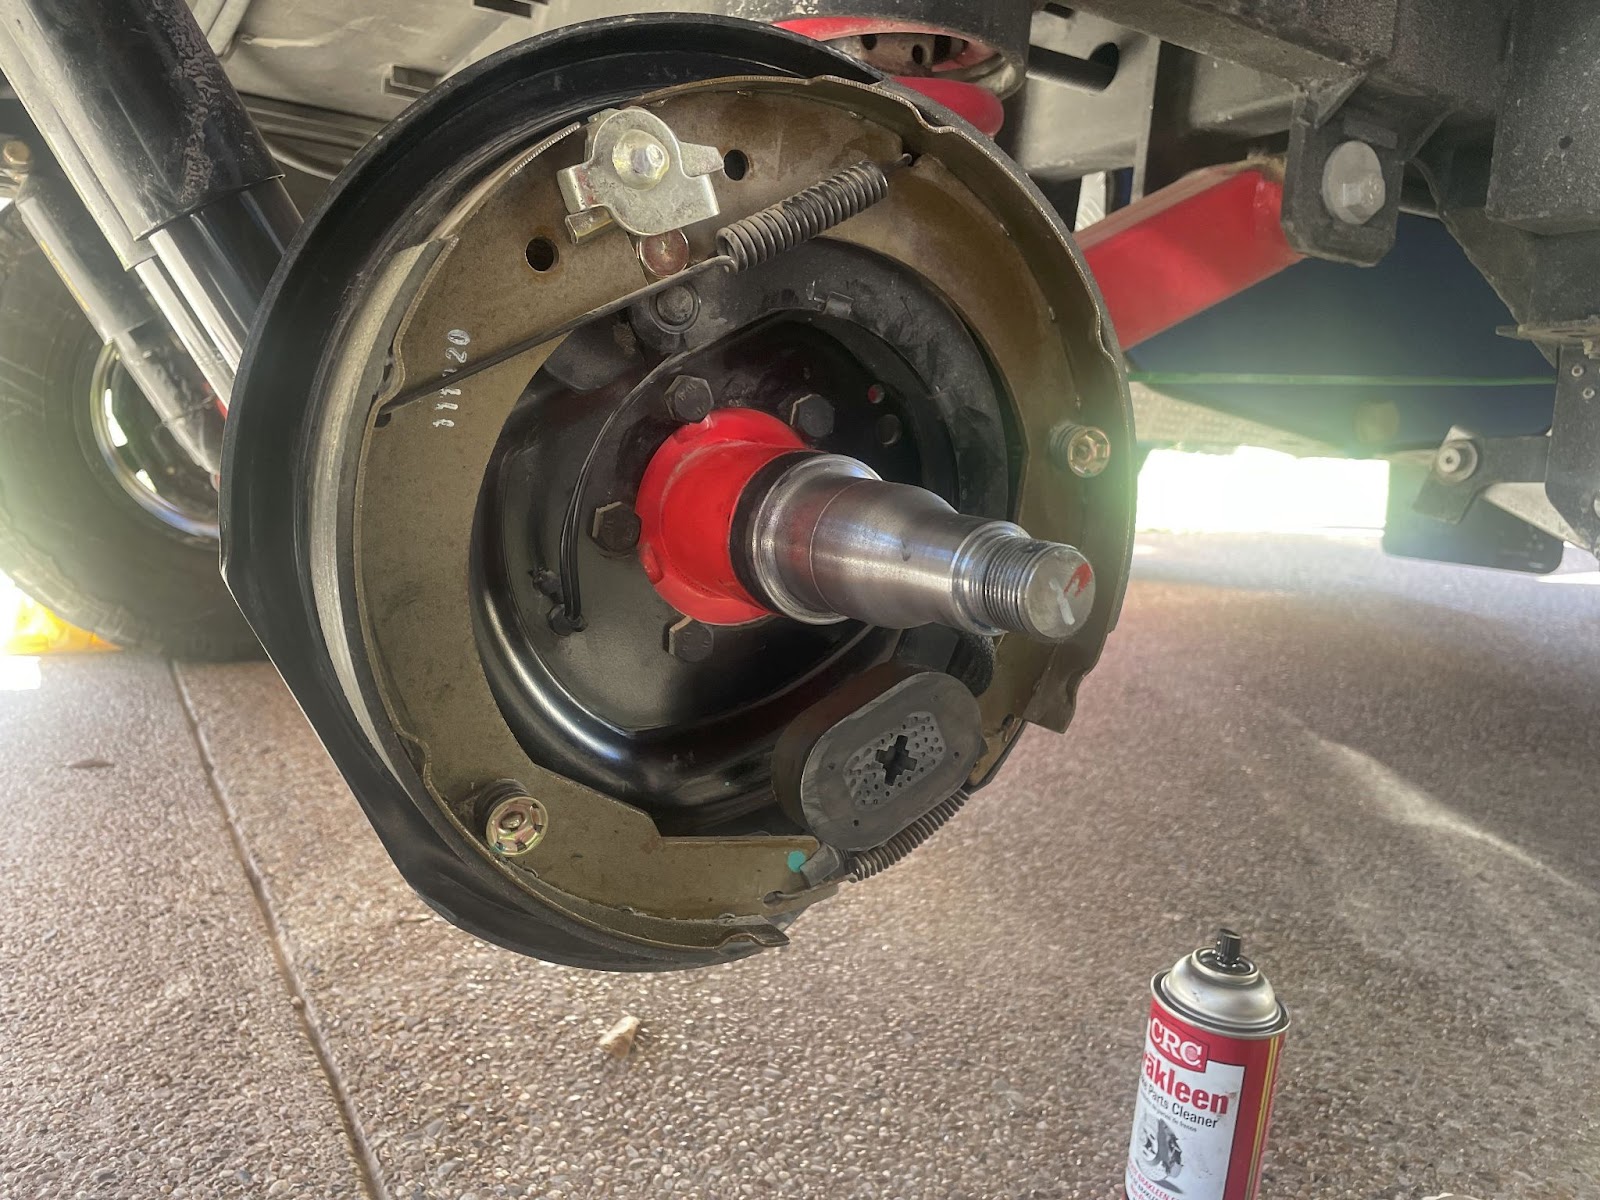
After a year and change, I serviced the wheel bearings and adjusted the brakes on my Dweller 13. Given the overseas manufacturing and the lack of any details from OBI, I was not sure what was going to be required for grease seals and bearings (if needed).

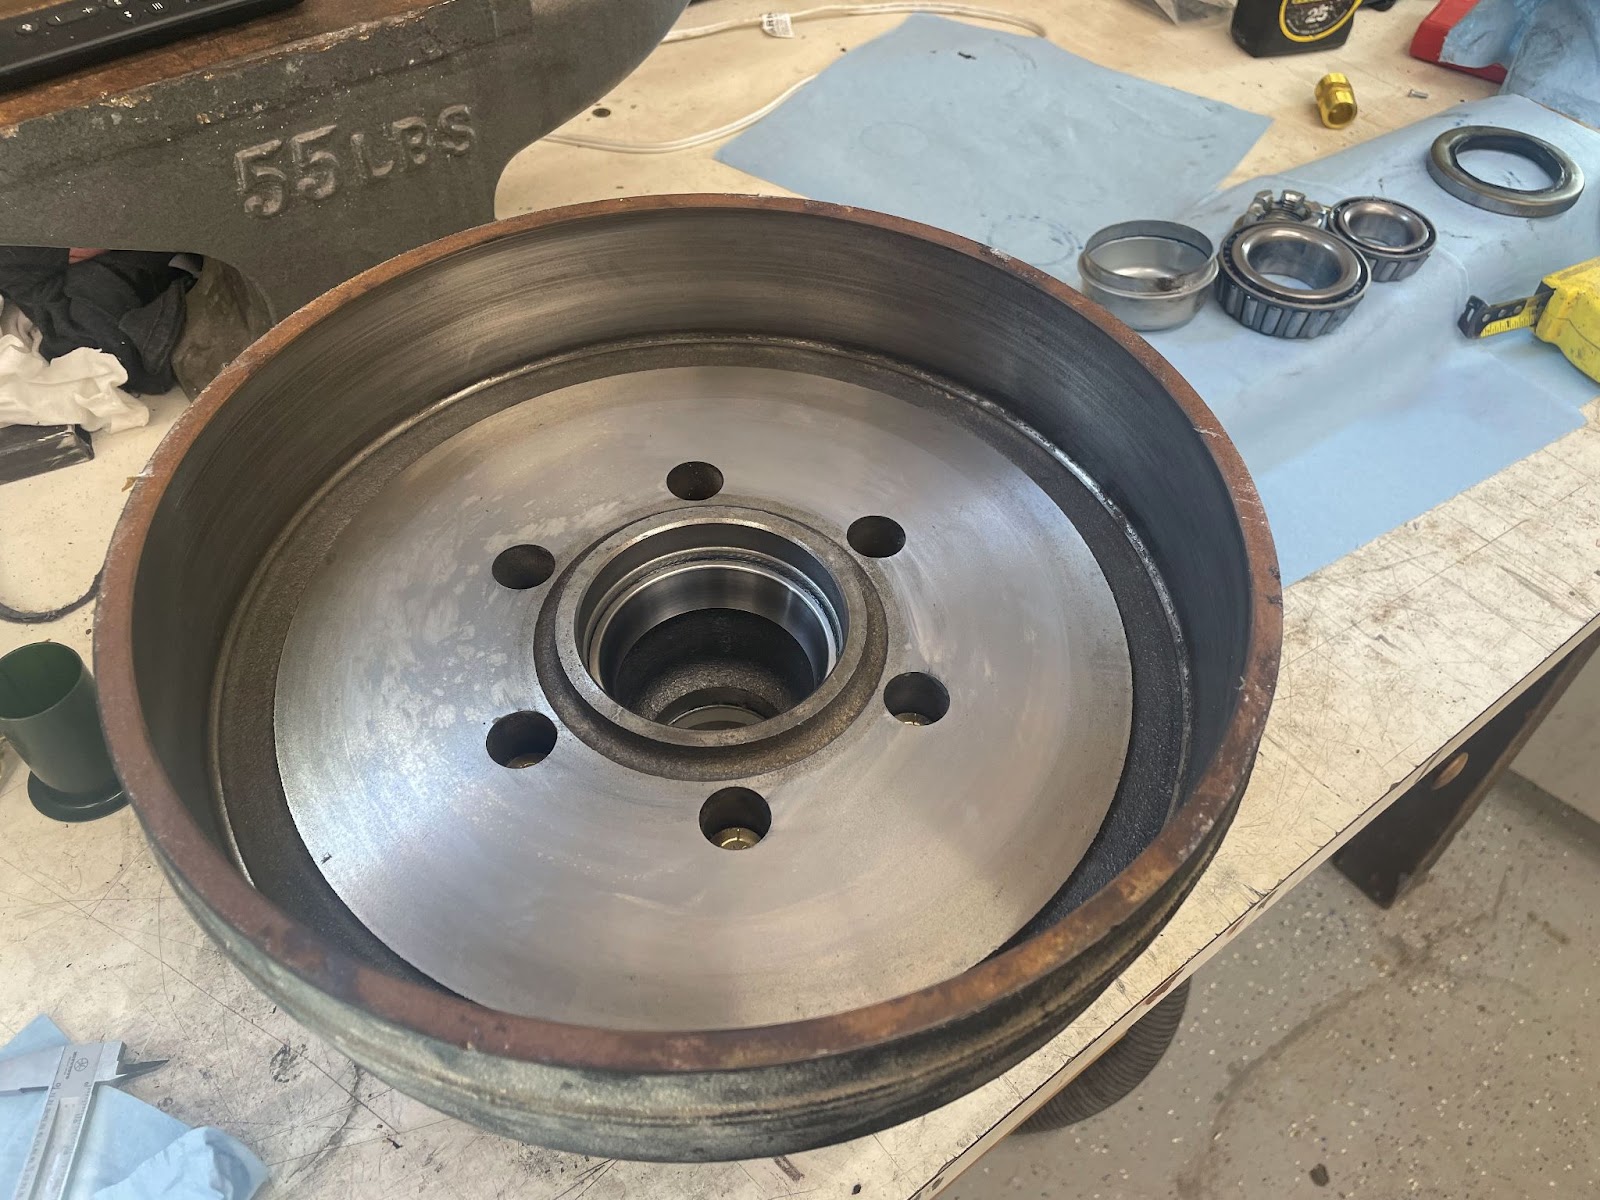
Inspection and measurement confirmed the brakes and hubs are Dexter-style 12” x 2” drums. Further inspection confirmed that all the service parts are exactly the same as the equivalent Dexter 6000 lb hub and brake assembly.
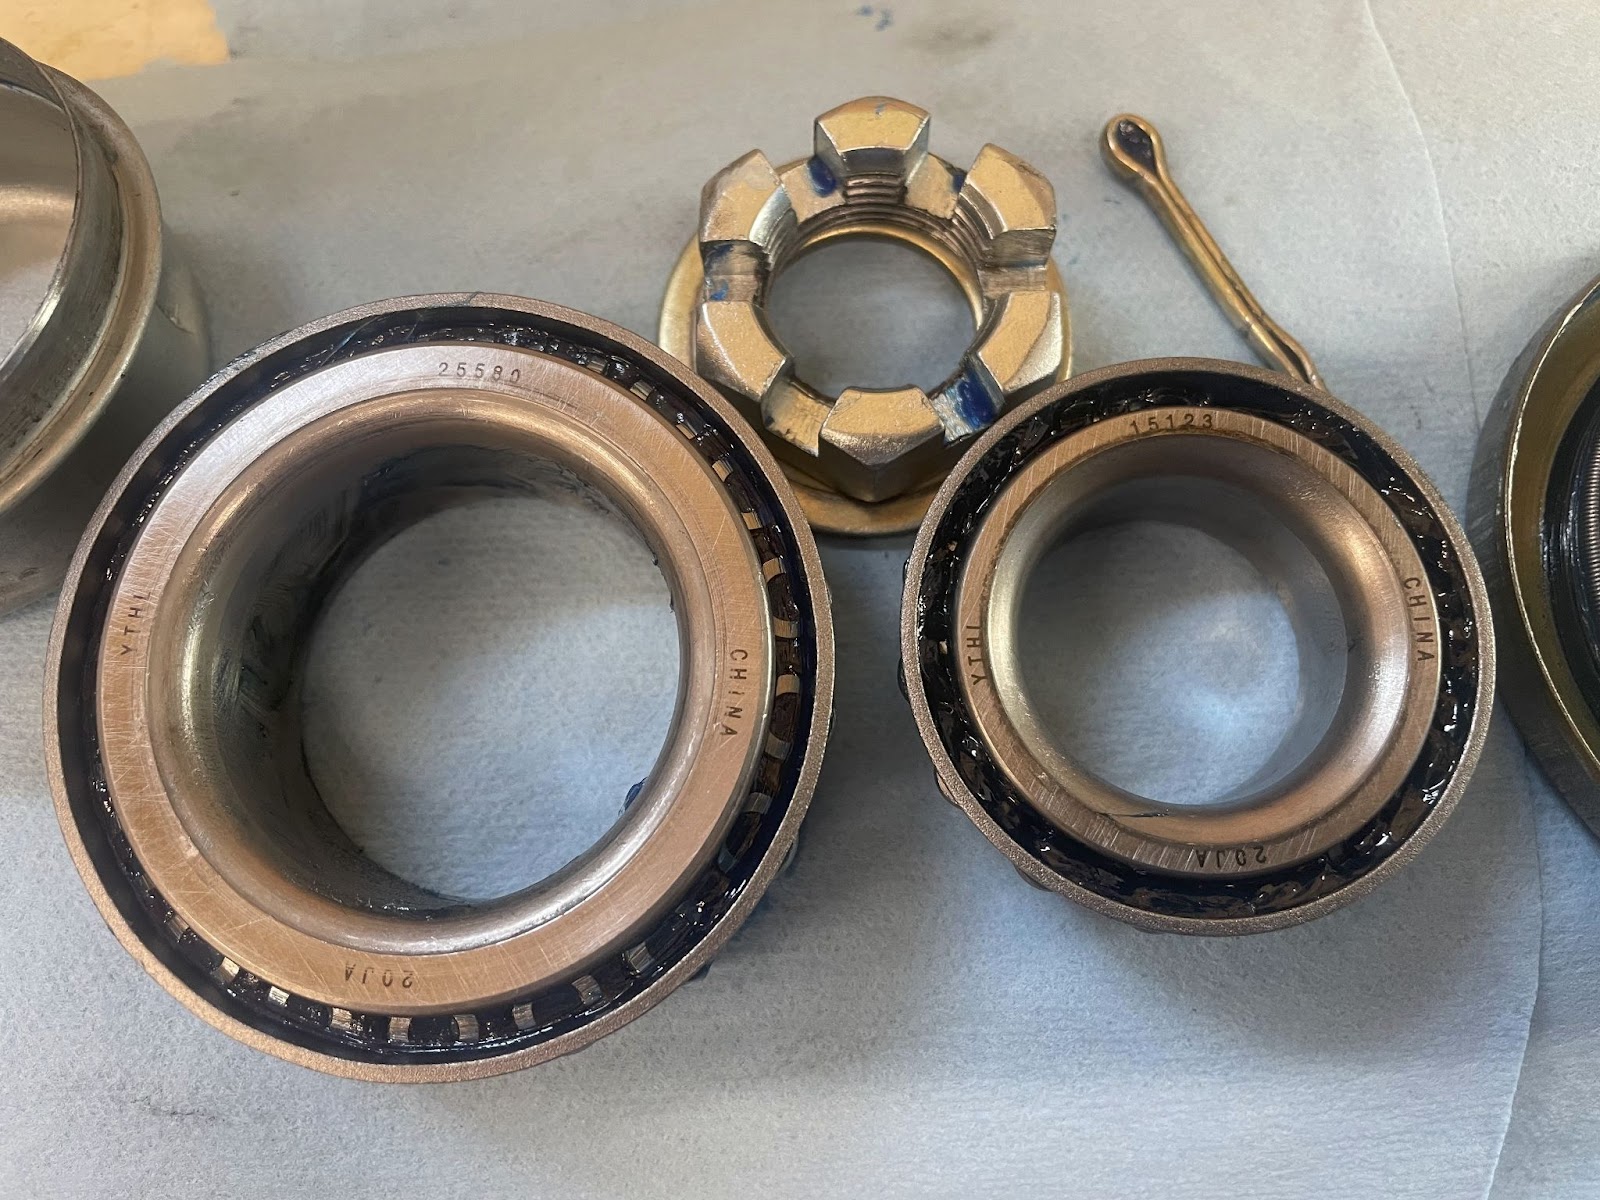
  • Grease Seal: 3.376” OD, 2.250” ID, Spring-loaded Double Lip. Dexter p/n: 010-036-00
  • Cotter Pin: 5/32” x 2”
  • Outer Race: p/n 15245, 2.441” OD
  • Outer Bearing: p/n 15123, 1.250” I.D.
  • Inner Race: p/n 25520, 3.265” OD
  • Inner Bearing: p/n 25580, 1.750” ID
  • Dust Cap: 2.44” OD
I was also happy to find that everything was in good shape. I have pulled my Dweller about 7K-8K miles. The brake shoes had the expected wear with no signs of dragging on either side. The bearing and hub cavity were “fully packed” with a bright blue grease. There was no sign of water intrusion and the bearings were in excellent shape.

Given that I did not know the specifics of the grease type, I went through the tedious process of fully de-greasing the bearings and hub cavity. I repacked the bearings with Lucas Red-N-Tacky, replaced the seals, and reinstalled with fresh cotter pins.

Servicing the bearings is a messy job but very straightforward to do with no special tools required ( I find a curved claw hammer as the perfect tool for removing grease seals). Be sure to adjust the brakes as well while you are at it. You can use a large screwdriver to turn the adjuster star wheel, but I think it is worth it to buy a nice brake adjusting spoon. If you have not done this before, Dexter has some very good videos covering both procedures.

CS64pFC7oW_VdilvY0eAmuTKz9LCj5h7SK8WenvQsLZRbhi9Ng9w_FZlOSf9C22EgIdsqLwXeKbKmtJGCWPNlKOhKApNlkSp2Iyd61AWv5GEHAnbFp705FjaQ32NPErcOcs4-HqTafruMbT-Kb7BoRtDzjWWNn05pXeDlg0BrX9gkddzZAXsKb2mn6Urlw


vOZOckq78vz6WS3zjuQvM9Nut7ov7uS8ilWclxc3ppDMAPHgVqPwpKKAvNztUXPhpzk4QNvDIWQ2PFt6yu5bNkKedbjyQ0n0vSrfgLOw67bXttxAwFBIvQFhIEUR_1nBfJ3lOQnH40KeCn0bCHt74LA-bIDBcIt387vfacukaYkgsBIkoIJ8ZR4FA8rj2g
QL1szEooVWqNJQh9R8X7Zmi1iXma5ET9eC9nn6Q44ipUY1lEJtynCMbQSk1hsrtBHXJAJqwaHrTDqqvpCHyZ_RV3nstp0GcGIkGKizl1qg6Ub4GNYsbjwgDIm1PRtQZYr0YUYPmlKgftXY6xz_VwE-4Me7hcWW0fIGB_kQDFZGNl-6XJT20A61ocww3UgA
TArfseR9bm4rWsRkqh14ALwtfRPRgq7Ar0SDjgD7P9rRJ-4UH_FHr80k5I9krN7eHMJvw7MIiFFgHlL94KLMHBZmpaPCufhit-w6sAg2kimhqrCCrQpYnbSkAVr27gQoJCJnGTYVILVXKxFES1OWlT_Ddbh-MRf52V_ZxP7qVlafyrJi9kHx-lY_ZBoZWg
 

RJWB

Member
Thought I'd share a modification with the group. I really didn't like the white bathroom floor. Didn't stay white long. I had seen some posts on the Opus Facebook page where folks had modified the floor with teak wood. Teakwood is crazy expensive so I went with a vinyl product with suction cups on the bottom. I had to order two pieces from Amazon and cut to fit. I'm very pleased with the outcome. Thanks
 

Attachments

  • Floor.jpg
    Floor.jpg
    1.4 MB · Views: 74
  • Bath Mat.JPG
    Bath Mat.JPG
    174.9 KB · Views: 67

rblitz

Member
I saw this awning extender on the MDX page the other day. Has anyone seen a similar product that would work on the Dweller? I like how it covers the kitchen. Thanks
View attachment 757257
I haven't seen that one but before I bought my D15 I was looking at an OP15 and the dealer was telling me that Opus was coming out with an awning or extension that would fit over the back sleeper bump out. The idea was to reduce effects of sun on the sleeping area and provide additional rain protection to the bump out. I've been checking Opus regularly to see if they were advertising it as an accessory. I've been hoping that it might work on the D15.

I agree, something to extend over the prep table part of the pullout kitchen is needed.
 
Last edited:

RonBA

New member
I do a lot of camping in the Spring and Fall where temps will fall below 32 during the night. Can anyone give me some feedback on how the Dweller handles freezing nights? If I keep the heater on will that prevent the pipes from freezing? I'm not talking about extreme cold, probably in the high 20's to low 30"s overnight.
Thanks for any thoughts.
I just drove my unit back from the Idaho dealership and spent the night in Ely Nevada. The temperature dropped down to 18 degrees. I set the thermostat to 62 degrees, and ended up turning it down later as it was way to warm for me to sleep. heater works great I did not have any water in the tanks so I cannot speak to how they would have done yet.
 

Obsessed2findARuggedHybid

Well-known member
I just drove my unit back from the Idaho dealership and spent the night in Ely Nevada. The temperature dropped down to 18 degrees. I set the thermostat to 62 degrees, and ended up turning it down later as it was way to warm for me to sleep. heater works great I did not have any water in the tanks so I cannot speak to how they would have done yet.

That's awesome. Did you run furnace while you were driving? Did you get a good deal. Just curious if prices are dropping as there are a lot of Dwellers on the market
 

WillySwan

Active member
Anyone else experience a significant lean to the passenger side? I think mine is a solid 2" +/- lower on that side, maybe more. Yes, tire pressures are the same side to side. Ground is level.
I hadn't noticed before, but I do have a slight passenger side lean. I just measured my D13 which is parked and level both side-to-side and front-to-back. The measurement from the ground to the fender is 34-1/4" on the passenger side and and even 35" on the driver side.
 

rblitz

Member
Appreciate the information. Have you upgraded to lithium yet? (i can't recall) That would remove weight from the passenger side, theoretically lessening the lean.
Exactly what I was thinking; those batteries are heavy. Also wondering if the side to side pitching everyone has noticed when going above 65mph could be set up by uneven side-to-side weight distribution.
 

Forum statistics

Threads
185,894
Messages
2,879,292
Members
225,450
Latest member
Rinzlerz
Top