I have not upgraded house batteries yet. Changing to 3 x 100Ah LiFePO4 battereis would reduce the weight by a bit over 100 lbs. which should reduce any static lean. It would be interesting to get a weight on each tire but I don't have a good way to do that.Appreciate the information. Have you upgraded to lithium yet? (i can't recall) That would remove weight from the passenger side, theoretically lessening the lean.
You are using an out of date browser. It may not display this or other websites correctly.
You should upgrade or use an alternative browser.
You should upgrade or use an alternative browser.
OBI Dweller Review and Discussion
- Thread starter gendlert
- Start date
Obsessed2findARuggedHybid
Well-known member
I guess this goes to show we all need be aware of balance of our trailers. I guess Batteries should be in the middle or balanced out with other components if they are not in the middle
Photog Doug
New member
Love your setup! I'm seriously considering the Dweller 13 but was concerned with how my 2016 4Runner would be as a tow vehicle. I pull a Meaner Bean teardrop now weighing around 2400 lbs and the 4Runner has to work at it even though it has the Magnuson supercharger when traveling I-70 through Colorado. How is your Tacoma managing the towing? Thanks!First excursion with our D13. Alabama hills CA just below Mt Whitney.
View attachment 752604
Obsessed2findARuggedHybid
Well-known member
Love your setup! I'm seriously considering the Dweller 13 but was concerned with how my 2016 4Runner would be as a tow vehicle. I pull a Meaner Bean teardrop now weighing around 2400 lbs and the 4Runner has to work at it even though it has the Magnuson supercharger when traveling I-70 through Colorado. How is your Tacoma managing the towing? Thanks!
You would really have to travel light on both trailer and 4runner. I wouldn't do it. Lots of Dwellers on the market you should be able to find one at reduced price
I made another "harsh" discovery on my D13.
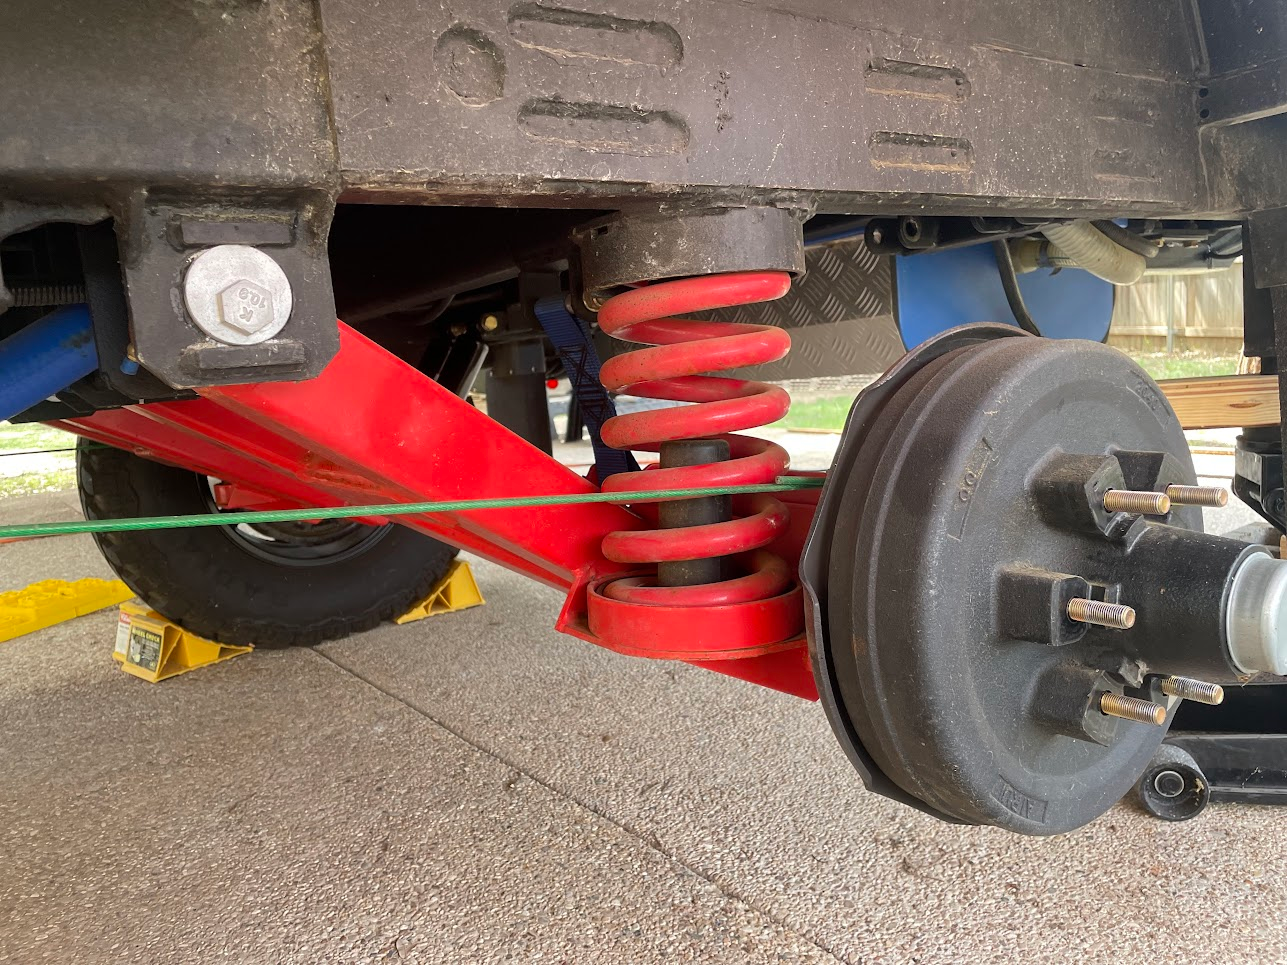
The suspension jounce bumpers, the bumpers located in the middle of the coil springs, are totally non-functional. The jounce bumper's job is to prevent an abrupt and harsh bottoming out of the suspension under full compression. As delivered from OBI, the jounce bumpers on my D13 do nothing to soften or limit the suspension compressions and/or protect the shock absorbers.
What do I mean? I mean that when the shocks are fully compressed, the jounce bumpers have not started to engage and absorb energy. Under full compression, there is nothing to prevent the shock absorbers from harshly bottoming out. This is a recipe for broken shock absorbers.
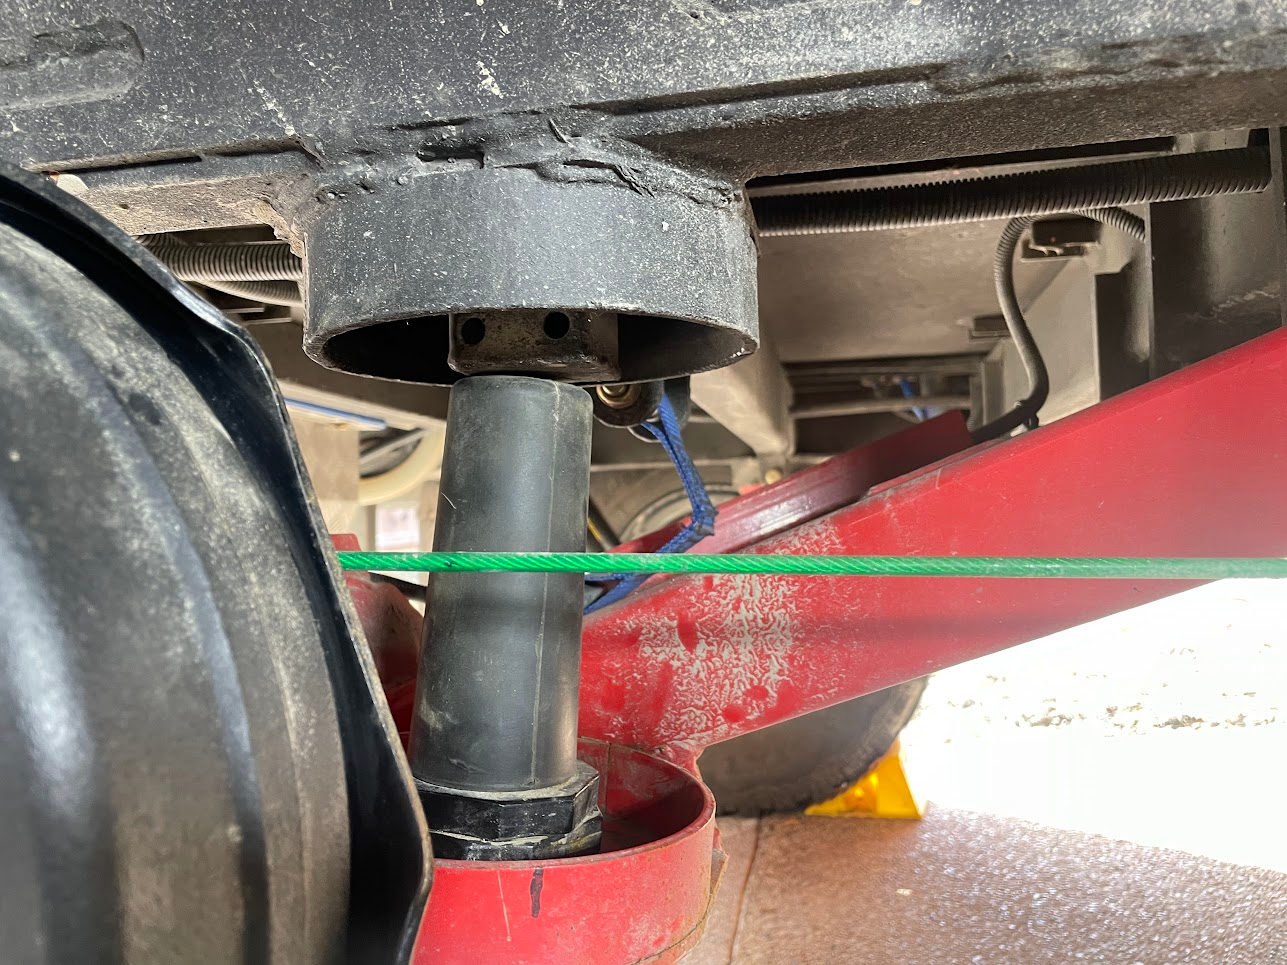
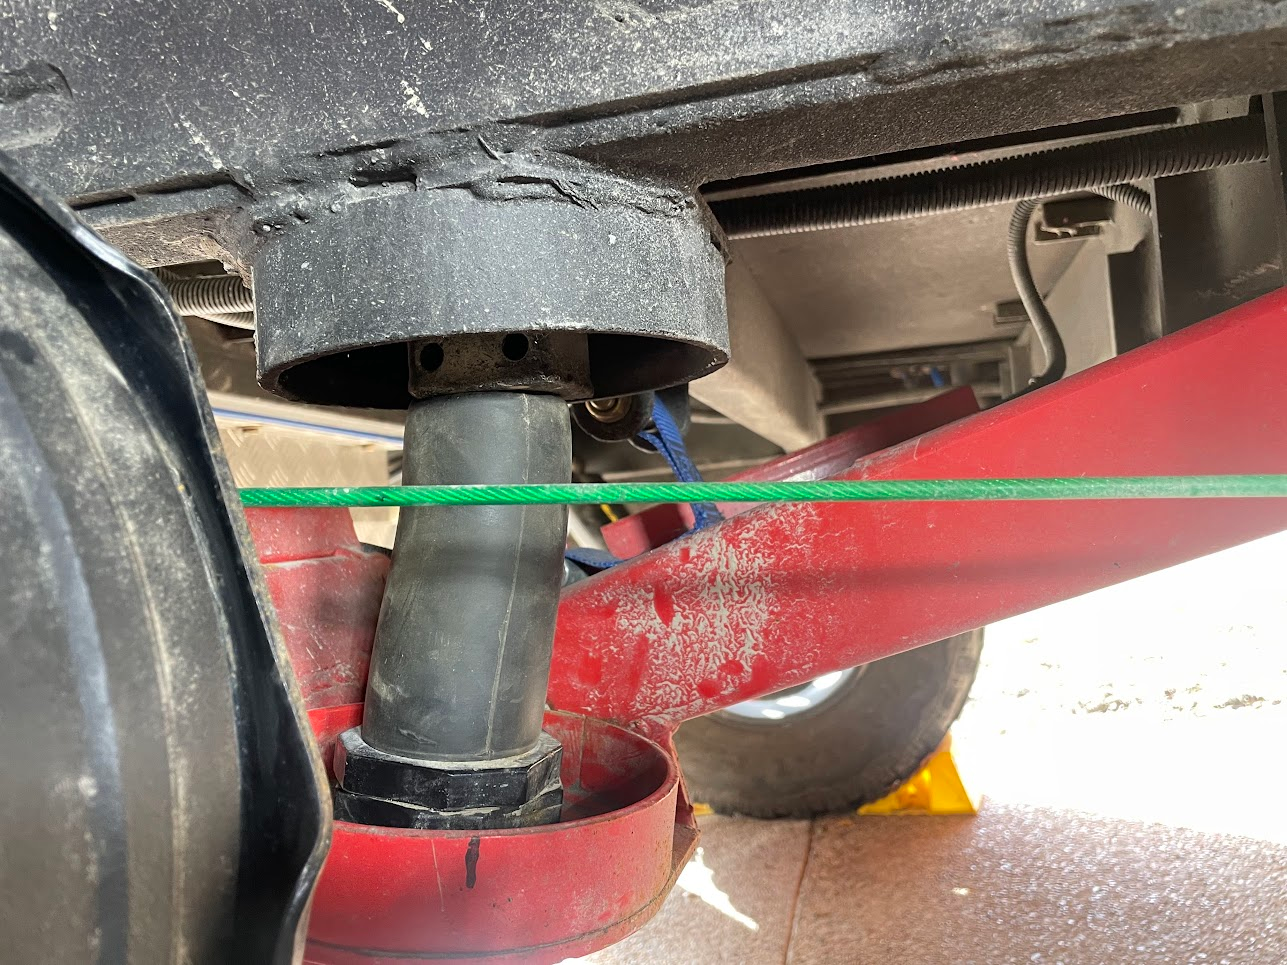
The jounce bumper is located inside of the coil spring on the trailing arm.
To confirm this was really an issue, I removed the coil spring and reinstalled a shock absorber. I then fully compressed the suspension until the shock was bottomed-out. As you can see, the jounce bumper never makes contact.
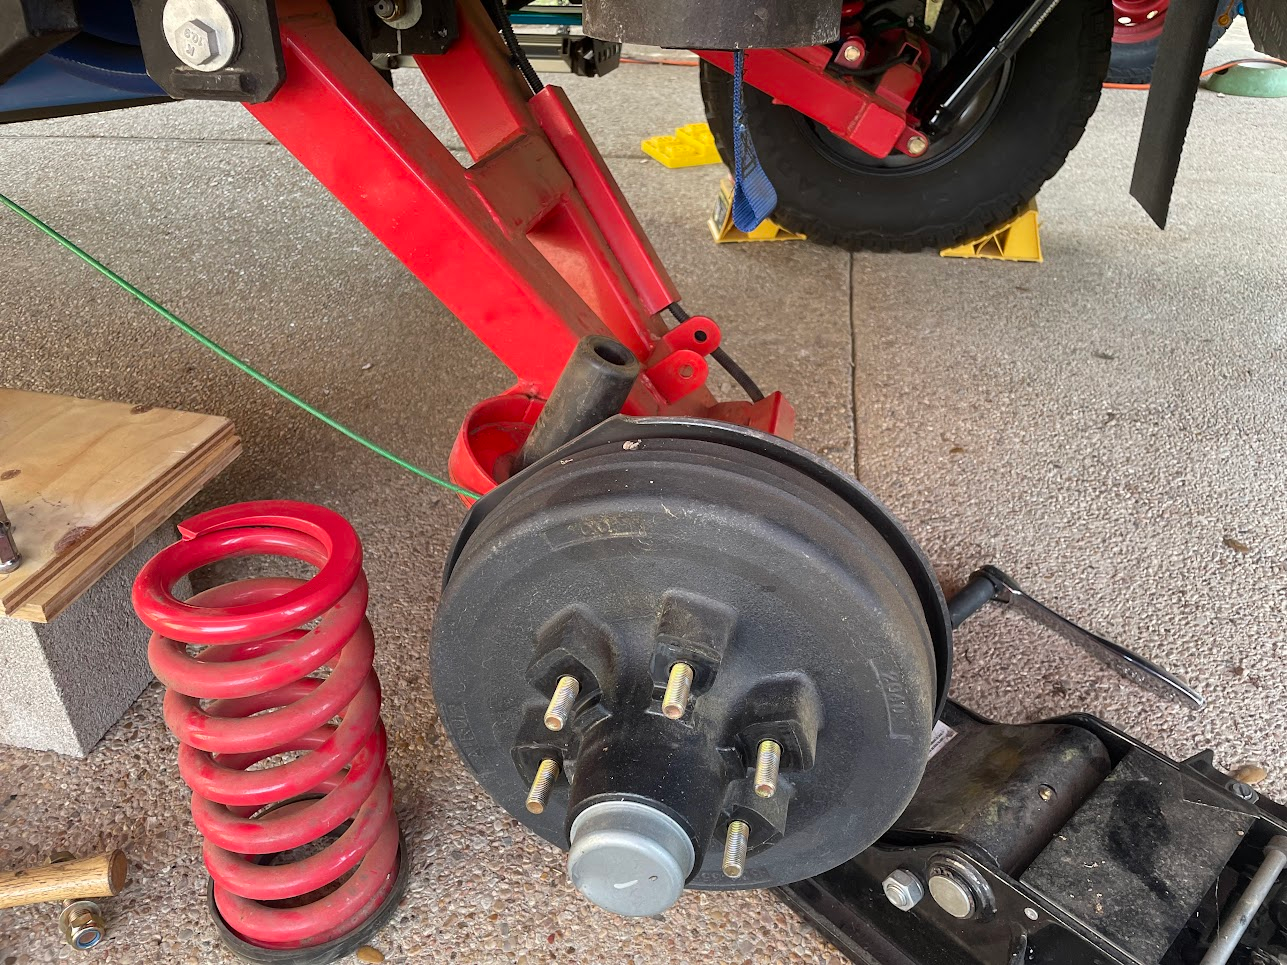
Shock fully compressed.
Notice the air-gap between above the jounce bumper when the shock is fully compressed. The jounce bumper is doing nothing.

A jounce bumper differs from a traditional bump stop. In addition to protecting and limiting suspension travel, a jounce bumper adds a progressive component to the spring rate of the suspension. A bump stop is usually a hard rubber block that limits suspension travel. A jounce bumper is a rubber spring that also functions as a progressive spring. The more the jounce bumper is compressed, the higher the effective spring rate becomes. In my opinion, the lack of an effective jounce bumper is contributing to the excessive sway that many Dweller owners have experienced.
I brought this to OBI’s attention in late May of last year. Their response was, “I’ll bring this to the engineer's attention, appreciate your input!” I never heard anything more from them.
My Gen-1 Modification
In the absence of any feedback or support from OBI, I worked up a simple modification to try to address this shortcoming. I took some steel stock I had kicking around and built some spacers to lift the jounce bumpers so they will engage before the suspension bottoms out. I decided to try raising the bumpers 1-1/2 inches.
With this spacing, the jounce bumpers engage when the shock absorbers have about 1-1/2 inches of travel.

With the 1-1/2 inch spacer installed, this is what the bumper looks like when the shock is fully compressed.
I was considering increasing the spacing, but I didn’t for a couple of reasons. First, I didn’t want to “overcompensate” and second I didn’t have enough material to build more spacers. I completed this modification in late May and I used it this way all summer.
My Gen-1 Results
I pulled the Dweller about five thousand miles this summer. About 500 miles of that was on unpaved secondary roads and about 150 miles of that was on tertiary or worse roads with huge potholes and large “water bars” and “rolling dips”. I gave it a pretty good workout. Nothing broke.
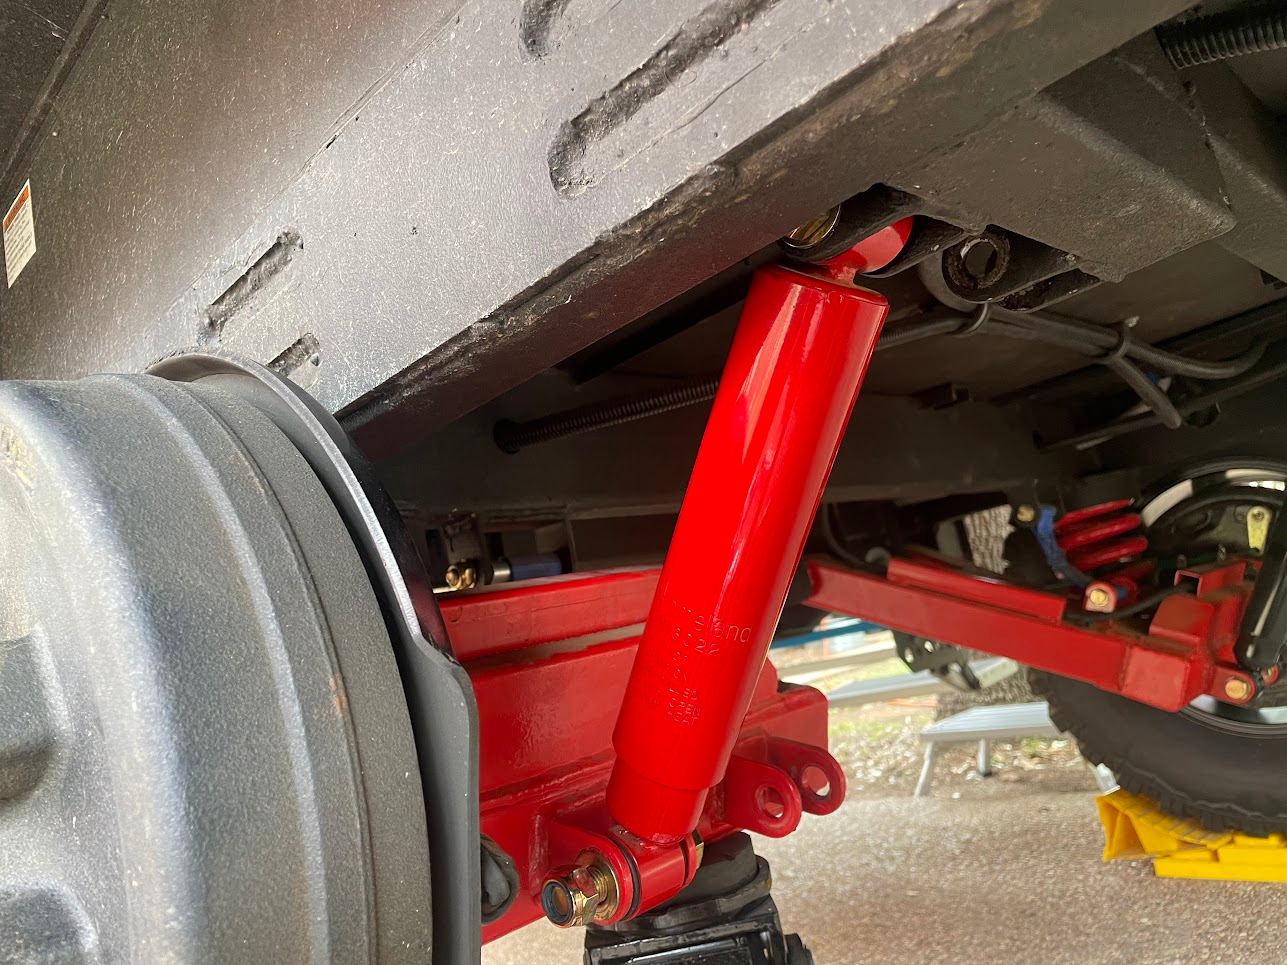
To measure my suspension compression, I installed a couple of “tattletales” on the shock absorbers to measure maximum compression. It is the same idea as the external o-ring on a mountain bike shock that is used for the same purpose.
Tattletale fashioned from zip-ties and a cut up tin can.
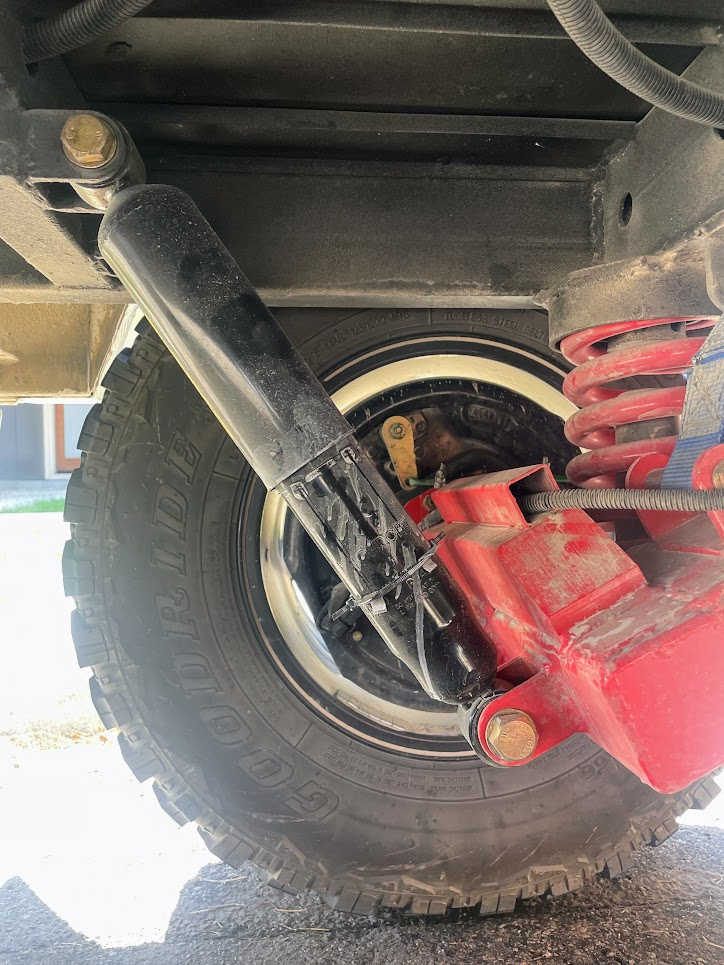
I measured compression from the center of the lower shock mount to the top of the tattletale.


The maximum suspension compressions i measured were about 4-3/8 inch (driver side) and about 4 inches (passenger side). With the Monroe shocks, I measured full compression at 3-15/16 inches from the center of the lower shock mount. I’m pretty sure that I bottomed out the shock on the passenger side.
My Gen-2 Modification
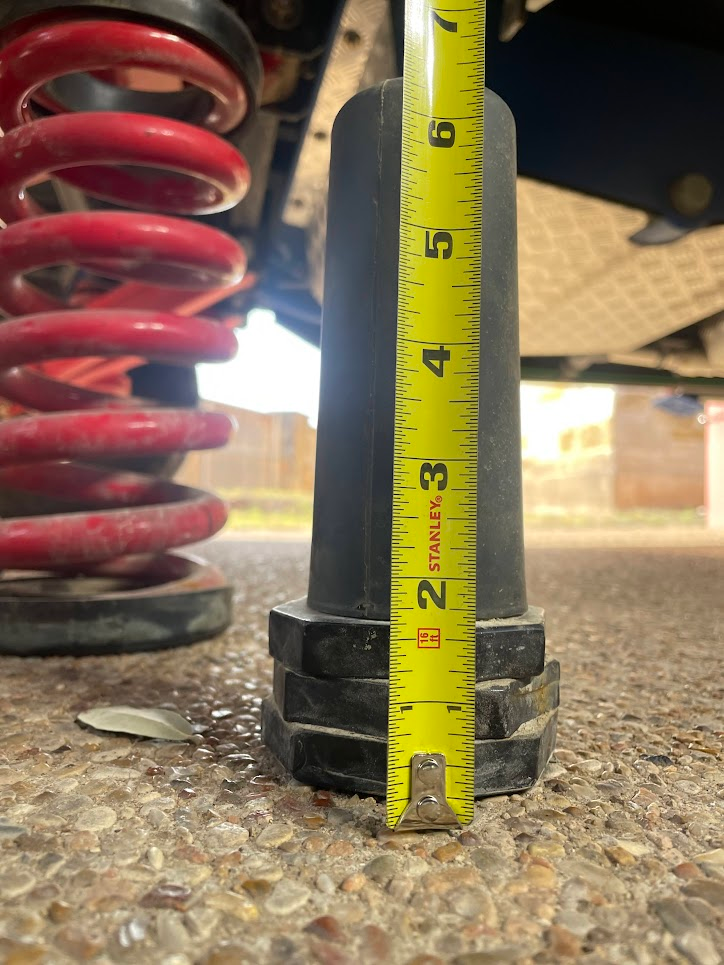
I’m increasing the spacing to 2 inches. Instead of steel spacers, I'm going with the reliable old hockey puck. Two regulation pucks provides an even 2 inches of spacing. They look better too.
Here is what it looks like now with the pucks installed and the shock fully compressed.

I’m cautiously optimistic that this will be a lasting solution for the way I use the trailer. I'm going to continue to monitor suspension travel with the tattletales and will report any additional feedback.
Here is my material list if anyone wants to replicate this:
The suspension jounce bumpers, the bumpers located in the middle of the coil springs, are totally non-functional. The jounce bumper's job is to prevent an abrupt and harsh bottoming out of the suspension under full compression. As delivered from OBI, the jounce bumpers on my D13 do nothing to soften or limit the suspension compressions and/or protect the shock absorbers.
What do I mean? I mean that when the shocks are fully compressed, the jounce bumpers have not started to engage and absorb energy. Under full compression, there is nothing to prevent the shock absorbers from harshly bottoming out. This is a recipe for broken shock absorbers.
The jounce bumper is located inside of the coil spring on the trailing arm.
To confirm this was really an issue, I removed the coil spring and reinstalled a shock absorber. I then fully compressed the suspension until the shock was bottomed-out. As you can see, the jounce bumper never makes contact.
Shock fully compressed.
Notice the air-gap between above the jounce bumper when the shock is fully compressed. The jounce bumper is doing nothing.
A jounce bumper differs from a traditional bump stop. In addition to protecting and limiting suspension travel, a jounce bumper adds a progressive component to the spring rate of the suspension. A bump stop is usually a hard rubber block that limits suspension travel. A jounce bumper is a rubber spring that also functions as a progressive spring. The more the jounce bumper is compressed, the higher the effective spring rate becomes. In my opinion, the lack of an effective jounce bumper is contributing to the excessive sway that many Dweller owners have experienced.
I brought this to OBI’s attention in late May of last year. Their response was, “I’ll bring this to the engineer's attention, appreciate your input!” I never heard anything more from them.
My Gen-1 Modification
In the absence of any feedback or support from OBI, I worked up a simple modification to try to address this shortcoming. I took some steel stock I had kicking around and built some spacers to lift the jounce bumpers so they will engage before the suspension bottoms out. I decided to try raising the bumpers 1-1/2 inches.
With this spacing, the jounce bumpers engage when the shock absorbers have about 1-1/2 inches of travel.
With the 1-1/2 inch spacer installed, this is what the bumper looks like when the shock is fully compressed.
I was considering increasing the spacing, but I didn’t for a couple of reasons. First, I didn’t want to “overcompensate” and second I didn’t have enough material to build more spacers. I completed this modification in late May and I used it this way all summer.
My Gen-1 Results
I pulled the Dweller about five thousand miles this summer. About 500 miles of that was on unpaved secondary roads and about 150 miles of that was on tertiary or worse roads with huge potholes and large “water bars” and “rolling dips”. I gave it a pretty good workout. Nothing broke.
To measure my suspension compression, I installed a couple of “tattletales” on the shock absorbers to measure maximum compression. It is the same idea as the external o-ring on a mountain bike shock that is used for the same purpose.
Tattletale fashioned from zip-ties and a cut up tin can.
I measured compression from the center of the lower shock mount to the top of the tattletale.
The maximum suspension compressions i measured were about 4-3/8 inch (driver side) and about 4 inches (passenger side). With the Monroe shocks, I measured full compression at 3-15/16 inches from the center of the lower shock mount. I’m pretty sure that I bottomed out the shock on the passenger side.
My Gen-2 Modification
I’m increasing the spacing to 2 inches. Instead of steel spacers, I'm going with the reliable old hockey puck. Two regulation pucks provides an even 2 inches of spacing. They look better too.
Here is what it looks like now with the pucks installed and the shock fully compressed.
I’m cautiously optimistic that this will be a lasting solution for the way I use the trailer. I'm going to continue to monitor suspension travel with the tattletales and will report any additional feedback.
Here is my material list if anyone wants to replicate this:
- 4 ea - Hockey Pucks with 25/64 inch hole drilled in the center
- 2 ea - 3/8 x 3-inch bolts
- 4 ea - Washers
- 2 ea - 3/8 Nylock nuts
I have to admire all of y'all's ability and patience working with the OBI Dweller's. I do not have the talent to do the corrections that have been shown here nor would I have the patience. Knowing me, I'd drive it back to the dealer or to the US distributor and park it in a way to block the door and spend time telling customers to look elsewhere if they wouldn't take care of all of these problems timely. And I'm not kidding. If that didn't work, there are legal alternatives.
Last edited:
Obsessed2findARuggedHybid
Well-known member
Willy you are amazing and all the Dweller owners out thier are really lucky to have you, Gentert and others who have modified your Dwellers and make honest criticism and fixes.
So OBI with help from dealers market the Dweller and Conquerors as AU and SA designed and down play were they are actually manufactured in China. I can't help but wonder if design flaws like this one come from engineers that are employed by OBI and work in AZ or do they just rely on the designers and engineers that are employed by the Chinese manufacturer that really good at mass producing trailers fast and cheap using suspension systems like this one?
My guess is there are maybe 500-1000 Dwellers out there that need this and other fixes you have found. I doubt OBI would ever admit there is a problem and pay for it to be fixed. I hope I am wrong.
The Dweller as designed and delivered is not perfect. However, the short comings that have been discovered and documented by myself and others are relatively easily modified or fixed. Overall the D13 has some solid bones. I don't want to start an arguement of "mine's better", but the design and the major systems - the frame, the body, the cabinetry, the electrical, the plumbing are as good as anything I have seen at this price point. Even the trailing arm suspension is a solid design with the exception of the shocks and jounce bumpers.I have to admire all of y'all's ability and patience working with the OBI Dweller's. I do not have the talent to do the corrections that have been shown here nor would I have the patience. Knowing me, I'd drive it back to the dealer or to the US distributor and park it in a way to block the door and spend time telling customers to look elsewhere if the they wouldn't take care of all of these problems timely. And I'm not kidding. If that didn't work, there are legal alternatives.
The importer and my particular dealer have provided very little meaningful support after the sale. I kind of expected that, but it is worse than I thought it would be.
I seriously considered ponying up the bucks and waiting the time for a purebred Australian import, but I glad I didn't. I have used my D13 pretty hard for a year and a half. Nothing has catastrophically broke and it has not leaked or left me stranded. My spouse and I have had some great experiences so far. I have no regrets with buying the Dweller.
WillySwan, I totally admire your willingness and ability to work through these. I personally looked at one and liked the layout very much. The reason that it wasn't pursued further by me was due to a lack of indoor storage solution.
I certainly don't want this to come as a shot to you but rather hopefully a message to OBI, the distributor, the dealers and potential customers. I personally believe that it's disgraceful that companies' would continue to promote ANY known product with these types of problems. For example, swaying or rocking while driving at highway speed is not only a personal injury or death situation but a class action lawsuit waiting to happen. It is one thing for those involved in the distribution and selling to not know but it is an entirely different situation once they do.
I certainly don't want this to come as a shot to you but rather hopefully a message to OBI, the distributor, the dealers and potential customers. I personally believe that it's disgraceful that companies' would continue to promote ANY known product with these types of problems. For example, swaying or rocking while driving at highway speed is not only a personal injury or death situation but a class action lawsuit waiting to happen. It is one thing for those involved in the distribution and selling to not know but it is an entirely different situation once they do.
Last edited:
Love your setup! I'm seriously considering the Dweller 13 but was concerned with how my 2016 4Runner would be as a tow vehicle. I pull a Meaner Bean teardrop now weighing around 2400 lbs and the 4Runner has to work at it even though it has the Magnuson supercharger when traveling I-70 through Colorado. How is your Tacoma managing the towing? Thanks!
I'm routinely towing it around the relatively flatish Midwest. If I were in Colorado, I would probably get a bigger tow vehicle. With an additional tranny cooler (Hayden 679) and KDMAX tune it tows fine in ECT S-4 or 5.
Obsessed2findARuggedHybid
Well-known member
The Dweller as designed and delivered is not perfect. However, the short comings that have been discovered and documented by myself and others are relatively easily modified or fixed. Overall the D13 has some solid bones. I don't want to start an arguement of "mine's better", but the design and the major systems - the frame, the body, the cabinetry, the electrical, the plumbing are as good as anything I have seen at this price point. Even the trailing arm suspension is a solid design with the exception of the shocks and jounce bumpers.
The importer and my particular dealer have provided very little meaningful support after the sale. I kind of expected that, but it is worse than I thought it would be.
I seriously considered ponying up the bucks and waiting the time for a purebred Australian import, but I glad I didn't. I have used my D13 pretty hard for a year and a half. Nothing has catastrophically broke and it has not leaked or left me stranded. My spouse and I have had some great experiences so far. I have no regrets with buying the Dweller.
You do have a point when you say " this price point" I saw a 2022 Dweller 13 for 39k at the Boise dealer. Even at that price I am not mechanical enough enough to deal with all the issues that are coming up on these new rigs
Jounce Bumper Spacer Installation
Here is a high-level overview of the procedure I followed to install my spacers. If you choose to follow this procedure proceed at your own risk! Trailers are heavy and springs are dangerous.
Here is a high-level overview of the procedure I followed to install my spacers. If you choose to follow this procedure proceed at your own risk! Trailers are heavy and springs are dangerous.
- Thoroughly block and stabilize your trailer.
- The parking brake cable will lose all tension to both brakes when you drop the trailing arm. Release the parking brake now so you are not counting on the parking brake to hold the trailer in place.
- Loosen upper shock absorber mounting bolts. No need to remove
- Remove lower shock absorber mounting bolts. Let the shocks swing out of way and hang from upper mounts.
- Jack up trailer until the tire is in the air, securely block in raised position on frame. Remove the tire.
- Using a marking pen, put an index mark on both the lower spring pocket and the coil spring. This is likely not required, but it does ensure that the spring can be reinstalled in the exact same orientation it was removed from.
- Using a floor jack placed under the trailing arm, lift the trailing arm enough to remove tension from the webbing limit strap.
- Remove the lower bolt that is holding the limit strap in place.
- Slowly lower the trailing arm. The spring should drop out of the upper spring pocket. If it does not drop on its own, you may need to “gently assist it” with a pry bar.
- Continue to lower the trailing arm enough to fully remove the coil spring. The coil spring will have rubber pads on both the top and the bottom. Make sure they both come out with the spring.
- Remove the jounce bumper using a 5/8 inch (16mm) socket with a long extension to reach into the interior of the jounce bumper and a 5/8 inch wrench on the nut on the bottom of the spring pocket.
- Clean out all of the road dust and gravel from the lower spring pocket.
- Reinstall the jounce bumper with the new spacers and appropriate length 3/8-inch bolt and washers. I used a 3 inch long bolt. If using the hockey puck spacers, I recommend using a nylock bolt instead of a split lock-washer. Tighten until snug, but do not overtighten and distort the puck spacers.
- Re-install the coil spring over the jounce bumper and into the trailing arm spring pocket. Align the index marks.
- Slowly raise the trailing arm. You will need to lift and help the coil spring into the upper pocket. Be careful not to catch the rubber pad on the edge of the spring pocket. Soapy water may be helpful to get the upper pad to slip into place but I did find a need to do that.
- Compress coil spring enough to install the lower limit strap bolt.
- Re-install the limit strap. Lower and remove the floor jack from under the trailing arm.
- Inspect your work.
- Re-install tire.
- Re-install shocks.
- Lower trailer and torque all bolts to appropriate values
- Repeat on the other side.
glennsmith15
New member
Respectfully..."all the issues" is a little extreme. I think there's a big difference between optimization and failure/need to fix, and most of the posts in this forum have been geared towards optimization. I'm not the most mechanically inclined person to begin with and a lot of the things discussed are pretty easy to work on.You do have a point when you say " this price point" I saw a 2022 Dweller 13 for 39k at the Boise dealer. Even at that price I am not mechanical enough enough to deal with all the issues that are coming up on these new rigs
Obsessed2findARuggedHybid
Well-known member
Valid point and I certainly don't want to offend any Dweller owners. Hey these rigs are reasonably priced especially the 2022 models so keeping upwards of 90k in your pocket leaves way for lots of optimizing that is for sure. But for the mechanically impotent guys like me and folks researching what rig fits there specific needs "all the issues " does not seem that extreme IMHO. Maybe just a tad less then a little extreme?
A couple of updates of minor issues I found and easily resolved, but you should be aware of:
1. After 8 months sitting uncovered in the AZ heat, the veneer on the underside of the tabletop started peeling up. The adhesive failed, which honestly doesn't surprise me. Not much stands up to AZ heat. I fixed it with a caulk gun and a tube of liquid nails. Took me 5 mins to repair.
2. I had a faulty Propane/CO alarm. This one was interesting, and I need to reach out to the manufacturer of the alarm to find out if they know of the issue. I plugged my trailer in to charge it at home, and the Propane alarm started going off and I couldn't get it to stop. I didn't have any propane hooked up to the trailer at the time, either, so I know it wasn't a real positive alarm. I clipped the wires under the bench seat, called OBI, and they sent me a new one to put in, no questions asked. When I looked at the wiring diagram, it says there should be a 1A fuse inline on the positive line, which it definitely did NOT have. I went to Ace Hardware, bought an inline fuse holder, a set of 1A fuses, and soldered that back in with the new alarm on the positive line. It's been fine so far. I'll keep you posted if that changes. Probably a one-off fluke, but if anyone else runs into the issue, it's another easy fix. Took me 20 mins to fix plus a trip to Ace.
My Propane/CO alarm just started doing the same thing. Only seems to get triggered when I'm plugged in to shore power.
When you added the inline 1A fuse, did you shut off power from the source somehow? Any problems since you've done this re-install?
Forum statistics
Members online
- svmaple
- gabrielef
- tpreston
- g_m
- MSD
- Beater_Bimmer
- Roger M.
- PeteEinMT
- IdaSHO
- Jasalvas
- mark5280
- 67 Fastback
- jaradmb
- ARDOR
- sndohio89
- Jabroni
- Inspired Adventurist
- mcdutchblue
- jbaucom
- poo_head
- EPO
- MatttheHatt
- Homer Crimson
- escadventure
- BroncoHauler
- RDude
- Spatch
- ThundahBeagle
- Titanpat57
- hangdog2
- shawner2713
- jeepadict
- HokeyRover
- v-adventures
- legrandice
- 4runnerteq
- Trav73
- Peter_n_Margaret
- Frog184
- Rakkasan3187
- freerider
Total: 989 (members: 46, guests: 943)