Post up your drawer/storage system

slus

Adventurer
Here is the one I built a few months ago for the jeep.
drawersopen6.jpg

Where did those recessed tie down hooks come from? I've been looking around and can't seem to find a decent black flush mount hook.
 

Wonka Toy

New member
Low cost Solution for my Range Rover Classic

Take two cheap slimline roller boxes (€12 each), one 8*4 sheet 1/2 inch marine ply, six lengths 3/4in quadrant, glue and screws and set to work:

First I made a box 10mm higher than the boxes and with a 22.5 degree slope on the front to fit the seats...

Next I made two internal dividers giving three compartments in all. The quadrant gives extra support to the joints while the rounded ends help to locate/guide the boxes in. The plan for the centre compartment is to make a ground anchor to store in here...

The cutting was kept simple by making the floor/base smaller to fit between the wheel arches while making the top wider to fill the whole boot.....


Finally the top was cut to fit and tested for strength by some willing bystanders...

Since finishing the woodwork I have trimmed the top in some industrial carpet to stop the dogs from skating and trimmed the edges with some plastic anglewhich is a couple of millimeters wider than the ply and stops the boxes rolling out accidentally.

I have to secure it to the floor yet but first I better replace the rusty section :(
 

Attachments

  • DSC00304.JPG
    DSC00304.JPG
    431.5 KB · Views: 253
  • DSC00305a.JPG
    DSC00305a.JPG
    81.9 KB · Views: 306
  • DSC00309.JPG
    DSC00309.JPG
    352.3 KB · Views: 474

gprsdlyt

Adventurer
04 wj.
to get the most width i lifted the sleeping surface above the 'wells and trimmed interior panels. i cut the headliner to make extra head room and to allow for the 'flip' portion to be the longest possible. i have good size storage for gear due to this 'lift'. oh, and pull back the carpet under that to reveal a false floor and then the entire spare well is used for the larger tools that dont get used as often. the pull out 'slide' that supports the 'flip' provides add'l storage (it holds my personal effects duffels, clothes etc.). as far as the upper area, im still bouncing ideas, attic, etc? questions or ideas?, holla!
more pics here. http://www.expeditionportal.com/forum/showthread.php?t=26626&page=2

2luqosz.jpg

2rps6ee.jpg
 

theindian

Observer
heres my H3 cargo storage drawer that turned into a sleeping platform. Its made of 3/4" plywood and trimed out with precoated book shelf track. I used book shelf supports and 1" bookshelf track as an ibeam along with some side wing extensions for more shoulder space. The sidewing ibeams support the platform up to a couple of support legs. the boot shelf supports are attached to the box . still working on a few things like the floor mounts and tie down mounts. And im thinking of a removible frig slid platform. Thanks to all that posted up thier systems it gave me so many ideas and headaches:Wow1:
DSC00497.jpg

DSC00503.jpg

DSC00499.jpg

DSC00502.jpg

DSC00500.jpg

DSC00513.jpg

DSC00512.jpg

DSC00508.jpg
 
Last edited:

SFROMAN

Adventurer
Theindian,
Do you hve to move your seats all the way forward for your platform to work? Or did you just move the seat all th way forward to make more space?
 

rubberduck

Observer
Mine is a 1x2 metal frame with perforated metal. Works like pegboard. The platform is a simple box with plastic tubs. Works great. I'm also building a removable barrier for the top.
 

Attachments

  • ImageUploadedByTapatalk1304858447.693572.jpg
    ImageUploadedByTapatalk1304858447.693572.jpg
    80.7 KB · Views: 397

theindian

Observer
Theindian,
Do you hve to move your seats all the way forward for your platform to work? Or did you just move the seat all th way forward to make more space?
I Have to move it forward for the extra space for the platfofrm to work With the platform deployed its 48x 73"
 

theindian

Observer
Rubberduck, That is a cool idea with the tool pegboard, How are the tools secured? I wish I had the room Id steal that idea. Nice job!!
 

gprsdlyt

Adventurer
thanks for the reply guys!
'theindian' nice setup!
i thought about a piano hinge but didnt see a real HD one around the depot, so went with these gate hinges. plenty strong for flipn' that 3/4 birch ply back and forth.
 

Herbie

Rendezvous Conspirator
Big thanks to everyone who has posted ideas into this thread! I've taken lots of inspiration.

Here is my system (version1, always leave room for improvement). I have a conversion-van bench seat that folds back into a short bed. In order to extend the bed to a full 72" long, I wanted to incorporate a bed platform into the storage mechanism and be sure to waste NO precious space.

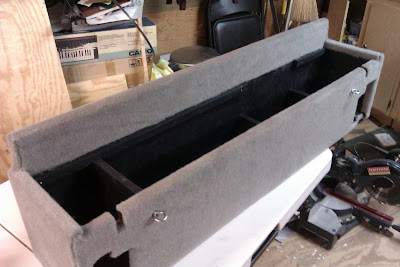
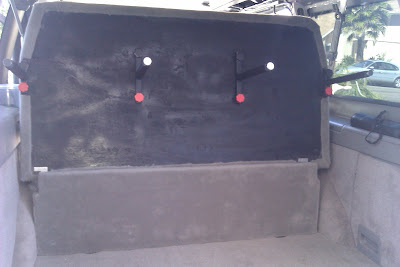
The system starts with a box that snugs up against the back of the bench. It's 3/4" CDX plywood, screwed and glued. Inside covered in brush-on bedliner, outside carpeted in a decent match to the OEM carpet. One side of the box holds the house battery and electronics, the rest is tool storage for now, but I sized the compartments for an Espar D2 heater if I can find one at a reasonable price.
IMAG0399.jpg


The tall rearward edge of the box also supports the forward edge of the bed platform. The platform attaches here with removable pin hinges so that I can pivot the platform up to access the jack compartment on the right side, and things underneath.

IMAG0446.jpg


The support legs attach with knob-headed bolts so that I have a tool-less way to remove the legs and break everything down so it can store flat in my garage when not in use. There are tee-nuts in the platform for the legs, and additional nuts on the corners so I can add longer (telescoping) legs and use the bed platform as a camp-table if needed.

IMAG0433.jpg


Storage underneath the platform is based around bins for easy packing/unpacking of the vehicle (also my daily driver), so I can quickly move the bins from van to shelves in the garage, and back. The storage area will take three large Roughneck totes, or two large plus one "short" bin with my Coleman stove on top, or two bins and a 7-gallon water jug.

IMG_5154.JPG


There's room under the bench/bed for a water tank, so eventually water will be plumbed in a bit more permanently, but for my solo shakedown trip to Overland Expo last month, this was more than enough room for all of my gear.

More details and photos available in my build thread, and even MORE pictures available in my web album.
 

theindian

Observer
thanks for the reply guys!
'theindian' nice setup!
i thought about a piano hinge but didnt see a real HD one around the depot, so went with these gate hinges. plenty strong for flipn' that 3/4 birch ply back and forth.

thanks back at ya! i think the what makes the piano hinge so effective is that the load is spread out along the whole joint ,needing a lesser size hinge pen. thats makes them attractive for theese kinds of projects. I first ordered a al aluminum hinge that was 21/2" wide but didnt like it ,felt pretty flimsey so i got a couple of2" steel hinges. a couple of boating stores told me the aluminum hinges would have been more than enough,but i just felt better about the steel hinges and they where nice and blingy chrome. I think the pens where 1/8".
 

Paladin

Banned
Well, I might as well post up my setup since it's nearing completion. The original idea was to create a proper cargo barrier with a shelf for bi-level storage. Mostly to stop stuff flying forward, but the two-level will help keep things stabilized. I've packed almost to the roof before and, it's not cool. After a few miles off-road, shift happens.

sIMG_3959.jpg


The Discovery has quite a bit of storage room, but it's mostly oriented vertically. It would be too easy for things to fly over the seat and hit my kids. Some people rely on the factory tie-down points to secure their load, but they are simply weld-nuts welded to the 20 gauge sheet metal floor.

The first order of business was the forward bulkhead. I'm building it with roll-cage specs in mind, because hopefully if the truck is ever upside down, it will help protect the kids, or worst case, won't collapse and make the situation worse. 2" square 1/8" wall tube.

IMG_7288.jpg


This will have 2" square mesh applied to it. Next, I built a cargo shelf frame. The height of this will match the height of the top of the cubby boxes on the sides.

IMG_7354.jpg


Next, I added backstays which bolt to the factory 3rd row headrest mounting points.

IMG_7361.jpg


2 6mm bolts each side, which I don't think will be enough. I'll probably end up welding the feet to the structure. This will be a bolted connection here.

IMG_7366.jpg


It was very hard to get the cage back out to finish welding and paint. Hopefully it goes back in OK!
 

Forum statistics

Threads
185,842
Messages
2,878,776
Members
225,393
Latest member
jgrillz94
Top