You are using an out of date browser. It may not display this or other websites correctly.
You should upgrade or use an alternative browser.
You should upgrade or use an alternative browser.
The Camp 4x4 Bus - 1973 Suburban 8.1 Swap & Build
- Thread starter camp4x4
- Start date
camp4x4
Adventurer
Another weekend... more progress!
Feels like I got my momentum back on this thing. I wasn't able to get down during the week, but I think that's going to be the new norm. Weekend work should get things there in a reasonable time though.
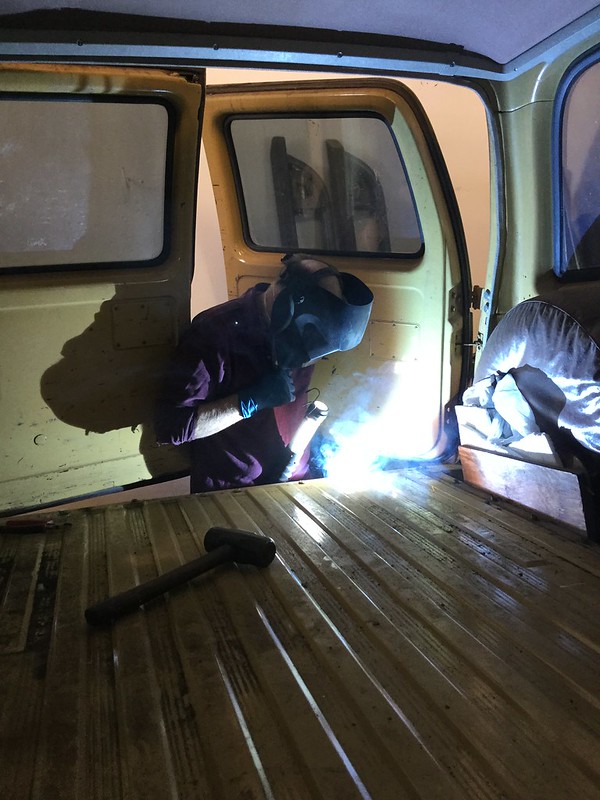
Saturday I was able to convince my friend Ron - the Pinz owner who took the trip to Poker Flat with me - to come down. I promised I'd trade teaching him how to use a MIG welder for his effort. That worked out pretty well. He picked up the MIG pretty fast after a dozen or so practice beads. Then I put him to work tacking down all the new body mount bolts I'd put in but hadn't tacked in yet. He did really well grinding down the old tacks so the new washers would sit flat, then tacking the washers to the body and the bolt heads to the washers. Then we got the bolts/nuts all torqued down and were ready to move on to the next thing. That was definitely a tedious and time consuming process; clearly somewhere that having two sets of hands really helped out. And it gave him a chance to use his new skill on a practical application.
Ron tacking in the last of the body mount bolts.
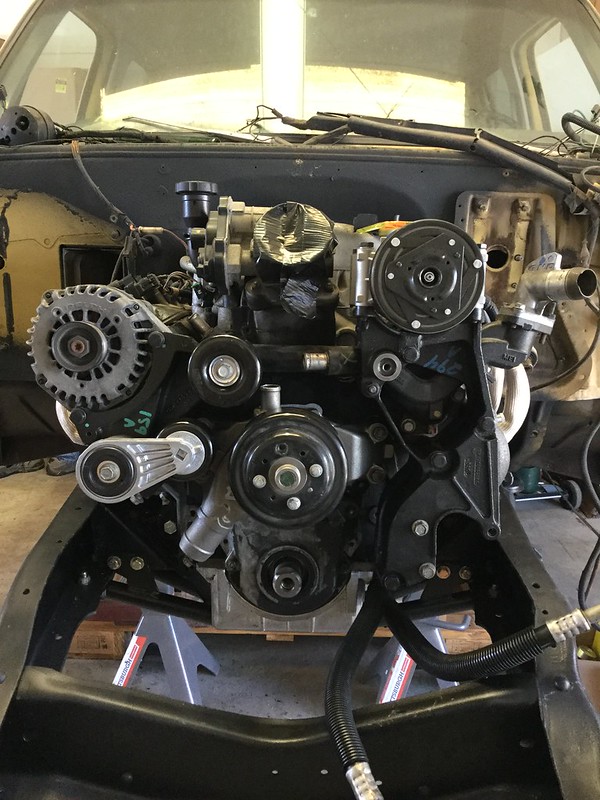
Meanwhile, I got busy installing the engine accessories. I could not for the life of me find all the right OEM bolts from online suppliers, so I just measured for each one and ordered the closest thing from Fastenal along with some washers. Seems like everything did the trick. All I have to do now is borrow a harmonic balancer installer from Autozone and press that guy in there.
Accessorized.
We finished up in the middle of the afternoon by pulling out the entire harness. Since I'm going to be re-wiring this guy from scratch I figured I could probably re-use some of the connectors, and it will be handy to be able to lay this out while looking at the schematic I have. Those things never make sense to me, so hopefully between the two of them I'll have some hope of getting this right.
Electrical spaghetti.
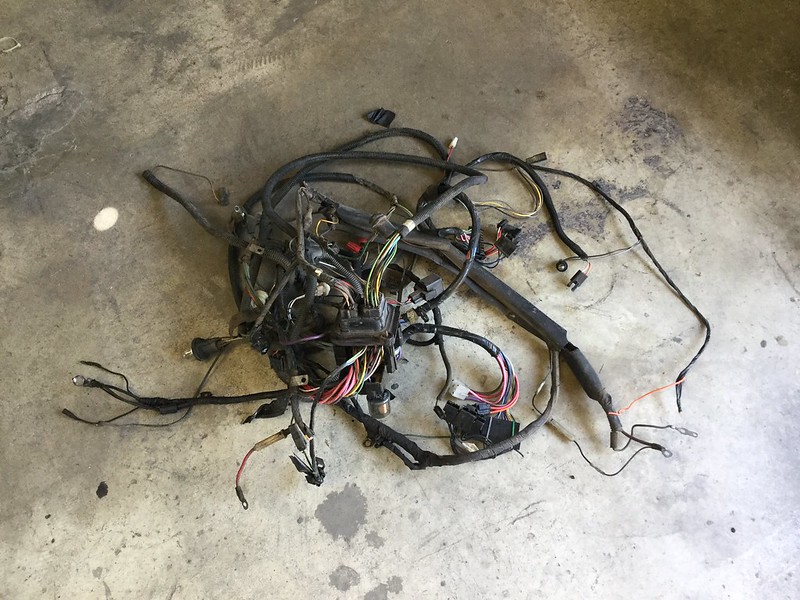
Stripped dash.

I've also been thinking a lot about the fuel delivery situation, particularly issues with running an external pump. Looking at where the tank sits on my '87 (which will be the same on the '73), and where the pump would end up being in relation to the tank - essentially where the fuel filter is right now - I can see that I'll only have the benefits of siphon until about half-empty. After that the fuel pump will be sucking to get fuel, and any air in the line risks vapor lock or starvation issues. I really want to keep the external fuel pump as it makes servicing far easier, so the solution I've found is Holley's Hydramat. One of the major reasons they give for creating the product in the first place is carb to efi swaps that run into this exact issue (which is pretty much exactly what I'm doing just a full engine carb to EFI swap instead of simply putting EFI on an old engine). The Hyrdamat has some sort of magic material that can pull the most modest amounts of fuel from the very bottom of the tank, being otherwise entirely surrounded by air - and deliver an airless flow of fuel up the pickup tube. It is nothing short of a miracle. From reviews I've read by offroad racers of both stadium trucks and trophy trucks, they've TRIED to get their trucks to vapor lock and have been unable to with the Hydramat installed. I also found an install guide from Holley that show I can use a tube to 3/8" NPT adapter on the stock pickup then screw the Hydramat straight on. :wings:
Hydramat Installed in OEM tank

And since I was gonna now be taking everything apart I figured I'd spend the extra dough and pick up a fresh tank and sender. This project is really turning into the mouse who asked for a cookie.
[video]https://www.youtube.com/Gyk55GYnGl0?t=14s[/video]
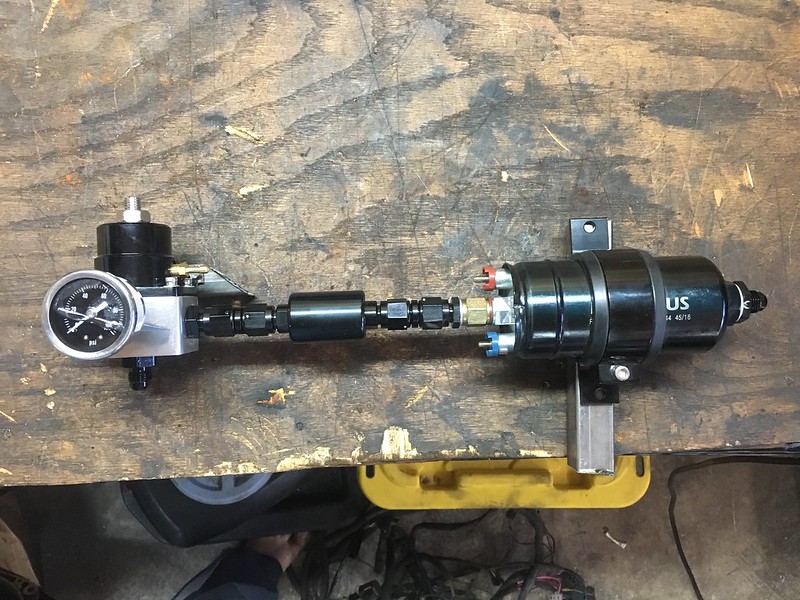
And lastly, I've decided that I'm going to re-use a device I'd formerly had installed in my track car to monitor various sensors. Autosport Labs makes something called a Race Capture Pro (I have the mkII version) that can take in analog, PWM and OBDII inputs (such as temp, rpm, pressure, etc) and has an Android bluetooth app that lets you custom create dashboards and read-outs for those sensors. Since I want to keep the stock dash, and I'm not super fond of the idea of adding gauges on the dash or pillar, I'm going to wire in less-often-used things like fuel pressure, oil temp, etc. into the RCP, and keep a little 8" Android tablet around to read them when I need them. I can always add gauges later if I really feel like it. To that end I've ordered up a 100psi fuel pressure sender that I'll be adding to the output side of the adjustable regulator I've ordered. Here's the final assembly of the pump > filter > regulator I've got going:
Fuel pump, filter, regulator
Feels like I got my momentum back on this thing. I wasn't able to get down during the week, but I think that's going to be the new norm. Weekend work should get things there in a reasonable time though.
Saturday I was able to convince my friend Ron - the Pinz owner who took the trip to Poker Flat with me - to come down. I promised I'd trade teaching him how to use a MIG welder for his effort. That worked out pretty well. He picked up the MIG pretty fast after a dozen or so practice beads. Then I put him to work tacking down all the new body mount bolts I'd put in but hadn't tacked in yet. He did really well grinding down the old tacks so the new washers would sit flat, then tacking the washers to the body and the bolt heads to the washers. Then we got the bolts/nuts all torqued down and were ready to move on to the next thing. That was definitely a tedious and time consuming process; clearly somewhere that having two sets of hands really helped out. And it gave him a chance to use his new skill on a practical application.
Ron tacking in the last of the body mount bolts.
Meanwhile, I got busy installing the engine accessories. I could not for the life of me find all the right OEM bolts from online suppliers, so I just measured for each one and ordered the closest thing from Fastenal along with some washers. Seems like everything did the trick. All I have to do now is borrow a harmonic balancer installer from Autozone and press that guy in there.
Accessorized.
We finished up in the middle of the afternoon by pulling out the entire harness. Since I'm going to be re-wiring this guy from scratch I figured I could probably re-use some of the connectors, and it will be handy to be able to lay this out while looking at the schematic I have. Those things never make sense to me, so hopefully between the two of them I'll have some hope of getting this right.
Electrical spaghetti.
Stripped dash.
I've also been thinking a lot about the fuel delivery situation, particularly issues with running an external pump. Looking at where the tank sits on my '87 (which will be the same on the '73), and where the pump would end up being in relation to the tank - essentially where the fuel filter is right now - I can see that I'll only have the benefits of siphon until about half-empty. After that the fuel pump will be sucking to get fuel, and any air in the line risks vapor lock or starvation issues. I really want to keep the external fuel pump as it makes servicing far easier, so the solution I've found is Holley's Hydramat. One of the major reasons they give for creating the product in the first place is carb to efi swaps that run into this exact issue (which is pretty much exactly what I'm doing just a full engine carb to EFI swap instead of simply putting EFI on an old engine). The Hyrdamat has some sort of magic material that can pull the most modest amounts of fuel from the very bottom of the tank, being otherwise entirely surrounded by air - and deliver an airless flow of fuel up the pickup tube. It is nothing short of a miracle. From reviews I've read by offroad racers of both stadium trucks and trophy trucks, they've TRIED to get their trucks to vapor lock and have been unable to with the Hydramat installed. I also found an install guide from Holley that show I can use a tube to 3/8" NPT adapter on the stock pickup then screw the Hydramat straight on. :wings:
Hydramat Installed in OEM tank
And since I was gonna now be taking everything apart I figured I'd spend the extra dough and pick up a fresh tank and sender. This project is really turning into the mouse who asked for a cookie.
[video]https://www.youtube.com/Gyk55GYnGl0?t=14s[/video]
And lastly, I've decided that I'm going to re-use a device I'd formerly had installed in my track car to monitor various sensors. Autosport Labs makes something called a Race Capture Pro (I have the mkII version) that can take in analog, PWM and OBDII inputs (such as temp, rpm, pressure, etc) and has an Android bluetooth app that lets you custom create dashboards and read-outs for those sensors. Since I want to keep the stock dash, and I'm not super fond of the idea of adding gauges on the dash or pillar, I'm going to wire in less-often-used things like fuel pressure, oil temp, etc. into the RCP, and keep a little 8" Android tablet around to read them when I need them. I can always add gauges later if I really feel like it. To that end I've ordered up a 100psi fuel pressure sender that I'll be adding to the output side of the adjustable regulator I've ordered. Here's the final assembly of the pump > filter > regulator I've got going:
Fuel pump, filter, regulator
Last edited:
camp4x4
Adventurer
You seem to have got a lot done for not having time!!
Curious on your pump setup, can you change the filter without pulling it apart?
I try to be productive when I do get down there...
")
You know, that's a really good question. The answer is.... kind of. Once everything is bolted in place I'd have to loosen the bolt on the pump clamp so the pump could slide back, then I could loosen the AN couplers to the filter and remove it. So... not bad, but I may look at putting some hose in between one of em to make that easier. Good catch...
camp4x4
Adventurer
Bought floor patch panels today.
So a little good news.. I found LMC's patch panels are cheap-ish and they have ones specifically for the footwells and body support panels! I've looked at some how-to videos and tutorials and this doesn't really look like a big deal. I think I can get these in just fine with my MIG. Didn't plan on doing body work to this thing, but since it isn't something that's really an external facing panel I'm cool with these not being perfectly paint matched in the end. I'll get them in, anti-rust primer them and be done with it. Very excited to have a cheap relatively simple fix for these holes.

So a little good news.. I found LMC's patch panels are cheap-ish and they have ones specifically for the footwells and body support panels! I've looked at some how-to videos and tutorials and this doesn't really look like a big deal. I think I can get these in just fine with my MIG.
Didn't plan on doing body work to this thing, but since it isn't something that's really an external facing panel I'm cool with these not being perfectly paint matched in the end. I'll get them in, anti-rust primer them and be done with it. Very excited to have a cheap relatively simple fix for these holes. camp4x4
Adventurer
Question for the peanut gallery
Okay, so I'm getting a new fuel pickup since I'm getting a new fuel tank and new everything else...
What I'm debating is going 3 tube or 4 tube...
The stock tube setup is 3 tube: Feed, Return, Filler Vent. I believe this uses a vented gas cap.
Obviously this vents the tank to atmosphere which is... eh... fine... whatever. The truck is never likely to be able to fit in a garage anyway so...
The 4 tube setup is: Feed, Return, Filler Vent and EVAP vent.
I could go with a 4 tube pickup and run the extra vent through a charcoal vapor canister, but then I really wouldn't know where to send it from there... I've remove the evap purge solenoid from the throttle body and capped it since I won't be running most of the emissions stuff. I could, I supposed, tap that plate and put a barb fitting in it to vent the charcoal canister to the intake all the time... I'd want to put a non vented gas cap on.
That's obviously a lot more work but has the benefit of never risking the smell of gas venting.
So.. who has thoughts?
camp4x4
Adventurer
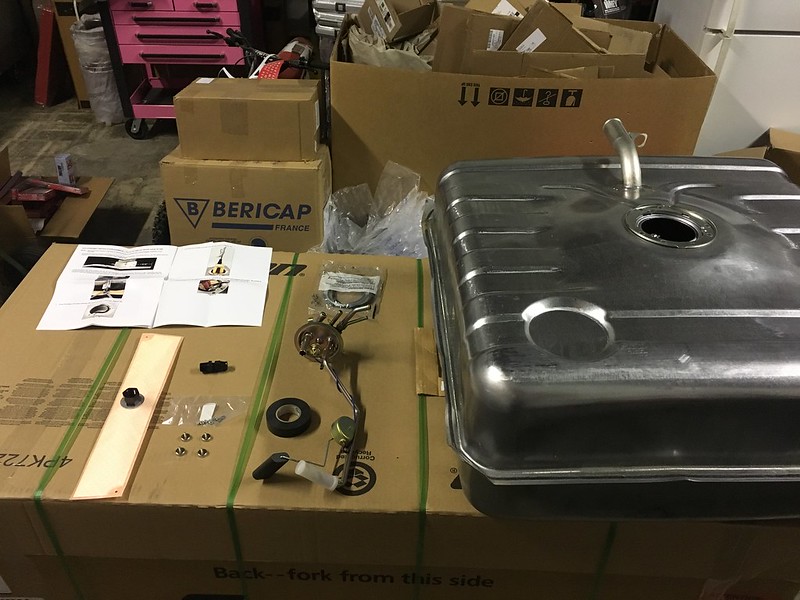
Managed to get a little work done last night in between helping the wife with a bit of welding for one of her projects. All the parts to install the new pickup in the gas tank with the Holley Hydramat had arrived so I figured that was one simple thing I could knock out quickly. Overall the process was pretty simple thanks to Holley's instruction sheet that specifically shows a way to use the stock pickup with the Hydramat. I did add a pair of their magnetic hold-downs and now I kind of wish I hadn't. The little buggers are HELLA strong and I'm a little nervous that if I ever go to pull the thing out I may just damage the material. But, it's in there and good for now.
Parts ready to go
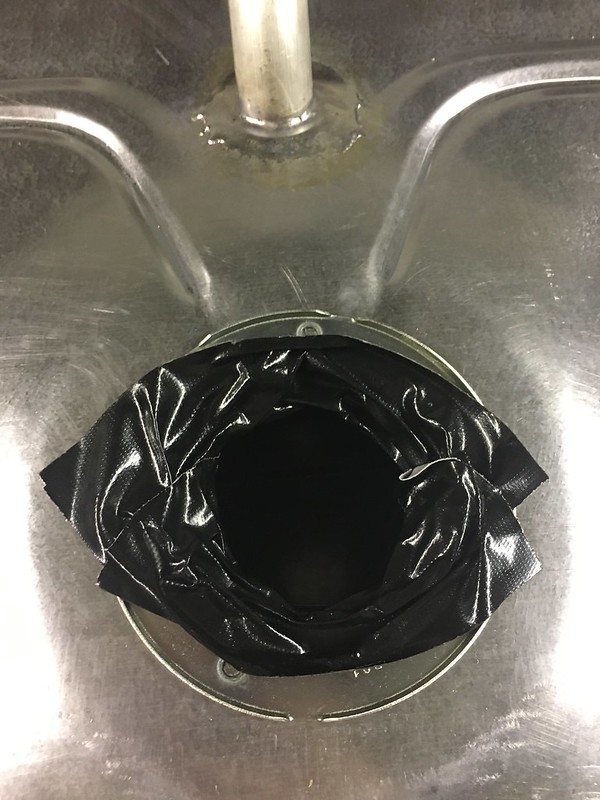
Taped sharp edges
Cutting the pickup

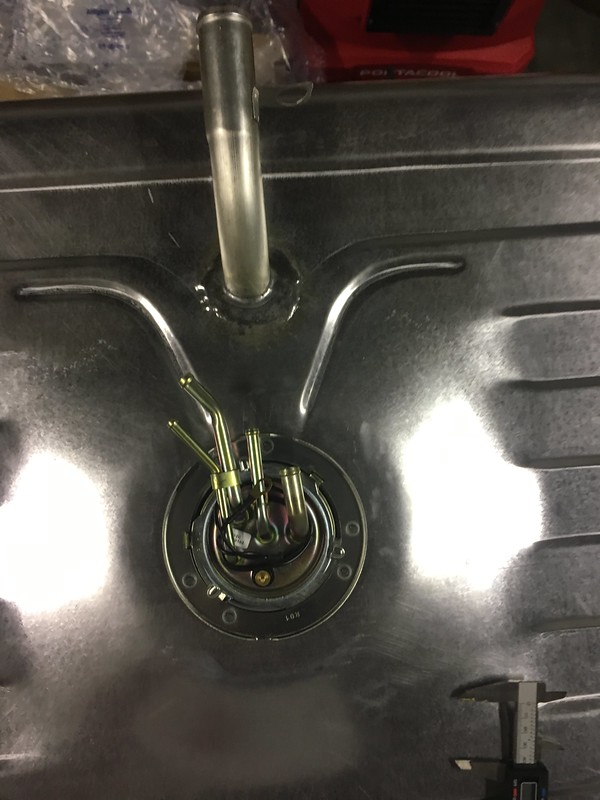
Installed
I also was in the shop briefly to get the harmonic balancer on finally. I'd originally borrowed the wrong tool from Autozone. When I brought it back I found the right one. Well, kind of right. The OEM Harmonic Balancer Installer 27144 definitely had the right parts, but it was impossible to get a socket on the nut you have to tighten to push the balancer onto the crank. I ended up using a big adjustable wrench at a weird angle to make super slow progress until it was far enough in I could get the stock bolt in and finish it up. It's all on there good and torqued now but sheesh... kind of makes me wish I'd popped for the 8.1 tool kit from Larry's swap thread. Oh well.
This weekend I'll be working on it all Saturday. I'm waiting on the patch panels to come in before I do anything about those holes. They'll be here Tuesday. I've got a lot of electrical diagraming to do, so I may work on that. I also have to fabricate a mount for the fuel pump, filter and regulator. And since the body is now in it's final resting place I could actually do the final fabrication needed for the sliders I have. Basically I just need to cut and weld the stand-offs between the frame mount plates and the sliders. That reminds me, I'm outta welding gas... gotta run grab the tank and get it filled today.
Parts ready to go
Taped sharp edges
Cutting the pickup
Installed
I also was in the shop briefly to get the harmonic balancer on finally. I'd originally borrowed the wrong tool from Autozone. When I brought it back I found the right one. Well, kind of right. The OEM Harmonic Balancer Installer 27144 definitely had the right parts, but it was impossible to get a socket on the nut you have to tighten to push the balancer onto the crank. I ended up using a big adjustable wrench at a weird angle to make super slow progress until it was far enough in I could get the stock bolt in and finish it up. It's all on there good and torqued now but sheesh... kind of makes me wish I'd popped for the 8.1 tool kit from Larry's swap thread. Oh well.
This weekend I'll be working on it all Saturday. I'm waiting on the patch panels to come in before I do anything about those holes. They'll be here Tuesday. I've got a lot of electrical diagraming to do, so I may work on that. I also have to fabricate a mount for the fuel pump, filter and regulator. And since the body is now in it's final resting place I could actually do the final fabrication needed for the sliders I have. Basically I just need to cut and weld the stand-offs between the frame mount plates and the sliders. That reminds me, I'm outta welding gas... gotta run grab the tank and get it filled today.
Sock Puppet
Adventurer
Excellent work!
camp4x4
Adventurer
Working out electrical
I'm finally digging in to planning the wiring.
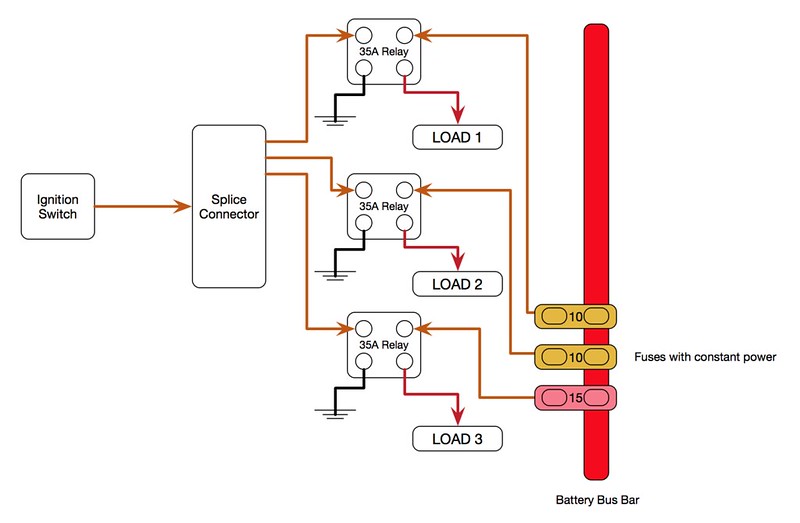
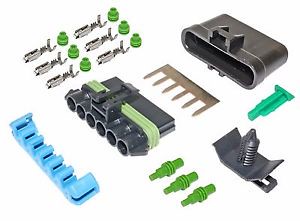
I'd originally purchased a dual-bus fuse holder; I was planning on 1 bus being for everything connected to my main battery and 1 bus for the aux battery accessories. But I hadn't really considered how to handle splitting the Accessory and Ignition circuits. But, I believe I've figured out how to manage this using the build in relays. Let me know what you guys think. I'd do the same thing for the Accessory output wire from the ignition switch. For splitting wires I'll be using Metri-Pack splice kits which can do up to 1 in to 5 splices that can easily be changed without cutting or soldiering wires.
Ignition Wiring
Metri-Pack Splice Kit
I'm finally digging in to planning the wiring.
I'd originally purchased a dual-bus fuse holder; I was planning on 1 bus being for everything connected to my main battery and 1 bus for the aux battery accessories. But I hadn't really considered how to handle splitting the Accessory and Ignition circuits. But, I believe I've figured out how to manage this using the build in relays. Let me know what you guys think. I'd do the same thing for the Accessory output wire from the ignition switch. For splitting wires I'll be using Metri-Pack splice kits which can do up to 1 in to 5 splices that can easily be changed without cutting or soldiering wires.
Ignition Wiring
Metri-Pack Splice Kit
Last edited:
camp4x4
Adventurer
I think those are commonly known as weatherpack connectors. They are great you can get them in almost anything and you can get kits too.
Fascinating little bit of history on connectors I just learned: http://www.hotrod.com/articles/three-plug-options-for-wiring-systems/
Metri Pack is the modern brother of Weather Pack which is the weather-sealed version of the original Packard standard connectors...
Difference between Metri Pack and Weather Pack is primarily that the Metri Pack terminals are flat blades, while the Weather Pack terminals are round tubes.

Last edited:
Forum statistics
Members online
- Nerdalert2
- Bho4779
- fourMAT
- calemaddox
- KillerB
- czechmate83
- wrestler034
- HD.Adventuring
- BajaBenson
- paachi
- MTAA
- hoosier96
- Slickrock Slim
- crupe
- Gerald S
- dittothat
- Alaska2Baja
- montechie
- Scrib
- rumin8
- hoptroll
- Shermanator
- Manky
- ryanwzeman
- jesus888
- Ozarker
- Gascan4X4
- WOODY2
- Spixelz
- SC4ws
- Davegar
- CurtStyler
- Chiefhahn
- Midwestfabs
- Alwaysstranded
- badm0t0rfinger
- FJRanger
- Kingsize24
- Modeler
- buyrovers
- Fergie
- chuppie
- MotoDave
- mark5280
- cruiseconrtrol208
- ionyota
- Cthayn
- Sly tuna
- Mike_Alpha
Total: 601 (members: 55, guests: 546)